Toro 03200 Reelmaster 3100-D User manual

FormNo.3444-175RevA
27-inchVerticutter
Reelmaster®3100-DSeriesDPACuttingUnit
ModelNo.03203—SerialNo.408000000andUp
Registeratwww.Toro.com.
OriginalInstructions(EN)*3444-175*

ThisproductcomplieswithallrelevantEuropean
directives.Fordetails,pleaseseetheDeclarationof
Incorporation(DOI)atthebackofthispublication.
Introduction
Theverticutterkitismountedonaride-onmachine
andisintendedtobeusedbyprofessional,hired
operatorsincommercialapplications.Itisprimarily
designedforverticuttinggrassonwell-maintained
lawnsinparks,sportselds,andoncommercial
grounds.Usingthisproductforpurposesotherthan
itsintendedusecouldprovedangeroustoyouand
bystanders.
Readthisinformationcarefullytolearnhowtooperate
andmaintainyourproductproperlyandtoavoid
injuryandproductdamage.Youareresponsiblefor
operatingtheproductproperlyandsafely.
Visitwww.Toro.comforproductsafetyandoperation
trainingmaterials,accessoryinformation,helpnding
adealer,ortoregisteryourproduct.
Wheneveryouneedservice,genuineT oroparts,or
additionalinformation,contactanAuthorizedService
DealerorT oroCustomerServiceandhavethemodel
andserialnumbersofyourproductready.Figure1
identiesthelocationofthemodelandserialnumbers
ontheproduct.Writethenumbersinthespace
provided.
Important:Withyourmobiledevice,youcan
scantheQRcodeontheserialnumberplate(if
equipped)toaccesswarranty,parts,andother
productinformation.
g291194
Figure1
1.Modelandserialnumberlocation
ModelNo.
SerialNo.
Thismanualidentiespotentialhazardsandhas
safetymessagesidentiedbythesafety-alertsymbol
(Figure2),whichsignalsahazardthatmaycause
seriousinjuryordeathifyoudonotfollowthe
recommendedprecautions.
g000502
Figure2
Safety-alertsymbol
Thismanualuses2wordstohighlightinformation.
Importantcallsattentiontospecialmechanical
informationandNoteemphasizesgeneralinformation
worthyofspecialattention.
Contents
Safety.......................................................................3
GeneralSafety...................................................3
CuttingUnitSafety..............................................3
BladeSafety.......................................................3
SafetyandInstructionalDecals..........................4
Setup........................................................................5
1InspectingtheVerticutter.................................5
2InstallingtheTransportRollers.........................5
3InstallingtheO-ringandtheGrease
Fitting..............................................................6
4AdjustingtheBladeDepth................................6
5AdjustingtheRearGrassShield.......................7
6AdjustingtheRollerScrapers...........................7
7AdjustingtheTransportRollers........................8
8MountingtheVerticutterReel...........................8
ProductOverview.....................................................9
Specications....................................................9
Attachments/Accessories...................................9
Operation..................................................................9
TrainingPeriod...................................................9
OperatingTips....................................................9
Maintenance...........................................................10
UsingtheKickstandWhenTippingthe
CuttingUnit...................................................10
LubricatingtheVerticutter.................................10
RemovingtheVerticutterBladesfromthe
Shaft..............................................................11
InstallingtheVerticutterBlades..........................11
OptionalBladeSpacing....................................12
ServicingtheRoller...........................................13
©2021—TheToro®Company
8111LyndaleAvenueSouth
Bloomington,MN554202
Contactusatwww.Toro.com.
PrintedintheUSA
AllRightsReserved

Safety
Thismachinehasbeendesignedinaccordancewith
ENISO5395andANSIB71.4–2017.
GeneralSafety
Thisproductiscapableofamputatinghandsandfeet.
Alwaysfollowallsafetyinstructionstoavoidserious
personalinjury.
•Readandunderstandthecontentsofthis
Operator’sManualbeforestartingthemachine.
•Useyourfullattentionwhileoperatingthe
machine.Donotengageinanyactivitythat
causesdistractions;otherwise,injuryorproperty
damagemayoccur.
•Removealldebrisorotherobjectsthatmightbe
pickedupandthrownbythebladesofthecutting
unit.Keepallbystandersawayfromtheworking
area.
•Donotputyourhandsorfeetnearmoving
componentsofthemachine.
•Donotoperatethemachinewithoutallguards
andothersafetyprotectivedevicesinplaceand
functioningproperlyonthemachine.
•Keepclearofanydischargeopening.
•Keepbystandersandchildrenoutoftheoperating
area.Neverallowchildrentooperatethemachine.
•Beforeyouleavetheoperator’sposition,dothe
following:
–Parkthemachineonalevelsurface.
–Lowerthecuttingunit(s).
–Disengagethedrives.
–Engagetheparkingbrake(ifequipped).
–Shutofftheengineandremovethekey.
–Waitforallmovementtostop.
–Iftheverticutterbladesstrikeasolidobjector
theunitvibratesabnormally,stopandshutoff
theengine.Checktheverticutterfordamaged
parts.Repairanydamagebeforestartingand
operatingtheverticutter.
–Ensurethattheverticuttersareinsafe
operatingconditionbykeepingallhardware
tight.
Improperlyusingormaintainingthismachinecan
resultininjury.Toreducethepotentialforinjury,
complywiththesesafetyinstructionsandalways
payattentiontothesafety-alertsymbol,which
meansCaution,Warning,orDanger—personalsafety
instruction.Failuretocomplywiththeseinstructions
mayresultinpersonalinjuryordeath.
CuttingUnitSafety
•Thecuttingunitisonlyacompletemachinewhen
installedonatractionunit.Readthetraction
unitOperator’sManualcarefullyforcomplete
instructionsonthesafeuseofthemachine.
•Stopthemachine,removethekey(ifequipped),
andwaitforallmovementtostopbeforeinspecting
theattachmentafterstrikinganobjectorifthere
isanabnormalvibrationinthemachine.Makeall
necessaryrepairsbeforeresumingoperation.
•Keepallpartsingoodworkingconditionandall
hardwaretightened.Replaceallwornordamaged
decals.
•Useonlyaccessories,attachments,and
replacementpartsapprovedbyToro.
BladeSafety
Awornordamagedbladecanbreak,andapieceof
thebladecouldbethrowntowardyouorbystanders,
resultinginseriouspersonalinjuryordeath.
•Inspectthebladeperiodicallyforwearordamage.
•Usecarewhencheckingtheblades.Wrapthe
bladesorweargloves,andusecautionwhen
servicingtheblades.Onlyreplaceorsharpenthe
blades;neverstraightenorweldthem.
•Onmulti-bladedmachines,takecareasrotating1
bladecancauseotherbladestorotate.
3

SafetyandInstructionalDecals
Safetydecalsandinstructionsareeasilyvisibletotheoperatorandarelocatednearanyarea
ofpotentialdanger.Replaceanydecalthatisdamagedormissing.
decal137-9706
137-9706
1.Cuttinghazardofthehandorfoot—shutofftheengine,
removethekeyordisconnectthesparkplug,waitforall
movingpartstostop,andreadtheOperator’sManual
beforeperformingmaintenance.
4

Setup
LooseParts
Usethechartbelowtoverifythatallpartshavebeenshipped.
ProcedureDescriptionQty.Use
1Verticutter1Inspecttheverticutter.
Transportrollerassembly2
2Cotterpin2Installthetransportrollers.
O-ring1
3Greasetting1InstalltheO-ringandthegreasetting.
4Nopartsrequired–Adjustthebladedepth.
5Nopartsrequired–Adjustthereargrassshield.
6Nopartsrequired–Adjusttherollerscrapers.
7Nopartsrequired–Adjustthetransportrollers.
8Nopartsrequired–Mounttheverticutterreel.
MediaandAdditionalParts
DescriptionQty.Use
Operator'sManual1
PartsCatalog(notincluded)—refertothe
includedpostcardforinformationonobtaining
thePartsCatalog
–Reviewthematerialandsaveitinanappropriateplace.
Note:Determinetheleftandrightsidesofthe
machinefromthenormaloperatingposition.
1
InspectingtheVerticutter
Partsneededforthisprocedure:
1Verticutter
Procedure
1.Checkeachendofthereelforgrease.Grease
shouldbevisiblyevidentintheinternalsplines
ofthereelshaft.
2.Ensurethatallnutsandboltsaresecurely
tightened.
2
InstallingtheTransport
Rollers
Partsneededforthisprocedure:
2Transportrollerassembly
2Cotterpin
Procedure
Secureatransportrollerbrackettoeachsideplatepin
withacotterpin(Figure3).
5

g195548
Figure3
1.Transportrollerassembly2.Cotterpin
Note:Positiontherollertotherearoftheverticutter.
3
InstallingtheO-ringand
theGreaseFitting
Partsneededforthisprocedure:
1O-ring
1Greasetting
Procedure
Installthegreasettingonthereelmotorsideofthe
verticutter.Usethefollowingdiagramtodeterminethe
positionofeachreelmotor(Figure4).
g196714
Figure4
1.Verticutter14.Weight
2.Verticutter25.Reelmotor
3.Verticutter3
1.Removeanddiscardthesetscrewonthe
reel-motorsideplate(Figure5).
g028407
Figure5
1.Bolts3.Setscrew(removeand
discard)
2.Straightgreasetting
(install)
2.Installthestraightgreasetting(Figure5).
3.Fortheverticutter3location(Figure4),move
theendweighttotheoppositesideofthecutting
unit.
4.Iftherearenoboltsonthereel-motorsideplate,
installthem(Figure5).
5.InstalltheO-ringonthereelmotor(Figure6).
g191072
Figure6
1.O-ring
6

4
AdjustingtheBladeDepth
NoPartsRequired
Procedure
Note:Themaximumrecommendedblade
penetrationdepthis6mm(1/4inch).
1.Placetheverticutterreelonalevelsurface.
2.Place2gaugebars,whichhavethedesired
depthofbladepenetrationbelowtheground,
underthefrontandrearrollersoftheverticutter
reel(oneachendofthereel)(Figure7).
g012693
Figure7
1.Gaugebar2.Adjustingbolt
Note:Theverticutterbladesmustnottouchthe
gaugebars.
3.Turntheadjustingboltoneachheight-of-cut
bracket(Figure7)sothatthereelbladescome
incontactwiththelevelsurfaceonbothends.
Note:Astheverticutterbladeswear,the
diameterofthereeldecreasesandthedepth
settingchanges.Checkthedepthsetting
periodicallytoensurethatthedesiredsettingis
achieved.
5
AdjustingtheRearGrass
Shield
NoPartsRequired
Procedure
Note:Whenoperatinginturfconditionswheremuch
debrisorunusuallyheavythatchisencountered,open
thereardischargeshieldtohelpallowthedebristo
dischargefromthereel.
1.Loosentheboltsonthepivotofthegrassshield
(Figure8).
g196703
Figure8
1.Reargrassshield2.Pivotbolt
2.Rotatethegrassshieldtothedesiredsetting,
andtightenthebolts(Figure8).
CAUTION
Donotopentherearshieldsothatitishigher
thanleveltoground.
Throwndebriscouldcausepersonalinjury.
7

6
AdjustingtheRoller
Scrapers
NoPartsRequired
Procedure
1.Loosentheangenutsthatsecuretheroller
scrapers(Figure9).
g012271
Figure9
1.Frontrollerscraper3.Transportroller
2.Rearrollerscraper4.Cotterpin
2.Movethescraperrodsinorouttoattain0.0to
0.75mm(0.0to0.03inch)clearancebetween
thescraperandroller.
3.Ensurethatthescraperrodisparalleltothe
rollerandtothelevelsurface.
4.Tightentheangenutstolocktheadjustment.
7
AdjustingtheTransport
Rollers
NoPartsRequired
Procedure
Beforetheverticuttersareloweredtotheshopoor
orremovedfromthetractionunit,lowerthetransport
rollers(Figure9)toprotectthebladesfromhard
surfacecontact.
1.Removethecotterpinthatsecuresthetransport
rollerbrackettothesideplatepin.
2.Positionthetransportrollerasfollows:
•Lowertherollerbracketbeforetheverticutter
isloweredtotheshopoor.
•Raisetherollerbracketaftertheverticutteris
raisedtotheoperatingposition.
3.Securethetransportrollerbrackettotheside
platepinwiththecotterpin.
4.Repeattheprocedureontheoppositeendof
theverticutter.
8
MountingtheVerticutter
Reel
NoPartsRequired
Procedure
Important:Whenloweringtheverticutterreels,
takecaretopreventdamagetothereelbladesdue
tocontactwithaconcreteoororapavedsurface.
Lowerthetransportrollersbeforeloweringthe
verticuttierstoaconcreteoororapavedsurface.
Figure10showstheorientationofthehydraulicdrive
motorforeachofthelocations.
Verticutterreelsaremountedtotractionunitthe
samewaycuttingunitsare.Refertothetractionunit
Operator'sManualformountinginstructions.
g196714
Figure10
1.Verticutter14.Weight
2.Verticutter25.Reelmotor
3.Verticutter3
8

ProductOverview
Specications
Netweight56kg(124lb)
Attachments/Accessories
AselectionofT oroapprovedattachmentsand
accessoriesisavailableforusewiththemachine
toenhanceandexpanditscapabilities.Contact
yourAuthorizedServiceDealerorauthorizedToro
distributororgotowww.T oro.comforalistofall
approvedattachmentsandaccessories.
Toensureoptimumperformanceandcontinuedsafety
certicationofthemachine,useonlygenuineT oro
replacementpartsandaccessories.Replacement
partsandaccessoriesmadebyothermanufacturers
couldbedangerous,andsuchusecouldvoidthe
productwarranty.
Operation
TrainingPeriod
Beforeoperatingtheverticutterreels,evaluatethe
performanceofthereelatthedesiredsetting.Operate
inaclear,unusedareatodetermineifthedesired
resultsareachieved.Adjustasdesired.
OperatingTips
1.Operatethetractionunitatfullthrottle,fullreel
speed(setting11)andbetween5to8km/h(3
to5mph).
2.Themaximumrecommendedsettingis6mm
(1/4inch)deepbladepenetration.
3.Thepowerrequirementstooperatethe
verticutterreelsvarywithturfandsoilconditions.
Travelspeedmayneedtobereducedinsome
conditions.
4.Whenoperatinginturfconditionswheremuch
debrisisencountered,orunusuallyheavy
thatch,openthefrontandreardischargeshields
tohelpallowthedebristodischargefromthe
reel.
CAUTION
Throwndebriscouldcausepersonal
injury.
Donotopentherearshieldsothatitis
higherthanleveltotheground.
9

Maintenance
UsingtheKickstandWhen
TippingtheCuttingUnit
Note:Whenevertheverticutterhastobetipped
toexposetheverticutterblades,usethekickstand
(suppliedwithtractionunit)(Figure11).
g196702
Figure11
1.Kickstand
LubricatingtheVerticutter
Eachverticutterhas5greasettings(Figure12)that
mustbelubricatedweeklywithNo.2lithiumgrease.
Thelubricationpointsarethefrontroller(2),therear
roller(2),andthereelmotorsplines(1).
Important:Lubricatingthecuttingunits
immediatelyafterwashinghelpspurgewaterout
ofthebearingsandincreasesbearinglife.
1.Wipeeachgreasettingwithacleanrag.
2.Applygreaseuntilyouseecleangreasecoming
outoftherollersealsandthebearingreliefvalve
(Figure12).
g029271
Figure12
1.Reliefvalve
3.Wipeanyexcessgreaseaway.
10

RemovingtheVerticutter
BladesfromtheShaft
1.Securetheendoftheverticuttershaft,which
hasonlyonewasherandnut,inavise.
2.Onotherendofshaft,rotatethenut
counter-clockwiseandremovethenut.
CAUTION
Thebladesareextremelysharpandmay
haveburrsthatcancutyourhands.
Usecautionwhenremovingtheblades
fromtheshaft.
3.Removethesmallspacer,thewasher,the
bladesandthelargespacers.Cleanand
lubricatethesquareshaftwithalightcoatingof
greasetosimplifytheassembly(Figure13).
g010889
Figure13
1.Shaft4.Smallspacer
2.Nut5.Blade(19)
3.Washer6.Largespacer(18)
Important:Donotinverttheverticutter
reelblades.Theorderofdisassemblyis
extremelyimportant.Donotinvertthe
verticutterreelbladeswhendisassembling
orreversetheorderwhenassemblingthem.
Notetheverticutterbladesindexhole.The
indexholeisprovidedforassemblyinorder
toobtaintheproperhelixfortheverticutter
reel.
InstallingtheVerticutter
Blades
1.Assembleareelblade(Figure14).
2.Assemblealargespacer.
3.Donotinvertthereelbladeswhenassembling
themontothereelshaft.
Note:Ifthebladesareinverted,thebladesthat
areinuse(rounded)mixwiththesharpends
ofthepreviouslyunusedblades;thiscauses
unsatisfactoryverticutterperformance.
4.Installthenextbladeclockwisesothattheindex
referencehole(Figure14)isnotalignedwiththe
rstbladeholebyoneatoftheshaft.
g010890
Figure14
1.Indexreferencehole
5.Continuetoinstallspacersandbladesinthis
manneruntilthefullcomplementofbladeshas
beeninstalled.
Note:Whenproperlyassembled,theblades
arestaggeredinsuchamannerastoappear
likeahelix.
6.Installthesmallspacertotheshaft.
7.ApplyBlueLoctite242tothenut.Installthenut
ontotheshaft(machinedsideofthenuttoward
thespacer)andtightenitto109to135N∙m(80
to100ft-lb).
11

OptionalBladeSpacing
Changingthecongurationoftheverticutterfromthestandardspacing(1.20inches)totheoptionalspacing
(0.94inch)requiresanadditional23spacers(PartNo.140-5532)andanadditional5carbide-tipblades(Part
No.106-8625)asshowninFigure15.
g349402
Figure15
1.1.20-inchbladespacing(default)2.0.94-inchbladespacing
12
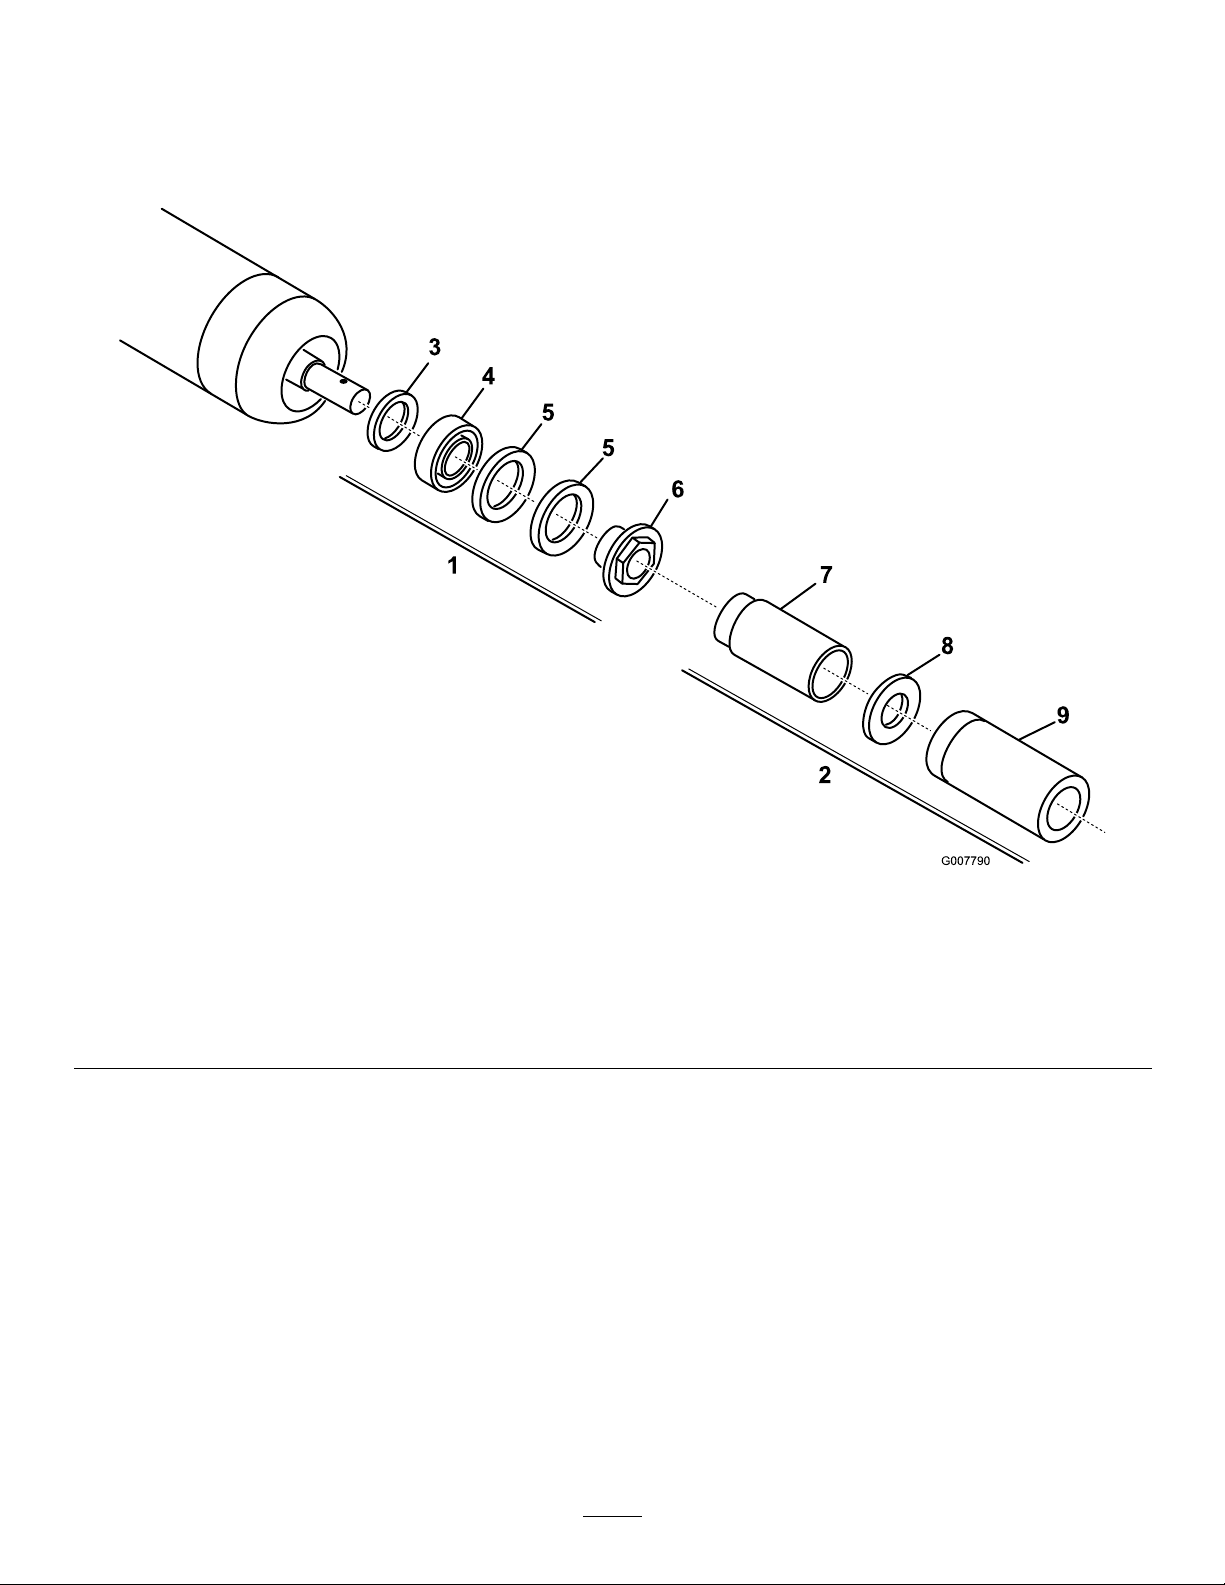
ServicingtheRoller
TheRollerRebuildKit(PartNo.114-5430)andthe
RollerRebuildToolKit(PartNo.115-0803)(Figure
16)areavailableforservicingtheroller.TheRoller
RebuildKitincludesallthebearings,bearingnuts,
innerseals,andoutersealstorebuildaroller.
TheRollerRebuildToolKitincludesallthetoolsand
theinstallationinstructionsrequiredtorebuildaroller
withtherollerrebuildkit.Refertoyourpartscatalogor
contactyourauthorizedTorodistributorforassistance.
g007790
Figure16
1.RollerRebuildKit(PartNo.114-5430)6.Bearingnut
2.RollerRebuildToolkit(PartNo.115-0803)7.Innersealtool
3.Innerseal8.Washer
4.Bearing9.Bearing/outer-sealtool
5.Outerseal
13

DeclarationofIncorporation
TheT oroCompany,8111LyndaleAve.South,Bloomington,MN,USAdeclaresthatthefollowingunit(s)
conform(s)tothedirectiveslisted,wheninstalledinaccordancewiththeaccompanyinginstructionsontocertain
ToromodelsasindicatedontherelevantDeclarationsofConformity.
ModelNo.SerialNo.ProductDescriptionInvoiceDescriptionGeneralDescriptionDirective
03203408000000andUp
27-inchVerticutter,
Reelmaster3100-DSeries
DPACuttingUnit
RM310027IN
VERTICUTTERCUVerticutter2006/42/EC
RelevanttechnicaldocumentationhasbeencompiledasrequiredperPartBofAnnexVIIof2006/42/EC.
Wewillundertaketotransmit,inresponsetorequestsbynationalauthorities,relevantinformationonthispartly
completedmachinery.Themethodoftransmissionshallbeelectronictransmittal.
ThismachineryshallnotbeputintoserviceuntilincorporatedintoapprovedToromodelsasindicatedonthe
associatedDeclarationofConformityandinaccordancewithallinstructions,wherebyitcanbedeclaredin
conformitywithallrelevantDirectives.
Certied:AuthorizedRepresentative:
MarcelDutrieux
ManagerEuropeanProductIntegrity
ToroEuropeNV
Nijverheidsstraat5
2260Oevel
Belgium
JohnHeckel
EngineeringDirector
8111LyndaleAve.South
Bloomington,MN55420,USA
February15,2021

EEA/UKPrivacyNotice
Toro’sUseofYourPersonalInformation
TheToroCompany(“T oro”)respectsyourprivacy.Whenyoupurchaseourproducts,wemaycollectcertainpersonalinformationaboutyou,eitherdirectly
fromyouorthroughyourlocalT orocompanyordealer.T orousesthisinformationtofullcontractualobligations-suchastoregisteryourwarranty,
processyourwarrantyclaimortocontactyouintheeventofaproductrecall-andforlegitimatebusinesspurposes-suchastogaugecustomer
satisfaction,improveourproductsorprovideyouwithproductinformationwhichmaybeofinterest.Toromayshareyourinformationwithoursubsidiaries,
afliates,dealersorotherbusinesspartnersinconnectiontheseactivities.Wemayalsodisclosepersonalinformationwhenrequiredbylaworin
connectionwiththesale,purchaseormergerofabusiness.Wewillneversellyourpersonalinformationtoanyothercompanyformarketingpurposes.
RetentionofyourPersonalInformation
Torowillkeepyourpersonalinformationaslongasitisrelevantfortheabovepurposesandinaccordancewithlegalrequirements.Formoreinformation
aboutapplicableretentionperiodspleasecontact[email protected].
Toro’sCommitmenttoSecurity
YourpersonalinformationmaybeprocessedintheUSoranothercountrywhichmayhavelessstrictdataprotectionlawsthanyourcountryofresidence.
Wheneverwetransferyourinformationoutsideofyourcountryofresidence,wewilltakelegallyrequiredstepstoensurethatappropriatesafeguardsare
inplacetoprotectyourinformationandtomakesureitistreatedsecurely.
AccessandCorrection
Youmayhavetherighttocorrectorreviewyourpersonaldata,orobjecttoorrestricttheprocessingofyourdata.T odoso,pleasecontactusbyemail
at[email protected].IfyouhaveconcernsaboutthewayinwhichT orohashandledyourinformation,weencourageyoutoraisethisdirectlywithus.
PleasenotethatEuropeanresidentshavetherighttocomplaintoyourDataProtectionAuthority.
374-0282RevC

TheToroWarranty
Two-Yearor1,500HoursLimitedWarranty
ConditionsandProductsCovered
TheToroCompanywarrantsyourToroCommercialproduct(“Product”)
tobefreefromdefectsinmaterialsorworkmanshipfor2yearsor
1,500operationalhours*,whicheveroccursrst.Thiswarrantyis
applicabletoallproductswiththeexceptionofAerators(referto
separatewarrantystatementsfortheseproducts).Whereawarrantable
conditionexists,wewillrepairtheProductatnocosttoyouincluding
diagnostics,labor,parts,andtransportation.Thiswarrantybegins
onthedatetheProductisdeliveredtotheoriginalretailpurchaser.
*Productequippedwithanhourmeter.
InstructionsforObtainingWarrantyService
YouareresponsiblefornotifyingtheCommercialProductsDistributoror
AuthorizedCommercialProductsDealerfromwhomyoupurchasedthe
Productassoonasyoubelieveawarrantableconditionexists.Ifyouneed
helplocatingaCommercialProductsDistributororAuthorizedDealer,or
ifyouhavequestionsregardingyourwarrantyrightsorresponsibilities,
youmaycontactusat:
ToroCommercialProductsServiceDepartment
8111LyndaleAvenueSouth
Bloomington,MN55420-1196
952–888–8801or800–952–2740
E-mail:[email protected]
OwnerResponsibilities
Astheproductowner,youareresponsibleforrequiredmaintenanceand
adjustmentsstatedinyourOperator'sManual.Repairsforproductissues
causedbyfailuretoperformrequiredmaintenanceandadjustmentsarenot
coveredunderthiswarranty.
ItemsandConditionsNotCovered
Notallproductfailuresormalfunctionsthatoccurduringthewarranty
periodaredefectsinmaterialsorworkmanship.Thiswarrantydoesnot
coverthefollowing:
•Productfailureswhichresultfromtheuseofnon-T ororeplacement
parts,orfrominstallationanduseofadd-on,ormodiednon-T oro
brandedaccessoriesandproducts.
•Productfailureswhichresultfromfailuretoperformrecommended
maintenanceand/oradjustments.
•ProductfailureswhichresultfromoperatingtheProductinanabusive,
negligent,orrecklessmanner.
•Partsconsumedthroughusethatarenotdefective.Examplesofparts
whichareconsumed,orusedup,duringnormalProductoperation
include,butarenotlimitedto,brakepadsandlinings,clutchlinings,
blades,reels,rollersandbearings(sealedorgreasable),bedknives,
sparkplugs,castorwheelsandbearings,tires,lters,belts,andcertain
sprayercomponentssuchasdiaphragms,nozzles,owmeters,and
checkvalves.
•Failurescausedbyoutsideinuence,including,butnotlimitedto,
weather,storagepractices,contamination,useofunapprovedfuels,
coolants,lubricants,additives,fertilizers,water,orchemicals.
•Failureorperformanceissuesduetotheuseoffuels(e.g.gasoline,
diesel,orbiodiesel)thatdonotconformtotheirrespectiveindustry
standards.
•Normalnoise,vibration,wearandtear,anddeterioration.Normal
“wearandtear”includes,butisnotlimitedto,damagetoseatsdueto
wearorabrasion,wornpaintedsurfaces,scratcheddecalsorwindows.
Parts
Partsscheduledforreplacementasrequiredmaintenancearewarranted
fortheperiodoftimeuptothescheduledreplacementtimeforthatpart.
Partsreplacedunderthiswarrantyarecoveredforthedurationofthe
originalproductwarrantyandbecomethepropertyofT oro.T orowillmake
thenaldecisionwhethertorepairanyexistingpartorassemblyorreplace
it.Toromayuseremanufacturedpartsforwarrantyrepairs.
DeepCycleandLithium-IonBatteryWarranty
DeepcycleandLithium-Ionbatterieshaveaspeciedtotalnumber
ofkilowatt-hourstheycandeliverduringtheirlifetime.Operating,
recharging,andmaintenancetechniquescanextendorreducetotal
batterylife.Asthebatteriesinthisproductareconsumed,theamount
ofusefulworkbetweenchargingintervalswillslowlydecreaseuntilthe
batteryiscompletelywornout.Replacementofwornoutbatteries,
duetonormalconsumption,istheresponsibilityoftheproductowner.
Note:(Lithium-Ionbatteryonly):Refertothebatterywarrantyforadditional
information.
LifetimeCrankshaftWarranty(ProStripe02657Model
Only)
TheProstripewhichisttedwithagenuineToroFrictionDiscand
Crank-SafeBladeBrakeClutch(integratedBladeBrakeClutch(BBC)+
FrictionDiscassembly)asoriginalequipmentandusedbytheoriginal
purchaserinaccordancewithrecommendedoperatingandmaintenance
procedures,arecoveredbyaLifetimeWarrantyagainstenginecrankshaft
bending.Machinesttedwithfrictionwashers,BladeBrakeClutch(BBC)
unitsandothersuchdevicesarenotcoveredbytheLifetimeCrankshaft
Warranty.
MaintenanceisatOwner’sExpense
Enginetune-up,lubrication,cleaningandpolishing,replacementoflters,
coolant,andcompletingrecommendedmaintenancearesomeofthe
normalservicesToroproductsrequirethatareattheowner’sexpense.
GeneralConditions
RepairbyanAuthorizedToroDistributororDealerisyoursoleremedy
underthiswarranty.
TheToroCompanyisnotliableforindirect,incidentalorconsequential
damagesinconnectionwiththeuseoftheToroProductscoveredby
thiswarranty,includinganycostorexpenseofprovidingsubstitute
equipmentorserviceduringreasonableperiodsofmalfunctionor
non-usependingcompletionofrepairsunderthiswarranty.Except
fortheEmissionswarrantyreferencedbelow,ifapplicable,thereisno
otherexpresswarranty.Allimpliedwarrantiesofmerchantabilityand
tnessforusearelimitedtothedurationofthisexpresswarranty.
Somestatesdonotallowexclusionsofincidentalorconsequential
damages,orlimitationsonhowlonganimpliedwarrantylasts,sotheabove
exclusionsandlimitationsmaynotapplytoyou.Thiswarrantygivesyou
speciclegalrights,andyoumayalsohaveotherrightswhichvaryfrom
statetostate.
NoteRegardingEmissionsWarranty
TheEmissionsControlSystemonyourProductmaybecoveredby
aseparatewarrantymeetingrequirementsestablishedbytheU.S.
EnvironmentalProtectionAgency(EPA)and/ortheCaliforniaAirResources
Board(CARB).Thehourlimitationssetforthabovedonotapplytothe
EmissionsControlSystemWarranty.RefertotheEngineEmissionControl
WarrantyStatementsuppliedwithyourproductorcontainedintheengine
manufacturer’sdocumentation.
CountriesOtherthantheUnitedStatesorCanada
CustomerswhohavepurchasedT oroproductsexportedfromtheUnitedStatesorCanadashouldcontacttheirT oroDistributor(Dealer)toobtain
guaranteepoliciesforyourcountry,province,orstate.IfforanyreasonyouaredissatisedwithyourDistributor'sserviceorhavedifcultyobtaining
guaranteeinformation,contactyourAuthorizedT oroServiceCenter.
374-0253RevH
Other manuals for 03200 Reelmaster 3100-D
12
This manual suits for next models
1
Table of contents
Other Toro Cutter manuals


Popular Cutter manuals by other brands


Logan
Logan FoamWerks W3002 instruction manual

Holmatro
Holmatro BCU 05 A Series manual

Staubli
Staubli PV-WZ-KS operating instructions

Mafell
Mafell KF 1000 Translation of the original operating manual

Mafell
Mafell KSS40 18 M bl Translation of the original operating instructions

Inder
Inder P-305 Series User instruction manual