PROVOX Vega User manual
Vega™
IFU
MD
RT

f)
g)
c)
d)
b)
e)
a)
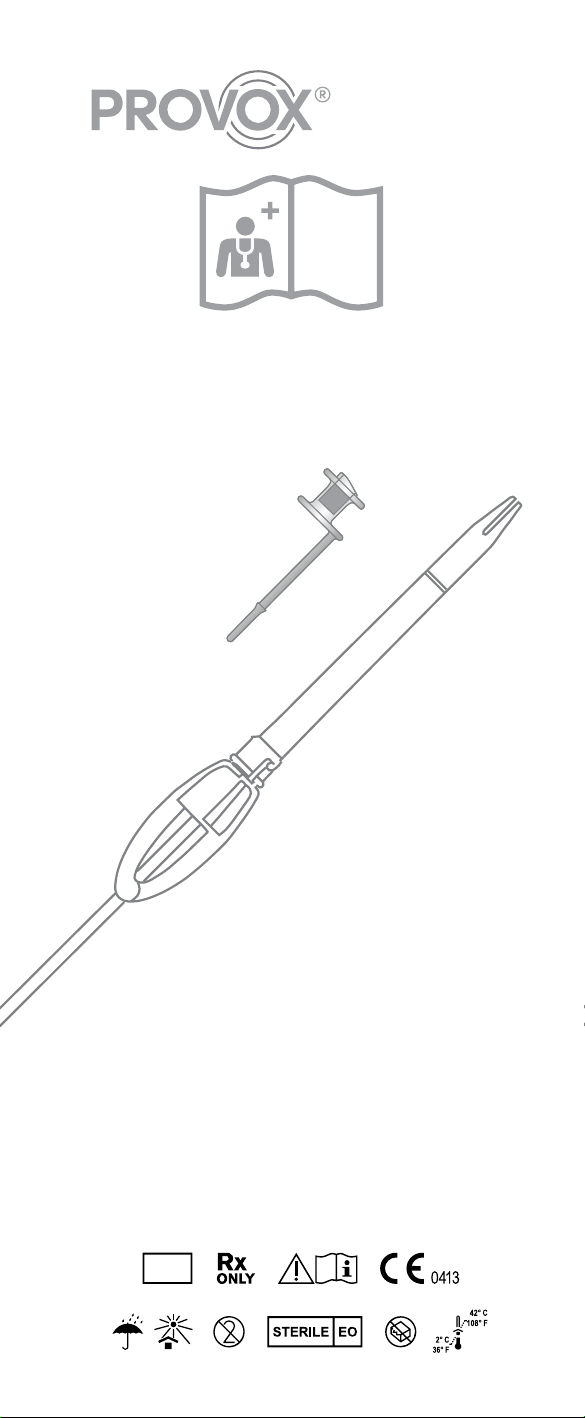
a) Size information
b) Prosthesis Hood
c) Esophageal Flange
d) Tracheal Flange
e) Safety Strap
f) Valve Flap
g) Prosthesis Shaft
h) Radio-opaque fluoroplastic Valve Seat
Figure. 2
Figure. 3
Figure. 4
Figure. 1
h)
a) Insertion Pin
b) Folding Tool
c) Loading Tube
d) Attachment Slot
e) Distal grip surface
f) Proximal grip surface
f)
e)
d)
c)
b)
a)
2.2 Preparation

3
Figure. 5
Figure. 6
Figure. 7
Figure. 8
2.3.1 Method 1 System Insertion
2.3.2 Method 2 Tube Insertion
4
Figure. 9
Figure. 11
Figure. 12
Figure. 10
2.3.3 Method 3 Overshoot Insertion
5
Figure. 13
Figure. 14
Figure. 15
Figure. 16
2.3.4 Method 4 Capsule Insertion
2.4 Assembly and reloading
6
Figure. 18
Figure. 19
Figure. 17
2.5 Finalization

7
Prescription information
CAUTION: United States Federal law restricts this device to sale, distribution and use
by or on order of a physician or a licensed practitioner. The availability of this product
without prescription outside the United States may vary from country to country.
Disclaimer
hereunder as to the lifetime of the product delivered, which may vary with individual
Patents and Trademarks
®is a registered trademark owned by Atos Medical AB, Sweden.
® Vega™is a trademark of Atos Medical AB. For information about protective
rights (e.g. patents), please refer to the webpage www.atosmedical.com/patents.

8
Manufacturer; Hersteller; Fabrikant; Fabricant; Produttore; Fabricante;
Fabricante; Tillverkare; Producent; Produsent; Valmistaja; Framleiðandi;
მწარმოებელი;
; ; ; ;
;;
Date of manufacture; Herstellungsdatum; Productiedatum; Date de
Tillverkningsdatum; Fremstillingsdato; Produksjonsdato;Valmistuspäivä;
tim tarihi; წარმოების თარიღი;
;
; ; ;
senast: Anvendes inden; Brukes innen; Viimeinen käyttöpäivä; Síðasti
ვარგისია;
sebelum tanggal; Tarikh guna sebelum; ; ;
; ;
სერიის კოდი;
pok; ; ; ; ;
mer; Produktreferencenummer; Produktreferansenummer; Artikkelinumero;
Tilvísunarnúmer vöru; Toote viitenumber; Produkta atsauces numurs;
პროდუქტის
საკონტროლო ნომერი;
; ; ;
;

9
არ გამოიყენოთ ხელახლა;
Մեկանգամյա օգտագործման համար; Не подлежит
повторному использованию; Jangan gunakan ulang; Jangan guna semula;
; ; ; ;
;;
ved hjelp av etylenoksid; Steriloitu eteenioksidilla; Dauðhreinsað með
სტერილიზებულია ეთილენის ოქსიდის გამოყენებით;
Ստերիլիզացված է էթիլենի օքսիդի միջոցով;
etilena oksida; Disterilkan menggunakan etilena oksida;
; ;
; ;
Do not use if package is damaged; Produkt nicht verwenden, wenn die
არ გამოიყენოთ, თუ შეფუთვა დაზიანებულია;
、; ;
; ;
Keep away from sunlight and keep dry; Vor Sonnenlicht und Feuchtigkeit

10
Límite de temperatura de almacenamiento; Limite da temperatura de
შენახვის ტემპერატურის ლიმიტი;
simpanan; ; ; ;
;
Store at room temperature. Temporary deviations within the temperature
Sono consentiti scostamenti temporanei entro i limiti di temperatura
RT
MAX
MIN
შეინახეთ მზისგან დაცულ ადგილას
და მშრალ მდგომარეობაში;
matahari dan pastikan sentiasa kering; ;
;
; ; ;

11
su privremena odstupanja unutar temperaturnog opsega (maks.–min.);
verilir; შეინახეთ ოთახის ტემპერატურაზე. დროებითი გადახრები
ტემპერატურის ფარგლებში (მაქს.-მინ.) დასაშვებია
;
;
;
) .
.( -
siktig, se bruksanvisningen; Varoitus, katso käyttöohjeet; Varúð, lesið not
გაფრთხილება,
მოითხოვეთ გამოყენების ინსტრუქცია;
; ;
; ;
არასტერილური;
; ; ;

12
გამოყენების ინსტრუქცია;
Arahan penggunaan; ; ; ; ;
;;
cinteknisk produkt; Medicinsk udstyr; Medisinsk utstyr; Lääkinnällinen
სამედიცინო მოწყობილობა;
Medis; Peranti Perubatan; ; ; ; ;
MD
IFU
visning avsedd för läkaren; Brugsanvisning tiltænkt kliniker; Bruksanvisning
გამოყენების ინსტრუქციები ექიმისთვის;
gunaan untuk klinisian; ; ;
; ; ;
IFU
avsedd för patienten; Brugsanvisning tiltænkt patient; Bruksanvisning
გამოყენების
ინსტრუქციები პაციენტისთვის;
tunjuk penggunaan khusus untuk pasien; Arahan penggunaan untuk pesakit;
; ; ;
;
IFU

13
Contents
EN ENGLISH................................................... 14
FR FRANÇAIS................................................. 18
ES ESPAÑOL................................................... 23
PT PORTUGUÊS............................................ 28
IS ÍSLENSKA................................................... 32
ET EESTI........................................................... 37
LT LIETUVIŲ KALBA .................................... 41
CS ČESKY ........................................................ 45
HU MAGYAR .................................................. 50
SK SLOVENČINA........................................... 54
SL SLOVENŠČINA ........................................ 59
PL POLSKI....................................................... 64
RO ROMÂNĂ ................................................. 69
HR HRVATSKI................................................. 73
SR SRPSKI ....................................................... 78
EL ΕΛΛΗΝΙΚΑ................................................ 82
TR TÜRKÇE ..................................................... 88
KA - ქართული.......................................... 92
HY .............................................. 98
AZ ......................103
RU ...............................................108
ID BAHASA INDONESIA..........................113
MS BAHASA MELAYU ..............................118
JA 日本語 .....................................................122
KO 한국어 ....................................................127
ZHTW 繁體中文.........................................131
HE .....................................................139
AR .....................................................143

14
Provox® Vega™
1. Descriptive information
1.1 Intended use
Cleaning of the voice prosthesis is performed by the patient while it remains in situ.
carried out by a medical doctor or a trained medical professional in accordance with
local or national guidelines.
The Provox Insertion System is not intended to be used for insertion of a voice prosthesis
in a freshly made puncture.
1.2 Description of the device
General
sterile (Fig. 2)
1.3 CONTRAINDICATIONS
prosthesis among patients already using prosthetic voice rehabilitation.
1.4 WARNINGS
• Dislodgement or extrusion of the Provox Vega voice prosthesis
body in the airway may cause severe complications such as acute respiratory distress
and/or respiratory arrest.
• Select the proper prosthesis size.
• Instruct the patient to consult a physician immediately if there are any signs of
• Instruct the patient to consult a physician if leakage through or around the voice
prosthesis occurs. Leakage may cause aspiration pneumonia.
• If used, choose laryngectomy tubes or stoma buttons with a suitable shape that do
during insertion and removal of the laryngectomy tube or stoma button. This may
lead to severe tissue damage and/or accidental ingestion of the prosthesis.
• Instruct the patient to use only genuine Provox accessories
(Brush, Flush, Plug) for maintenance and to avoid all other kinds of manipulation.
• Re-use and re-processing
device, which could cause patient harm.
1.5 PRECAUTIONS.
• Carefully assess any patient with bleeding disorders or who is undergoing
anticoagulant treatment for the risk of bleeding or hemorrhage prior to placement or
replacement of the prosthesis
product.
infection risk.
2. Instructions for use
2.1 Choose size of the Voice prosthesis
Choosing the right shaft diameter and length of the replacement prosthesis
• Selecting shaft diameter
The Clinician should determine the proper diameter of the prosthesis appropriate for
the patient.
ENGLISH

15
inserted.
puncture shrinks to the appropriate diameter.
• Selecting shaft length
To select the correct length, you may use the current prosthesis as its own measuring
device.
Flange of the old prosthesis and the mucosal wall, a shorter prosthesis should be
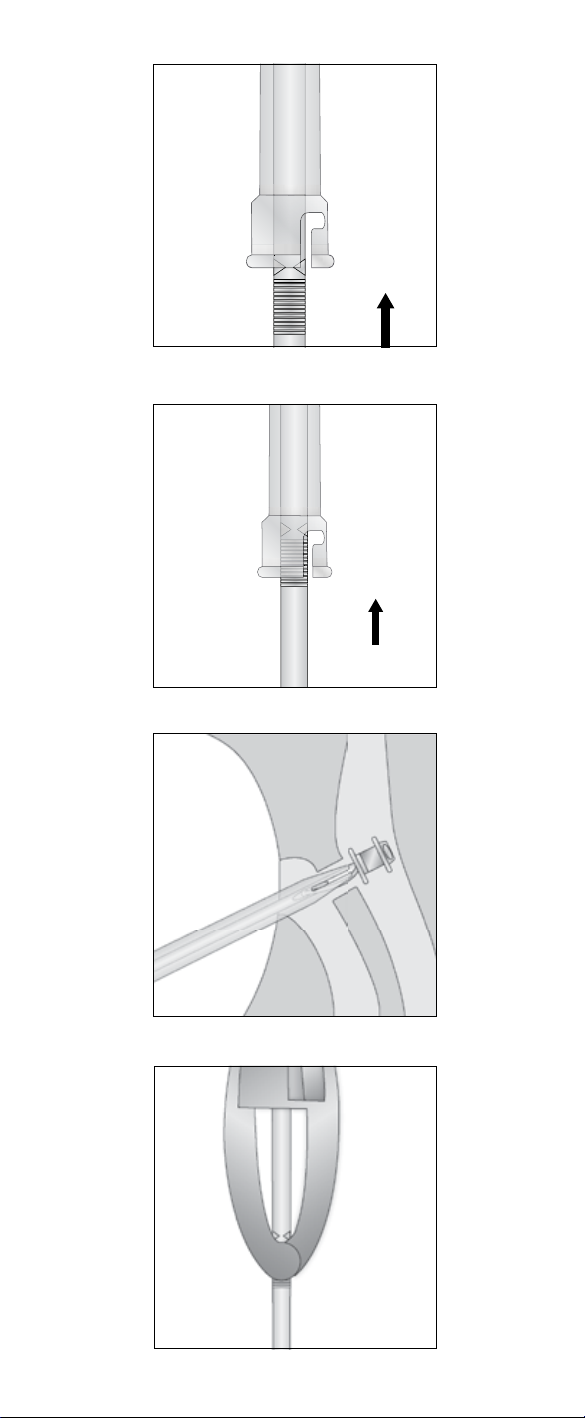
2.2 Preparation
(Fig. 3-6)
Position voice prosthesis
attached, and with the tip of the pin positioned all the way into the blue ring of
Pin shall be snapped into the Folding Tool).
Loading Tube until it locks in place (Fig. 5).
Load
Remove the old voice prosthesis
prosthesis is then pushed into the esophagus for passage through the intestinal
before using this method.
Prepare the puncture (optional)
7. The puncture may be dilated to prepare for the insertion of the voice prosthesis.
This is usually not necessary but may facilitate insertion in patients with angled
or tight punctures that easily collapse.
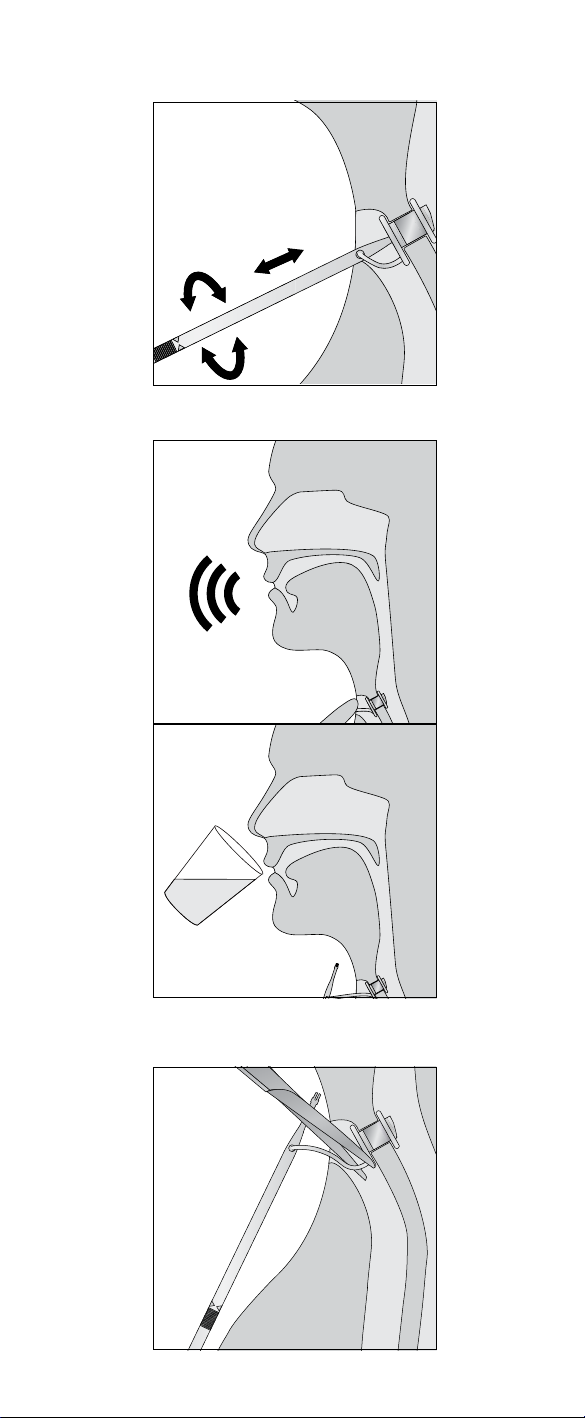
2.3 Insertion, Anterograde replacement procedure
and then retracted to the intended position.
insertion.
2.3.1 Method 1: System Insertion
1. Enter the TE-puncture
resistance, dilatation and/or lubrication can ease the insertion.
2. Insert the voice prosthesis
prosthesis is entirely unfolded in the esophagus.
3. Release the voice prosthesis
Pull the Loading Tube and Folding Tool together straight out from the puncture.
The voice prosthesis remains in the puncture; still firmly attached to the
4. Finalize the procedure
2.3.2 Method 2: Tube Insertion
To enhance visibility, the Folding Tool can be removed once the prosthesis has been
pushed into the Loading Tube.
Note:
1. Remove the Folding Tool
Remove the Folding Tool by unlocking and disconnecting it from the Loading
Tube (Fig. 8).
2. Enter the TE-puncture
resistance, dilatation and/or lubrication can ease the insertion.

16
3. Insert the voice prosthesis
4. Release the voice prosthesis
and pull the Loading Tube straight out from the puncture. This will release the
Note:
rotate the voice prosthesis into place.
5. Finalize the procedure
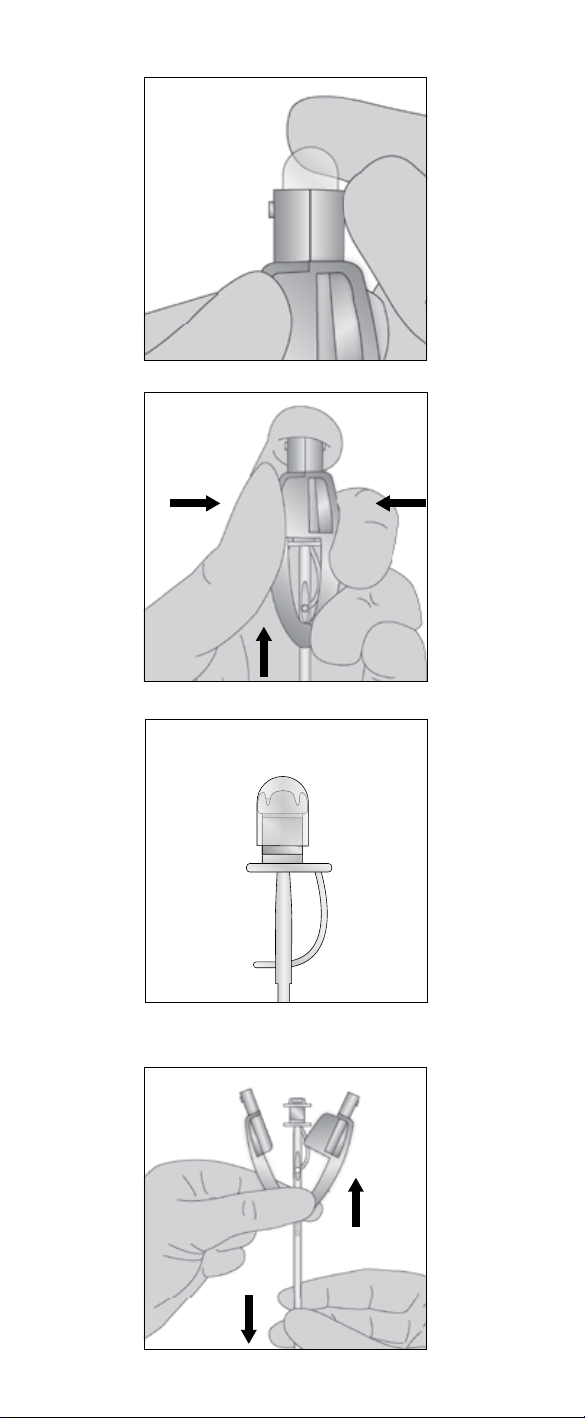
2.3.3 Method 3: Overshoot Insertion
1. Remove the Folding Tool (Optional)
After the prosthesis has been pushed into the Loading Tube, remove the Folding
Tool by unlocking and disconnecting it from the Loading Tube (Fig. 8).
2. Enter the TE-puncture
resistance, dilatation and/or lubrication can ease the insertion.
3. Insert the voice prosthesis
prosthesis is fully deployed in the esophagus (Fig.11).
is fully deployed in the esophagus (Fig. 12).
4. Release the voice prosthesis
Pull the Loading Tube straight out from the puncture. The prosthesis remains in
5. Finalize the procedure
2.3.4 Method 4: Capsule Insertion
Intended use
Description of the device
WAR NINGS
• Always ensure that the voice prosthesis is folded correctly and that it is properly
attachment of the Capsule.
prosthesis after insertion.
PRECAUTIONS
•
may damage the voice prosthesis.
the voice prosthesis.
procedure the Loading Tube is not used.
1. Insert the prosthesis into Provox Capsule
2. Check proper loading
of the voice prosthesis is secured to the inserter pin intended for inserting the
prosthesis into the puncture.
3.
points 6 and 7).

17
4. Insert Provox Capsule into the puncture.
strap of the voice prosthesis to ensure it is in the proper position.
5. Release the voice prosthesis
Remove the inserter pin from the voice prosthesis. The voice prosthesis remains
in the puncture.
6. Finalize the procedure
2.4 Assembly and reloading the Provox Insertion
System
Position voice prosthesis
Pin.
2. Attach the Safety Strap by leading it through the Attachment Slot from either side.
attached and with the tip of the pin positioned all the way into the blue ring of the
Connect the Folding Tool
in place. Pull the pin until the pin is snapped into the Folding Tool (Fig. 16). The
as described above in section 2.2.
CAUTION:
any signs of damage, do not use the voice prosthesis.
2.5 Finalize the procedure
After insertion:
Strap is pointing downwards.
Test proper function
by asking the patient to speak and by observing that the prosthesis does not leak
while the patient drinks water (Fig. 18).
Cut the Safety Strap
is now ready for use.
2.6 Disposal
Al
when disposing of a used medical device.
3. Important patient information
3.1 General information
Ensure that the patient understands to contact their clinician if:
• There is leakage through or around the prosthesis (coughing and/or change of mucus
color).
stoma region (pain, redness, heat, swelling, traces of blood on the brush after
brushing).
Also inform the patient that:
• After a prosthesis replacement traces of blood may be found in the sputum. This may
prosthesis.
3.2 Prosthesis maintenance
Cleaning the prosthesis at least twice a day can help prolong the device life.
CAUTION: Only use genuine Provox accessories that are intended for use with
Provox Vega when cleaning the prosthesis.
•
mucus and food remnants from the prosthesis.
from the prosthesis, which can help increase the life of the device.
Note:
clinician who prescribes the device, have demonstrated ability to understand and
consistently follow the instructions for use without clinician supervision.

18
• Some dietary measures, like the daily intake of yogurt or butter milk containing
for each accessory.
4. Additional information
4.1 Compatibility with MRI, X-ray and radiation therapy
4.2 Device lifetime
Depending on individual biological circumstances the device life varies, and it is
not possible to predict the integrity of the device over a longer period of time. The
integrity of the device will eventually deteriorate.
Laboratory testings of simulated usage for a test period of 12 months show that, in
the absence of bacteria and yeasts, the device will maintain its structural integrity for
this time period. The device has not been tested for usage beyond 12 months. Usage
beyond this limit is under the sole discretion of the prescriber.
4.3 Compatibility with antifungal medicine
voice prosthesis and components when using the following antifungal medications:
5. Reporting
Please note that any serious incident that has occurred in relation to the device shall
be reported to the manufacturer and the national authority of the country in which the
user and/or patient resides.
Provox® Vega™
1. Description générale
1.1 Utilisation prévue
Le système d’insertion Provox Insertion System n’est pas conçu pour être utilisé pour
l’insertion d’une prothèse phonatoire dans une ponction réalisée récemment.
1.2 Description du dispositif
Généralités
FRANÇAIS

19
1.3 CONTRE-INDICATIONS
1.4 AVERTISSEMENTS
• Le déplacement ou l’extrusion de la prothèse phonatoire Provox Vega de la
• Choisissez la bonne taille de prothèse.
• Indiquez au patient de consulter immédiatement un médecin en cas de signes
• Recommandez au patient de consulter un médecin
• En cas d’utilisation de canules de laryngectomie ou de boutons de trachéostomie,
• Recommandez au patient d’utiliser uniquement les accessoires Provox
tout autre type de manipulation.
• La réutilisation et le retraitement
1.5 PRÉCAUTIONS.
2. Mode d’emploi
2.1 Sélection de la taille de la prothèse phonatoire
Sélection du diamètre et de la longueur de fût corrects de la prothèse de rechange
plusieurs longueurs de fût.
• Sélection du diamètre de fût
• Sélection de la longueur de fût
comme instrument de mesure.
2.2 Préparation
(Fig. 3-6)
Positionnement de la prothèse phonatoire
Déploiement de la collerette œsophagienne
Chargement

20
Retrait de l’ancienne prothèse phonatoire
Préparation de la ponction (facultatif)
2.3 Insertion, procédure de remplacement antérograde
2.3.1 Méthode 1 : Insertion du système
1. Insertion dans la ponction trachéo-œsophagienne
2. Insertion de la prothèse phonatoire
3. Libération de la prothèse phonatoire
4. Finalisation de la procédure
2.3.2 Méthode 2 : Insertion du tube
Remarque :
1. Retrait du dispositif de déploiement
de chargement (Fig. 8).
2. Insertion dans la ponction trachéo-œsophagienne
3. Insertion de la prothèse phonatoire
4. Libération de la prothèse phonatoire
Remarque :
en place.
5. Finalisation de la procédure
2.3.3 Méthode 3 : Insertion par dépassement
1. Retrait du dispositif de déploiement (facultatif)
Table of contents
Languages:
Other PROVOX Medical Equipment manuals


Popular Medical Equipment manuals by other brands


Apera Instruments
Apera Instruments DO8500 instruction manual

Braun
Braun Aesculap Series Instructions for use/Technical description

Med Systems
Med Systems Electro Flo 5000 user manual

Karl Storz
Karl Storz TELE PACK + Instructions for use

PARSYS
PARSYS TELECARDIA user manual

Beurer
Beurer IH50 Instructions for use

MGE UPS Systems
MGE UPS Systems SAM 12 Operating and maintenance manual

Cegla
Cegla CombiHaler manual

Invasix
Invasix InMode Operator's manual

Sunoptic Surgical
Sunoptic Surgical Titan 300 Operator's manual

CEITEC NANO
CEITEC NANO TESCAN MIRA3 SEM quick start guide

Arthrex
Arthrex Lift-Assist AR-1627 Instructions for use