manuals.online logo
Brands
  1. Home
  2. •
  3. Brands
  4. •
  5. VitalConnect
  6. •
  7. Medical Equipment
  8. •
  9. VitalConnect VistaTablet User manual

VitalConnect VistaTablet User manual

1
MKT-163 Rev. C (February 2021)
QuickStart Guide
for VistaTablet
This guide describes how to use the VitalPatch®biosensor
and VistaTablet for remote patient monitoring.
• The VitalPatchis worn on the chest to measure and
record your vital signs and heart rhythms.
• The VistaTabletsends data from VitalPatch to your care
team for monitoring.
Wear the VitalPatch at all times during the monitoring period
and keep the VistaTablet near you.
For detailed instructions and warnings, refer to IFU-06,
VitalPatch Instructions for Use and IFU-26,VistaPoint
Instructions for Use. You can view these by tapping the
Menu button on the VistaTablet and then tapping Help.
Customer Support
1-800-219-3000
Unpacking and Charging VistaTablet
If you have not already done so, remove the VistaTablet
charger and cable from their packaging. Keep all packing
materials.
Use only the provided USB cable and charger for your
VistaTablet. Keep the device plugged into the charger
whenever possible. You can use the VistaTablet while it is
charging. Look at the battery indicator in the status bar.
Do not let the VistaTablet battery run out.
Turning the VistaTablet On and Off
The VistaTablet should always be ON when you are wearing a
VitalPatch. The screen will go to sleep (but device will remain
ON) after a period of inactivity.
• ToTurnON:Press Power Key until the device vibrates and
the screen lights up. To check if ON, tap the Home Key.
• ToUnlock:Swipe across the screen with your nger and
then enter your PIN code.
• ToTurnOFF: Press and hold the Power Key until the
Options menu displays, and then select Power O.
Checking Cloud Connection
Keep the VistaTablet in a place with a strong cell phone signal.
If the screen shows  CloudConnectionLost , move the
VistaTablet to a location with a better signal.
Section 1: Using the VistaTablet
CALL911ifyouarehavinganemergency!
Section 2: Applying the VitalPatch
To see an instructional video, tap the Menu button, tap
Help, and then tap VitalPatchApplication.
1. Prepare Upper-Left Chest
a. If a previous VitalPatch is still applied, remove it rst.See
Section7onpage4.
b. If there is body hair on the site, shave the site before
cleaning. Prepare an area larger than the VitalPatch. See
gure to the right.
c. Clean site with an alcohol wipe and allow to dry.
Prepare
upper-left chest
in this location
LEFT
Side
VitalPatch VistaTablet Care Team
Status Bar
Home
Key
Menu
Charging
Port
Power Key Volume Up/Down
VistaTablet Battery Level
VitalPatch Hours
2
Tap
Connect VitalPatch
2. Remove from Pouch and Power-On
a. Tear open pouch at the notch and remove VitalPatch.
b. Allow the VitalPatch to “breathe” for at least 2 minutes
before proceeding to the next step.
c. Place VitalPatch on a at surface. Press and release the
power button. A green light below the logo will ash
when VitalPatch is powered on (the light will go o).
3. Hold Against Chest
a. Hold the VitalPatch against the chest in the position
shown in the gure to the right.
b. Space two ngers below the jugular notch (dip at the
base of the neck).
c. Position diagonally with the threelines angled
downward away from the midline.
4. Remove Backings and Apply
DONOTtouchtheadhesivewithyourngers!
a. Hold one side of the VitalPatch down.
b. Lift the opposite side, and peel the backing o from the
center. Press against skin.
c. Peel the backing o from the other side of the VitalPatch.
d. Firmly press down both sides to attach to skin.
5. Optional Adhesive Overlay
If your care team recommends an adhesive overlay, please
review the instructional video. Go to the Menu button, tap
Help, and then tap VitalPatchAdhesiveOverlay.
• DONOT shower or exercise for 30minutes after
applying the VitalPatch.
• DONOT expose the VitalPatch directly to the shower
head, and avoid excessive contact with soap or
scrubbing. Gently pat the VitalPatch dry after showering.
• DONOT swim with the VitalPatch or use in a sauna,
steam room or hot tub.
• DONOT wear more than one VitalPatch at a time.
Remove the old VitalPatch before applying a new one.
VitalConnect
Light ashes ON
Press and
release power
button
Peel o
backing
from center
Hold
VitalPatch
down
VitalConnect
Midline
LEFT
Side
LEFT
Hand
Section 4: Pairing with VistaTablet
1. Begin the Pairing Process
a. Tap ConnectVitalPatch button.
b. Tap SearchforVitalPatchID to search for nearby
VitalPatch biosensors. A list will of IDs will display.
c. Tap the Bluetooth ID of your VitalPatch. If the Bluetooth
ID does not appear in the list, tap the Rescan button to
repeat the search. If the VitalPatch is still not listed, press
the power button on the VitalPatch again and tap the
Rescan button.
Note:If a previous VitalPatch is still connected, disconnect it
before pairing (see Section6onPage3).
Select ID from list
Connect to VitalPatch
Search for VitalPatch ID
How do you want to connect?
Scanning for Devices
VC2B008BF_003C3C
VC2B008BF_0014D2
Section 3: Wearing the VitalPatch
• EachVitalPatchwilllastupto7days(168hours).
To preserve data recorded by the VitalPatch, make sure
you are connected to the VistaTablet before the
VitalPatch expires.
• If discomfort or irritation occurs, the VitalPatch should be
removed. Contact your care team immediately.
• If the VitalPatch begins to fall o or lift from the skin,
contact your care team immediately.
3
Posture Calibration
Step 1 Select Patch Position
Next >
SecondaryPrimary (preferred)
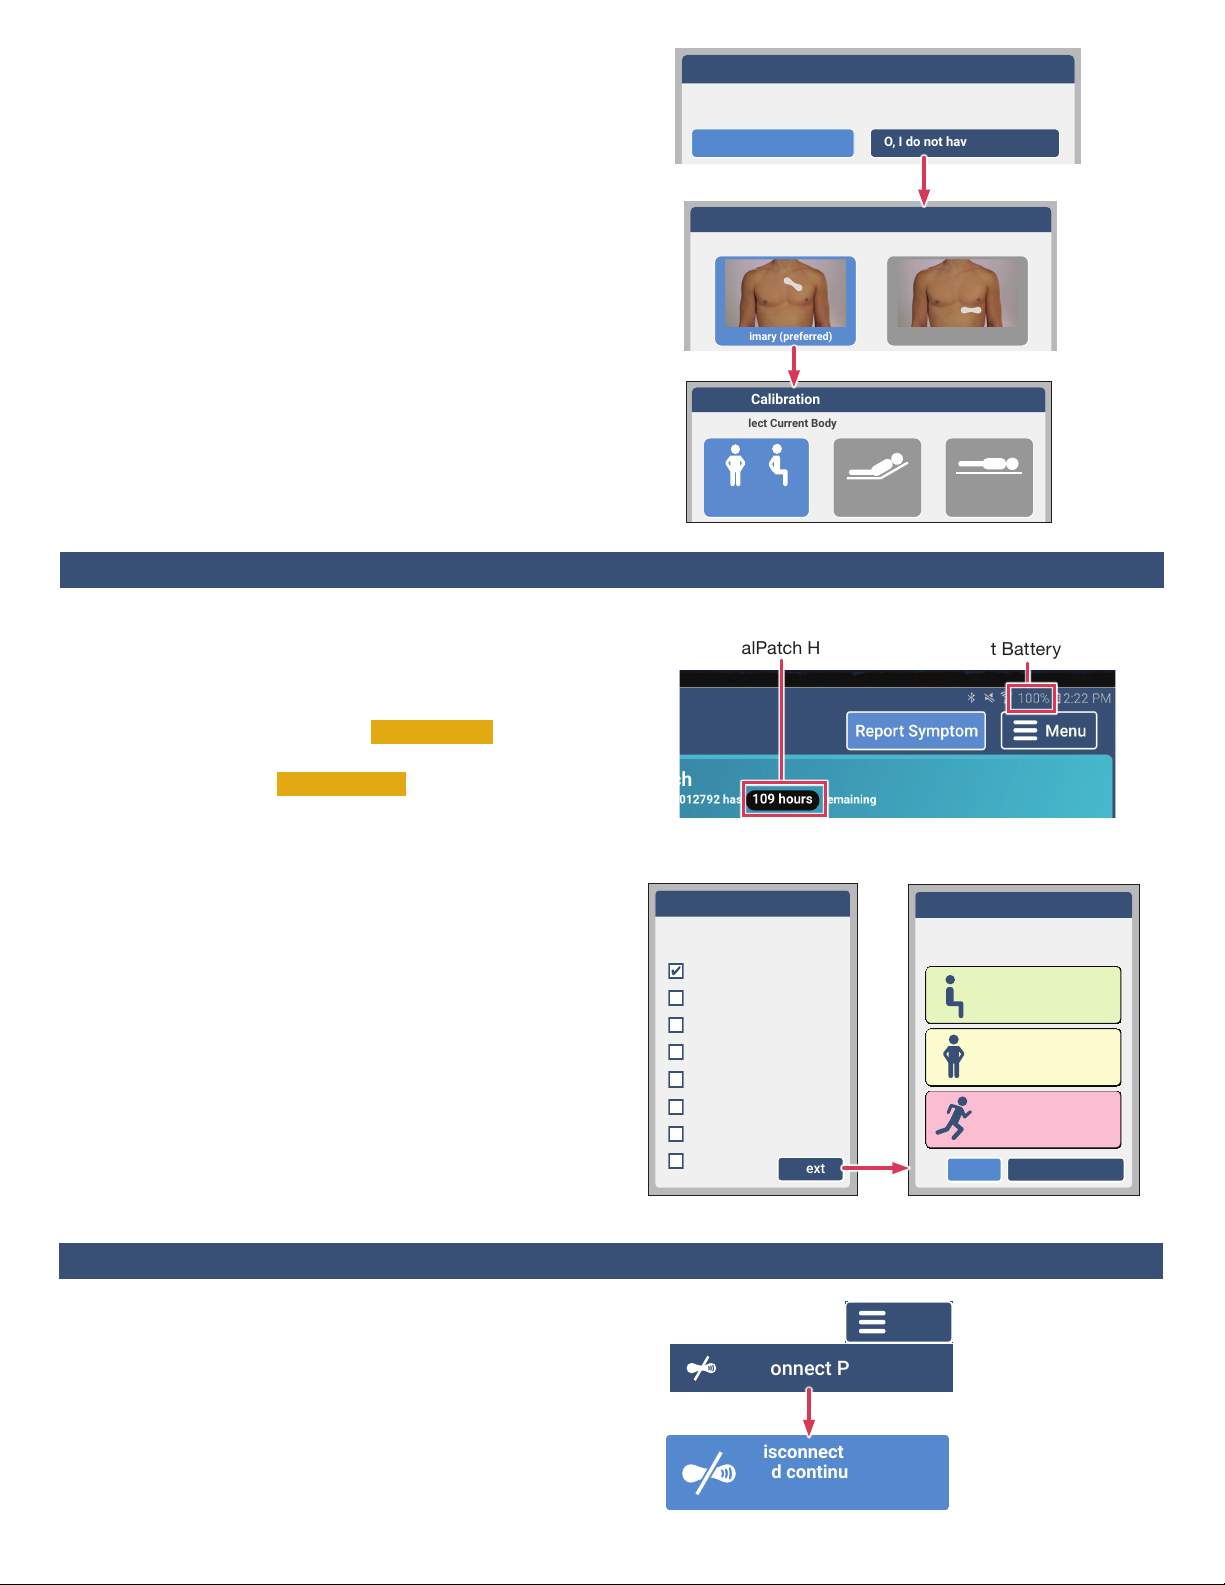
Check VitalPatch Hours and Status
• To check the status of your VitalPatch, look for “hours
remaining” on the screen. Replace the VitalPatch when
it expires (or as directed by your care team).
• If the screen shows Vital Signs  Not Uploading , make
sure the VistaTablet and VitalPatch are near each other.
• If the screen shows  Patch Off Body , check that the
VitalPatch is adhered to the skin. If the patch appears
to have lifted o, contact Customer Support (1-800-
219-3000) for additional guidance.
Report Symptoms
If you feel a symptom, do the following:
a. When it is safe to do so, unlock the VistaTablet and tap
the ReportSymptom button.
b. From the list of options, tap one or more symptom(s).
Tap Other if the symptom is not listed. Tap Next.
c. If you selected Other as a symptom, you will be asked
to enter a description of the symptom(s). Enter the
information and tap Next.
d. Tap the activity level (Low, Medium or High) that you
experienced when the symptom occurred. Tap Send
Symptom when complete.
2. Choose Pacemaker Status
If you see a question about a pacemaker, select YES if
you have a pacemaker. Select NO if you do not have a
pacemaker. If you do not know, ask your care team.
3. Select Patch Position
Select the Primary position image and then tap Next.
4. Select Body Position
• StandingorSitting — Sit as upright as possible.
• Elevated — Lie on a bed elevated at an angle of 30°.
• Supine — Lie down as at as possible.
Remain still in the current body position and tap
Calibrate. Conrm selections when prompted.
The VistaTablet may ask you to calibrate body
temperature. Refer to IFU-26,VistaPoint Instructions for
Use for more information. After calibration, the screen will
display a dashboard with current status.
Posture Calibration
Step 2 Select Current Body Position
Calibrate
< Back
Bed is Flat
Supine
Bed Angle 30°
Elevated
(preferred)
Standing or Sitting
Anxious/Panic
Report a Symptom
What did you feel?
(select one or more)
Heart racing
Heart fluttering
Heart skipping beats
Shortness of breath
Dizzy or lightheaded
Chest pain
Fainted
Other Next
Anxious/Panic
Report a Symptom
What was your activity level
when you felt the symptom?
Low
Sitting or resting
Medium
Standing or moving
High
Exercising
Back Send Symptom
Section 5: Daily Activities During Monitoring
Each VitalPatch will last up to 7 days. If your monitoring
period is longer than 7 days, replace the VitalPatch as
follows just prior to expiration:
a. Tap the Menu button and then tap DisconnectPatch.
b. Tap the DisconnectVitalPatchandcontinue
monitoringpatientbutton.
c. Remove the VitalPatch. See Section7onPage4.
d. Apply a new VitalPatch. See Section2onPage1.
Section 6: Replacing the VitalPatch
Disconnect VitalPatch
and continue
monitoring patient.
Disconnect Patch
Menu
Connection Successful
If you do not know, please ask your doctor.
Do you have an implanted pacemaker device?
YES, I have a pacemaker
NO, I do not have a pacemaker
VistaTablet Battery Level
VitalPatch Hours
4
Section 7: Removing VitalPatch
Section 8: Return the Monitoring Equipment
Before removing the VitalPatch, disconnect the VitalPatch
from the VistaTablet. See Section6onPage3.
1. If Overlay Was Used, Peel off
a. Grasp a corner of the overlay and peel it o the skin.
b. Continue pulling the overlay o. Stretch the overlay
horizontally to help release it from the skin. The
VitalPatch may pull o with the overlay.
2. Peel off VitalPatch
a. Wipe an adhesive removal pad along the edge of the
VitalPatch.
b. Grasp a corner of the VitalPatch and peel it o the skin
while sweeping the adhesive removal pad underneath.
c. Dispose the VitalPatch according to local laws for routine
electronic waste.
d. Clean skin with an alcohol pad and allow to dry.
3. Apply New VitalPatch
If your monitoring period is longer than 7 days, replace the
VitalPatch. See Section2onPage1. If your monitoring
period is nished, see Section8below.
IMPORTANT: The monitoring equipment must be returned
immediately upon completion of the monitoring period.
Failuretoreturnmayresultinanadditionalbillforthe
costofthedevice.
Use the following procedure to return:
a. Discard used VitalPatch biosensors, alcohol wipes, and
adhesive removal pads.
b. Place the tablet, charger and charge cable in the
original packaging. If you have unused VitalPatch
biosensors (in their original, undamaged pouches),
include them as well.
c. If you received the monitoring kit from a hospital or
your doctor’s oce, return items to that location.
Sweep adhesive
removal pad
Peel O
VitalPatch
VitalConnect
Grasp a corner of the overlay and
stretch horizontally to remove
VitalConnect, Inc.
224 Airport Parkway, Suite 300, San Jose, CA 95110 | (408) 963-4600 | www.vitalconnect.com | [email protected]
© 2021 VitalConnect. A list of our trademarks can be found at www.vitalconnect.com. All other marks may be trademarks of their respective companies.
Getting Help
Tap the Menu button in the upper-right corner of the
VistaTablet screen and then tap Help. You can read
instructional documents or watch tutorial videos.
Press the Home button to return to monitoring.
d. If the monitoring kit was shipped to you at home:
–Place the contents in the provided shipping box.
–Close the shipping box and tuck in the ap. Seal
the box closed using the provided materials, or use
packing tape.
–Apply the UPS return shipping label to the shipping
box.
–Drop o the shipping box at any UPS shipping
location. To schedule a pick-up, contact UPS at
1-800-742-5877. Inform UPS that you have a
pre-paid label.
–Save the tracking number from the return UPS label
for your records.

Other VitalConnect Medical Equipment manuals

VitalConnect VitalPatch Installation instructions

VitalConnect

VitalConnect VitalPatch Installation instructions

VitalConnect VitalConnect Platform User manual

VitalConnect

VitalConnect VitalConnect Platform User manual

VitalConnect Vista Solution VistaPoint 2.0 User manual

VitalConnect

VitalConnect Vista Solution VistaPoint 2.0 User manual

VitalConnect VitalPatch User manual

VitalConnect

VitalConnect VitalPatch User manual

VitalConnect Kettering HEALTH HF Patch Pilot User manual

VitalConnect

VitalConnect Kettering HEALTH HF Patch Pilot User manual

VitalConnect VistaPoint 3.1 User manual

VitalConnect

VitalConnect VistaPoint 3.1 User manual

VitalConnect VitalPatch User manual

VitalConnect

VitalConnect VitalPatch User manual

VitalConnect VistaPoint 2.1 User manual

VitalConnect

VitalConnect VistaPoint 2.1 User manual

VitalConnect VistaPoint 3.2 User manual

VitalConnect

VitalConnect VistaPoint 3.2 User manual

VitalConnect VistaPoint 3.0 User manual

VitalConnect

VitalConnect VistaPoint 3.0 User manual

Popular Medical Equipment manuals by other brands

Bodypoint SP110S Installation and user instructions

Bodypoint

Bodypoint SP110S Installation and user instructions

Monitex Ti-Lite GT-1500 user manual

Monitex

Monitex Ti-Lite GT-1500 user manual

IngMar Medical ASL 5000 Quick setup guide

IngMar Medical

IngMar Medical ASL 5000 Quick setup guide

Viztek Ultra U-Arm installation guide

Viztek

Viztek Ultra U-Arm installation guide

PeakMedical Mo-2 user guide

PeakMedical

PeakMedical Mo-2 user guide

Dermlite Lumio S instructions

Dermlite

Dermlite Lumio S instructions

Alltion AC-2000 Series user guide

Alltion

Alltion AC-2000 Series user guide

Stryker 5050 Operation manual

Stryker

Stryker 5050 Operation manual

Aura Medical AVYA user manual

Aura Medical

Aura Medical AVYA user manual

VISIOMED Visiocheck BW-X07HD user manual

VISIOMED

VISIOMED Visiocheck BW-X07HD user manual

Cincinnati Sub-Zero ELECTRI-COOL 757 product manual

Cincinnati Sub-Zero

Cincinnati Sub-Zero ELECTRI-COOL 757 product manual

Medic Therapeutics D20 user manual

Medic Therapeutics

Medic Therapeutics D20 user manual

Alaris Medical Systems Medley 8110 Directions for use

Alaris Medical Systems

Alaris Medical Systems Medley 8110 Directions for use

Trudell Medical International AeroDawg quick start guide

Trudell Medical International

Trudell Medical International AeroDawg quick start guide

MBTelehealth Littman 3200 user guide

MBTelehealth

MBTelehealth Littman 3200 user guide

Acteon Mini LED user manual

Acteon

Acteon Mini LED user manual

R82 Panda Futura 5 Series English Manual

R82

R82 Panda Futura 5 Series English Manual

Stryker Sonopet 5450-800-278 Instructions for use

Stryker

Stryker Sonopet 5450-800-278 Instructions for use

manuals.online logo
manuals.online logoBrands
  • About & Mission
  • Contact us
  • Privacy Policy
  • Terms and Conditions

Copyright 2025 Manuals.Online. All Rights Reserved.