ProX XW-HDU03 User manual

XW-HDU03
XW-HDU03

Important Information
Read this user ’s manual carefully before use and retain for future reference.
The XW-HDU03 warranty may NOT apply to below cases:
■Repairs or product modification and alterations executed by unauthorized service
personnel.
■When damages caused by accidents include but not limited to lightning, water or fire.
■The serial number on the product has been altered, deleted, removed or made
illegible.
Safety Precautions
TO AVOID RISK OF ELECTRICAL SHOCK,
DO NOT ATTEMPT TO OPEN THE UNIT
BY YOURSELF. FOR ANY ASSIST,
PLEASE CONTACT YOUR LOCAL
DISTRIBUTOR OR PRO-X.
■Before using an external power supply, always check that the voltage is within the
specified range and that the polarities of the connector are correct.
■Do not use the unit in highmoisture environment, which may cause electric shock or fire.
■Avoid overloading electrical outlets or extension cords which otherwise could
result in electric shock or fire.
■For protection from lightning or when the product is left unused for a long period
of time, disconnect it from the power source. Always disconnect the power cord
from the power outlet when not using. This reduces the risk of electric shock or fire.
■Do not place the unit on an uneven surface or somewhere with vibration, which
may cause unit failure or damage.
■After long time of continuous use, the outer case of the unit may be warm to touch.
■In case of damage, smoke, unusual smell or other unexpected situations, stop
using the unit immediately and consult your local distributor or PRO-X.
■The HDMI interface does not support hot plug.
■This product should not be exposed to dripping or splashing. No object filled with
liquid should be placed on the product.
WARNING
RISK OF
ELECTRICAL
SHOCK
DO NOT OPEN
1
Statements
● Never use the unit nearby an aircraft, medical devices or other high-accuracy electronic
instruments, it may cause interference and fault on the operation.
● The unit is approved for technical standard compliance certification as a wireless
device of radio stations with low antenna power specified under international
radio wave regulations. Therefore a license for radio station use is not required to
operate this product.
● Optimal distance of working between XW-HDU03TX (transmitter) and XW-
HDU03RX (receiver) is between 3 meters and 200 meters LOS (line of sight).
Introduction
The XW-HDU03 system is designed for wirelessly transmitting uncompressed 1080P HD
SDI/SDI video and audio from any camera to field monitors.
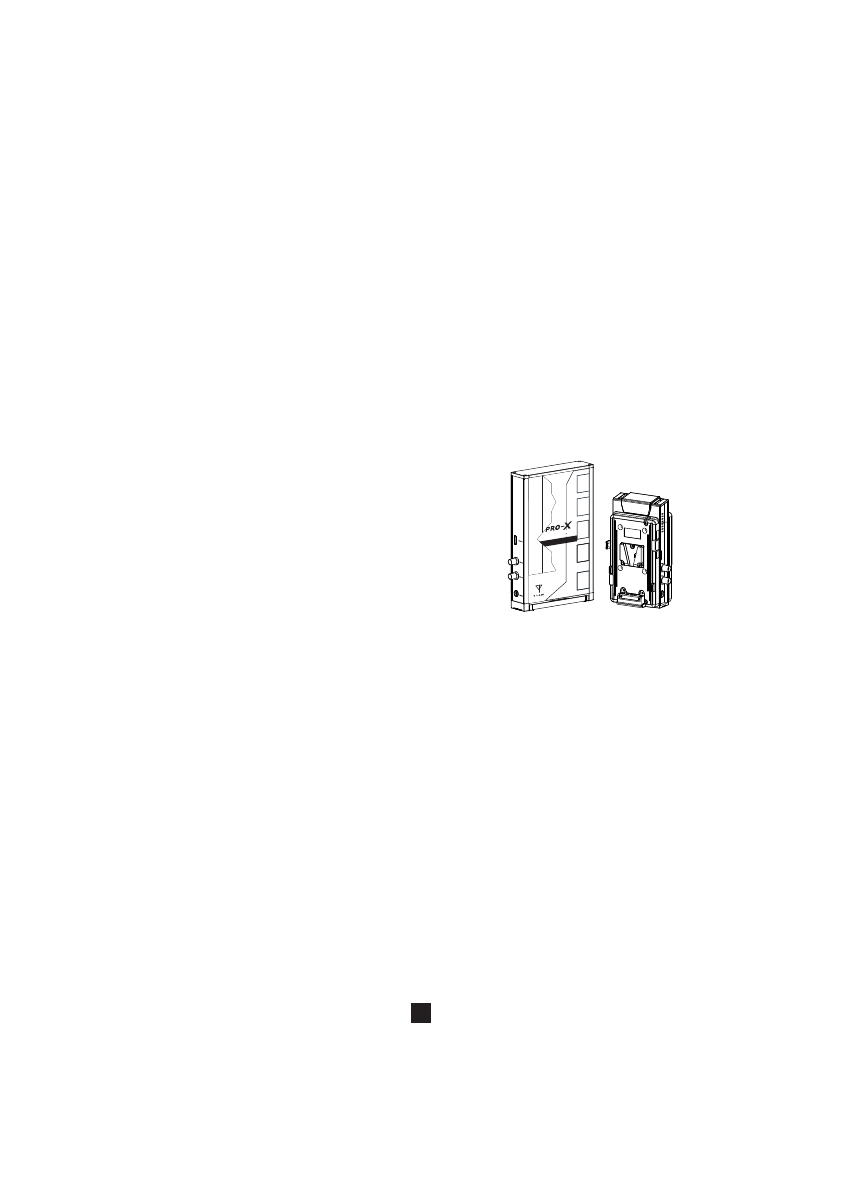
XW-HDU03TX is the transmitter, and connects to a camera.
XW-HDU03RX is the receiver, and connects to a monitor.
Video signals from the camera can be transmitted in
a distance of 200m without cables.
The director, producer and even film crew can see
exactly what the camera is shooting in real time.
It works on 5.1GHz ~ 5.9GHz band radio frequencies
and there are 0~9, total 10 frequency points for
selection.
With omni-directional and high efficiency antenna
system,
it transmits uncompressed video in 200 meters LOS
with less than 1ms latency.
Features
1.Video transmitted in real time with latency less than 1 millisecond
2.Fully uncompressed 1080P video
3.High definition video with embedded sound
4.SDI input /output, automatically detects HD-SDI and SD-SDI video
5.Transmission distance within 200m LOS
6.0~9 total 10 frequency point selections on 5.1GHz~5.9GHz
7.Power can be supplied by V type or 3-Stud mount Lithium-ion battery or by AC Adapter
8.Back-up power failure function enables immediate and automatic switching to a
connected battery if the external DC connected power is disconnected
Note: The transmission distance may vary depending on surroundings, radio wave
conditions, etc. The transmission distance of approximately 200m is not guaranteed.
In locations with many other devices operating in 5GHz frequencies, operation of
the set can be affected, and video may be interrupted.
2
HD WIRE LESS TR ANSMIS SION SY STEM
200 Meters Tra nsmission D istan ce
XW-HDU03 RX
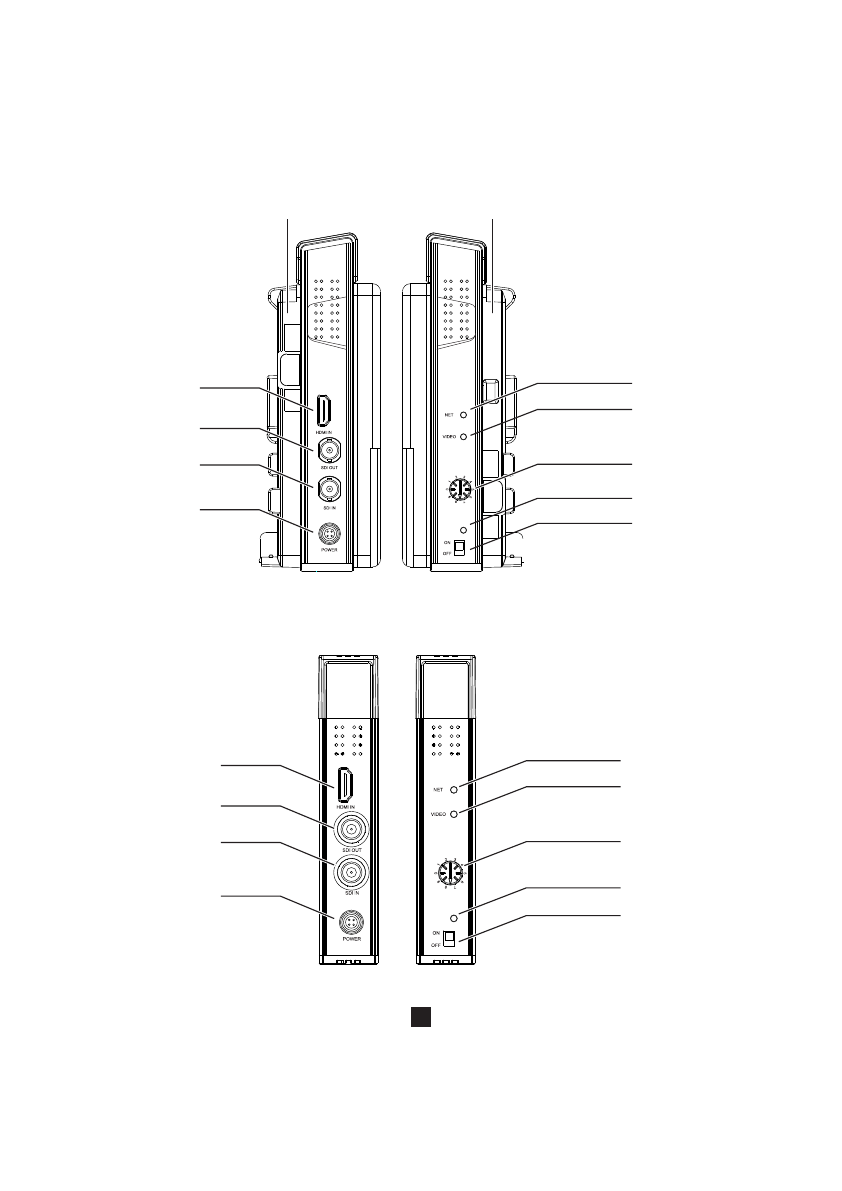
Right Side
V Type Mount
DC IN
HDMI IN
SDI OUT
SDI IN
Left Side
V Type Mount
NET LED
VIDEO LED
Frequency Points
Selector Dial
POWER LED
Power Swtich
3
XW-HDU03 TX
XW-HDU03R TX
HDMI IN
SDI OUT
SDI IN
DC IN
NET LED
VIDEO LED
Frequency Points
Selector Dial
POWER LED
Power Swtich
Right Side Left Side

XW-HDU03 RX
4
Right Side Left Side
V Type Mount
NET LED
Frequency Points
Selector Dial
VIDEO LED
POWER LED
Power Swtich DC IN
SDI OUT
HDMI OUT
SDI OUT
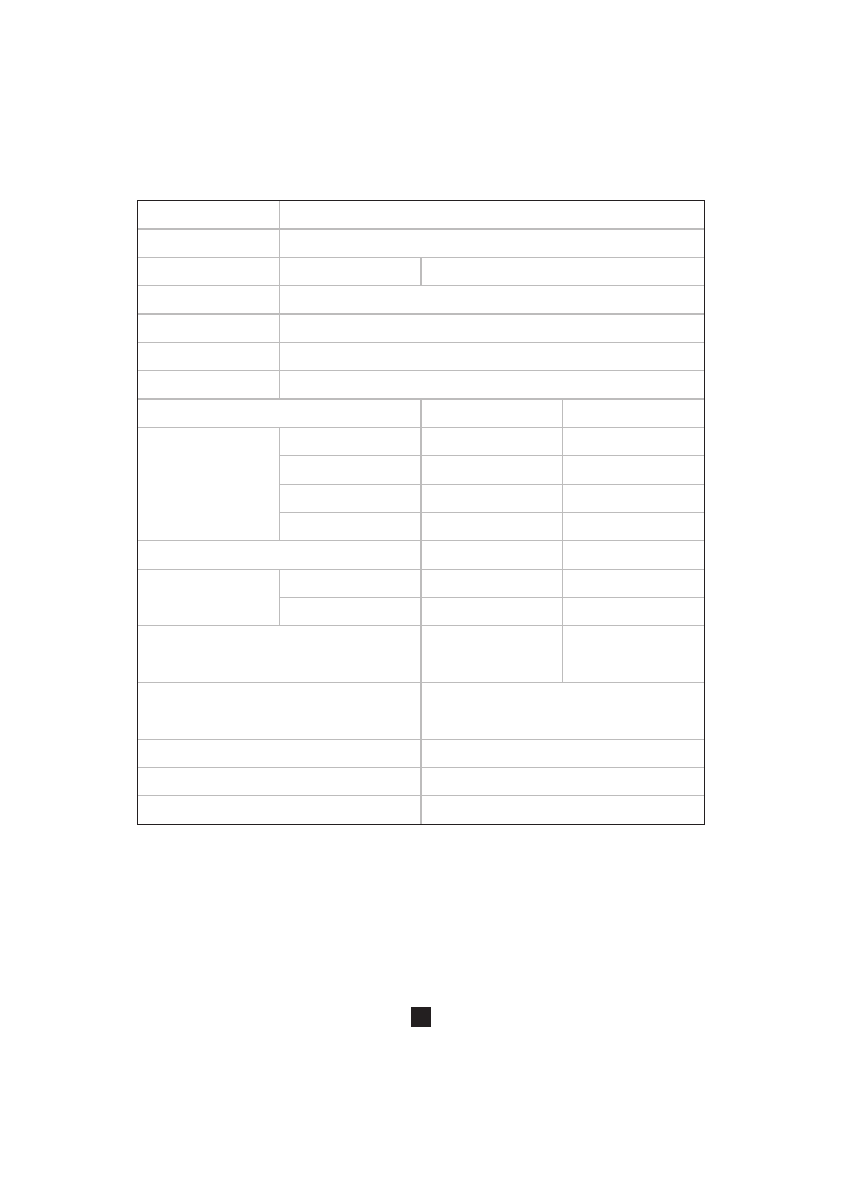
Specifications
SDI Input
SDI Output
HDMI Intput
HDMI Output
Power Switch on Operation Panel
LED
TX
1
1
1
No
1
1
1
Model
Video Resolution
Audio Format
Time Code
Transmission Distance
Latency
Frequency
Interfaces
XW-HDU03
1080P, 1080i, 720P, 576i, 480i
Digital Audio
LTC; VITC
200m LOS (line of sight)
Less than 1 millisecond
5.1GHz~5.9GHz
Up to 3.072Mbps AC-3 and DTS
Audio/Video
NET
Power
Dimension W× L× H
Antenna
Power Supply Input
Approved Standards
Working Temperature
Battery or DC 6.5V /2.0A~17V 0.8A
CE, NCC
0-40℃/32-104 ℉
RX
No
2
No
1
1
1
1
5
62×102×171mm
2.44×4.02×6.73inches
60.5×149×234 mm
2.38×5.87×9.21 inches
Built-in Omni-directionaland High
Efficiency Antenna System

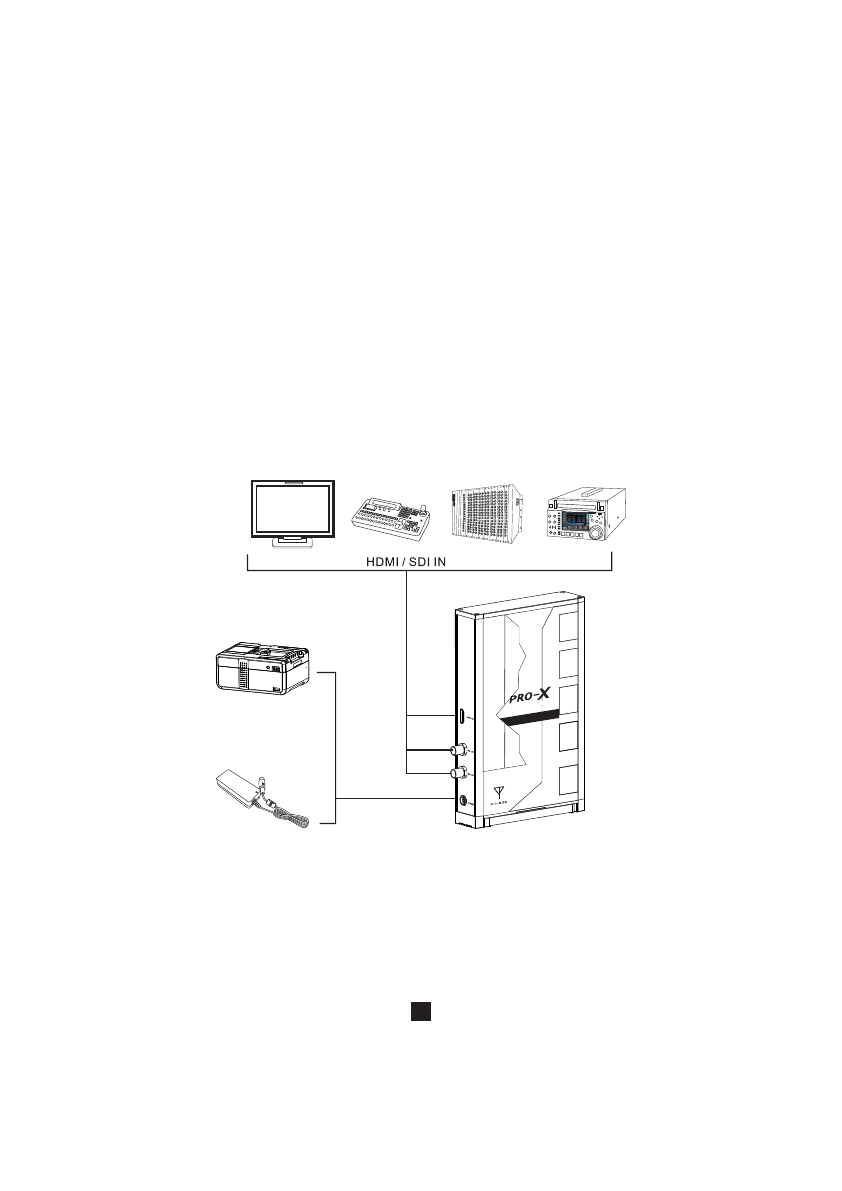
Wireless Video Transmission
1.Cable Connect and Power the Set
For TX:Connect HD device’s SDI output connector to the SDI IN of
TXwith SDI cable.
Connect camera’s HDMI output connector to the HDMI IN of
Txwith HDMI cable.
Connect DC IN on TX and a battery with P-Tap with DC IN cable,
and turn the power switch on.
Cine Camera Digital HD Monitor Cine Camera
HDMI Cable
SDI Cable
DC IN Cable
V Type Mount Battery DV Battery
XW-HDU03 TX
6
Video Camera XW-HDU03 TX V Type Mount Battery
7
For RX: Connect RX HDMI OUT connector to the monitor’s HDMI input
with HDMI cable. Turn the monitor on, choose “HDMI Input” in
video&audio source from monitor menu.
Connect switcher’s SDI input to SDI OUT of RXwith SDI cable.
Connect DC IN on RX and AC power source with the adaptor, or
you can mount a PRO-X battey on RX and turn the power switch on.
Digital HD Monitor Video Switcher Video Matrix Switcher Digital Recorder
V Type Battery
DC IN Cable/
Mount a Battery
Directly
Adaptor
HD WI RELES S TRANS MIS SION S YSTEM
200 Met ers Tran smiss ion D istanc e
XW- HD U03 RX

8
2. Power On
When TX and RX all connected with power source, turn the power switch
on and Power LED stays on.
DC IN
RX TX
POWER LED
RX TX
TX
TX RX
When the input signal is identified, VIDEO LED on TX stays on, NET LED
on TX stays on.
When signal link between TX and RX is established, NET LED and VIDEO LED on
TX stay on, NET LED and VIDEO LED on RX stay on. TX and RX are now well
connected and ready to transmit signals.

9
Notes:
◆Signal transmission may be affected by the position, height and angle of
placement. If the signal is weak, please look for the best condition by adjusting
the location, height of the unit.
◆When TX and RX are used very closely to each other (less than 3m as an
example), the received signal becomes too strong and may make the video
unavailable.
◆Transmission may be interfered if there are other 5GHz wireless devices in
operation nearby.
◆When an external power supply is used, power failure can be avoided by mounting
a PRO-X V type mount battery lithium ion battery to the set at the same time. If the
external power supply fails, operation continues via battery power.
◆If the video works improperly, restart the set (TX and RX) and try again.
◆When wireless transmission begins, the set takes about 15-20 seconds to start
its system. During this period of time, do not operate RX.
◆Do use TX and RX of the same serial number in pairs.

10
Troubleshooting
Fault
Power LED doesn’t light up
No video is displayed on
the monitor
Solutions
● Check the battery mounted is available.
● Check the power plugs of TX and RX are properly inserted
into a functioning power outlet.
● Make sure the power sources connected to TX and RX are
functional
● Make sure TX and RX are working at the same
frequency
● Verify that the proper cable has been selected and
installed between the TX input and your SDI output.
● Make sure your camera connected with TX has been
powered.
● On your monitor side, select the SDI/HDMI source
you connected to RX.
● Check your video resolution with SDI input from your
device is 1080P, 1080i, 720P, 576i or 480i.
● Ensure transmission distance is not over 200m (LOS).
● When all the above are checked and there’s still no
video, change to another frequency point and
restart the set.
Poor picture quality or
intermittent video play
● Check your video resolution with SDI input from your
device is 1080P, 1080i, 720P, 576i or 480i.
● Make sure cable connection is correct.
● Ensure transmission distance is not over 200m (LOS)
and there’s no interference between TX and RX.
● Check if there’s any high power intercom system
within 2 meters
● Make sure there’s no large block between the set
(e.g. walls)
● Check if there are large metal objects moving
between TX and RX (e.g. trucks)
● Check if there is any device/equipment to block or
interfere signals nearby (e.g. high power
equipments, signal tower)
● Make sure the set is not placed on a metal shelf or
similar place with metal
● Try restart the set or change the set to another
frequency point and restart the set.
No audio ● Check your monitor or other equipment’s volume is
properly set and not in “MUTE” mode.
● Make sure cable connection is correct.
● Check your video resolution with SDI input from your
device is 1080P, 1080i, 720P, 576i or 480i.
● Shutdown and restart the set.
HD WIRE LESS TR ANSMIS SION SYSTEM
200 Meters Tra nsmission D istance
XW-HDU03 RX
11
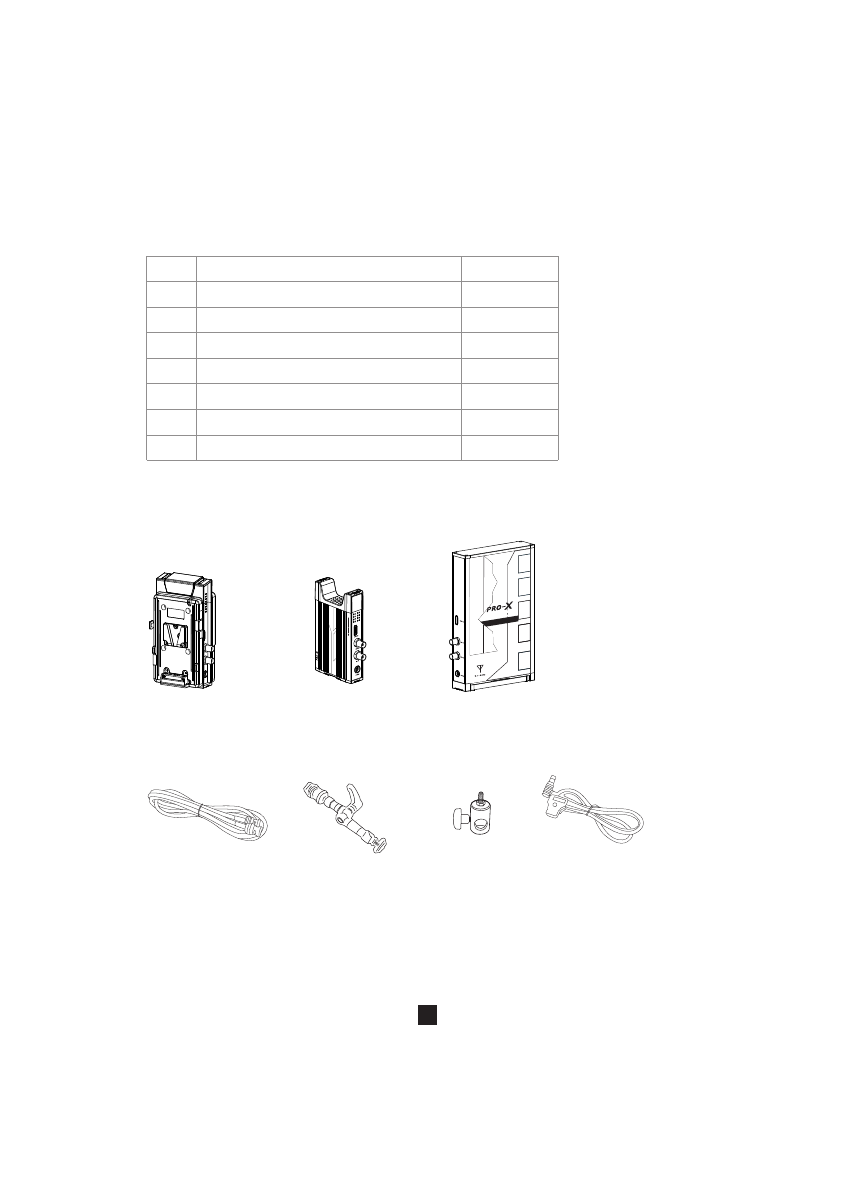
Standard Packing
Please check whether the following items are present in the package.
If any items missed or damaged, please contact your dealer.
No.
1
2
3
4
5
6
7
Description
XW-HDU03 TX
XW-HDU03 RX
PT-LEMO DC IN Cable
SDI Cable
Magic Arm (7 Inch)
Lamp Holder
User’s Manual
Quantity
1
1
2
1
1
1
1
XW-HDU03 RXXW-HDU03 TX
DC IN Cable
Lamp Holder
SDI Cable Magic Arm
XW-HDU03R TX
This manual suits for next models
2
Table of contents
Other ProX Professional Video Accessories manuals


