PT W41035 User manual

OWNER'S MANUAL
WARNING: READ, UNDERSTAND AND FOLLOW ALL INSTRUCTIONS AND
WARNINGS BEFORE OPERATING THIS TOOL. FAILURE TO DO SO MAY
RESULT IN PERSONAL INJURY AND/OR PROPERTY DAMAGE AND WILL
VOID WARRANTY.
MULTI-PURPOSE LIFT
1,500 LB. CAPACITY
Item Number W41035

5
TOOL FEATURES
SPECIFICATIONS:
Specifications are subject to change without notice.
6. Leveling Bolts
7. 360° Casters
8. Steel Wheels
9. Ram Support
10. Safety Latch
Hydraulic Ram.......................................................................... W41035-1
Pivot Pin ................................................................................... W41035-2
Pump Pedal.............................................................................. W41035-3
Locking Pin............................................................................... W41035-4
Handle ...................................................................................... W41035-5
Steel Casters............................................................................ W41035-6
Steel Wheel .............................................................................. W41035-7
Load Surface Pad..................................................................... W41035-8
REPLACEMENT PARTS AVAILABLE:
Lift Range ................................................................. 4-3/4 in. to 16-1/2 in.
Maximum Load.......................................................................... 1,250 lbs.
Clearance ..................................................................................... 4-3/4 in.
Dimensions (without handle) ..................... 36 in. X 15-1/2 in. X 15-1/2 in.
Load Surface ...........................................................13-1/4 in. X 14-1/2 in.
7
4
3
1
2
6
8
10
9
1. Load Surface Pad
2. Safety Bar
3. Hydraulic Ram
4. Detachable Handle
5. Foot Pump

3
This instruction manual is intended for your benefit. Please read and follow the safety, installation, maintenance and troubleshooting
steps described within to ensure your safety and satisfaction. The contents of this instruction manual are based upon the latest
product information available at the time of publication. The manufacturer reserves the right to make product changes at any time
without notice.
SAFETY GUIDELINES / DEFINITIONS
UNPACKING AND INSPECTION
WARNING: Read and understand this entire instruction manual before attempting to assemble, install, operate or maintain
this product. Failure to comply with the instructions may result in serious personal injury and/or property damage!
The following signal words are used to emphasize safety warnings that must be followed when using this product:
DANGER:
Indicates an imminently hazardous situation
that, if not avoided, WILL result in death or serious injury.
WARNING:
Indicates a potentially hazardous situation that,
if not avoided, COULD result in death or serious injury.
CAUTION:
Indicates a potentially hazardous situation that,
if not avoided, MAY result in minor or moderate injury.
NOTE: Indicates important information, which if not
followed, MAY cause damage to equipment.
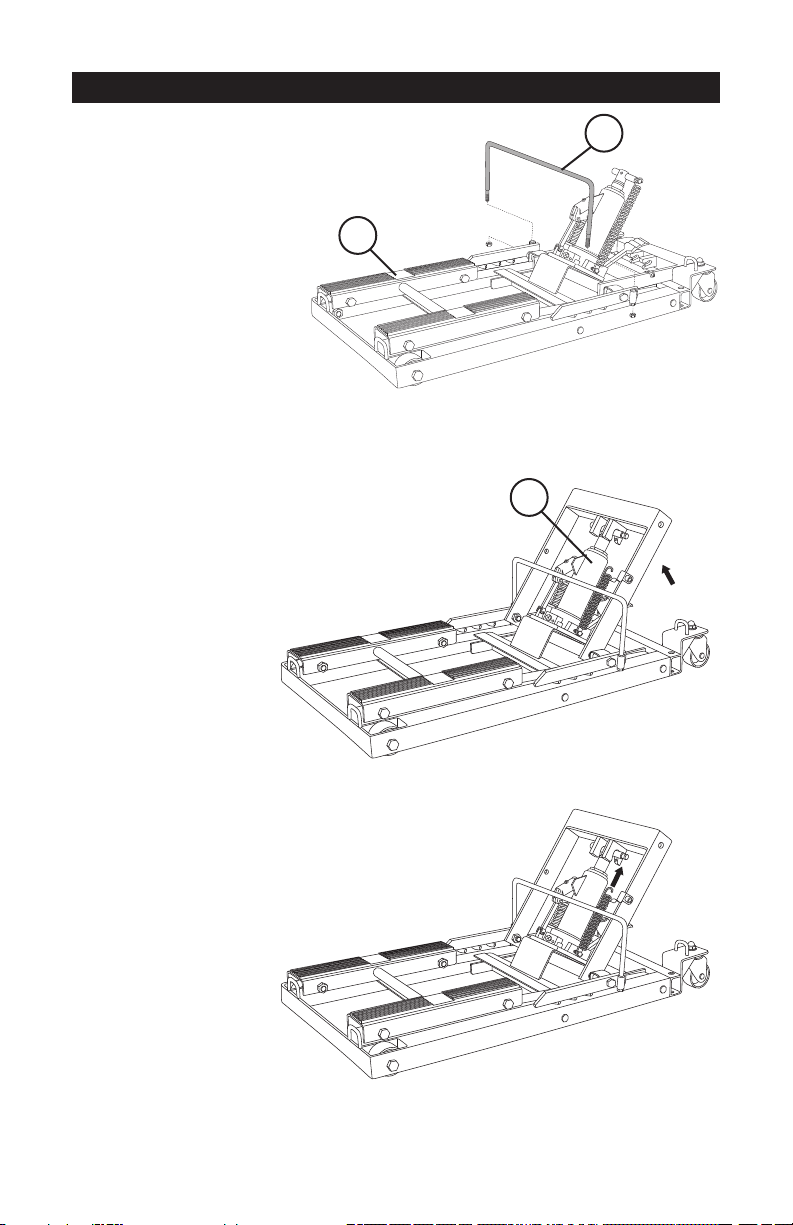
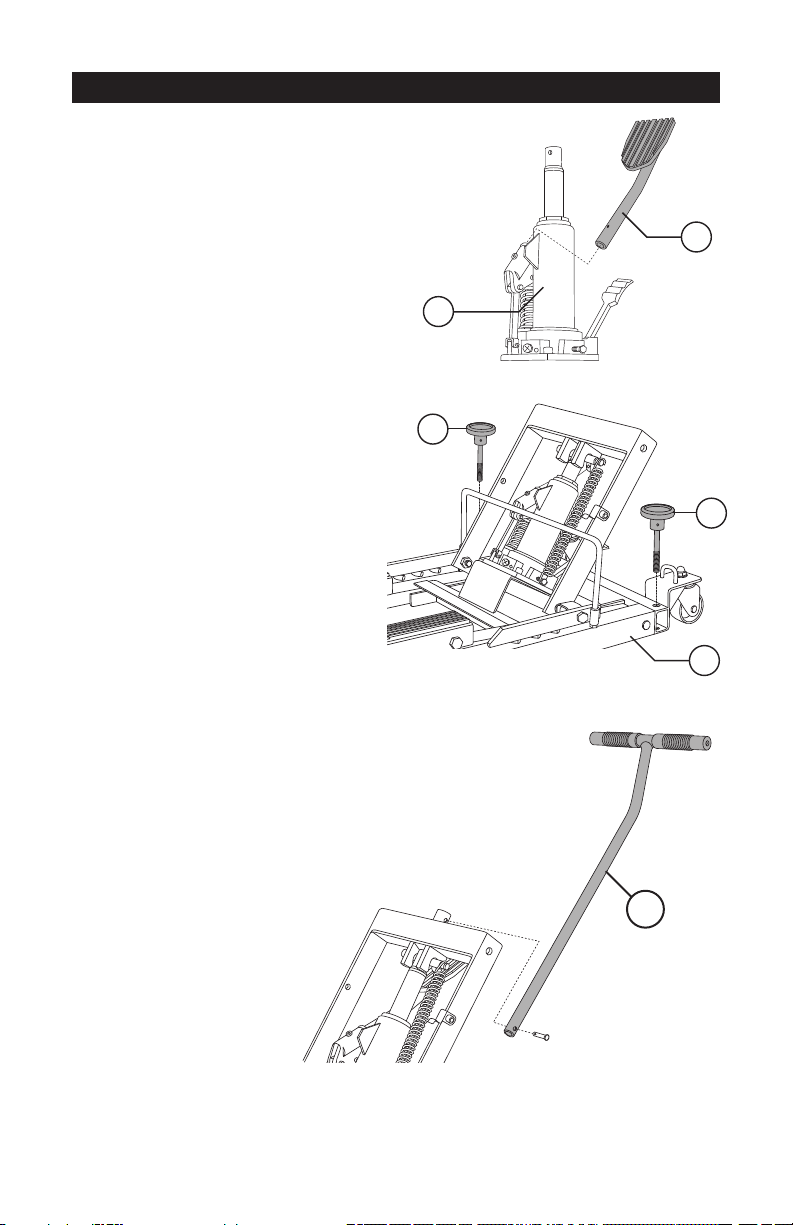
After opening the carton, unpack your new product and related parts and accessories. Please
inspect it carefully for any damage that may have occurred during transit. Please check it against
the package contents on page 4. If any parts are missing, please call customer service at 1-800-
426-1262 between 6 a.m. and 5 p.m. Pacific time.
WARNING: DO NOT operate this product if damaged during shipment, handling or misuse.
Do not operate the product until the parts have been replaced or the fault rectified. Failure to do
so may result in serious personal injury or property damage. All damaged parts must be repaired
or replaced as needed prior to operating this product. Check to see that all nuts, bolts and fittings
are secure before putting this product into service.
If you have any questions, or require assistance with damaged or missing parts, please contact
our customer service department at 1-800-426-1262. Please have the serial number, model
number, and date of purchase available for reference when calling.
PRODUCT WARNINGS
• Failure to heed these warnings may result in loss of load, damage to lift, and/or lift failure
resulting in personal injury or property damage.
• This is a lifting device only. Load must be supported immediately by Safety Bar and other
appropriate device.
•
Do not overload lift beyond rated capacity. Overloading can cause damage to or failure of the lift.
•
Refer to LIFTING PROCEDURES IN THE owners manual FOR THE ITEM YOU ARE
LIFTING. Lift only on areas as specified by the manufacturer.
• This lift is designed for use only on hard level surfaces capable of sustaining the load. Use of
lift on other than hard level surfaces can result in lift instability and possible loss of load.
WARNING: NEVER ATTEMPT TO RAISE THE LIFT WHILE THE TIE DOWNS ARE
ATTACHED TO THE LOAD.
• Leveling bolts are intended to fix the unit to the ground and avoid movement while lifting a
load. DO NOT use them as stabilizers.
• USE included straps to secure the load to the lift.
• ENSURE the safety levers are engaged when load is raised to prevent accidental lowering.
• DO NOT make any alterations to this product.
• LOWER LIFT as much as possible before moving lift while supporting a load.
• KEEP FINGERS, HANDS AND FEET AWAY from the lift arms and other moving parts.
• NEVER lift the load without first assuring that it is properly balanced and secure on the lift.

4
1. Remove hex screws from Frame Base (1) and use them
to attach Hydraulic Ram (3). Ensure that the release lever
on the ram is positioned facing away from the loading surface.
Tighten hex screws with a 6 mm hex key.
1. Wrench: 13 mm
2. Hex key: 6 mm
3. Phillips screwdriver
TOOLS REQUIRED
ASSEMBLY INSTRUCTIONS
PACKAGE CONTENTS
PARTS LIST
No. Description Qty.
1 Base.................................... 1
2 Ram Support....................... 1
3 Hydraulic Ram .................... 1
4 Safety Bar ........................... 1
No. Description .................... Qty.
5 Leveling Bolts .................... 2
6 Pump Pedal ....................... 1
7 Handle................................ 1
8 Universal Tie Downs .......... 4
4
13
6
5
78
1
3
2

5
2. Remove nuts from Safety Bar (4) and insert safety bar
into to the safety latch on the Frame Base (1).
Secure with nuts and tighten with 13 mm wrench.
3. Remove spring, lock and cotter pin from top of Hydraulic Ram (3).
Lift up the Ram Support (2) and connect to the Hydraulic
Ram (3) using lock and cotter pin. Make sure the
hydraulic ram is in the lowest position by
pushing on the release lever while pushing
down on the hydraulic ram lifting arm.
Fasten with lock and cotter pin.
4. Reattach the return spring to the lock pin
and the base of the Hydraulic Ram (3).
ASSEMBLY INSTRUCTIONS CONT.
1
4
2

6
5. Remove Phillips screw from Pump Pedal (6) and
insert tube end of foot pedal into pump assembly
on Hydraulic Ram (3). Fasten securely with
Phillips screw.
6. Insert adjustable Leveling Bolts (5) into
provided holes on Frame Base (1).
9. To attach Handle (7), remove locking pin with ring from Ram
Support (2) and insert handle into hole. Align the holes on the
handle with the holes on the ram support
and fasten with locking pin.
ASSEMBLY INSTRUCTIONS CONT.
7
6
3
5
5
1

7
• Be aware of what you are doing and use common sense while using the multi-purpose lift.
Do not use this lift when you are tired or under the influence of drugs, alcohol or medication.
A moment of distraction can cause serious personal injury.
• Do not rush. Maintain proper footing and balance at all times. This allows better control in
unexpected situations.
•
Dress appropriately. Do not wear loose clothing or jewelry. Keep hair, clothing and gloves away
from moving parts. Loose clothing, jewelry or long hair can get caught in moving parts.
WARNING. READ, UNDERSTAND AND FOLLOW ALL INSTRUCTIONS AND WARNINGS
BEFORE OPERATING THIS PRODUCT. FAILURE TO DO SO MAY
RESULT IN FIRE, ELECTRICAL
SHOCK, PERSONAL INJURY AND/OR PROPERTY DAMAGE AND WILL VOID WARRANTY.
OPERATION INSTRUCTIONS
1. To lower the Multi-Purpose Lift, gently
depress the valve release lever located on
the bottom left side of the hydraulic ram.
If the jack is lifted high enough that the safety bar
is engaged, the jack must be raised higher to
allow the safety lever to disengage in order
to lower the jack
2. Position the jack under the load to be lifted
while in the fully down position.
3. Turn leveling bolts clockwise until the
wheels nearest the leveling bolts are
slightly off the ground.
4. To raise the lift, repeatedly depress on the pump pedal until the load
has reached desired height. To avoid accidental lowering, ensure that
the safety levers engage into the slots built into the frame base. Gently
depress the lowering lever to allow the safety levers to lock into place.
5. Use the universal tie downs (8) included with your multi-purpose lift to
secure the load. Anchors are located at each corner of the lift. Place
vinyl covered hooks on anchors and solid non-moving part on top of
load. Thread web through cam buckle and pull tight. Hooks and
buckles must be in line with direction of pull. Loop straps are also
provided to prevent scratching of the lifted item. Secure loop
straps to load and connect to tie down before pulling tie down tight.

1. Attach the long strap hook to one of the anchors on the base of the lift.
2. Attach the ratcheting unit hook to a solid, non-moving part on the top of the load. You may use
one of the red strap loops provided to pass around your motorcycle or jet ski handle bar to
prevent paint scratches. Then hook the ratcheting unit to it.
3. Feed the free end of the long strap through the ratchet reel and pull it by hand until it tightens.
4. Tighten the strap by ratcheting the handle back and forth until load is well secured. There must
be a minimum of two full turns of strap around the reel.
5. To lock the ratchet, make sure to pull the handle until it points upwards.
6. To release, pull back the release bar on the ratcheting unit and fully open handle to a 180°
angle (pointing downwards).
7. Repeat this step on all four ends of the lift.
• For best results, use only hydraulic fluid with a rating of SAE 10 for refills. Check fluid level
with jack in fully down position. Fluid level should be up to bottom of oil fill plug. (See
instructions on ram)
• Regularly check for loose, worn or damaged parts and repair or replace as necessary.
• Replace worn or damaged parts with Performance Tool®replacement parts.
• Be sure that only qualified personnel perform repairs.
• Keep lift dry and clean, lubricate moving parts periodically.
• Check nuts and bolts to be sure they are snug, but not binding the moving parts.
SECURING THE LOAD
CARE AND MAINTENANCE
TROUBLE SHOOTING
• Your Performance Tool®Multi-Purpose Lift was constructed with quality materials and
workmanship and will give you many years of trouble free use when cared for. However, as
with any mechanical device, periodic adjustments are necessary to maintain a peak level of
performance. Should your lift display any of the following symptoms, the simple procedures
shown below will correct the problem.
WARNING: Remove jack from lift before making adjustments.
WILL NOT LIFT LOAD X X X
WILL NOT HOLD LOAD X
WILL NOT LIFT TO FULL HEIGHT
X X
PUMP FEELS “SPONGY”
X X
Power unit may be low on fluid.
With jack on level surface and in down position,
remove filler plug and add clean hydraulic jack fluid
to level of filler hole.
Power unit may be airbound. Depress release valve. Pump the handle
a minimum of 20 full strokes to purge the air from the system.
Valves may not be closing completely. To seat valves:
a) Close release valve.
b) With jack in fully lowered position, manually raise ram/extension as high as possible.
c) Open release valve and allow jack to descend to lowered position.

9

10
1 YEAR WARRANTY
PERFORMANCE TOOL®extends only the following warranties, and only to original retail purchasers. These
warranties give specific legal rights. Except where prohibited by local law, the law of the State of Washington
governs all warranties and all exclusions and limitations of warranties and remedies. There may be other rights
which vary from state to state.
PERFORMANCE TOOL®warrants the product to be free from defects in materials and workmanship under normal
use and service. A defective product may be returned for a free replacement within 90 days from the date of
purchase, provided that product is returned to place of purchase immediately after discovery of defect. After 90
days and up to one year from date of purchase, PERFORMANCE TOOL®will replace at no charge any parts which
our examination shall disclose to be defective and under warranty. These warranties shall be valid only when a
sales receipt showing the date of purchase accompanies the defective product or defective part (s) being returned.
For part (s) after 90 days, please remit your request, postage prepaid to:
PERFORMANCE TOOL, P.O. Box 88259 Tukwila, WA 98138
These warranties exclude blades, bits, punches, dies, bulbs, fuses, hoses, and other consumables which must be
replaced under normal use and service. These warranties shall not apply to any product or part which is used for a
purpose for which it is not designed, or which has been repaired or altered in any way so as to affect adversely its
performance or reliability, nor shall these warranties apply to any product or part which has been subject to
misuse, neglect, accident or wear and tear incident to normal use and service.
PERFORMANCE TOOL®does not authorize any other person to make any warranty or to assume any liability in
connection with its products.
Except for warranties of title and the limited express warranties set forth above, PERFORMANCE TOOL®makes no
express or implied warranties of any kind with respect to its products. In particular, PERFORMANCE TOOL®makes
no implied warranty of merchantability and no implied warranty of fitness for any particular purpose, except that for
goods purchased primarily for personal, family or household use and not for commercial or business use,
PERFORMANCE TOOL®makes an implied warranty of merchantability (and, if otherwise applicable, an implied
warranty of fitness for a particular purpose), but only for the particular qualities or characteristics, and for the
duration, expressly warranted above.
The laws on limitation of implied warranties may differ from state to state, so the above limitations may not apply in
all cases.
PERFORMANCE TOOL®shall not be liable for consequential, incidental or special damages resulting from or in any
manner related to any product, or to the design, use, or any inability to use the product. The sole and exclusive
remedy for a defective product or part shall be the repair, or replacement thereof as provided above. The laws on
limitation of remedies or on consequential, incidental or special damages may vary from state to state, so the above
limitations may not apply in all cases.
© Copyright 2021 WILMAR CORPORATION, P.O. Box 88259 Tukwila, WA 98138
Table of contents
Popular Lifting System manuals by other brands

Plymovent
Plymovent BALANCER-200 Series Installation and user manual

Guldmann
Guldmann GH3 Twin quick guide

Challenger Lifts
Challenger Lifts CL10 Installation, operation & maintenance manual

Savaria
Savaria V1504 owner's manual

MMP
MMP LIFTEM MARK IV Operation manual

Terex
Terex Genie Z-60/37DC Operator's manual

WERTHER INTERNATIONAL
WERTHER INTERNATIONAL STRATOS SRM Original instructions

Meyer
Meyer ELECTRO LIFT E-46 manual

Ravaglioli
Ravaglioli RAV4503 OFU Translation of the original instructions

Genie
Genie GS-3384 Service and repair manual

Milwaukee
Milwaukee 9682-20 Operator's manual

Aqua Creek
Aqua Creek Ambassador F-PPXRD-NA-02 user manual