PTZOptics PT-SUPERJOY-G1 User manual
PT-SUPERJOY-G1-User-Manual
PT-SUPERJOY-G1-User-Manual
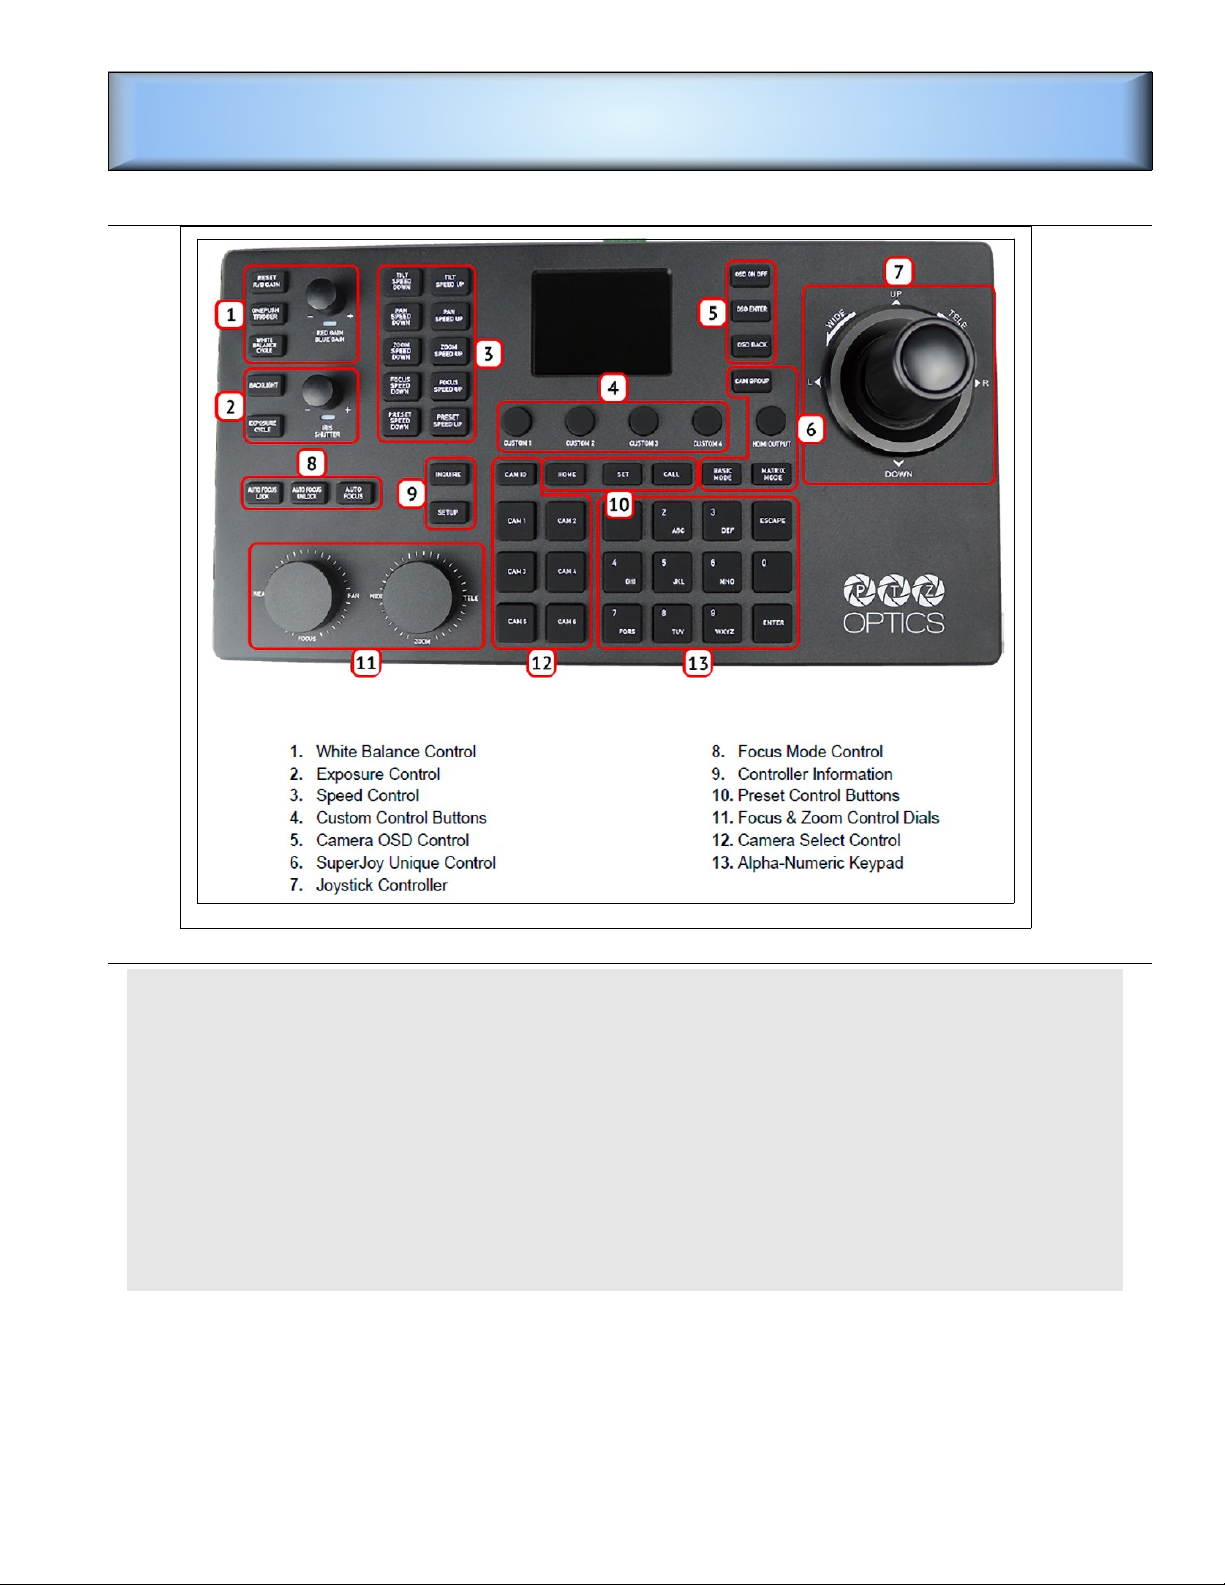
➢ To select a camera: press camera button (12). Current selected camera number will
appear in the OSD (see Figure ) and on the V800 Channel 5..
➢ Use the Joy Stick (7) to pan; left, right, up, down.
➢ Turn the Joy Stick knob (7) to zoom in and out.
➢ Use the Wide-Tele knob (11) to zoom in and out.
➢ You can pan with the Joy Stick and at the same time zoom with the Wide-Tele knob.
➢ To select a preset, press number button 1 through 0 (11).
➢ To change or set a preset, first adjust the camera to the desired position. Then press and
hold the desired preset button until the preset note in the on screen display window
disappears. Observe that presets 1 through 8 are reserved for most applications (see
Figure2). Please use presets 9 and 0 for temporary presets.
Observe that the Custom buttons can be set to automatically adjust all four cameras with one button press.
The Camera Presets sheet shows typical startup settings for each Control button.
Press the HDMI Output button to show the selected camera on the V800 CH5.
Page 1
Figure 1: PTZ Optics SUPERJOY G 1 Camera Controller.

PT SUPERJOY G1 Instructions
NOTE: The OSD shows the IP address of the controller. As of 2-2 -202 , the IP address was set to
192.168.1.12 as a static address.
Camera IP
Camera IP
Addresses
Addresses
The camera IP addresses are
shown in a web browser set
to 19 -168.1.1 ;
user name admin;
no password.
Camera IP Addresses are as follows:
Camera IP address
1 192.168.1.102
2 192.168.1.91
192.168.1.9
4 192.168.1.100
Page 2
Figure 3: On Screen Display.
Figure 2: Camera Presets.
Figure 4: Camera IP addresses.
Figure 5: Logging to the controller.

Camera IP Addresses
Custom Control Buttons
Custom Control Buttons
The PT-Superjoy controller has 4 cus-
tom control buttons (4 in Figure 1).
These custom buttons recall Super
Presets. When a custom button is
pressed, all cameras will move to the
Super Preset locations. This provide a
one button jump to typical program
starting locations.
Figure 6 shows possible custom cam-
era presets. These custom settings can
be changed, but Figure 6 shows typical
assignments.
When a Custom button is pressed on
the PT-Superjoy, all 4 cameras will
shift to the designated preset settings.
For example, Custom 4 will set all
cameras to preset 8, which is the typi-
cal setup for exercise class broadcasts.
Page 3
Figure 6: Custom group presets.

PT SUPERJOY G1 Instructions
The following comes from the official User Manual
Operating the Camera
To begin remotely operating a camera, you will first need to use the Camera Select buttons to begin using
the
controller. Once selected, you will have full remote operation of the camera from the controller.
Pan, Tilt, and Zoom Operation
The controller supports variable speed pan / tilt / zoom control, which allows you to set the control speeds
prior
to use.
You can ad ust the control speed using the Speed Buttons located on the left of the LCD screen. Once the
control speeds are set to a comfortable value, you can use the oystick controller to move the camera.
In addition to the oystick itself, you can use the Fine Tune Zoom Dial to zoom in and out at the slowest
possible speed.
Setting and Recalling Presets
Using the Quick Presets you can set and call presets 0 - 9 using the Alpha-Numeric keypad by following
the
steps below.
Quick Presets:
1. Move the camera to the location you wish to set the preset.
2. Press and hold one of the Alpha-Numeric buttons for 3+ seconds to set the corresponding preset.
The controller OSD will notify you upon successfully storing a quick preset.
3. To call a Quick Preset, tap one of the Alpha-Numeric buttons.
Alternatively, you can use the Set and Call buttons to set or call presets 0 - 255.
Set and Call:
1. Move the camera to the location you wish to set the preset.
2. Press the [SET] button.
3. Using the Alpha-Numeric keypad, type in a preset number to associate with the preset. Press [ENTER]
to save the preset.
4. To call a preset, press the [CALL] button, and type in a preset number. Press the [ENTER] key to call
the preset.
When using a PTZOptics camera, you can call a preset at a specific focus value by setting the preset
while in manual focus mode.
Home Button
● Use the Home Button to send the camera to the Home position (facing forward).
17
Rev 1.3 3/21
Adjusting the Camera’s Image
There are many options for ad usting the camera’s image which we will detail below
You can ad ust White Balance & Exposure settings, Red & Blue Gain, Iris, Shutter, Focus, & Backlight
Compensation to achieve the desired image style and quality.
● White Balance Control: Use the [WHITE BALANCE MODE] button to cycle through the camera’s
White Balance modes. Options include: Indoor White Balance, Outdoor White Balance, One Push
White Balance, Manual White Balance, & Auto White Balance respectively.
You can use the [R GAIN / B GAIN] Knob to ad ust the Red & Blue Gain values.
Press the knob to toggle between Red Gain and Blue Gain. For ad ustment when in supporting White
Balance Modes.
The camera will automatically change to Manual White Balance upon twisting the R Gain / B Gain
Page 4

Camera IP Addresses
Knob.
When the camera is in One Push White Balance, you can press the ONEPUSH TRIGGER] button from
the White Balance Control section of the controller to calibrate the white balance.
● Exposure Control: Use the [EXPOSURE MODE] button to cycle through the camera’s Exposure
modes. Options include: Manual Exposure, Shutter Priority, Iris Priority, Brightness Priority, & Auto
Exposure respectively.
You can use the [IRIS / SHUTTER] Knob to ad ust the Iris and Shutter values.
Press in the knob to toggle between Iris and Shutter. For ad ustment when in supporting Exposure
Modes.
The camera will automatically change to Manual Exposure upon twisting the Iris / Shutter Knob.
● Focus Control: Twist the [FOCUS] Dial towards Near or Far to focus the camera on a sub ect.
You can press the [AUTO FOCUS] Button to enable AutoFocus mode.
PTZOptics cameras will return to Auto Focus mode upon zooming in or out. You can lock the camera’s
focus from returning to Auto Focus mode by pressing the AUTO FOCUS LOCK] button. While the
focus is locked, you have full manual focus control from the FOCUS] Dial. Press the AUTO FOCUS
UNLOCK] button to return to normal focus control.
● Backlight Compensation: Press the [BACKLIGHT] button to enable or disable Backlight
Compensation.
18
Rev 1.3 3/21
Camera OSD Menu Control
To access the camera’s On Screen Display, OSD, menu and fine tune the camera, follow the steps
provided
below.
1. Press the [OSD ON / OFF] button.
2. Move the oystick up or down to traverse the camera's OSD menu.
3. Press the [OSD ENTER] button to select a specific option.
4. Move the oystick left and right to ad ust the settings.
5. Press the [OSD BACK] button to return to the previous window.
6. Press the [OSD ON / OFF] button again to close the camera's OSD menu.
PTZOptics cameras will automatically close their OSD Menu after 2 minutes 30 seconds of inactivity by
default.
Basic Mode
Basic Mode allows you to disable most of the capabilities of the SuperJoy and limit the control to the
oystick
and/or calling presets.
1. Press the [BASIC MODE] button to enable Basic Mode with Joystick.
2. Press the [BASIC MODE] button again to enable Basic Mode without Joystick.
3. Press the [BASIC MODE] button again to disable Basic Mode.
Matrix Mode
Matrix Mode allows you to disable most of the capabilities of the SuperJoy and limit the controls to calling
presets 1 - 3 of cameras 1 - 3.
1. Press 1 - 3 on the alpha-numeric keypad to call camera 1 presets 1 - 3 respectively.
2. Press 4 - 6 on the alpha-numeric keypad to call camera 2 presets 1 - 3 respectively.
3. Press 7 - 9 on the alpha-numeric keypad to call camera 3 presets 1 - 3 respectively.
Page 5

PT SUPERJOY G1 Instructions
Joystick Web Interface
Device Management
The Device Management page, available from the controllers web interface, allows you to define new
cameras
and ad ust already configured cameras.
Group 1 4: Camera groups 1 - 4. Each group includes 7 channels / cameras.
Channel: Joystick control address.
Options include: 1 - 7 (IP & Analog)
IP: The IP address of the saved network camera.
Port: The control port of the saved network camera.
Type (Network): The control protocol of the saved network camera.
Baudrate: The baud rate of the saved analog camera.
Address: The camera control address of the saved analog camera.
Type (Analog): The control protocol of the saved analog camera.
Operate: Click “modify” to edit the settings of the saved camera. Use “snap” to take a snapshot of the
camera’s current view. “Home” will allow you to send the camera to the home position.
For more information on editing already configured cameras from the Device Management interface,
check out the Adding a Camera > From the Web Interface section.
Control
The Control page, available from the controllers web interface, allows you to call presets of the connected
cameras. This page acts similarly to Basic Mode without Joystick .
Matrix Mode
The Matrix Mode page, available from the controllers web interface, allows you to call presets 1-3 of
cameras
1-3. This page acts similarly to Matrix Mode .
20
Rev 1.3 3/21
Settings
The Settings interface allows you to ad ust the configuration settings of the oystick.
Network: Allows configuration of the oystick’s network configuration (DHCP / Static IP).
Options include: DHCP or Static IP Address, Subnet Mask, Gateway, DNS1, & DNS2.
Upgrade: Upgrade the oystick’s firmware to the latest version.
Factory Restore: Restores the oystick to factory default settings.
Restart: Restart the oystick.
Import: Import oystick settings from PC.
Export: Export oystick settings to PC.
User: Add or edit admin and guest login credentials.
System Settings: Invert Pan and/or Tilt
Version: Displays the Hardware, Software, and Web firmware versions on the
This version was edited February 23, 2023
Page 6
Table of contents
Other PTZOptics Controllers manuals


Popular Controllers manuals by other brands


Berker
Berker 7534 10 12 manual

Auber Instruments
Auber Instruments AW-SYL-2352 instruction manual

Philips
Philips Dynalite Revolution Series installation instructions

WURM
WURM CRC-XP quick start guide

VS LIGHTING SOLUTIONS
VS LIGHTING SOLUTIONS Blu2Light MultiSensor XXL quick start guide

Carel
Carel pCO5+ user manual


