Puffco Peak Pro User manual


What’s inside / p 3
What’s new / p 4
Quick start / p 4 - 6
Temperature settings / p 7
Cleaning your device / p 8 - 9
Advanced features / p 10
App integration / p 11
THE PUFFCO PEAK PRO
This guide will show you how to use your
Peak Pro including preparation, cleaning,
and app connectivity.
READ CAREFULLY!
Please read the entire instruction
booklet before using your device to
ensure you’re getting the most out
of your Peak Pro. You will avoid
damaging your device, or interrupting
your experience if you do it now
vs. later.
See Puffco.com/Support for
instructional videos and helpful tips.

A
B
C
D
F
G
I
E
H
A: Loading tool
B: Dual Tools (5)
C: AC Adapter**
D: USB-C Cable
E: Jacket & Tether
WHAT’S INSIDE:
F: Oculus Carb Cap*
G: Chamber
H: Glass*
I: Peak Pro Base
Carrying Case (not shown)
*Each glass piece is hand blown and may vary slightly in size.
**AC Adapter May Not be Supplied.
33

Fill glass with water
just above the air-
holes. Do not fill
glass while attached
to base. X- Do not
allow water into
lower section!
Fully charge the
device before first
use. The light color
will indicate battery
level. Red (Low) -
Orange (Half) - Green
(Full). Triple-click to
check battery level.
1 2
X
WHAT’S NEW:
QUICK START:
Bluetooth App
Enabled
Wireless Charging
(Power Dock sold separately)
USB-C
Charging
Real-Time
Temperature Control
Large Capacity
Chamber
Customizable
LED lights
4
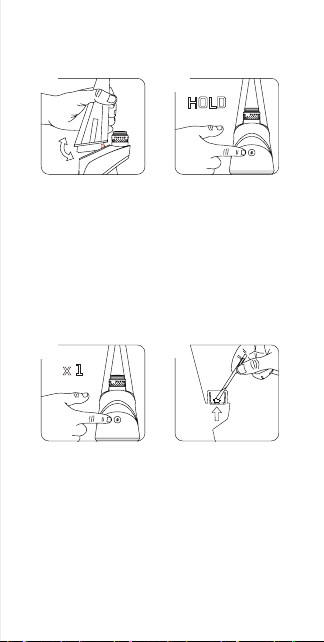
To unlock / lock the
device, hold down
the button for 3
seconds.
Use loading tool or
a Puffco Dual Tool
to place contents on
the bottom surface
of the bowl (not the
sides).
Align inlet hole on
the front of the
glass with chamber.
Carefully push the
front of glass into
the base, then push
the back down.
Single click to toggle
through heat settings.
Blue (Low) -
Green (Medium)
RED (High) -
White (Peak)
3
5
4
6
5

6
Double click to
initiate heat-up.
Press and hold
button anytime to
exit. Pulsing light
indicates heat-up
mode is active.
Use a cotton swab or
Dual Tool to clean
the chamber after
each use.
Wipe gently in a
circular motion.
Place carb cap on
top of chamber.
Press down until
snug. Use the
included chamber
jacket & tether to
keep it safe during
use.
Device will vibrate
and lights will flash
3 times when ready.
Inhaling gently will
produce the best
results. *See p. 10
for boost mode.
7
9
8
10
Attach tether here

7
09
TEMPERATURE SETTINGS:
These are the default color and
temperature settings. They are further
customizable through the app.
COLOR
HOW TO CHOOSE A SETTING
1. Ensure device is on.
2. Click once to cycle through each heat level.
3. Double click to initiate heat-up
Each heat setting has an intended purpose and
results depending on the experience you’re
looking for. There is no wrong answer when
selecting a setting, experiment to find what
works best for you and your consumption needs.
Best with delicate concentrates. Optimal
flavor and lowest vapor production.
LOW (HIGH FLAVOR) - 490 °F
MED (BALANCED) - 510 °F
Balanced flavor and vapor production, best of
both worlds.
HIGH (STRONG) - 530 °F
Higher vapor production while maintaining
flavor quality.
PEAK (ADVANCED) - 545 °F
Delivering the most vapor and strength with
less flavor.

CLEANING: CHAMBER
1. Remove the cap and
unscrew the chamber from
the base.
2. Light Cleaning:
Use a cotton swab to gently
remove any residue with
90%+ isopropyl alcohol.
3. Deep Cleaning:
Submerge the chamber in
90%+ isopropyl alcohol for
20 minutes. Never use water
(isopropyl alcohol only).
CLEANING: BASE
Preparation: Remove glass and chamber.
Gently clean the gold contact
points using cotton swabs
soaked in isopropyl alcohol.
Clean the airpath between
the chamber and the glass.
Do not allow water into
the base at any time.
Do not handle if hot.
Isopropyl alcohol is highly flammable. Let it dry
completely before heating device.
8

GENERAL WARNINGS:
- Do not overfill the chamber.
- Do not blow or exhale hard into the glass.
This will force water into the base.
- Do not store device with water in the glass,
unless you have the Puffco Travel Glass.
- Strong inhales may cause spillage and
damage to your chamber.
- Do not charge or operate below 32°F or
above 100° F.
-Use only with the provided cable and power
adapter.
- Keep away from moisture and high humidity.
- Store in a cool dark place when not in use.
- During use the chamber is hot (burn hazard).
CLEANING: GLASS
Preparation: Carefully remove glass from base.
1. Once removed,
submerge in isopropyl
alcohol.
2. After soaking, remove
from isopropyl alcohol and
rinse clean with water.
(Make sure it’s rinsed
thoroughly prior to use.)
Allow glass to thoroughly dry
before re-attaching to base.
X- Do not re-insert glass
onto base with water in the
bottom chamber.
X
9

BOOST MODE:
After heatup, double click to activate boost
mode. This extends the time and/or increases
the temperature of your hit. You can
continue to boost as needed. By utilizing the
app, you can customize the desired time and
temperature of your boost.
READY MODE (APP):
*The Peak Pro Power Dock and mobile app
are required to activate ready mode.
Once the Peak Pro is paired with a mobile
device, enable “Ready Mode” found in the
Peak Pro app settings.
Your device will now automatically initiate
the selected heat profile when lifted from
Peak Pro Power Dock.
STEALTH MODE:
Rapidly click 4 times to turn Stealth Mode
on/off. This turns off the lights on your
device for discretion.
ERROR CODES:
1: No chamber (3 white flashes)
2: Chamber error (red white red white)
3: Device overheating (red for 5 seconds)
4: Low battery (3 red flashes)
ADVANCED FEATURES:
10

2
1
APP INTEGRATION:
Hold the button for 6 seconds
to sync your Peak Pro with your
app. The device will turn on/off,
keep holding until glows blue.
Go to Puffco.com
to learn more.
The Peak Pro app integration has a wealth of
new features that allow you to customize your
experience, unlock special features,
and more.
11

09
If you’re having anything less than
a perfect experience, reach out to
our support team.
NEED HELP ?
CONTACT US!
*Please donot return your
Peak Pro to the store.
*Keep your proof of purchase.
1. Use the App!
The app gives us important diagnostic
information about your device. Fill out
a warranty claim form there for the
fastest service possible.
2. Visit Puffco.com/Support
For FAQ’s, how-to videos, and other
resources that may solve your
problem quickly.

SHARE THE VIEW:
Use #PuffcoPeak to share your experience.
Kindly follow us on Instagram!
Puffco
13

Contenido / págs 15
Novedades / págs 16
Inicio rápido / págs 16 - 18
Ajustes de temperatura / págs 19
Limpieza del dispositivo / págs 20 - 21
Ajustes avanzados / págs 22
Conexión con la aplicación / págs 23
THE PUFFCO PEAK PRO
Esta guía te enseñará cómo usar tu
Peak Pro, incluyendo la preparación,
limpieza y conexión con la aplicación.
LEER DETENIDAMENTE
Lee todo el manual antes de empezar
a usar tu dispositivo para asegurarte
de que estás aprovechando al máximo
tu Peak Pro. Si lo haces ahora, evitarás
dañar el dispositivo o interrumpir tu
experiencia.
Visita Puffco.com/Support para ver vídeos
tutoriales o leer consejos útiles.
14

A
B
C
D
F
G
I
E
H
A: Herramienta de carga
B: Dual Tools (5)
C: Adaptador AC**
D: Cable USB-C
E: Funda de atomizador
con atadura
CONTENIDO:
F: Oculus Carb Cap*
G: Chamber
H: Vidrio*
I: Base Peak Pro
Bolsa de viaje
(no se muestra)
*Todas las piezas de vidrio están hechas a mano, así que el
**Es posible que no se suministre el adaptador AC.
tamaño puede variar ligeramente.
15

Llena el vidrio con
agua hasta los orificios
internos. No rellenes
el vidrio mientras esté
sujeto a la base.
X- ¡No puede haber
agua en la sección
inferior!
Carga por completo
el dispositivo antes
de usarlo por primera
vez. El color de la luz
indicará el nivel de
carga de la batería.
Rojo (baja) - Naranja
(media) - Verde
(completa). Haz
clic tres veces para
comprobar el nivel de
la batería.
12
X
NOVEDADES:
INICIO RÁPIDO:
Conexión por
Bluetooth con la
aplicación
Carga inalámbrica
(la base de carga se vende por
separado)
Carga USB-C Control de temperatura
en tiempo real
Chamber de
gran capacidad
Luces LED
personalizablest
16

Para bloquear o des-
bloquear el dispositivo,
mantén presionado
el botón durante 3
segundos.
Utiliza una
herramienta de
carga o un Dual
Tool de Puffco
para introducir el
contenido en el
fondo del recipiente
(no en los laterales)
Alinea el orificio
delantero del vidrio
con el chamber. Con
cuidado, empuja la
parte delantera del
vidrio con la base y
empuja hacia abajo.
Presiona el botón
una sola vez para
los ajustes de
temperatura. Azul
(baja) - Verde (media)
- Rojo (alta) - Blanca
(máxima)
3
5
4
6
17

Haz doble clic para
que empiece a
calentar. Presiona y
mantén presionado
el botón en cualquier
momento para salir.
Una luz parpadeante
indicará que el modo
calentamiento está
activo.
Utiliza un bastoncillo
de algodón o un Dual
Tool para limpiar el
chamber después
de cada uso. Limpia
de forma suave
mediante movimientos
circulares.
Coloca el carb cap
en la parte superior
del chamber.
Presiona hacia abajo
hasta que quede
ajustado. Utiliza la
funda de atomizador
y atadura incluidas
para mayor
seguridad mientras
el dispositivo está
en uso.
El dispositivo vibrará y
las luces parpadearán
3 veces cuando
esté listo. Inhalar
suavemente para
obtener los mejores
resultados. *Ver
pág. 10 para obtener
información sobre el
modo boost.
7
9
8
10
Attach tether here
18

v
09
AJUSTES DE TEMPERATURA:
Estos son los colores y los ajustes de
temperatura por defecto. Se pueden
personalizar en la aplicación.
COLOR
CÓMO ELEGIR UN AJUSTE
1. Asegúrate de que el dispositivo está encendido.
2. Haz clic una vez para repasar todos los niveles de
calentamiento.
3. Haz doble clic para que empiece a calentar.
Todos los ajustes de calentamiento tienen un
objetivo concreto y los resultados dependerán
de la experiencia que estés buscando. No hay
equivocación cuando seleccionas un ajuste,
experimenta hasta encontrar el que más te guste y el
que mejor se adapte a tus necesidades de consumo.
El mejor para concentrados delicados. Sabor
optimo y menor producción de vapor.
BAJA (SABOR INTENSO)- 255 °C
MEDIA (EQUILIBRADO)- 265 °C
Balance de sabor y producción de vapor, lo mejor
de los dos mundos
ALTA (FUERTE)- 275 °C
Alta producción de vapor manteniendo la calidad
del sabor.
MÁXIMA (AVANZADO) - 285 °C
Proporciona más cantidad de vapor y potencia
con menos sabor.

LIMPIEZA: CHAMBER
20
1. Retira la tapa y desenrosca el
chamber de la base.
2. Limpieza rápida:
Utiliza un bastoncillo de algodón
y limpia suavemente cualquier
residuo con alcohol isopropílico
+90 %.
3. Limpieza a fondo:
Sumerge la cámara en alcohol
isopropílico +90 % durante
20 minutos. Nunca utilices agua,
solo alcohol isopropílico.
LIMPIEZA: BASE
Preparación: retira el vidrio y el chamber.
Limpia con suavidad los
puntos de contacto dorados
con bastoncillos de algodón
humedecidos en alcohol
isopropílico.
Limpia el flujo de aire entre
la cámara y el vidrio.
No mojes la base en ningún
momento.
No tocar si está caliente.
El alcohol isopropílico es altamente
inflamable. Deja que se seque por
completo antes de calentar el dispositivo.
Other manuals for Peak Pro
4
This manual suits for next models
1
Table of contents
Languages:
Other Puffco Vaporizer manuals


