Pulsar Infinity PS-2SD User manual

Pulsar® Infinity
Installation and Operation Manual
Model #PS-2SD
Revised August 2019

2 Water Treatment – Pulsar® Infinity Operation and Installation Manual
Product Stewardship
MAKING THE WORLD A BETTER PLACE
Innovative Water Care is committed to maintaining and improving our
leadership in the stewardship of our products. One of our initiatives is
to make health, safety, and environmental protection an integral part of
a product’s life cycle – from manufacture, marketing, and distribution
to use, recycling, and disposal.
Everyone involved with the product has responsibilities to address so-
ciety’s interest in a healthy environment and in products that can be
used safely. We are each responsible for providing a safe workplace.
All who use and handle products must follow safe and environmentally
sound practices.
For more information about our Product Stewardship Program, contact
your Innovative Water Care Representative. For product inquiries, con-
Dealer Contact:

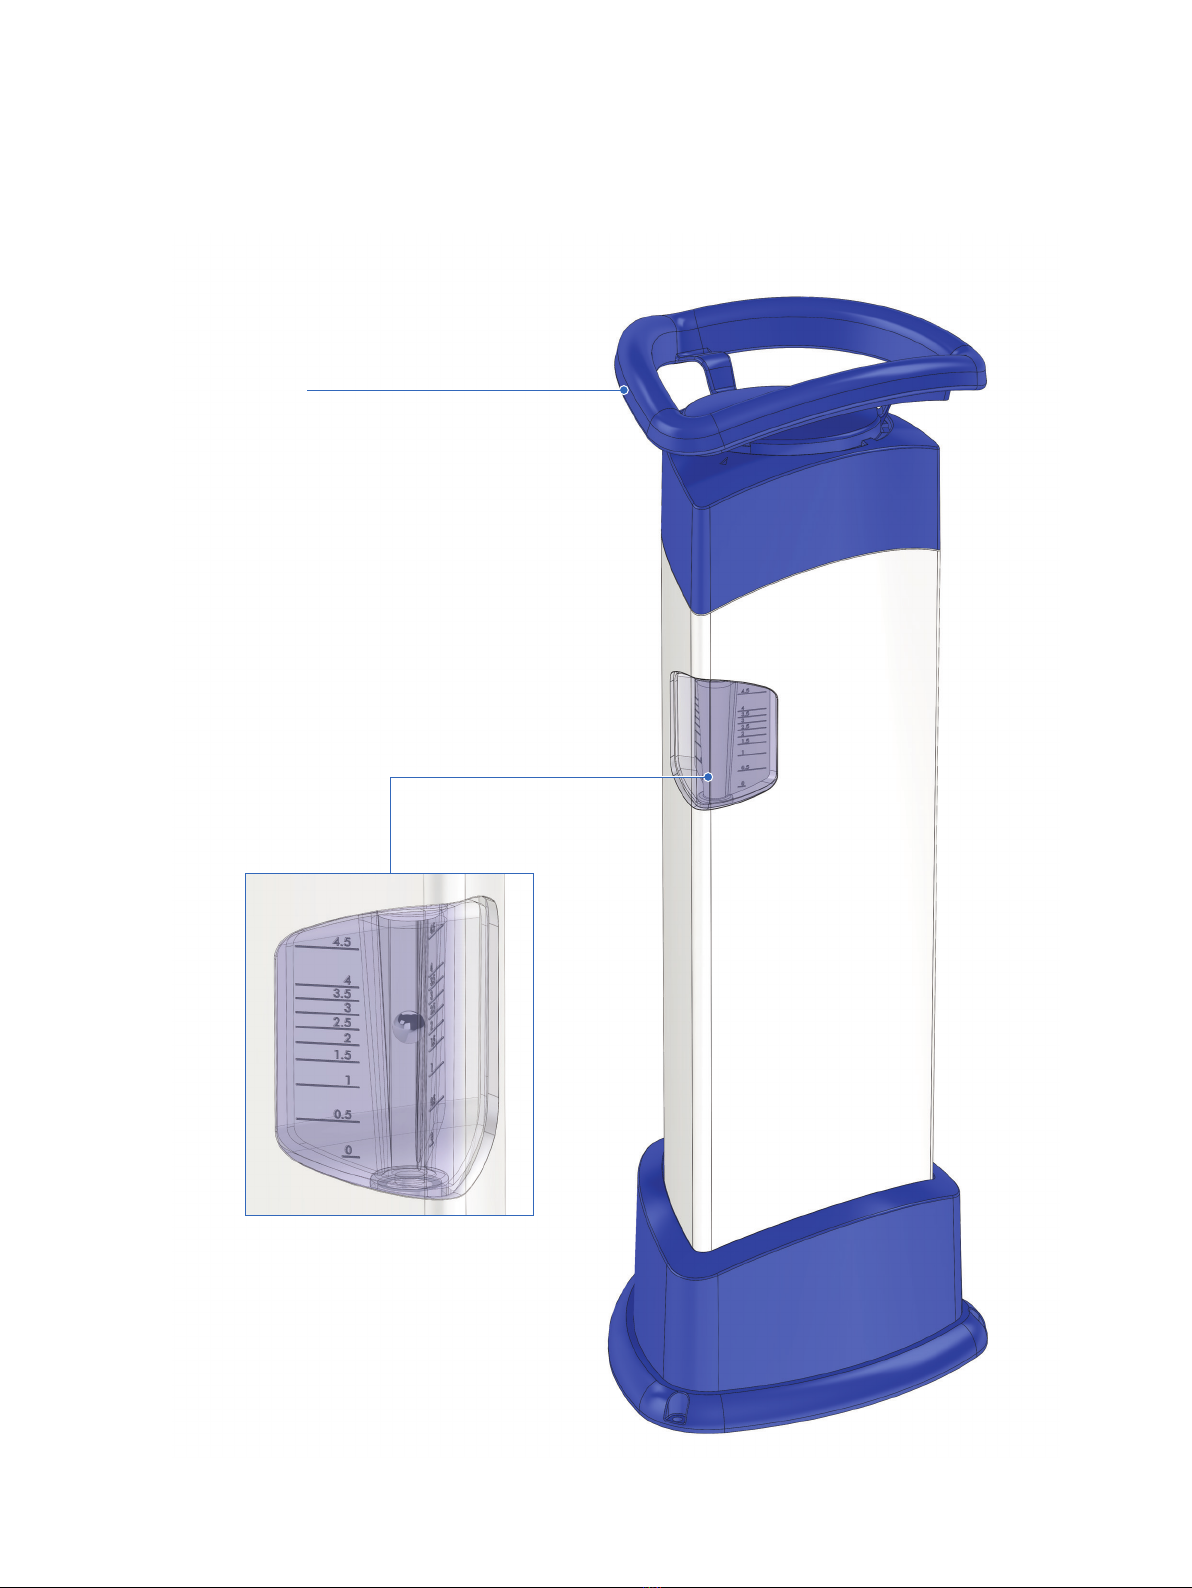
Pulsar® Infinity Operation and Installation Manual – Water Treatment 3
Innovative Water Care
1400 Bluegrass Lakes Parkway
Alpharetta, GA 30004
Registration
Register your Pulsar® Inifnity Feeder (the “Equipment”) within 30
days of your purchase date and your equipment will qualify for a two
(2) year warranty! Register your feeder at www.pulsarinfinity.com.
Please note you will need to provide proof of purchase with purchase
date when registering your feeder.
Limited Extended Warranty
If your Pulsar® Infinity Feeder is registered within 30 days of pur-
chase, your equipment is warranted against defects in material and
workmanship for a period of 24 months after shipment by Innova-
tive Water Care. If you do not register your Pulsar® Infinity Feeder be-
fore the registration deadline, your equipment is warranted against
defects in material and workmanship for a period of 6 months after
purchase. This warranty applies only to the original end-user and
this warranty is not transferrable. The extended warranty does not
include any electrical components. Electrical components’ warranty
is limited to 6 months in all cases.
Pulsar® Infinity Replacement Parts
Innovative Water Care warrants any equipment replacement parts to
be free of defects in material and workmanship for a period of ninety
(90) days from the date of installation. This warranty is restricted to
Pulsar® Infinity Feeder parts purchased on a replacement basis.
Exclusions
This warranty does not cover service, damage or failure due to ac-
cidents; fire, flood or other acts of God; abuse; misuse; abnormal or
improper use; neglect; improper maintenance; alterations or modifi-
cations by anyone other than Innovative Water Care or a Innovative
Water Care authorized dealer representative; repairs by anyone other
than Innovative Water Care or a Innovative Water Care authorized
dealer representative; or ordinary wear and tear. Use of any tablets or
chemicals other than the Pulsar® Infinity Tablets with the equipment
voids any warranty. Innovative Water Care makes no expressed or im-
plied warranties other than those stated above. No Innovative Water
Care representative or authorized dealer representative has authority
to change or modify this warranty in any respect. Innovative Water
Care shall not be responsible or liable for any indirect, special, or con-
sequential damages or any damages with respect to loss of property
or loss of revenues or profit that arise out of or in connection with the
use or performance of the equipment.
Pulsar® Infinity Feeder Warranty Policy

4 Water Treatment – Pulsar® Infinity Operation and Installation Manual
Table of Contents
1 Introduction
1.1 Pulsar® Infinity Tablets 5
1.2 Pulsar® Infinity Feeder 5
2 Overview
2.1 Theory of Operation 5
2.2 Major Components 6 - 8
2.3 Specifications 9
3 Installation
3.1 Pulsar® Infinity System Schematic: Standard Installation 10
3.1.1 Pulsar® Infinity System with ORP chemical
control 11
3.2 Tools & Equipment Required for Feeder Installation 11
3.3 Installation Parts and Assemblies 12
3.4 Installation Procedure 13 - 14
3.4.1 Making the inlet connection from the pool to
the feeder (Pre-Filter) 13
3.4.2 Making the chlorine injection connection from
the feeder to the pool (post-filter and heater) 14
3.4.3 Completing the feeder circulation loop 14
4 Feeder Start Up
4.1 Pre-Startup Procedure 15 - 18
4.1.1 Verify water flow through feeder 15
4.1.2 Adjusting the cartridge feed rate setting 15
4.1.3 Loading the cartridge assembly with
Pulsar® Infinity Tablets 16- 18
4.2 Startup Procedures 18 - 19
4.2.1 Feeder Startup 18
4.2.2 Feed Rate Table 19
4.2.3 Controlling Chlorine Output With an ORP 19
5 Feeder Inspection and Maintenance 22
5.1 Feeder Maintenance 20
5.2 Preventive Maintenance 20
6 Troubleshooting Guide 23
Troubleshooting Guide 21
7 Feeder Views
7.1 Feeder Assembly View (standard installation) 22
7.2 Installation Kit View (Standard Installation) 23 - 24
8 Optional ORP Kit
8.1 Optional ORP Kit 25 - 26
8.1.1 ORP Drain Kit (for use with ORP kit) 26
8.2 Vent Installation for Feeder Draining if used with an ORP kit 26 - 27
9 Appendix
A . Technical Bulletin: Pitot Tubes for 2 ½” and 3” Pool piping 28

1
Pulsar® Infinity Operation and Installation Manual – Water Treatment 5
1 Introduction
2 Overview
1.1 Pulsar® Infinity Tablets
The patent-pending, slow dissolving Pulsar® Infinity Tablets are a 3-in-1 product that chlorinates consistently, increases calcium to protect plaster,
and increases alkalinity to stabilize pH. The benefits of the Pulsar® Infinity Tablets include but is not limited to:
• DOES NOT add cyanuric acid to your pool reducing wasteful drainage
• DOES NOT reduce ORP effectiveness
• Dissolves slowly to give long lasting chlorination
• DOES NOT form nitrogen trichloride (strong chlorine odor) associated with trichlor use
• Highly concentrated to reduce shipping and handling costs
• More concentrated than liquid bleach
• Longer shelf life when compared to liquid bleach
• Adds less total dissolved solids (TDS) than liquid bleach
• Class 2 Oxidizer (less restrictive storage requirements compared to Class 3 Oxidizers)
1.2 Pulsar® Infinity Feeder
The Pulsar® Infinity Feeder is an easy to use, automatic solution that is exclusively designed to feed Pulsar® Infinity Tablets. Other calcium hypo-
chlorite or trichlor tablets will not fit into the feeder nor will they dissolve properly and provide the appropriate feed rate. With the simplicity of an
erosion feeder, the Pulsar® Infinity Feeder’s streamlined design is easy to install, service and requires minimal operator maintenance.
2.1 Theory of Operation
The patent-pending Pulsar® Infinity System is a pressurized feeder system designed for pools and spas ranging from 500 to 60,000 gallons
[
1,892.7
to 227,124.7 liters]
. A pre-filter to post-filter loop will be added to the main pool recirculation system as part of the Pulsar® Infinity Sys-
tem. This recirculation loop will create the pressure differential to provide the proper flow of water through the feeder.
The Pulsar® Infinity System incorporates the principles of High Capacity Erosion (HCE) technology. Water rises in a “column” from a submerged
nozzle below the tablet grid making contact with the Pulsar® Infinity Tablets. The tablets are then submerged in a column of water with the water
flow from the nozzle creating a chlorinated solution that is discharged to the pool return line. The feeder operates in a pressurized condition with a
pressure range between 5 to 20 psig
[0.35 to 1.38 bar]
.
The chlorine output is controlled by the cartridge height setting (distance of the tablet from the nozzle) and the inlet flow rate which has an operat-
ing range of 0.5 to 4.5 gpm [1.9 to 17.03 lpm]. In addition, an ORP controller may be used for more precise control. The inlet flow rate will allow a
minimum available chlorine (AvCl) output of 0.5 lb/day [0.2 kg/day] and will allow a maximum AvCl output of 9 lbs/day [4.1 kg/day] for both pools
and spas.

Pulsar® Infinity Operation and Installation Manual – Water Treatment 6
2.2 Major Components
Pressure Cap creates pressure tight seal
with minimal operator eort
Integrated Flow Meter

Pulsar® Infinity Operation and Installation Manual – Water Treatment 7
2.2 Major Components

Pulsar® Infinity Operation and Installation Manual – Water Treatment 8
2.2 Major Components (continued)
Locking mechanism allows for an
easier controlled reload
Adjustable grid height and
ow rate to control output rate

Pulsar® Infinity Operation and Installation Manual – Water Treatment 9
2.3 Specifications
Operational Characteristics
Operating Pressure range 5 to 20 psig [0.35 to 1.38 bar]
Nominal Pressure 15 psig [1.03 bar]
Operating Temperature range 40º to 130º F [4.4º to 54.4º C]
Flow Rate range 0.5 to 4.5 gpm [1.9 to 17.03 lpm]
Dimensions
Tubing 5/8” [15.9 mm] O.D. (LLDPE)
Feeder W12” x D13” x H31”
[304.8 mm x 330.2 mm x 787.4 mm]
Weight
Feeder Weight full 29.4 lbs [13.3 kg]
Feeder Weight empty 23 lbs [10.4 kg]
Cartridge Capacity
Tablet Quantity 11
Weight 6.4 lbs [2.9 kg]
Feed Rate
Available Chlorine (per day) Pool: 0.5 to 9.0 lbs (0.2 to 4.1 kg)
Spa: 0.5 to 9.0 lbs (0.2 to 4.1 kg)
Available Chlorine (per hour) Max: 0.375 lbs ( 0.17 kg)
Recommended Pool Size (Notes 1 & 2)
Indoor 1,000 to 60,000 gallons
[3,785.4 to 227,124.7 liters]
Outdoor Stabilized 1,000 to 40,000 gallons
[3,785.4 to 151,416.5 liters]
Outdoor Un-Stabilized 1,000 to 25,000 gallons
[3,785.4 to 94,635.30 liters]
Commercial Spa 500 to 5,000 gallons
[1,892.7 to 18,927.1 liters]
NOTE:
1. Applicable pool size is subject to local health codes.
2. Recommended pool size is a guideline based on ideal conditions. Actual pool size will vary due to site specific conditions.

Pulsar® Infinity Operation and Installation Manual – Water Treatment 10
3 Installation
3.1 Pulsar® Infinity System: Standard Installation
Choose a location in the pump room that will allow easy access for replenishing the feeder cartridge with Pulsar® Infinity Tablets. The Pulsar® Infin-
ity Feeder will be positioned in a location such that the pre to post filter recirculation loop is feasible.
NOTE: Refer to Appendix A for Pitot Tubes for 2 ½” and 3” pool piping
NOTE: If greater feed rates are required, contact your dealer for alternative feeder options

Pulsar® Infinity Operation and Installation Manual – Water Treatment 11
3.1.1 Pulsar® Infinity System with ORP Chemical Control
NOTE: If greater feed rates are required, contact your dealer for alternative feeder options
NOTE: Refer to Appendix A for Pitot Tubes for 2 ½” and 3” pool piping
• Drill – Cordless Recommended
• 7/8” [22.2 mm] Drill Bit
• Plumbers Tape or Pipe Sealant
• Tube Cutters or Utility Knife
• Gas Pliers (Channel Locks)
• 7/16” (11 mm) Nut Driver, Socket or Box wrench
3.2 Tools & Equipment Required for Feeder Installation

Pulsar® Infinity Operation and Installation Manual – Water Treatment 12
3.3 Installation Parts and Assemblies
Part Description Part Number
A - (2) Adjustable Saddle Clamp Assembly for 2” [50.8 mm] pipe 73096
B - (2) Adjustable Saddle Clamp Assembly for 1-1/2” [38.1 mm] pipe 73096
C - (2) 5” x 1/2” [127 mm x 12.7 mm] MNPT Pitot tube
Refer to Appendix A for Pitot Tubes for 2 ½” and 3” pool piping
73086
D - (3) 1/2” [12.7 mm] FNPT x 1/2” [12.7 mm] FNPT PVC Ball Valves 74061
E - (4) 1/2” [12.7 mm] MNPT x 5/8” [15.9 mm] O.D. Tubing Connector
- W10MC8
71918
F - 12’ X 5/8” [365.76 cm X 15.9 mm] O.D. LLDPE Tubing 73095
G - (2) 1/2” [12.7 mm] PVC Closed Nipples 71611

Pulsar® Infinity Operation and Installation Manual – Water Treatment 13
3.4 Installation Procedure
Background: The next steps involve installing a loop around the pool
filter where the Pulsar® Infinity Feeder will be located. The pool filter
will create a pressure differential to provide flow through the Pulsar®
Infinity Feeder. This loop is created using the saddle clamps, pitot
tubes, ball valves, tube fittings, and tubing provided with your sys-
tem.
NOTE: Refer to the schematics on pages 11-13 for a pool system
installation and follow the steps below.
NOTE: Before starting installation, determine if the pipes to be
drilled are above or below the pool water level. If they are below
the pool water level, isolation valves must be shut to prevent
backflow through the holes that are being drilled. If isolation
valves are shut properly, some water may drain out of the
drilled holes but will stop once piping is empty.
NOTE: Apply plumbers tape to all male threads to ensure a leak
free connection.
NOTE: Pitot tubes can be installed in either horizontal or verti-
cal pool piping.
3.4.1 Making the inlet connection from the pool to the
feeder (Pre-Filter)
Choose a location on the main pool recirculation piping on the dis-
charge side of the pool pump but upstream of the pool filter(s). Make
sure the pool pump is off and shut isolation valves from the pool pip-
ing so that it is dry.
1. Drill 7/8” (22.2 mm)hole anywhere on the top half of the pipe
(figure 1). Caution: Do not drill on the bottom half of the pipe.
Excess debris may enter your feeder.
2. For 2” [50.8 mm] pool pipe, use Assembly A (figure 2a). Do not
yet fully tighten nuts (figure 2b). For 1-1/2” [38.1 mm] pool
pipe, use Assembly B (figure 2c). Refer to Appendix A for Pitot
Tubes for 2 ½” and 3” pool piping.
3. Insert part C (figure 3a). Make sure Pitot tube is fully inserted
prior to tightening saddle clamp (figure 3b).
4. Connect part D, Ball Valve (figure 4).
5. Connect part E, Tubing Connector (figure 5).
Figure 2a
Figure 2c
Figure 1
Figure 3a
Notch facing
upstream
Notch facing
upstream
Flow from
pool
Flow from
pool
Figure 3b
Figure 4
Figure 5
Figure 2b

Pulsar® Infinity Operation and Installation Manual – Water Treatment 14
3.4 Installation Procedure (continued)
3.4.2 Making the chlorine injection connection from the
feeder to the pool (post-filter and heater)
Choose a location on the main pool recirculation piping downstream
of the pool filter(s), and heater (if available), but before the acid or
CO2injection point.
1. To make the outlet connection from the feeder to the pool, re-
peat all steps from section 3.4.1 except for step #3. Step #3 is
modified as follows:
3.4.3 Completing the feeder circulation loop
1. Complete feeder assembly with parts part D, ball valve, and
part E, tubing connector (figure 6).
2. Connect part D, ball valve, and part G, closed nipple to the drain
port to complete the feeder assembly (figure 7a & 7b).
3. Choose a location for the Pulsar® Infinity Feeder that allows
easy access for filling and maintenance.
4. Using the 5/8” [15.9 mm] O.D. tubing, part F (see figure 8),
cut the tubing to size and connect the feeder inlet to the pre-
filter tubing connector installed in step #5 of section 3.4.1, and
connect the feeder outlet to the post-filter tubing connector in-
stalled in step # 1 of section 3.4.2.
This completes your feeder recirculation loop.
Notch facing
downstream
(opposite side of
above view)
Flow from
pool
E
E
D
Figure 6
Figure 7b
Figure 8
Figure 7a

Pulsar® Infinity Operation and Installation Manual – Water Treatment 15
4 Feeder Start Up
4.1 Pre-Startup Procedure
Following the steps outlined below will ensure a smooth start-up of
the Pulsar® Infinity Feeder. For seasonal operation, perform this pro-
cedure each Spring.
IMPORTANT!! Do NOT put Pulsar® Infinity Tablets in the feeder
during the start-up operation.
4.1.1 Verify water flow through feeder
1. With the Pulsar® Infinity Feeder fully installed per the installa-
tion procedure, section 3.4, turn on the pool recirculation sys-
tem, and open all valves to the feeder.
Note: Before starting the flow test, ensure the pressure cap at
the top of the feeder is on and shut. Turn cap clockwise a quar-
ter turn until the triangle of the cap lines up with the body of
the feeder. This indicates the pressure tight seal on the feeder.
2. Increase the flow rate going through the feeder until it reaches
the maximum flow rate as read on the flow meter on the front
of the feeder.
3. With maximum flow going through the feeder, check the sys-
tem for leaks. Tighten all fittings as necessary if leakage is ob-
served.
4. When all leaks have been corrected, shut the inlet valve first,
then shut the outlet valve to fully isolate the feeder from the
pool filter system.
4.1.2 Adjusting the cartridge feed rate setting
Note: Adjust cartridge feed rate setting prior to loading with Pulsar®
Infinity Tablets. The feed rate setting of the cartridge may not be able
to be reduced if already full of tablets. Refer to table 4.2.2 on page 21
for feed rate setting.
1. With pressure cap and seal cap removed, remove the cartridge
assembly from the feeder, turn counter clockwise so that load
lines up with arrow on the feeder (figure 9). This locks the car-
tridge assembly for easy loading or feed rate setting adjust-
ment. Follow steps #2 - #5 to complete the feed rate setting
adjustment.
2. See figure 10.
3. Twist counterclockwise (figure 11).
4. Slide up or down (figure 12).
5. Twist clockwise (figure 13).
Figure 9
Figure 10
Figure 12
Figure 11
Figure 13

Pulsar® Infinity Operation and Installation Manual – Water Treatment 16
4.1 Pre-Startup Procedure (continued)
4.1.3 Loading the cartridge assembly with Pulsar® Infinity
Table ts
WARNING - Use ONLY Pulsar® Infinity Tablets in the feeder. The
use of any other treatment chemicals will void the warranty and
NSF listing. DANGER: Under no circumstances should you mix
calcium hypochlorite with other forms of concentrated chlorine
or other chemicals. Fire and/or explosion may result. Caution
must be used when refilling the cartridge with more tablets.
WARNING - Wear protective gloves when handling Pulsar® Infini-
ty Tablets. Refer to Safety Data Sheets for additional information
and precautions regarding the use and handling of the tablets.
WARNING - KEEP OUT OF REACH OF CHILDREN
1. Prior to removing the pressure cap, open the Ball Valve at the
drain and drain the solution into a bucket or down to a drain
(figure 14). Caution: Failure to perform this step may result in
a chlorine spill and possible injury.
2. Remove pressure cap. See figure 15a & 15b.
3. Load tablets (figure 16a & 16b, page 19).
4. See figure 17 (page 19).
5. Verify that O-ring is still in place and there is no debris in the
O-ring groove before replacing seal cap (figure 18, page 19).
6. Replace seal cap (figure 19, page 20).
7. To tighten pressure cap, follow the steps written on the top
housing of the feeder as shown in Figure 20, page 20.
8. Align white dot on handle with white dot on housing cap (figure
21, page 20).
9. Twist cap clockwise to align white dot on handle with arrow on
top housing (figure 22, page 20).
Figure 15b
Figure 15a
1
2
Figure 14
Drain

Pulsar® Infinity Operation and Installation Manual – Water Treatment 17
4.1 Pre-Startup Procedure (continued)
4.1.3 Loading the cartridge assembly with Pulsar® Infinity Tablets (continued)
Figure 16a
Figure 17
Figure 16b
Figure 18
1
2

Pulsar® Infinity Operation and Installation Manual – Water Treatment 18
4.2 Startup Procedures
Warning - Higher than normal levels of chlorine may develop in-
side the feeder during extended periods of no flow through the
feeder. This may result in a higher than normal level of chlorine
injected into the pool when flow through the feeder is re-estab-
lished. To prevent this, drain the feeder prior to start-up after
extended periods of no flow through the feeder.
4.2.1 Feeder Startup
After completing the PRE-START-UP PROCEDURE, and establishing that
all components of the feeder are operating properly, your Pulsar® Infin-
ity Feeder is ready for start-up.
1. Establish the proper cartridge feed rate setting for your pool us-
ing the chart in section 4.2.2
2. Load the cartridge assembly with Pulsar® Infinity Tablets by fol-
lowing section 4.1.3.
3. Open the inlet and outlet ball valves at the pool piping.
4. Open the ball valve at the feeder inlet and set the flow meter to
the recommended feed rate setting determined in step 1 using
the ball valve at the feeder inlet.
NOTE: If using the optional ORP kit, follow instructions in section
4.2.3 to control feed rate.
5. Monitor the flow rate through the feeder daily to ensure that the
proper flow rate is being maintained.
6. During the first few days of operation, check the chlorine level in
the pool frequently to establish the best inlet flow rate and car-
tridge feed rate setting for your pool. Adjust the chlorine output
either up or down according to the table, or adjust the ORP set-
point if using the ORP kit.
4.1 Pre-Startup Procedure (continued)
4.1.3 Loading the cartridge assembly with Pulsar® Infinity
Tablets (continued)
Figure 19
Figure 20
Figure 21 Figure 22

Pulsar® Infinity Operation and Installation Manual – Water Treatment 19
4.2.2 Feed Rate Tables
Pool & Spa
Cartridge
Setting
Inlet Flow Rate - gpm
0.5 11.5 22.5 33.5 44.5
Output Rate (lbs. Av. Cl/Day)
A1.5 22.4 3.2 4.5
B1.6 2.1 2.6 3.4 5
C1.7 2.2 2.8 3.6 5.5
D1.1 1.8 2.3 33.8 6.5
E1.2 1.9 2.4 3.2 47.5
F0.3 0.6 0.8 1.3 22.5 3.4 4.2 8
G0.4 0.7 0.9 1.4 2.1 2.6 3.6 4.4 8.5
H0.5 0.8 11.5 2.2 2.7 3.8 4.6 9
4.2.3 Controlling Chlorine Output With an ORP
1. Refer back to ORP schematic section 3.1.1.
NOTE: To use with an ORP, set the cartridge feed rate setting to H and fully open the inlet ball valve to allow maximum flow rate
through the feeder.
Use Higher Flow Rates

Pulsar® Infinity Operation and Installation Manual – Water Treatment 20
5 Feeder Inspection and Maintenance
5.1 Feeder Maintenance
Due to the combination of low chlorine concentration and relatively high flow rate, maintenance of the Pulsar® Infinity Feeder should be minimal.
To reduce the maintenance frequency even further, maintain pool water chemistry as follows:
Total Alkalinity 60-80ppm
Calcium Hardness 200-1800ppm
pH 7.2-7.6
5.2 Preventive Maintenance (quarterly or as needed)
A. Clean feeder with a standard 4 parts water / 1 part acid ratio quarterly.
1. Shut the inlet and outlet isolation ball valves and disconnect inlet and outlet tubing
2. Remove the pressure cap then remove cartridge assembly and all tablets from the feeder
3. If the feeder was bolted down to the ground, unfasten bolts, then turn feeder upside down and empty out
the feeder of remaining Cal Hypo debris
4. Reconnect the inlet and outlet tubing, then slowly crack open the inlet isolation valve and allow water to flow into
the feeder
i. Caution: opening the inlet valve too fast may send water gushing up out of the feeder
5. Once the feeder is almost full of water, Shut the inlet valve then add some acid to make up the 4:1 ratio
(water : acid)
6. Replace the pressure cap on the feeder and let the acid solution sit for 30 minutes
7. Open the inlet and outlet isolation valves and let water flow into the feeder for 5 minutes, allowing the acid
solution to clear out the outlet tubing
8. Shut the inlet and outlet valves, remove the pressure cap and inspect the feeder for cleanliness.
9. Repeat above steps if more cleaning is still needed
WARNING: BE SURE TO REMOVE ALL TABLETS FROM THE FEEDER PRIOR TO ADDING ACID TO THE FEEDER
Table of contents