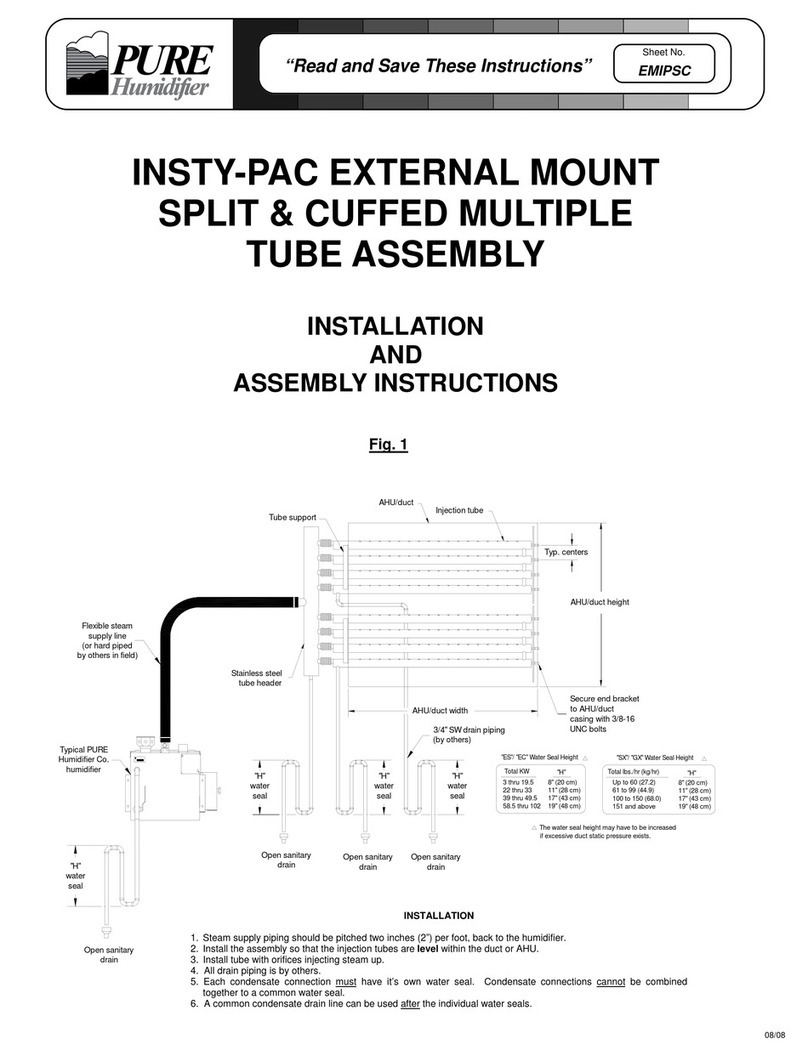
Pure Humidifier Fast-Pac Guide

Fig. 1
INSTALLATION
1. Steam supply piping should be pitched two inches (2”) per foot,
back to the humidifier.
2. Install tube with orifices injecting steam up.
3. All drain piping is done by others.
Form No: IFPC 4/15
Secure to AHU/duct
casing with 3/8-16
UNC bolts
"H"
water
seal
"H"
water
seal
AHU/duct width
AHU/duct height
Typical PURE
Humidifier Co.
humidifier
Flexible steam
supply line
(or hard piped
by others in field)
Open sanitary
drain
Duct plate
"SX"/ "GX" Water Seal Height
The water seal height may have to be increased
"ES"/ "EC" Water Seal Height
if excessive duct static pressure exists.
11" (28 cm)
8" (20 cm)
17" (43 cm)
19" (48 cm)
58.5 thru 102
Total KW
22 thru 33
3 thru 19.5
39 thru 49.5
151 and above
100 to 150 (68.0)
Total lbs./hr (kg/hr)
Up to 60 (27.2)
61 to 99 (44.9)
"H"
19" (48 cm)
11" (28 cm)
17" (43 cm)
8" (20 cm)
"H"
3/4" SW drain piping
(by others)
Open sanitary
drain
Secure to
AHU/duct
casing with
3/8-16
UNC bolts
Flex connectors
(by PURE)
Stainless steel
tube header
(by PURE) Typ. centers
Injection tube
AHU/duct casing
READ AND SAVE THESE INSTRUCTIONS
CUFFED FAST-PAC
INTERNAL MOUNT
MULTIPLE TUBE ASSEMBLY
INSTALLATION
AND
ASSEMBLY INSTRUCTIONS
TM
PURE HUMIDIFIER® is a registered trademark of PURE Humidifier Co.

2
Cuffed Fast-Pac Injection Tube Assembly
Internal Mounting Instructions
The Fast-Pac tube assembly supplied with the humidifier(s), is designed for rapid dissipation of
steam. The tube assembly is designed for internal AHU or duct mounting. AHU/duct access must
be provided which allows the injection tube assembly to be located internally! The injection
tube assembly was sized to fit inside the AHU or duct dimensions.
VERIFY COMPONENTS
Unpack the components from the shipping container. Verify all components are checked off
according to the packing list and the COMPONENTS IDENTIFICATION DRAWING (Fig. 2).
Report any missing pieces to your local PURE Humidifier Co. representative immediately.
LOCATION
1.) Mount the injection tube assembly in the AHU or duct work as shown on the
project plans or as indicated by the engineer.
2.) Install the injection tube with the 3/4”-NPT drain connection, located on the tube header,
directed towards the bottom of the AHU or duct.
3.) Install the tube assembly so that the injection tubes are pitched back towards the header with
a minimum of two inches (2”) of pitch per foot.
4.) Install the tube assembly with the steam discharge ports facing upwards.
5.) The tube assembly should be centered in the AHU or duct height with an even distance
between the bottom tube and the casing floor and the top tube and the casing ceiling.
MOUNTING
1.) Layout the center lines for the injection tube SUPPLY and CONDENSATE connections.
The supply connections outside diameter may vary, the condensate connection is
1-1/16” outside diameter. Duct plates are provided to seal the opening. The layout should be
based on the “Location” instructions listed above (see Fig. 3).
2.) Cut a hole through the AHU or duct wall for the supply connection. If the alternate
horizontal condensate drain connection is supplied, cut a 1-1/16” diameter hole through
the AHU or duct wall, for the drain connection (see Fig. 3).
3.) Install the tube HEADER onto the inside of the AHU or duct wall with the steam supply
connection installed through the access hole (cut in step above). Secure the header to the
AHU or duct wall with 3/8-16 fasteners (by others). The HEADER is provided with header
mounting brackets welded onto the header (see Fig. 2)
4.) Slip one side of each of the FLEXIBLE CONNECTORS onto the 1 1/2” diameter stub-
outs on the HEADER and secure the FLEXIBLE CONNECTOR to the header with one
screw clamp per stub-out (see Fig. 2 & 3).
5.) Layout the injection tubes (quantity varies with order) and secure each INJECTION TUBE to
the TUBE SUPPORT BRACKET with the 3/8-16 fasteners provided making sure that the
orifices will be discharging upwards after installation (see Fig. 2 & 3).
6.) Slide the open end of each INJECTION TUBE into the open side of the matching
FLEXIBLE CONNECTOR. Secure each tube to the FLEXIBLE CONNECTOR by
tightening the matching screw clamp (see Fig. 2 & 3).
7.) Secure the END BRACKET to the AHU or duct wall with 3/8-16 fasteners (by others). The
END BRACKET must be located so that a minimum of two inches (2”) of pitch back towards
the header exists (see Fig. 3).
8.) Seal the openings where the STEAM SUPPLY and CONDENSATE connections
penetrate through the AHU or duct wall with the duct plates provided (see Fig. 3).
9.) Connect steam supply and condensate piping to the humidifier as illustrated in Fig. 1.

3
Internal Mount Multiple Injection Tube Assembly
Component Identification
1 Supply/condensate header 1
2 Flexible connector 1 per tube
3 Adjustable screw clamps 2 per tube
4 Injection tubes varies with order
5 Tube support bracket 1
6 Tube mounting bolts 1 per tube
7 Duct plate (condensate) 1
ITEM
NO. DESCRIPTION QUANTITY
Header drain connection (3/4”-NPT)
Fig. 2 4
1
Header mounting bracket
(welded onto the header)
7
Steam inlet connection
(penetrate through unit
casing or duct wall)
32
5 6
Alternate drain connection (if ordered it
will need to penetrate through the unit
casing or duct wall).
Securing bolt
(not supplied)
Securing bolt
(not supplied)

4
Notes:
1.) Center the Fast-Pac injection tube assembly in the duct height.
2.) The injection tubes should pitch back towards the header with a minimum
of 2" per foot of pitch (see above illustration).
3.) Install injection tubes with the orifices injecting upwards.
4.) All condensate drain piping is by others.
Header & Support Bracket Mounting Detail
Fig. 3
Condensate drain connection
(dashed line is the alternate
location - special order)
Cut openings for
supply and drain
connections.
Seal with duct plates
Injection tube
Steam
supply
inlet(s)
2" Pitch per foot
End bracket
mounting bolts
AHU casing or duct wall
Supply/
condensate
header

5
Installation Tips
Condensate Return Line
Condensate from the header cannot be elevated. Do not connect water seals to
pressurized condensate return lines. The drain piping should be copper or stainless
steel. The use of PVC piping is not recommended; the humidifier temperature will
cause the PVC to soften and fail.
Laminar air flow
Tube assembly must be installed in a location that allows for laminar air flow across entire
grid. A minimum velocity of 300 feet per minute is required to avoid saturation and
excessive fog travel.
Plug fan installations
Install tube assembly as close as possible to the upstream coil to ensure laminar airflow and
proper absorption.
Insulated ducts
Internally insulated ducts must be lined with a non-absorbent material to avoid saturation. If
the duct is lined it must be removed three feet (3’) upstream and ten feet (10’) downstream
of tube assembly.
Final Filters
Tube assembly must be installed a minimum of ten feet (10’) upstream of final filters.
VAV Systems
Low velocity will cause long fog trails and steam will rise wetting the top of the AHU/duct
casing. Modulating VAV high-limit humidistat is required. A minimum velocity of 300 feet
per minute is required to avoid saturation and excessive fog travel.
Controls
Fan Interlock Switch
PURE Humidifier Co. recommends the use of an air flow proving switch or fan interlock to
prove air flow prior to humidifier cooperation. Humidifier operation without air flow will result
in over-saturation of the air stream. Air flow proving switches are available as optional
equipment from your PURE Humidifier Co. representative.
High-Limit Humidistat
PURE Humidifier Co. recommends the use of a duct high-limit humidistat to prevent
humidifier operation when the duct humidity level exceeds 85% relative humidity. Humidifier
operation above 85% relative humidity can result in over-saturation of the air stream. High-
limit humidistats are available as optional equipment from your PURE Humidifier Co.
representative. The high limit humidistat should be 8 to 10 feet (244-305 cm) downstream
from the humidifier injection tube. Installing the high-limit closer than 8 feet (244 cm) from
the humidifier may cause erratic control.
Smoke Alarms and Temperature Sensors
Smoke alarms should be located 12 to 14 feet (365-427 cm) upstream from the humidifier
injection tube.
Temperature sensors should be located 12 to 14 feet (365-427 cm) downstream from the
humidifier injection tube, or past any visible fog travel that may be greater than this distance.

6
Troubleshooting
Too Much Humidity
1. Humidity controller out of calibration.
2. Humidifier oversized.
3. Check humidifier (GX, SX, ES, EC) for proper operation.
Too Little Humidity
1. Humidity controller out of calibration.
2. Undersized humidifier.
3. Check humidifier (GX, SX, ES, EC) for proper operation.
4. Water seals are not primed.
5. Water seals are blown due to improper supply piping.
Humidifier Discharges Water
1. Faulty drainage:
A) Return line pressure greater than humidifier pressure.
B) Return line flooded.
C) Vertical lift.

7
Steam Supply Piping Examples
Pitched Towards Steam Generator
and Tube Assembly
1/4”/1’
2”/1’
Pitch
(see Note 1)
2”/1’
Notes:
1. Pitch hard piping or flexible hose 2" per foot if steam is flowing uphill, 1/4" per foot if the steam is flowing
downhill. Reference piping examples shown.
2. When feasible to do so, install a minimum one-foot riser from the top of the tank to reduce condensate carryover.
3. Use flex connectors or unions to allow for easy removal of cover.
4. Support flexible hose every 18" to avoid sagging.
5. Hard piping or flexible hose must match reservoir outlet size. Do not use supply piping with a smaller inside diameter
than the reservoir outlet.
6. Failure to follow the piping recommendation on this page may result in blown water seals, leaking cover gasket, or
dispersion tubes spitting.
7. Install a Drain Tee at any low spots in supply piping run where condensate will accumulate. All horizontal to vertical
up transitions require a water-sealed drip leg.
8. Reference job specific tube assembly O&M included with your order for complete details.
Pitched Towards Tube Assembly
Pitched Towards Drain Tee
Drain Tee
(see Note 7)
1/4”/1’ 2”/1’
1/4”/1’
Use two 45° elbows for
hard piping or wide 90° for
flexible steam hose
Supply piping
connectors
(see Note 4)
see Note 2 Typical
Humidifier
Reservoir
see Note 2
see Note 2
see Note 2

8
141 Jonathan Blvd. North
Chaska, MN 55318
Tel: (952) 368-9335 Fax: (952) 368-9338
www.purehumidifier.com
DISCLAIMER
Product Changes: Changes in products may be required from time to time due to factors beyond the
Seller’s control, or the need for continuing improvement of products. The Seller reserves the right to
make reasonable changes in products, specifications and performance of any kind without notice or
liability. The Seller also reserves the right to deliver revised designs or models of products against
any order, unless this right is specifically waived in writing by the Seller. The Seller shall have no
responsibility whatsoever with respect to changes made by the manufacturer in products sold but not
manufactured by the Seller.
Table of contents
Other Pure Humidifier Laboratory Equipment manuals
Popular Laboratory Equipment manuals by other brands

Turner Designs
Turner Designs TD-700 operating manual

GYROZEN
GYROZEN 1730R user manual

Oxford Instruments
Oxford Instruments Cypher SPM user guide

Wasatch Photonics
Wasatch Photonics Cobra OCT Getting started guide

Quidel
Quidel Lyme FIA Sofia 2 user manual

Thermo Scientific
Thermo Scientific MaxQ SHKA4000 operating manual

Retsch
Retsch SM100 operating manual

Agilent Technologies
Agilent Technologies 6100 Series LC/MS quick start guide

IKA
IKA KS 4000 i control operating instructions

IKA
IKA RW 47 digital operating instructions

IKA
IKA LR-2.ST operating instructions

VERDER
VERDER Carbolite Gero HT 5/220 Installation, operation and maintenance instructions