Puretone Phone Clip 2 User manual

Established 1976
V1.0
December 2014
Phone Clip 2
User Guide

Welcome
Statement
2
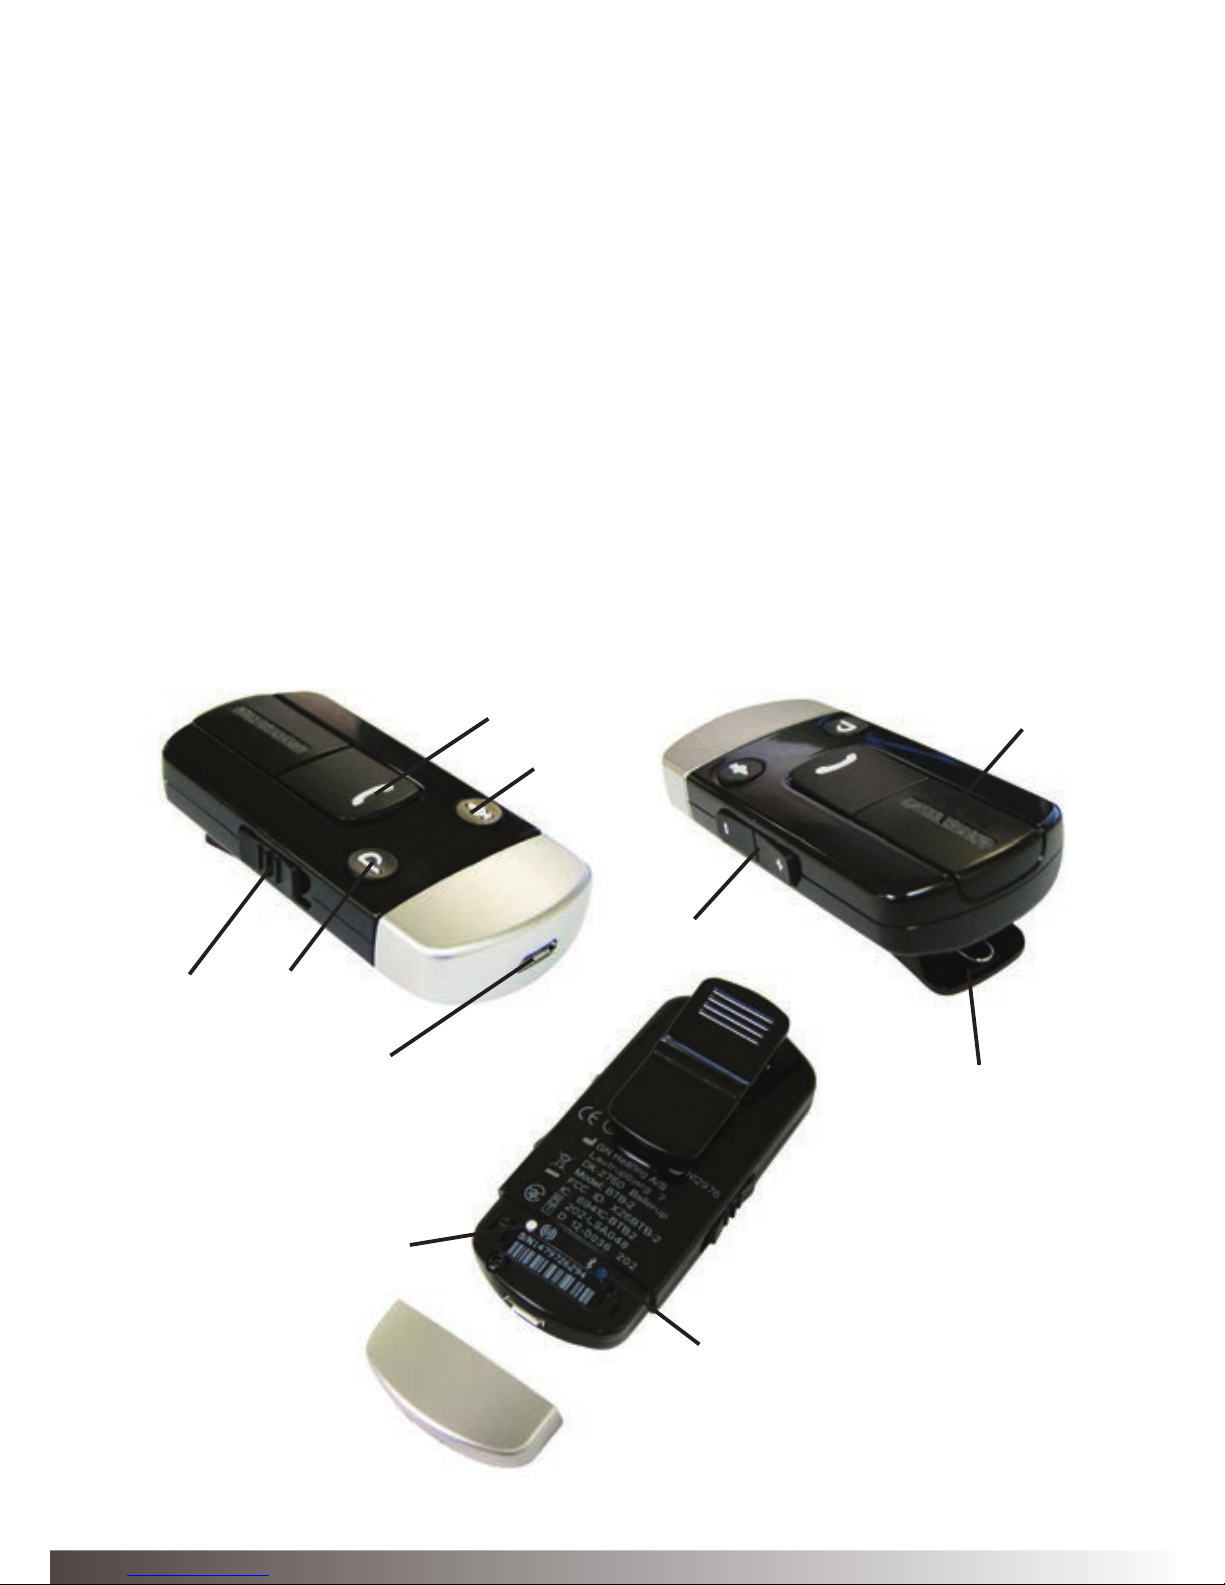
Congratulations on your purchase of a Phone Clip 2.
Phone Clip 2 will allow you to connect your wireless hearing instruments
to Bluetooth enabled mobile phones. This enables clear and hassle-free
phone connectivity, whether you are at home, in the ofce or on the move.
The Phone Clip 2 also doubles as a basic remote control making it possible
for you to adjust to volume of your hearing instruments and toggle through
programs, when you are not talking on the phone.
You can also choose to mute your hearing instrument microphone (not
supported on 680 series) to shut out environmental sound while you are
talking on the phone or when using the Phone Clip 2 as a remote control.
Please read this manual carefully to fully benet from the Phone Clip 2. Ask
your hearing care professional if you have any questions.
This device complies with Part 15 of the FCC Rules and IC Rules.
Operation is subject to the following two conditions: (1) this device may not
cause harmful interference, and (2) this device must accept any interference
received, including interference that may cause undesired operation.
Note: This equipment has been tested and found to comply with the limits
for a Class B digital device, pursuant to part 15 of the FCC Rules and
ICES-003 of the IC rules. These limits are designed to provide reasonable
protection against harmful interference in a residential installation. This
equipment generates, uses and can radiate radio frequency energy and,
if not installed and used in accordance with the instructions, may cause
harmful interference to radio communications.

3
However, there is no guarantee that interference will not occur in a particular
installation. If this equipment does cause harmful interference to radio or
television reception, which can be determined by turning the equipment off
and on, the user is encouraged to try to correct the interference by one or
more of the following measures:
• Reorient or relocate the receiving antenna.
• Increase the separation between the equipment and receiver.
• Consult the dealer or an experienced radio/TV technician for help.
Changes or modications can void the user’s authority to operate the
equipment.
Phone Clip 2 is intended to enable wireless hearing instrument users to
better follow phone conversations. The essential performance of the Phone
Clip 2 is to transfer signals between a phone with Bluetooth capabilities
and wireless hearing instrument.
When not used for phone conversations the Phone Clip 2 can be used as
a basic remote control enabling volume adjustment, program changing
(telecoil programs not supported on 680 series) and hearing instrument
microphone mute functionality (mute function not supported on 680 series).
In the EU: Products are intended for use in countries within European
Economic Area as well as Switzerland.
Intended Use
List of Countries

4
National Restrictions
This product is in compliance with the following regulatory standards:
In EU: The device conforms to the Essential Requirements according to
- Annex I of Council Directive 93/42/EEC for medical devices (MDD) and
essential requirements and other relevant provisions of Directive 1999/5/
EC (R&TTE).
In US: FCC CFR 47 Part 15, subpart C.
In Canada: These hearing instruments are certied under the rules of IC.
Other identied applicable international regulatory requirements in
countries outside EU and US. Please refer to local country requirements
for these areas.
IC: 6941C-BTB2
Cet appareil numérique de la classe B est conforme à la norme NMB-003
du Canada.
Operation is subject to the following two conditions: (1) this device may
not cause interference, and (2) this device must accept any interference,
including interference that may cause undesired operation of the device.
In JP:
Japanese Radio Law and Japanese Telecommunications Business
Law Compliance.
This device is granted pursuant to the Japanese Radio Law and the
Japanese Telecommunications Business Law. This device should not be
modied (otherwise the granted designation number will become invalid).

5
Contents
Description
Getting Started
Turning your Phone Clip 2 ON and OFF
Bluetooth Pairing
Phone Operation
Volume Control
Operating Time
Wearing Your Phone Clip 2
Light Indicators
Introduction to Bluetooth
Important Information
Technical Specications
Warranty
Troubleshooting Guide
6
7
8
9
12
13
14
15
15
16
17
21
21
22

6
Description
1. ON/OFF switch
2. Call pick-up/hang-up button
3. Hearing instrument program toggle
4. Hearing instrument microphone mute button
5. Micro USB for charging
6. Volume control
7. Microphone inlet
8. Mounting clip
9. Hearing instrument pairing button
10. Bluetooth pairing button
1
2
4
7
5
9
10
3
6
8

7
Getting Started
Charging the Battery
Before using your Phone Clip 2, you need to
fully charge the rechargeable battery.
To charge it, plug the charging cable into the
Phone Clip 2 as shown in the picture to the
right.
Then plug the other end of the charging cable
into a power outlet.
During the charging process, the light
indicator (LED) at the top of the Phone Clip 2
will show a solid red light.
When fully charged and still connected to
the charger, the LED will turn solid green
interrupted by a red blink every 2 seconds.
Charging an empty battery typically takes
around 3 hours. It is safe to leave the charger
connected overnight – the battery cannot be
overcharged.
• When charging your Phone Clip 2 for the
rst time, leave it to charge for at least 3
hours, even if the battery indicator shows
that the unit is fully charged (see section
about “Light indicators”).
• For safety reasons, recharge the battery
only with chargers supplied.
Do not charge the
Phone Clip 2 while it
is on your body.

Turning your Phone Clip 2 ON and OFF
8
To turn ON your Phone Clip 2 slide the ON/ OFF switch (1 on page 6) down
to the ON position. A white ”I” icon will be visible on the base of the switch
and the LED indicator will now blink green every 2.5 seconds.
To turn it OFF, slide the ON/OFF switch up to the OFF position. The LED
will now stop blinking.
If battery level is low the LED will blink yellow every 2 seconds indicating
that the unit should be recharged.
Pairing to hearing instruments
Note!
The following information is intended primarily for your Hearing Care
Professional, who in most cases will complete the tasks that are necessary
before the Phone Clip 2 can be used with your hearing instruments.
However, the process is designed to be simple and should be easily
accomplished by almost anyone.
1. Make sure Phone Clip 2 is turned on. Your hearing instruments must be
OFF – this is done by opening the battery door on the hearing instrument(s).
2. Remove the silver cap from the Phone Clip 2. With the tip of a pen or
similar object, press the small white pairing button one time on the back of
your Phone Clip 2 (see picture to
the right). The LED will now blink
yellow every 2 seconds to indicate
that is ready to be paired to your
hearing instruments. Your Phone
Clip 2 will remain in pairing mode
for 20 seconds.

9
3. While pairing mode is active, close the battery doors on both hearing
instruments and make sure they are ON. A successful pairing will be
indicated by an audible melody played in both hearing instruments. Also
the LED on the Phone Clip will remain lit (yellow) for 2 seconds.
If your mobile phone is Bluetooth enabled and supports the appropriate
proles, it can communicate with the Phone Clip 2 only after completing
two simple procedures: pairing and connecting.
The pairing procedure allows you to control which Bluetooth devices are
permitted to communicate with each other. It needs to be completed only
once for each device you wish to use with your Phone Clip 2.
You can pair up to 8 Bluetooth devices with the Phone Clip 2, but only 2
Bluetooth devices can be connected/active at a time.
The pairing procedure is described in the following section. Once a mobile
phone is permitted to communicate with the Phone Clip 2 by the pairing
procedure, the connection procedure congures the device to actually
output its audio signal over the Bluetooth connection. This procedure is
also described in the following section.
Pairing to your mobile phone
The pairing procedure is controlled by your mobile phone. Different mobile
phones have different menu structures. You should therefore refer to your
mobile phone’s manual if you cannot complete the pairing procedure with
the generic steps described here.
Bluetooth Pairing

10
1. Turn you Phone Clip 2 ON and remove the silver cap. Place your mobile
phone next to the Phone Clip 2, and make sure your phone is ON.
2. Find the connectivity settings on your phone. Look for the “Bluetooth”
feature in the main menu or one of the sub menus, such as “Connectivity”.
3. On your mobile phone, ensure that Bluetooth is turned ON.
4. With the tip of a pen or similar object, press the small blue Bluetooth
pairing button one time on the back of your Phone Clip 2 (see picture
below). Now the Phone Clip 2 will be in Bluetooth pairing mode for two
minutes.
5. On the mobile phone choose to search for Bluetooth devices.
6. Your mobile phone should present a list of Bluetooth devices discovered.
Select “Hearing Aid Phone” from this list.
7. Your mobile phone may then ask you to enter a passcode. If so, enter
“0000” (four zeros).
Your Phone Clip 2 should now be paired to
your mobile phone. Some mobile phones
may ask which Bluetooth service you wish to
enable. Select “Headset”.

11
Connecting
Once your mobile phone and Phone Clip 2 are paired, the mobile phone
may need to be connected before it will actually send the appropriate audio
signals.
This function should also appear in your mobile phone’s “Bluetooth” menu,
usually under a list of “Paired Devices”. In that list, highlight your Phone Clip
2 and select “Connect”.
When your Phone Clip 2 and mobile phone are connected, you may see a
headset symbol on the main screen of your mobile phone, similar to this:
The connection between the Phone Clip 2 and the mobile phone will be
maintained for as long as both devices are turned ON and remain within
range of each other. If either device is switched OFF or gets out of range,
you may have to perform the connection procedure again.
On some phones you can congure “Automatic Reconnection”. We
recommend that you do so if the feature is available. Refer to the user
guide of your mobile phone for instructions on how to do this if supported.

12
Phone Operation
Below you will nd an overview of how you operate the Phone Clip 2 when
using it in connection with phone calls.
Note: Except for the answer and end call operations one or more of the
below described operations may be phone dependent, i.e. they may either
differ slightly or be absent altogether.
Answering and ending a call
Rejecting a call
Transferring a call initiated on the mobile phone to Phone Clip 2
Put an active call on hold
Last number redial
Push the call pick-up/hang-up button once.
If another call is already active it will be terminated and the new incoming
call - indicated by knocking tones - will become active. If another call is
currently on hold it will become the active call instead.
Double click the call pick-up/hang-up button.
If another call is already active it will remain active, only the new incoming
call – indicated by knocking tones – will be rejected.
Push the call pick-up/hang-up button once.
Press and hold the call pick-up/hangup button for 2 seconds.
If another call is currently on hold or an incoming call is pending - this will
now become the active call instead.
Double click the call pick-up/hangup button while no call is active nor
pending. If two mobile phones are connected this operation applies to
the last paired mobile phone.

13
Phone Operation
Voice dialling
Increase or decrease the volume of the speaker at the other
end of the phone call
Mute or unmute your hearing instrument microphones during a
phone call
Press and hold the call pick-up/hangup button for 2 seconds.
If two mobile phones are connected this operation applies to the last
paired mobile phone. This functionality requires that the Voice dialling
functionality is available and activated on your Bluetooth phone.
Push the + sign on the side of the Phone Clip 2 to increase the volume.
Push the - sign on the side of the Phone Clip 2 to decrease the volume.
Push the microphone mute/unmute button on the front of the
Phone Clip 2 (not supported on 680 series).
When not on the phone, the Phone Clip 2 can be used as a simple
remote control for your hearing instruments.
Volume Control
Increasing the volume of your hearing instrument(s)
Push the + sign on the volume control (6 on page 6) to increase the
volume of your hearing instrument(s).
Decreasing the volume of your hearing instrument(s)
Push the - sign on the volume control (6 on page 6) to decrease the
volume of your hearing instrument(s).
Remote Control Operation

Depending on the phone, you can also utilise the volume control that is
built in your mobile phone.
Please note that if you have two hearing instruments changing the
volume will apply to both hearing instruments in unison.
To mute your hearing instrument microphones push the microphone
mute/unmute button (4 on page 6) once on the front of the Phone Clip 2.
Battery consumption and the operating time of your Phone Clip 2
depend greatly on the usage of the device.
Your Phone Clip 2 battery can be recharged hundreds of times.
If the operating time reduces substantially, please contact your hearing
care professional.
To unmute your hearing instrument microphones push the microphone
mute/unmute button (4 on page 6) once on the front of the Phone Clip 2.
Push the program button (3 on page 6) to toggle through available
programs in your hearing instrument(s) (telecoil programs not supported
on 680 series).
14
Mute or unmute the microphone(s) on your
hearing instrument(s) (not supported on 680 series)
Toggle through hearing instrument programs
Operating Time

15
Clip your Phone Clip 2 on your sweater, jacket or other clothing so that
the microphone inlet (7 on page 6) faces upwards. This ensures that the
microphones in the Phone Clip 2 are placed optimally to pick up your
voice during phone conversations.
The Phone Clip 2 has a swivel clip to ensure that you can always place it
so that the microphone inlet faces upwards towards the mouth.
For optimal voice pickup keep the device within a range of 10-30cm from
your mouth.
The Light indicator at the top of your Phone Clip 2 serves as a multi-
purpose user interface, providing information on the status of your
device.
Normal operation
Battery low
Charging
Fully charged - still
connected to charger
Ready for pairing with
hearing instrument(s)
Ready for pairing with
Bluetooth device
Bluetooth call active
Wearing Your Phone Clip 2
Light indicators (LED)

16
Introduction to Bluetooth
Bluetooth provides a way for devices like mobile
phones to communicate wirelessly.
First, check whether the phone you wish to
use offers Bluetooth connectivity. Look for the
following symbol on the device or its user guide.
Second, the range of possible applications on a Bluetooth-enabled
device is dened by “proles”. The device you wish to use with your
Phone Clip 2 must support the appropriate Bluetooth proles.
To receive or place phone calls your mobile phone must support either
the “handsfree” or the “headset” prole. Many, but not all mobile phones
support these Bluetooth proles. Look for this information in your mobile
phone user guide.
Bluetooth Operating Range
In free air, your Phone Clip 2 supports Bluetooth operation up to a range
of approximately 10 meters. Line-of-sight between the devices is not
required. However, the following factors may affect the maximum range:
• Interference in the environment.
• The mobile phone which you are connecting to may support a more
limited range than the 10 meters supported by the Phone Clip 2.
If your mobile phone moves out of range, the connection will be
terminated. If the device is then moved again within the range, the Phone
Clip 2 will attempt to re-establish connection. Whether it achieves to do
so will depend on delay since the link was broken and on the mobile
phone properties.

17
Important Information
Maintenance and Care
• Clean the Phone Clip 2 using a damp cloth. Never use household
cleaning products (washing powder, soap etc…) or alcohol to clean the
device.
• When Phone Clip 2 is not in use, turn it OFF and store it safely.
• Protect Phone Clip 2 from excessive moisture (bathing, swimming)
and heat (radiator, car dashboard). Protect it from excessive shock and
vibration.
• Protect the microphone and charger inlets from debris and dirt.
If necessary, use the cleaning brush provided with your hearing
instruments to clean these areas.
General warnings
• Keep this device out of reach of children.
• Phone Clip 2 uses low-powered digitally coded transmissions in order
to communicate with other wireless devices. Although unlikely, nearby
electronic devices may be affected. In that case, move the Phone Clip 2
away from the affected electronic device.
• When using Phone Clip 2 and the device is affected by electromagnetic
interference, move away from the source.
• Avoid exposing your product to rain, moisture or other liquids to protect
against damage to the product or injury to you.
• Keep the product and any cords and cables away from operating
machinery.
• If the product overheats, if the product has been dropped or damaged,
if the product has a damaged cord or plug, or if the product has been
dropped in a liquid, discontinue use and contact your hearing care
professional.
!

• Dispose of the product according to local standards and regulations.
• Do not use in areas where there are explosive hazards.
Ignition of Flammable Atmospheres
• Do not use the product in environments where there is a danger of
ignition of ammable gasses.
General Precautions
• Do not use this device in locations where it is forbidden to use
electronic devices.
• X-ray radiation (e.g. CT scans, MRI scans) may adversely affect the
correct functioning of this device. We recommend that you switch the
device OFF before undergoing X-ray procedures and keep it outside
the room.
• High-powered electronic equipment, larger electronic installations and
metallic structures may impair and signicantly reduce the operating
range.
• If the hearing instruments do not respond to the device because of an
unusual eld disturbance, move away from the disturbing eld.
• Your hearing instruments and this device were given a unique
communication code during the tting. This ensures that the device will
not affect hearing instruments worn by others.
• Do not make any changes or modications to this device.
• Opening the Phone Clip 2 might damage it. If problems occur which
cannot be resolved, consult your hearing care professional.
• Phone Clip 2 may only be repaired by an authorized service centre.
• Do not use Phone Clip 2 in areas where RF transmission is prohibited,
e.g. air planes etc.
• Do only connect Phone Clip 2 to connections which it is explicitly
intended for.
18
!

19
Built-In Battery Care
• Your product is powered by a rechargeable battery.
• The full performance of a new battery is achieved only after two or three
complete charge and discharge cycles.
• The battery can be charged and discharged hundreds of times, but will
eventually wear out.
• Unplug the charger from the electrical plug and the product when not
in use.
• If left unused, a fully charged battery will lose its charge over time.
• Leaving the product in hot places, such as in a closed car in the
summer conditions, will reduce the capacity and lifetime of the battery.
• A product with a cold battery may not work temporarily, even when the
battery is fully charged. Battery performance is particularly limited in
temperatures well below freezing.
Battery warning!
• ”Caution” – The battery used in this product may present a risk of re or
chemical burn if mistreated.
• Do not attempt to open the product or replace the battery.
It is built-in and not changeable. Use of other batteries may present a
risk of re or explosion and the warranty will be terminated.
• The battery in your product can not be removed or replaced by the
user. Any attempt to do so is risky and may result in damage of the
product.
• Only recharge the Phone Clip 2 only with a power supply unit that has
been supplied together with the product.
• Dispose of batteries according to local regulations. Please recycle when
possible.
• Do not dispose the battery as household waste or in a re as it may
explode.
• Batteries may explode if damaged.
!

20
Charger Care
Please observe the following if the product is supplied with a charger.
• Do not attempt to charge your product with anything other than the AC
adapter provided. The use of any other types may damage or destroy
the product and could be dangerous. Use of other chargers may
invalidate any approval or warranty.
• For availability of approved enhancements, please check with your
hearing care professional.
• Charge the product according to the instructions supplied with the
product.
Charger warning!
• When you disconnect the power cord or any enhancement, grasp and
pull the plug, not the cord.
• Never use a charger that is damaged.
• Do not attempt to disassemble the charger as it may expose you to
dangerous electric shock.
• Incorrect reassembly can cause electric shock or re when the product
is subsequently used.
• Avoid charging your product in extremely high or low temperatures and
do not use the charger outdoors or in damp areas.
• Do not charge the Phone Clip 2 while it is on your body.
!
Table of contents