Q Mobility Group Access Alpha Type E+ Air 2023 User manual

Alpha Type E+ Air 2023
1x
4x 2x
1x
1x
AB C
NL: Installatiekit
GB: Installation kit
FR: Kit de montage
DE: Installationssatz
INSTALLATION MANUAL
TYPE E+
D E
NL: Voor bijkomende inlichtingen kunt uons steeds bereiken via info@auto-access.eu.
GB:For additional information you can always reach us via info@auto-access.eu.
FR:Pour plus d'informations, vous pouvez toujours nous contacter via info@auto-access.eu.
DE: Für weitere Informationen können Sie uns jederzeit über info@auto-access.eu erreichen.
Delften 23 Hal 83
B2390 Westmalle www.auto-access.eu
sales@auto-access.eu
Q-Access
Delften 23, hal 84
2390 Malle
+32 (0) 3 312 07 42
info@q-mobilitygroup.be
Installatie Handleiding
Installation Manual
Installation Manuel
Installationshandbuch
Access
Your car upgrade provider
Alpha Type E+ Air 2023
FORD RANGER 2023 XLT
FORD RANGER 2023 LIMITED
FORD RANGER 2023 WILDTRAK
FORD RANGER 2023 RAPTOR
Instalační Manuál
Instalační Manuál
Instalační Manuál

Installation Manual Type E+ Air
Access
by
+32 (0) 3 312 07 42
info@q-mobilitygroup.be1/8
NL: Installatiekit
GB: Installation kit
FR: Kit de montage
DE: Installationssatz
a.
e. f.
1x
4x
2x
1x
1x
AB C
NL: Installatiekit
GB: Installation kit
FR: Kit de montage
DE: Installationssatz
INSTALLATION MANUAL
TYPE E+
D E
NL: Voor bijkomende inlichtingen kunt uons steeds bereiken via info@auto-access.eu.
GB:For additional information you can always reach us via info@auto-access.eu.
FR:Pour plus d'informations, vous pouvez toujours nous contacter via info@auto-access.eu.
DE: Für weitere Informationen können Sie uns jederzeit über info@auto-access.eu erreichen.
Delften 23 Hal 83
B2390 Westmalle www.auto-access.eu
sales@auto-access.eu
b.
6x
1x
1x
4x
2x
1x
1x
AB C
NL: Installatiekit
GB: Installation kit
FR: Kit de montage
DE: Installationssatz
INSTALLATION MANUAL
TYPE E+
D E
NL: Voor bijkomende inlichtingen kunt uons steeds bereiken via info@auto-access.eu.
GB:For additional information you can always reach us via info@auto-access.eu.
FR:Pour plus d'informations, vous pouvez toujours nous contacter via info@auto-access.eu.
DE: Für weitere Informationen können Sie uns jederzeit über info@auto-access.eu erreichen.
Delften 23 Hal 83
B2390 Westmalle www.auto-access.eu
sales@auto-access.eu
c.
2x
1x
1x
4x
2x
1x
1x
AB C
NL: Installatiekit
GB: Installation kit
FR: Kit de montage
DE: Installationssatz
INSTALLATION MANUAL
TYPE E+
D E
NL: Voor bijkomende inlichtingen kunt uons steeds bereiken via info@auto-access.eu.
GB:For additional information you can always reach us via info@auto-access.eu.
FR:Pour plus d'informations, vous pouvez toujours nous contacter via info@auto-access.eu.
DE: Für weitere Informationen können Sie uns jederzeit über info@auto-access.eu erreichen.
Delften 23 Hal 83
B2390 Westmalle www.auto-access.eu
sales@auto-access.eu
d.
1x
4x
2x
1x
1x
AB C
NL: Installatiekit
GB: Installation kit
FR: Kit de montage
DE: Installationssatz
INSTALLATION MANUAL
TYPE E+
D E
NL: Voor bijkomende inlichtingen kunt uons steeds bereiken via info@auto-access.eu.
GB:For additional information you can always reach us via info@auto-access.eu.
FR:Pour plus d'informations, vous pouvez toujours nous contacter via info@auto-access.eu.
DE: Für weitere Informationen können Sie uns jederzeit über info@auto-access.eu erreichen.
Delften 23 Hal 83
B2390 Westmalle www.auto-access.eu
sales@auto-access.eu
1x1x
b.
1x
a.
1x
NL: Voor bijkomende inlichtingen kunt u ons steeds bereiken via info@q-mobilitygroup.be
GB: For additional information you can always reach us via info@q-mobilitygroup.be
FR: Pour plus d'informations, vous pouvez toujours nous contacter via info@q-mobilitygroup.be
DE: Für weitere Informationen können Sie uns jederzeit über info@q-mobilitygroup.be access eu erreichen
NL: Verwijder de sleutels van de hardtop voor je begint met de installatie.
GB: Remove the keys from the hardtop before starting the installation.
FR: Retirez les clés du toit rigide avant de commencer l'installation.
DE: Entfernen Sie die Schlüssel vom Hardtop, bevor Sie mit der Installation beginnen.
Access
CZ: Montážní sada
CZ:Před instalací vyjměte klíče z hardtopu.
CZ:
CZ: Před instalací vyjměte klíče z Hardtopu

1x
4x 2x
1x
1x
AB C
NL: Installatiekit
GB: Installation kit
FR: Kit de montage
DE: Installationssatz
INSTALLATION MANUAL
TYPE E+
D E
NL: Voor bijkomende inlichtingen kunt uons steeds bereiken via info@auto-access.eu.
GB:For additional information you can always reach us via info@auto-access.eu.
FR:Pour plus d'informations, vous pouvez toujours nous contacter via info@auto-access.eu.
DE: Für weitere Informationen können Sie uns jederzeit über info@auto-access.eu erreichen.
Delften 23 Hal 83
B2390 Westmalle www.auto-access.eu
sales@auto-access.eu
1x 4x 2x
1x 1x
AB C
NL: Installatiekit
GB: Installation kit
FR: Kit de montage
DE: Installationssatz
INSTALLATION MANUAL
TYPE E+
D E
NL: Voor bijkomende inlichtingen kunt uons steeds bereiken via info@auto-access.eu.
GB:For additional information you can always reach us via info@auto-access.eu.
FR:Pour plus d'informations, vous pouvez toujours nous contacter via info@auto-access.eu.
DE: Für weitere Informationen können Sie uns jederzeit über info@auto-access.eu erreichen.
Delften 23 Hal 83
B2390 Westmalle www.auto-access.eu
sales@auto-access.eu
1x
4x 2x
1x
1x
AB C
NL: Installatiekit
GB: Installation kit
FR: Kit de montage
DE: Installationssatz
INSTALLATION MANUAL
TYPE E+
D E
NL: Voor bijkomende inlichtingen kunt uons steeds bereiken via info@auto-access.eu.
GB:For additional information you can always reach us via info@auto-access.eu.
FR:Pour plus d'informations, vous pouvez toujours nous contacter via info@auto-access.eu.
DE: Für weitere Informationen können Sie uns jederzeit über info@auto-access.eu erreichen.
Delften 23 Hal 83
B2390 Westmalle www.auto-access.eu
sales@auto-access.eu
Access
Access
by
+32 (0) 3 312 07 42
info@q-mobilitygroup.be2/8
Installation Manual Type E+ Air
NL: Kabelboom (a + b)
GB: Wiring Loom (a + b)
FR: Harnais de fil (a + b)
DE: Kabelbaum (a + b)
a.
b.
1.
5.
2.
6.
3.
4.
b.
1
6
3
4
2
5
a.
CZ: Kabelový svazek (a+b)

NL: Schroef de massakabel (-) los van
de batterij.
GB: Unscrew the ground cable (-) from the battery.
FR: Dévisser le câble de mise à la terre (-)
de la batterie.
DE : Schrauben Sie das Massekabel (-) von der
Batterie ab.
1
Access
by
+32 (0) 3 312 07 42
info@q-mobilitygroup.be3/8
Access
NL: Verwijder de overige bramen met een vijl
en luchtdrukpistool en breng primer aan.
GB: Remove the remaining burrs with a file
and air gun and apply primer.
FR: Éliminez les bavures restantes avec une lime
et un pistolet à air et appliquez un apprêt.
DE: Entfernen Sie die verbleibenden Grate mit
einer Feile und einer Luftpistole und tragen Sie
die Grundierung auf.
3
NL: Boor een gat van 26mm ter hoogte
op de aangegeven positie.
GB: Drill a 26mm hole at the indicated position
FR: Percez un trou de 26 mm à la position indiquée.
DE : Bohren Sie an der angegebenen Stelle ein
26 mm Loch.
2
4
NL: Snij een stuk van de binnenbekleding langs
beide zijden in de bovenste hoeken van de Type E+
Air en ontvet de onderkant van de hardtop.
GB: Cut a piece of the inner lining along both
sides in the top corners of the Type E+ Air and
degrease the underside of the hardtop.
FR: Coupez un morceau de la doublure intérieure
aux deux côtés dans les coins supérieurs du Type E+
Air et dégraisser le dessous du hardtop.
DE: Schneiden Sie ein Stück des Innenfutters an
beiden Seiten in den oberen Ecken des Type E+ Air
ab und die Unterseite des Hardtops entfetten.
CZ: Odšroubujte
zemnící kabel (-)
zbaterie.
CZ:
Vyvrtejte 26mm otvor
v označené oblasti
CZ: Vyhlaďte oblast pilníkem a vzduchovou pistolí a
naneste primer.
CZ:
Odřízněte kus čalounění
podél obou stran horních
rohůTypu E+ Air a
odmaštěte spodní stranu hardtopu.
CZ: Odšroubujte zemnící kabel (-)
z
baterie.
CZ: vyvrtejte 26mm otvor
na vyznačené pozici.
CZ: odřízněte kus vnitřního čalounění
podél
obou stran vrchních rohůTypu E+ Air a
a odmaštěte spodní hranu hardtopu.
CZ: Odšroubujte
CZ:
CZ:
Vyvrtejte 26mm otvor
Odřízněte kus vnitřního čalounění
zemnící kabel (-)
z baterie.
na vyznačené pozici.
podél
obou stran vnitřních rohůTypu E+ Air a
odmaštěte spodní hranu hardtopu.

NL: Ontvet de bovenzijde van de laadbak.
GB: Degrease the bed rail.
FR: Dégraissez le bord du haut de la benne
DE: Entfetten Sie die Oberseite des Ladefläche
5
Access
by
+32 (0) 3 312 07 42
info@q-mobilitygroup.be4/8
NL: Kleef de montagestrip (e) in één stuk
op de bovenzijde van de laadbak.
GB: Apply the mounting tape (e) in one piece
on the upper side of the bed rail.
FR: Collez le strip de montage (e) sur le bord
de la benne en une partie.
DE: Befestigen Sie die Befestigungsleiste (e) in
einem Stück auf die Oberseite des Ladefläche.
6
NL: Breng silicoonkit aan in de
voegen van de laadbak vooraan.
GB: Apply silicone in the connections of
front bed area.
FR: Mettez silicone dans les
interstices de la benne.
DE: Tragen Sie Silikondichtungsmittel
in die Fugen gegen die Kabine.
7
NL: Positioneer de hardtop op
de laadbak met 4 personen.
GB: Position the hardtop on
the vehicle with 4 people
FR: Positionnez le hardtop sur
la voiture avec 4 personnes.
DE: Positionieren Sie das Hardtop mit
4 Personen auf derLadefläche.
8
Access
CZ: Odmaštěte
okraje korby vozu.
CZ: Nalepte těsnění (e)
v celku na horní straně
okraje korby vozu.
CZ: Naneste silikon
na spoje v přední části korby.
CZ:Umístěte hardtop
na auto pomocí 4 lidí.
CZ: Odmaštěte
CZ: Nalepte těsnění (e)
CZ: Naneste silikon
CZ: Umístěte hardtop
okraje korby vozu.
v jednom kuse na
vrchní stranu okrajůkorby vozu.
na spoje
v přední části nákladového prostoru.
na vozidlo
s pomocí 4 osob.

NL: Lijn de hardtop uit op de achterkant van de wagen
en zorg ervoor dat de rubber van de hardtop goed aansluit.
GB: Align the hardtop with the rear of the car and make
sure that the rubber of the hardtop fits properly.
FR: Alignez le hardtop avec l'arrière de la voiture et assurez
vous que le caoutchouc de l’hardtop est bien ajusté.
DE : Richten Sie das Hardtop am Heck des Autos aus und
achten Sie darauf, dass das Gummi des Hardtops richtig sitzt.
9
Access
by
+32 (0) 3 312 07 42
info@q-mobilitygroup.be5/8
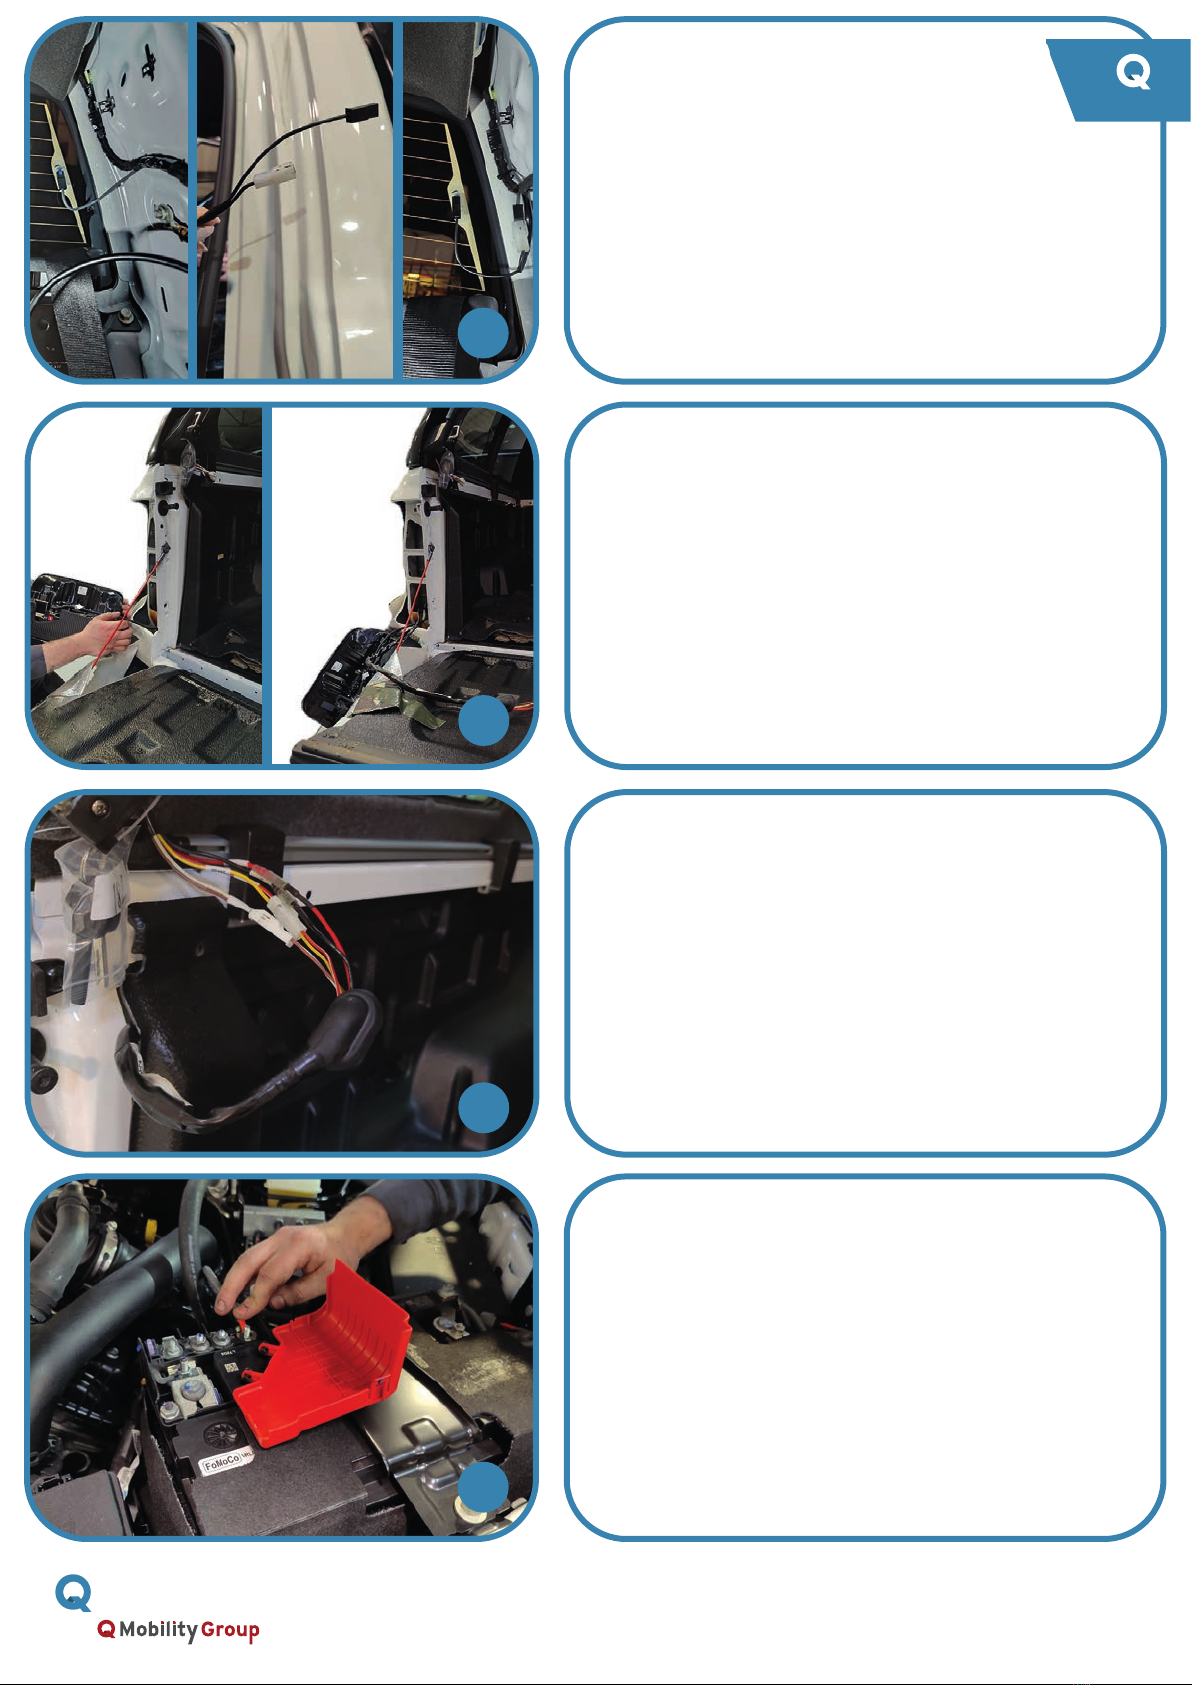
NL: Open de motorkap en laat kabelboom (a) zakken
langs de carroserie. Verbind de min van (1) met de massa.
GB: Open the hood and lower the wiring loom (a) along
the bodywork. Connect the minus of (1) to ground.
FR: Ouvrez le capot et abaissez le faisceau de câbles (a)
la carrosserie. Connectez le moins de (1) à la terre.
DE: Öffnen Sie die Motorhaube und senken Sie das
Kabel (a) entlang der Karosserie ab. Verbinden
Sie den Minus von (1) mit Masse.
11
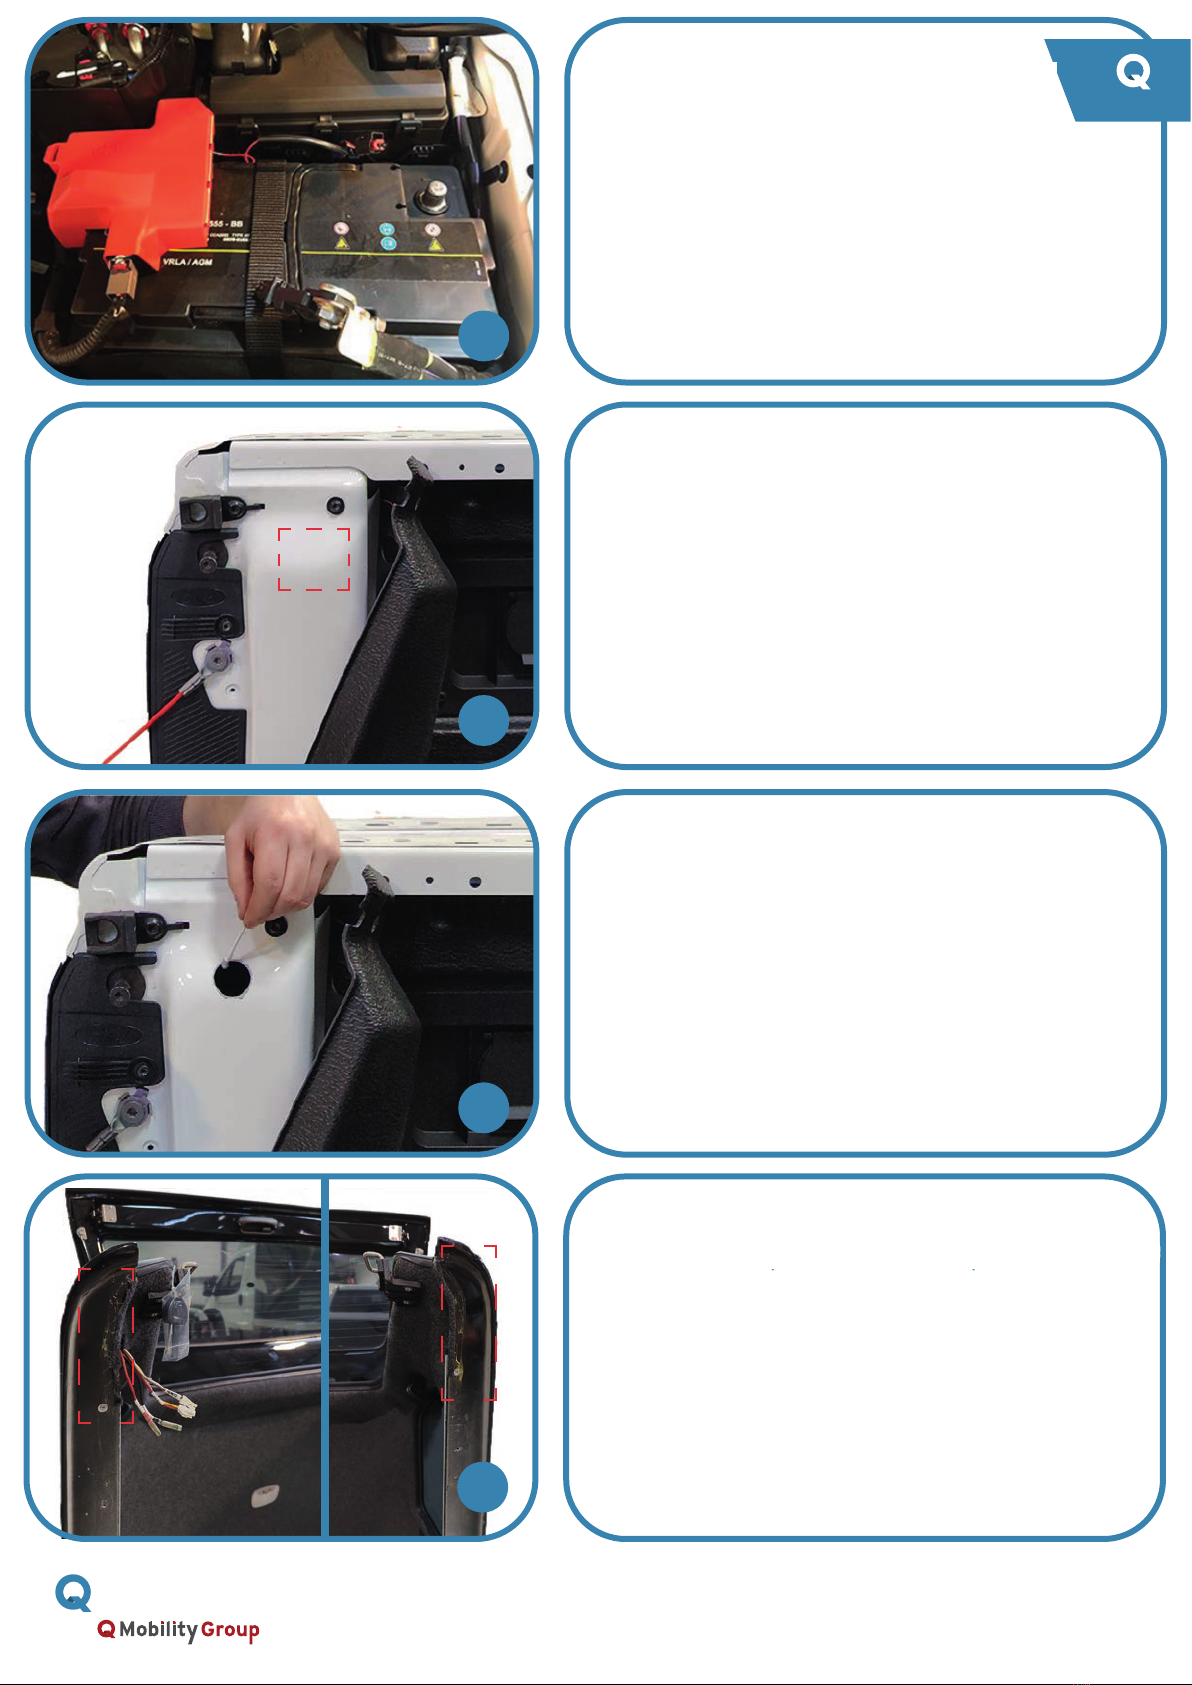
NL: Zet de hardtop vast met de bijgeleverde
klemmen (c) en (d) (aanhaalmoment = 7 NM)
GB: Secure the hardtop with the supplied
clamps (c) and (d) (tightening torque = 7 NM)
FR: Fixez le hardtop avec les pinces fournies (c) et (d)
(couple de serrage = 7 NM)
DE: Befestigen Sie das Hardtop mit den mitgelieferten
Klemmen (c) und (d) (Anzugsmoment = 7 NM)
10
d
cc c
c
d
NL: Trek de kabelboom (a) over het chassis van de
voorkant van de wagen naar het linker achterlicht.
Bevestig aan de originele kabel met kabelbinders.
GB: Pull the wiring loom (a) over the chassis from
the front of the car to the rear left brake light.
Strap to the original cable with cable ties
FR: Tirez le faisceau de câbles (a) sur le châssis de
l'avant de la voiture vers le feu stop gauche. Attachez
le faisceau de câbles au câble d'origine avec des colliers.
DE: Führen Sie das Kabel (a) über das Chassis von der
Vorderseite des Fahrzeugs zum linken Rücklicht.
Befestigen Sie das Originalkabel mit Kabelbinder.
12
b.
1
6
3
4
2
5
a.
Access
CZ: Zarovnejte hardtop
CZ: Upevněte
CZ: Otevřete kapotu a položte
CZ: Protáhněte kabeláž (a)
s zadní částí vozu
a ujistěte se, že těsnění hardtopu sedí správně.
hardtop dodanými
kabeláž (a)
skrz podvozek
svorkami (c) a (d)
podél karosérie.
ze předku vozidla k levému zadnímu brzdovému světlu.
(utahovací moment = 7NM)
Spojte mínus (1) k zemění.
z
přední části vozu k levému zadnímu brzdovému světlu.
Připevněte k originálním kabelům kabelovými svorkami.

NL: Sluit kabelboom (b) aan op punt 2 van kabelboom
(a). Doe dit ter hoogte van de brandstoftank.
GB: Connect the wiring loom (b) to point 2 of wiring
loom (a). Do this near the fuel tank.
FR: Connectez le faisceau de câbles (b) au point 2
du faisceau de câbles (a). Faites-le près du
réservoir de carburant.
DE: Kabelbaum (b) an Punkt 2 des Kabelbaums (a)
anschließen. Tun Sie dies in der Nähe
des Kraftstofftanks.
13
Access
by
+32 (0) 3 312 07 42
info@q-mobilitygroup.be6/8
NL: Ontkoppel de originele stekker voor het
slot van de wagen, verbind deze met punt 3 van
kabelboom (a) ! Belangrijk dit is de stekker aan
de achterkant rechts van de wagen (niet links) !
GB: Detach the original plug for the lock of the car and
connect it to point 3 of wiring loom (a) ! Important this is
the plug at the rear right of the car (not left) !
FR: Déconnectez la fiche d'origine de la serrure de la
voiture et connectez-la au point 3 du faisceau de câbles (a)
! Important c'est la fiche à l'arrière droit de la voiture !
DE: Originalstecker für das Autoschloss abziehen und an
Punkt 3 des Kabelbaums (a) anschließen ! Wichtig das ist
der Stecker hinten rechts am Auto (nicht links)!
14
Before After
(3)
NL: Verwijder het rubber aan de binnenkant van de
deur en daarna de instaplijst en de afdekkappen.
GB: Remove the rubber on the inside of the
door and then the door sill and the covers.
FR: Retirez le caoutchouc à l'intérieur du
porte, puis le seuil de porte et les couvercles.
DE: Entfernen Sie das Gummi auf der Innenseite
des Tür und dann die Einstiegsleiste und
die Abdeckungen.
15
NL: Verwijder het klepje van de zwarte top met
blauwe markering en trek hier kabelboom (b) door.
GB: Remove the black top cover with blue marking
and pull the wiring loom (b) through it.
FR: Retirez le couvercle supérieur noir avec marquage
bleu et tirez le faisceau de câbles (b) à travers celui-ci.
DE: Entfernen Sie die schwarze obere Abdeckung mit
blauer Markierung und ziehen Sie den Kabelbaum (b)
hindurch.
16
Access
CZ: Spojte
CZ: Odpojte původní zástrčku zámku auta a
CZ:
CZ: Vyjměte
kabeláž (b) do bodu 2
kabeláže (a).
zapojte ji do bodu 3 kabeláže (a) !
Vyjměte těsnění
černý vrchní kryt s modrým označením
Proveďte to blízko nádrže.
Důležité,
jedná se o zástrčku vpravo vzadu auta (ne na levo) !
z vnitřní strany zadních dveří
a poté
a protáhněte
práh dveří a kryty.
kabeláž (b) skrz vzniklý otvor.

NL: Ontkoppel van boven de originele stekker voor
de achterruitverwarming en koppel hier punt (6)
van kabelboom (b) op aan.
GB: Disconnect the original plug for the rear
window heating from above and connect point (6)
of the wiring loom (b) to it.
FR: Débrancher par le haut la fiche d'origine du
chauffage de lunette arrière et y brancher le point
(6) du faisceau de câbles (b).
DE: Originalstecker der Heckscheibenheizung von
oben abziehen und Punkt (6) des Kabelbaums
(b) daran anschließen.
17
(6)
Before After
Access
by
+32 (0) 3 312 07 42
info@q-mobilitygroup.be7/8
NL: Verbind punt (4) kabelboom (a) met de stekker
van de hardtop.
GB: Connect point (4) wiring loom (a) to the plug
of the hard top.
FR: Connectez le point (4) du faisceau (a)
au connecteur du toit rigide.
DE: Punkt (4) des Kabelbaums (a) am
Hardtop-Steckverbinder anschließen.
19
NL: Verwijder het linker achterlicht en trek
punt (4) van kabelboom (a) hierdoor.
GB: Remove the left rear light and pull point (4)
of wiring loom (a) through it.
FR: Déposez le feu arrière gauche et tirez le
point (4) du faisceau de câbles (a) à travers celui-ci.
DE : Linkes Rücklicht ausbauen und Punkt (4)
des Kabelbaums (a) durchziehen.
18
19
20
NL: Verbind de plus van punt (1) van kabelboom (a)
met de batterij.
GB: Connect the positive of point (1) of
wiring loom (a) with the battery.
FR: Connecter le positif du point (1) du faisceau
de câbles (a) avec la batterie.
DE: Verbinden Sie den Pluspol von Punkt (1)
des Kabelbaums (a) mit der Batterie.
Access
CZ: odpojte
CZ:
CZ: Spojte
CZ: Spojte pozitivní
původní zástrčku
Vyjměte levé zadní světlo
bod (4) kabeláže (a)
bodu (1) kabeláže (a)
odmražování zadního okna
a protáhněte
k zástrčce hardtopu.
s
shora
bod (4) kabeláže (a)
baterií.
a připojte k němu bod (6) kabeláže (b)
skrz vzniklý otvor.

NL: Test de volgende punten
1. Achterruitverwarming
2. Derde stoplicht
3. Centrale vergrendeling
4. Binnenverlichting
GB: Test the following points
1. Rear window defroster
2. Third brake light
3. Central locking system
4. Interior light 20
FR: Testez les points suivants
1. Chauffage de la lunette arrière
2. Troisième feu de stop
3. Verrouillage centralisé
4. Eclairage intérieure
DE: Testen Sie die folgenden Punkte
1. Heckscheibenheizung
2. Dritte Bremsleuchte
3. Zentralverriegelung
4. Innenbeleuchtung
Access
by
+32 (0) 3 312 07 42
info@q-mobilitygroup.be8/8
Access
Q-Access
Delften 23, hal 84
2390 Malle
+32 (0) 3 312 07 42
info@q-mobilitygroup.be
Alpha Type E+ Air 2023
CZ: Zkontrolujte následující body
1. Odmražování zadního okna
2. Třetí brzdové světlo
3. Centrální zamykání
4. Vnitřní světlo
Other Q Mobility Group Automobile Accessories manuals
Popular Automobile Accessories manuals by other brands

WABCO
WABCO TP2205 installation guide

SpeedTech Lights
SpeedTech Lights K-FORCE 27 LINEAR instruction manual

Alberen
Alberen iTAKSI M12 user guide

Saab
Saab 12 797 660 installation instructions

Aerpro
Aerpro VE 2 Series Installation & user manual

Metra Electronics
Metra Electronics 99-7819 installation instructions

MadJax
MadJax 14-011 installation instructions

Subaru
Subaru F411SFL050 installation instructions

Tuffy
Tuffy TJ 055 installation instructions

walser
walser 30864 (S) User instructions

RHINO 4x4
RHINO 4x4 EVO 3D installation instructions

Masterbuilt
Masterbuilt HITCH-HAUL Bike Carrier HEDB2 Assembly and operating instructions