Qiagen Q-Base User manual

Sample to Insight__
January 2019
Q-Base
User Manual

Q-Base User Manual 01/2019
2
Contents
1Introduction........................................................................................................4
1.1 About this user manual............................................................................4
1.2 Intended use of the QIAcube Connect.........................................................5
1.3 Requirements for QIAcube Connect users....................................................6
2Safety Information...............................................................................................7
3General Description .............................................................................................7
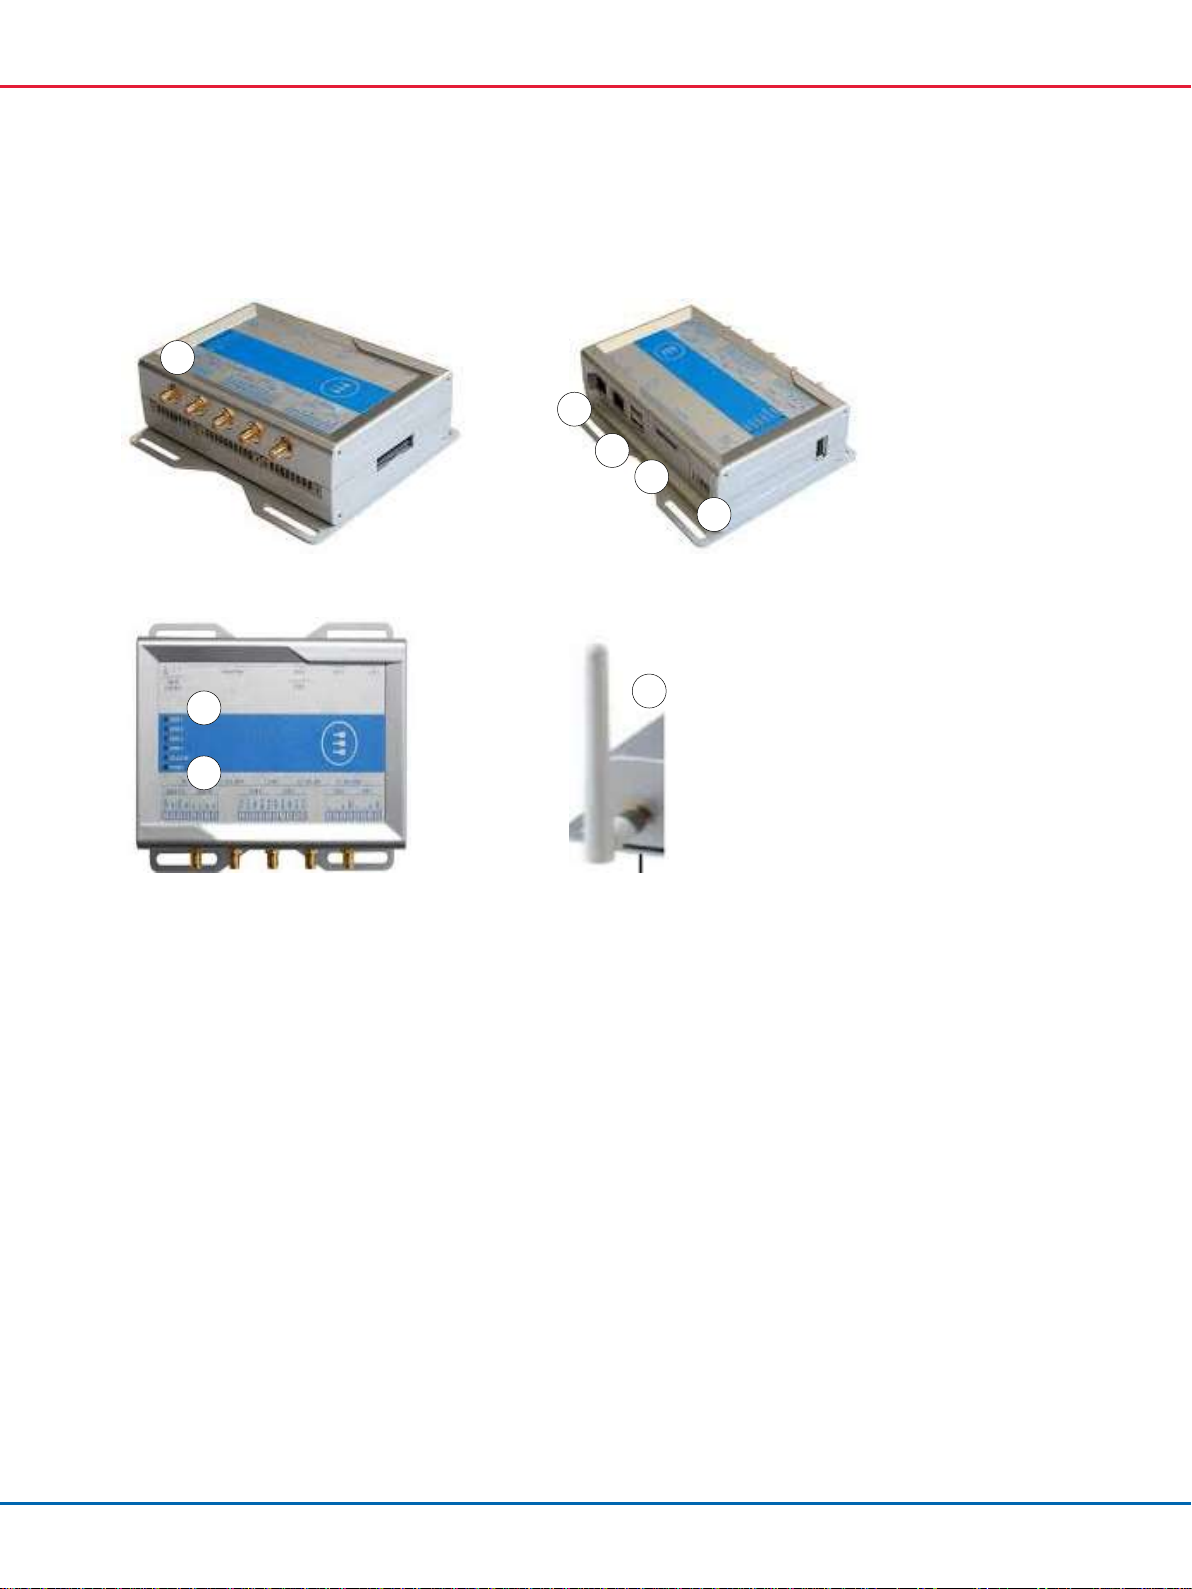
3.1 External features of Q-Base......................................................................8
4Installation Procedures..........................................................................................9
4.1 Site requirements....................................................................................9
4.2 Power requirements................................................................................9
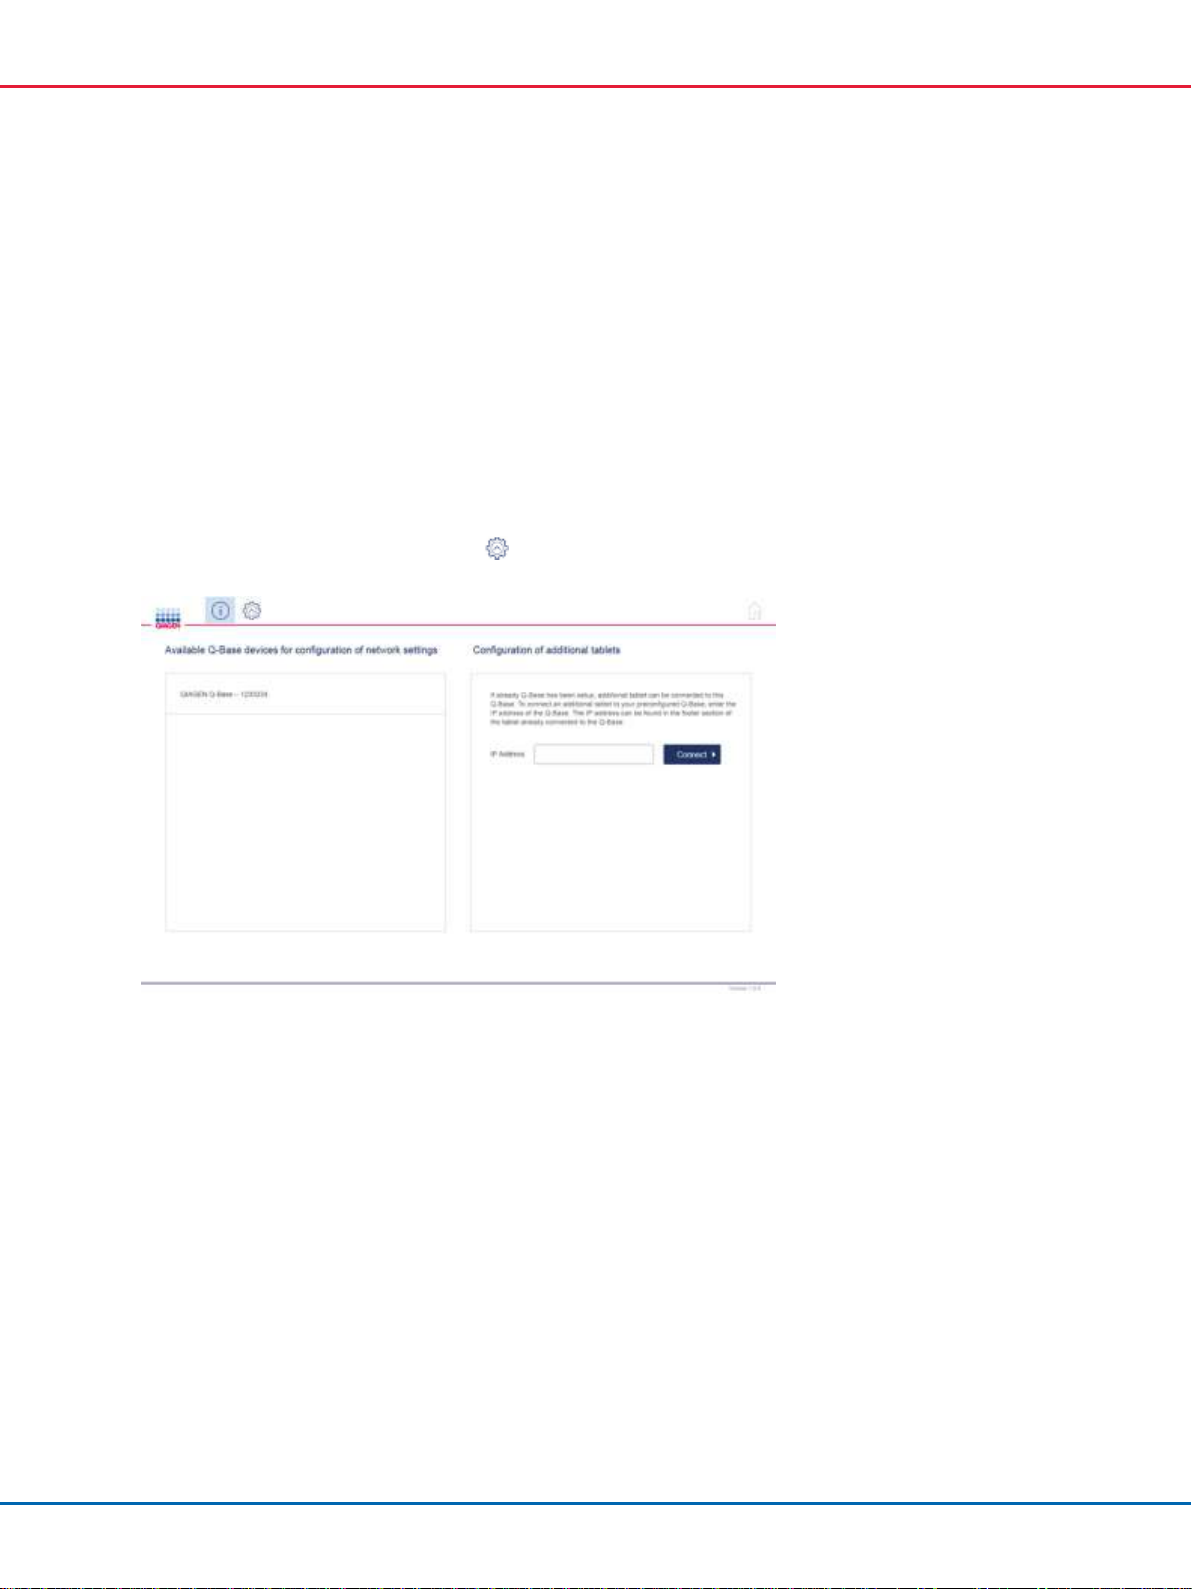
4.3 Connecting Q-Base to your network...........................................................9
4.4 Connecting additional tablets to an existing Q-Base....................................17
4.5 Administration of Q-Base via Webmin......................................................17
4.6 Factory reset of Q-Base .........................................................................20
4.7 Insert/remove the microSD card..............................................................21
5QIAcube Connect app features.............................................................................22
5.1 Instrument status ..................................................................................22
5.2 Run setup............................................................................................23
5.3 Maintenance........................................................................................24
5.4 History ...............................................................................................24
5.5 In-app notification ................................................................................24
6Troubleshooting.................................................................................................25
6.1 General information..............................................................................25
6.2 Contacting QIAGEN Technical Services .....................................................25
6.3 FAQs..................................................................................................25
7Glossary ..........................................................................................................28
8Appendix A Technical Details ............................................................................29
8.1 Technical data......................................................................................29
8.2 Declaration of Conformity ......................................................................29

Q-Base User Manual 01/2019
3
8.3 Certificates..........................................................................................29
8.4 Waste Electrical and Electronic Equipment (WEEE).......................................29
8.5 FCC Declaration ...................................................................................29
9Appendix B Ordering Information......................................................................30
Ordering Information.........................................................................................30
10 Version history..................................................................................................31

Q-Base User Manual 01/2019
4
1Introduction
Before using the Q-Base, it is essential that you read this user manual carefully and pay attention to
the safety information. The instructions and safety information must be followed to ensure safe
operation of the instrument and to maintain the instrument in a safe condition.
QIAGEN brings the QIAcube Connect customer experience to the next level with remote instrument
monitoring through Q-Base (an IoT gateway) and the QIAcube Connect tablet application. The
gateway can be connected to one or more QIAcube Connect instruments and serves as an interface
between the instrument and the QIAcube Connect tablet application.
Schematic view of connection and data flow between Q-Base, QIAcube Connect and a tablet device
1.1 About this user manual
This user manual provides information about the QIAcube Connect in the following sections:
1. Introduction
2. Safety Information
3. General Description
4. Installation Procedures
5. QIAcube Connect App Features
6. Troubleshooting
7. Glossary
8. Appendix A Technical Details
9. Appendix B Ordering Information
10.Version History

Q-Base User Manual 01/2019
5
1.1.1 Technical assistance
At QIAGEN®, we pride ourselves on the quality and availability of our technical support. Our
Technical Services Departments are staffed by experienced scientists with extensive practical and
theoretical expertise in molecular biology and the use of QIAGEN products. If you have any
questions or experience any difficulties regarding the QIAcube Connect or QIAGEN products in
general, do not hesitate to contact us.
QIAGEN customers are a major source of information regarding advanced or specialized uses of
our products. This information is helpful to other scientists as well as to the researchers at QIAGEN.
We therefore encourage you to contact us if you have any suggestions about product performance
or new applications and techniques.
For technical assistance and more information, please see our Technical Support Center at
www.qiagen.com/support/technical-support or call one of the QIAGEN Technical Service
Departments or local distributors (see back cover or visit www.qiagen.com).
1.1.2 Policy statement
It is the policy of QIAGEN to improve products as new techniques and components become
available. QIAGEN reserves the right to change specifications at any time.
To produce useful and appropriate documentation, we appreciate your comments on this user
manual. Please contact QIAGEN Technical Services.
1.2 Intended use of the QIAcube Connect
Q-Base enables users to connect the QIAcube Connect app running on a tablet to their QIAcube
Connect instrument(s) via local intranet. The Q-Base interface manages the instrument data transfer
from QIAcube Connect to the QIAcube Connect app. Q-Base is connected to intranet,
for example via Wi-Fi. Once installed, Q-Base does not require regular operation or maintenance
activities.
The QIAcube Connect App and Q-Base are only sold together with QIAcube Connect instruments
and are to be used in a laboratory setting by trained personnel. The QIAcube Connect App and
Q-Base are intended for molecular biology applications. These products are not intended for the
diagnosis, prevention or treatment of a disease.

Q-Base User Manual 01/2019
6
1.3 Requirements for QIAcube Connect users
The table below covers the general level of competence and training necessary for transportation,
installation, use, maintenance, and servicing of the QIAcube Connect.
Task
Personnel
Training and experience
Delivery
No special requirements
Installation, routine use and
maintenance
Laboratory technicians or equivalent
Appropriately trained and
experienced personnel familiar
with use of computers and
automation in general
Servicing
QIAGEN Field Service Specialists only
Trained and authorized by
QIAGEN

Q-Base User Manual 01/2019
7
2Safety Information
Before installing or using Q-Base, it is essential that you carefully read the user manual provided by
the hardware supplier Eurotech and pay attention to their safety information. The instructions and
safety information in this user manual must be followed to ensure safe operation of the instrument
and to maintain the instrument in a safe condition.
The safety information for Q-Base (Eurotech Reliagate 10-12) can be found at this site:
https://www.eurotech.com/en/products/iot/multi-service-iot-edge-gateways/reliagate-10-12
3General Description
The Q-Base hardware enables connection of the QIAcube Connect app running on a tablet to
QIAcube Connect instruments via a local intranet connection. The Q-Base interface manages the
instrument data transfer from the QIAcube Connect instrument(s) and provides this data to the
QIAcube Connect app. Q-Base can be connected to the intranet via Wi-Fi or LAN. The initial
network settings of Q-Base are configured via the QIAcube Connect app using a Bluetooth®
connection between Q-Base and the tablet.
The QIAcube Connect app provides real-time status monitoring of QIAcube Connect instrument(s).
The app also displays the QIAcube Connect run setup according to the selected application protocol
and sample number.

Q-Base User Manual 01/2019
8
3.1 External features of Q-Base
Front view of Q-Base
Rear view of Q-Base
Top view of Q-Base
Q-Base Wi-Fi antenna
1
2.4 GHz Wi-Fi/Bluetooth antenna connector
5
Power cord socket
2
RJ-45 Ethernet port (ETH 1)
Note: Do not remove the plug of Ethernet port ETH 0.
Do not use Ethernet port ETH 0
6
Green LED indicator for Bluetooth on/off (first LED)
7
Blue LED indicator for power on/off (last LED)
3
USB port (connector 0)
8
Wi-Fi/Bluetooth antenna (to be installed before first use)
4
Service panel (includes micro SD card slot, factory reset button
and backup battery)
For more details regarding hardware features, refer to the user manual provided by Eurotech:
https://www.eurotech.com/en/products/iot/multi-service-iot-edge-gateways/reliagate-10-12
1
2
3
4
5
8
6
7

Q-Base User Manual 01/2019
9
4Installation Procedures
This section provides instructions on installing Q-Base on your local network.
4.1 Site requirements
Q-Base must be connected to the same network as the QIAcube Connect instrument and the tablet.
Q-Base does not need to be located in close proximity to the QIAcube Connect for the connection
to work properly.
4.2 Power requirements
Q-Base requires the following power supply: 100 240 V AC, 50/60 Hz
The included power supply transforms the voltage to the operational voltage of 6-36 V DC. Ensure
that the voltage rating of the Q-Base is compatible with the AC voltage available at the installation
site. Mains supply voltage fluctuations are not to exceed 10% of nominal supply voltages.
Important: The power connector is NOT protected against short circuit. Always include an external
fuse to protect the product.
Details about power supply specifications and how to supply power can be found in user manual
from Eurotech:
https://www.eurotech.com/en/products/iot/multi-service-iot-edge-gateways/reliagate-10-12
4.3 Connecting Q-Base to your network
This section describes how to initially set up Q-Base within your network and ensure the connection
to your QIAcube Connect instrument.
Note: If you would like to connect Q-Base to your LAN, and your LAN does not support automatic
assignment of IP addresses (not supporting DHCP), you might need support from your IT department
or an IT professional.
1. Install the Wi-Fi/Bluetooth antenna to the leftmost antenna connector as shown in section 3.1,
External features of Q-Base.
Note: Do not use any other port to install the Wi-Fi/Bluetooth antenna.

Q-Base User Manual 01/2019
10
2. Power up the Q-Base by plugging the power cord into an appropriate power socket. If you
use a LAN cable to connect to your network, plug the LAN cable into ethernet port ETH1
before you switch on the Q-Base
Important: Do not use Ethernet port ETH0 for the LAN connection.
Note: Bluetooth is automatically turned off after 10 minutes.
3. Turn on the tablet and launch the QIAcube Connect app.
4. Read and accept the app terms and agreement to proceed. The terms and agreement only
appear during the first launch of the application.
5. Turn on Bluetooth on the tablet.
6. On the tablet, press the Configuration icon ( ) to start Bluetooth pairing between Q-Base
and the tablet.
Note: For successful Bluetooth pairing between Q-Base and the tablet, the devices must be
within a maximum range of 10 meters.
7. After a few seconds, the Q-Base name will be listed under Available Q-Base devices for the
first time configuration.
Note: If the Q-Base cannot be found, refresh the Bluetooth search by pressing the
Configuration icon again.
8. Select the Q-Base name from the list to pair Q-Base with the tablet via Bluetooth.

Q-Base User Manual 01/2019
11
9. Enter the default login details. The User Name is Admin and the Password is Qiagen123.
10.The QIAcube Connect app will prompt you to change the password. Enter a password of your
choice according to the password rules provided by the app, and then press Reset.
11.Enter the LAN or Wi-Fi settings as described in sections 4.3.1 or 4.3.2 before proceeding
with step 11.

Q-Base User Manual 01/2019
12
Note: Do not press Finish Configuration before you have entered the IP address of Q-Base into
the QIAcube Connect instrument. The Q-Base IP address can be found in the right information
panel in the app.
12.Turn on the QIAcube Connect instrument and log in as an admin user.
13.On the QIAcube Connect touchscreen, select the Configuration tab, and then select the Q-
Base tab as shown below.
14.Make sure that the box next to Communication Enabled is checked

Q-Base User Manual 01/2019
13
15.Enter the Q-Base IP address in the Q-Base URL field on the QIAcube Connect touchscreen. The
IP address is shown in the QIAcube Connect app. Type the IP address into the field or scan
the barcode (see screenshot below).
Note: Do not press Test on the QIAcube Connect touchscreen before pressing Finish
Configuration on the tablet. Otherwise the test will be unsuccessful.
Note: The IP address shown above is just an example.
16.Once you have entered the Q-Base IP address, press Apply to continue.
17.Press Finish Configuration on the tablet.
Important: Finish Configuration, the connection will only be established after
10 minutes, automatically.
18.Optional: Wait for 10 seconds and press Test on the QIAcube Connect touchscreen to test for
a functional connection.
19.Reboot the QIAcube Connect instrument to start the connection and receive the instrument
status.

Q-Base User Manual 01/2019
14
4.3.1 Connecting to WLAN/Wi-Fi
Note: Q-Base only supports connection to Wi-Fi networks with visible SSIDs and WPA2.
1. Press the WLAN tab to configure the Wi-Fi connection.
2. Press Scan to search for available Wi-Fi networks.
3. Select the desired Wi-Fi network from the list of Available networks.
4. Once selected, enter the Wi-Fi password in the Password field.
Note: The server, SSID and security type details will be automatically filled.
5. Press Connect.
6. Proceed with step 12 in section 4.3 (page 12).

Q-Base User Manual 01/2019
15
4.3.2 Connecting to LAN (static IP or DHCP)
LAN connection with a static IP
Note: If you would like to connect Q-Base to a LAN that does not support automatic assignment of
IP addresses (i.e., does not support DHCP), you might require additional support from an IT
professional.
Note: When entering details into the screen above, Static IP Manual is selected by default
1. In the IP address field, enter the IP address that should be used for the Q-Base.
2. In the Subnet mask field, enter the subnet mask that should be used for the Q-Base.
3. Optional: Enter the DNS server in the DNS server field.
4. In the Gateway field, enter the IP address of the gateway.
5. Press Connect.
Note: The first time Q-Base is configured for LAN, there may be a delay of approximately 2 4
minutes to reach the provided Q-Base URL through the tablet app.
6. Proceed with step 12 in section 4.3 (page 12).

Q-Base User Manual 01/2019
16
LAN connection using DHCP
1. To use DHCP-configured LAN, select DHCP in the Device network settings area.
Note: When using DHCP-configured LAN, the network settings for Q-Base will be obtained
automatically from the DHCP server. No further input is required.
2. Proceed with step 12 in section 4.3 (page 12).
Note: The first time Q-Base is configured for LAN, there may be a delay of approximately 2 4
minutes to reach the provided Q-Base URL through the tablet app.

Q-Base User Manual 01/2019
17
4.4 Connecting additional tablets to an existing Q-Base
Multiple tablets can be connected to one Q-Base.
1. In the QIAcube Connect app, press the Configuration icon ( ).
2. Enter the IP address of the existing Q-Base.
Note: The Q-Base IP address can be found in the QIAcube Connect app of the first configured
tablet in the bottom left corner of the screen.
3. Press the Connect icon.
4. Press the tab Home button to receive the first data.
4.5 Administration of Q-Base via Webmin
Q-Base administration can be performed via Webmin, using an internet browser on a personal
computer that is connected to the network via a secure https connection. To connect to Webmin,
enter the IP address of the Q-Base and port 10000 within the internet browser.
Proceed as follows:
1. Open a web browser on the personal computer (e.g., Internet Explorer®).
2. Type the connection details into the address field and press Enter. Use this format: https:\\
followed by the Q-Base IP address followed by port 10000.
Example: https:\\10.100.226.170:10000

Q-Base User Manual 01/2019
18
Note: The Q-Base IP address can be found in the QIAcube Connect app of the first configured
tablet in the bottom left corner of the screen.
Note: Q-Base uses a self-signed certificate for the https connection. Therefore, the browser
may issue a security warning. Ignore the warning or add an exception to access the Q-Base
configuration.
3. Log in user name and the password.
4. Perform the desired Q-Base action(s) as described in sections 4.5.1 4.5.7.

Q-Base User Manual 01/2019
19
4.5.1 Bluetooth on/off
Click the Bluetooth On/Off buttons to turn Bluetooth on or off. If Bluetooth is turned on, the LED
User 1 will illuminate green on the Q-Base.
4.5.2 Wi-Fi on/off
Click the Wi-Fi On/Off buttons to turn Wi-Fi on or off.
4.5.3 Save log files
To save the log file from Q-Base, follow these steps below.
1. Insert the USB stick into the Q-Base USB port (connector 0).
2. Click Mount USB Drive and then click Copy Log File.
3. The log files will be copied onto the USB stick.
4. Click Unmount USB Drive before removing the USB drive.
4.5.4 Change admin password
To change the Q-Base login password, enter the password into the Enter Password field. Re-type
the password in the Confirm Password field, and click the Set Change Admin Password button.
4.5.5 Reboot of Q-Base
Click the Reboot button to reboot the Q-Base.
4.5.6 Set the number of run records (report files)
The number of run records (report files) can be configured from 1 60 per the QIAcube Connect
instrument.
1. Enter the value from 1 60 in the Number of run records field.
2. Click the Set number of run records button.

Q-Base User Manual 01/2019
20
4.5.7 Update Q-Base software
New versions of software for Q-Base can be downloaded from the following site:
www.qiagen.com/MyQIAcubeConnect.
Follow the steps below to update the software.
1. Prepare the USB stick by copying the newest rpm file from our webpage into the main folder.
2. Insert the USB stick into the Q-Base USB port (connector 0).
3. Click Mount USB Drive and then click Copy Log File.
4. Click Copy RMP from USB to copy the rpm file onto the Q-Base.
5. Click Upgrade system.
6. Wait until the Upgrade system button is disabled. This indicates that the update process is
complete.
7. Click Unmount USB Drive before disconnecting the drive from Q-Base.
4.6 Factory reset of Q-Base
If required, Q-Base can be reset to the original factory settings.
Note: When performing a factory reset, all existing data including log files and settings will be
deleted. The Q-Base password will be reset to the default password Qiagen123. The Q-Base will
be rebooted and will start with the first time configuration (section 4.3). The USER1 LED will blink
during the factory reset, and will turn off when the factory reset is complete.
Press the reset button on the service panel for at least 10 seconds to perform the factory reset.
Other manuals for Q-Base
1
Table of contents
Other Qiagen Measuring Instrument manuals
Popular Measuring Instrument manuals by other brands

AEA Technology
AEA Technology Liberator Series Operation manual

Hanna Instruments
Hanna Instruments pHep HI 98107 instruction manual

EUTECH INSTRUMENTS
EUTECH INSTRUMENTS Oakton CON 510 instruction manual

Awite
Awite AwiFLEX XL Original instruction manual

F&F
F&F WNC-3 manual

DeFelsko
DeFelsko PosiTector 200 instruction manual

Hanna Instruments
Hanna Instruments HI9811-51 instruction manual

Campbell
Campbell LI200RX instruction manual

NDT Systems
NDT Systems NovaScope 5000 user manual

HYDAC International
HYDAC International FMM-O-M Installation and maintenance instructions

Triplett
Triplett CM1050 user manual

SICK
SICK VMS6200 operating instructions