Qilive Q.6257 User manual

Ultra-silent fan
Q.6257
FR Ventilateur ultra-silencieux
ES Ventilador ultrasilencioso
PT Ventoinha de pé
PL Ultracichy wentylator
HU Rendkívül csendes ventilátor
RO Ventilator ultra silențios
RU Бесшумный вентилятор
UA Надзвичайно тихий вентилятор

User manual P. 4
Manuel d’utilisation P. 13
Manual del usuario P. 23
Manual do utilizador P. 32
Instrukcja użytkownika S. 41
Használati útmutató 51. o.
Manual de utilizare P. 60
Руководство пользователя C. 69
Посібник користувача C. 79
EN
FRFR
ES
PT
PL
HU
RO
RU
UA

15
16
17
18
20
19
21
22
1 2 3 4 5 86 7
10
9
11
14
13
12
EN
FR
ES
PT
PL
HU
RO
RU
UA

4
1. SAFETY INFORMATION
Before using this product, carefully read these instructions
and keep the user manual for future reference.
1. Before connecting the product to a wall socket, ensure
that the local electrical current matches the one
specified on the product’s nameplate. This product
should only be connected to a grounded socket.
2. This product is for indoor use only. No other use
(professional) is permitted.
3. This appliance can be used by children aged from
8 years and above and persons with reduced
physical, sensory or mental capabilities or lack of
experience and knowledge if they have been given
supervision or instruction concerning use of the
appliance in a safe way and understand the hazards
involved. Children shall not play with the appliance.
Cleaning and user maintenance shall not be made
by children without supervision.
4. Ensure that the fan is switched off from the supply
mains before removing the guard.
5. Do not under any circumstance remove the fan
guards for either maintenance or cleaning.
6. Do not submerge the product, mains cable or plug in
water or any other liquid.
7. WARNING: Do not use this product in or around
bathtubs, showers, sinks, or other sources of water.
TABLE OF CONTENTS:
1. SAFETY INFORMATION P. 4
2. TECHNICAL DATA P. 7
3. DESCRIPTION P. 7
4. INSTALLATION P. 7
5. USE P. 9
6. MAINTENANCE AND CLEANING P. 11
7. GUARANTEES AND LIMITATIONS OF LIABILITY P. 11

55
EN
8. CAUTION: Do not use this product near water.
9. This product is not intended to be used through a
remote control system or external timer.
10. Do not cover the product during use.
11. This product must be positioned on a flat surface for
use. Do not turn over while in use.
12. CAUTION: Keep all ventilation outlets around the
product clear.
13. WARNING: Improper use of this product could result
short circuits, fires, electric shocks or other hazards.
14. WARNING: Avoid contact with moving parts. Never
insert fingers or any other part of your body or any
object through the fan guard. Adults should pay
special attention when using this fan close to children.
15. This product is intended for home use and for use in
similar environments such as:
- kitchen areas for staff in shops, offices or other
work environments;
- farms;
- by customers in hotels, motels and other residential
environments;
- guest room type environments.
16. This product is not suitable for outdoors use.
17. The mains cable should be regularly examined for
damage or deterioration. Do not use the product if
the mains cable is found to be damaged.
18. Do not leave the product unattended when in
operation.
19. For detailed information on setting up the product,
refer to the corresponding sections of your user
manual.
20. WARNING: Entirely assemble the product prior to use.
21. Never plug in or unplug the mains plug when your
hands are wet.
22. Do not change or modify the product, as this affects
the safety of the product. Caution, risk of injury!
23. Observe the following battery safety guidelines.

6
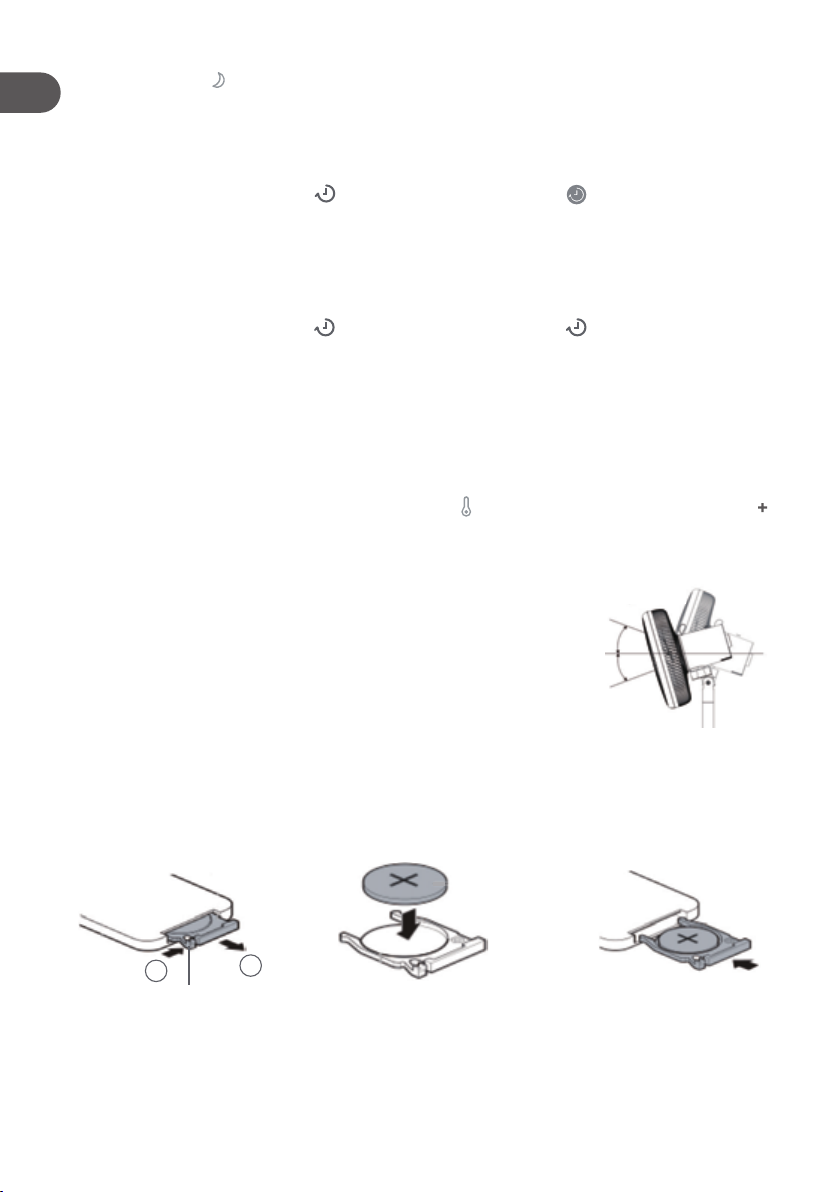
- Always observe correct polarity while inserting the
battery.
- Remove the battery if not used for a long time or
the battery are exhausted.
- Never expose the battery to excessive heat such
as sunshine, fire or similar.
- Never heat the battery or throw the battery into
fire. Never dismantle, damage or short-circuit the
battery.
- Chemical Burn Hazard. Do not ingest battery.
- This product contains a coin/button type battery,
which can be swallowed. If swallowed, severe
internal burns can occur within two hours of
ingestion and can cause death.
- Keep new and used batteries out of reach of
children. If the battery compartment cannot be
completely secured, discontinue use of the product,
and keep it out of reach of children. If you suspect
a battery has been swallowed or placed inside any
part of the body, see immediate medical attention.
24. This marking indicates that this product should
not be disposed with other household wastes.
To prevent possible harm to the environment
or human health from uncontrolled waste
disposal, recycle it responsibly to promote the
sustainable reuse of material resources. To return
your used device, please use the return and collection
systems or contact the retailer where the product
was purchased. They can take this product for
environmental safe recycling.
25. Batteries must not be disposed of with normal
household waste. Recycle them at the
collection points provided for this purpose.
Contact the local authorities or your dealer for
recycling advice. Correct disposal of old batteries
helps protect the environment and human health.

77
EN
2 . TEC HN I C A L D A TA
Rated voltage/power input 220 - 24 0 V/AC, 27 W
Maximum air output ( F) 4 4 .22 m³ /min
Service value ( SV) 1.87 ( m³ /min) /W
Standby energy consumption ( PSB ) 0.266 W
Fan sound power level ( LW A) 58.22 dB ( A) ( high speed) ;
32.03 dB ( A) ( low speed)
Maximum air speed ( c) 4 .11 metres/sec
Service value measurement standard I EC 6087 9:1986
D imension 4 00 x 365 x 1000 mm
W eight 4 kg
D elivery content 1 x stand fan; 1 x remote control with
a CR2025 battery; 1 x user manual
3 . D ESC RI PTI ON
3 . 1 M a i n u n i t
1. Front guard
2. B lade assembly nut
3. B lade assembly
4 . Rear guard nut
5. Rear guard
6. Engine shaft
7 . Carry handle
8. Engine unit
9. Stand tube
10. Mains cable with plug
11. B ase
12. I R sensor
13. Control panel and display
14 . Safety screw
3 . 2 Re m o t e c o n t r o l
15. Power button
16. Speed up button
17 . Switch-on timer button
18. O scillation button
19. Mode button
20. Switch-off timer button
21. Speed down button
22. D isplay brightness button
4 . I N STA LLA TI ON
After unpacki ng, check for completeness of delivery and for shipping damage. I f yo ur
delivery is damaged or incomplete, please contact our after-sales service.
1 . Fi x t h e s t a n d t u b e ( 9 ) t o t h e b a s e ( 1 1 )
• Firmly and fully insert the stand tube ( 9) onto the protruding connector on the base
( 11) , then turn the stand tube until it clicks into place. The click sound indicates that
the latch on the bottom of the base has locke d the inserted stand tube. Then use the
supplied long screw to tighten the stand tube from the base bottom.

8
Stand tube
Base
Latch to hold
the stand
Tighten with
the long screw
2. Fix the rear guard (5)
• Remove the blade assembly nut (2) and the rear guard nut (4) from the engine shaft (6).
• Position the rear guard (5) onto the engine shaft (6) while ensuring that the mark “I”
on the rear guard (5) is up.
• Then re-position the rear guard nut (4) onto the engine shaft (6), and tighten it to
secure the rear guard (5).
3. Fix the blade assembly (3)
• Fully position the blade assembly (3) onto the engine shaft (6).
• Then tighten the blade assembly (3) by fastening the blade assembly nut (2).
4. Fix the front guard (1)
• Position the front guard (1) over the rear guard (5) while ensuring the marks “I” and
“II” on the front guard (1) are up, and align the mark “I” on the front guard (1) with the
mark “I” on the rear guard (5).

99
EN
• Then turn the front guard (1) clockwise until the mark “I” on the rear guard (5) is
located in the center of the mark “II” on the front guard (1).
• Finally tighten the front guard (1) with the safety screw (14).
5. USE
Caution:
• Make sure that the product is placed on a flat and stable floor.
• The power socket must be in the vicinity of the fan and easily accessible.
• Always position the power cord so that nobody can trip over or become entangled
in it.
5.1 Turn on/off
• Connect the supplied power cable (10) to the mains socket on the fan base (11) and
to the wall socket.
• To turn the fan on or off, press on the control panel (13) (or on the remote control).
Note:
When using the remote control, point the remote control at the IR sensor (12) on the fan
base, and make sure there is no obstacle between the remote control and the IR sensor.
5.2 Set speed
• When the fan is on, press on the control panel (13) (or on the remote control)
to select a speed level (totally 12 speed levels). The corresponding speed level
indicator is displayed on the control panel (13).
5.3 Set oscillation
• When the fan is on, press on the control panel (13) (or on the remote control) to
activate or deactivate oscillation.
5.4 Set LED display brightness
• Press on the control panel (13) (or on the remote control) to toggle the LED
display on the control panel (13) through high brightness, low brightness and off.
5.5 Set operating modes
Press on the control panel (13) (or on the remote control) to select one of the following
three fan speed mode. The corresponding icon illuminates on the control panel (13).
• Normal mode ( ): The fan runs at the set speed.
• Natural mode ( ): The fan automatically changes the speed at intervals according
to the initially set fan speed, so that natural and pleasant air circulation can be
generated.

10
• Sleep mode ( ): The fan runs at the set speed initially, then the speed automatically
changes to a next lower level every 30 minutes until the lowest speed level is reached.
The fan remains on unless it is switched off manually or by a switch-off timer.
5.6 Set switch-off timer
You can set a timer at which the fan will automatically turn off.
• When the fan is on, press on the control panel (13) (or on the remote control)
to select a timer (up to 8 hours can be set). The timer is set after the set time
indicated by “h” flashes five times and disappears on the control panel (13). Then
the current speed level is displayed on the control panel (13)
5.7 Set switch-on timer
You can set a timer at which the fan will automatically turn on.
• When the fan is off, press on the control panel (13) (or on the remote control)
to set a timer (up to 8 hours can be set). The set time indicated by “h” is displayed
on the control panel (13).
5.8 Temperature controlled fan speed
When this function is activated and the ambient temperature is detected above 24°C, the
fan automatically changes fan speeds by detecting changes of the ambient temperature.
Note: If this function is activated and the ambient temperature is detected below or equal
to 24°C,the fan will operate at speed 1.
• To activate or deactivate the function, press on the control panel (or hold down
and -on the remote control).
• If the function is activated, the display on the control panel (13) always shows the
current ambient temperature indicated by °C symbol. If the function is deactivated,
no temperature is displayed.
5.9 Fan head adjustment
Turn the fan head upwards or downwards to adjust angle of
airflow.
5.10 Replacement of remote control battery
The remote control is powered by a CR2025 button cell. Replace the battery when the
battery depletes.
• Find the battery compartment door on the back of the remote control. Press and
hold the tab (A) and simultaneously pull the battery tray out (as shown in the figure
below), and place a new CR2025 battery in the battery tray with correct polarity
indicated, then close the battery tray.
A
12

1111
EN
6. MAINTENANCE AND CLEANING
• WARNING: Switch the product off and unplug it from the mains socket before each
cleaning.
• WARNING: Do not remove the fan guards for cleaning or maintenance.
• WARNING: Allow the product to cool off before cleaning it.
• Clean the product with a soft dusting cloth.
• Do not allow water or other liquids to enter into the engine unit (8) as it can cause
short circuits, fires, electric shocks or other hazards.
• Do not use any aggressive cleaning liquids, rubbing alcohol or other chemical
solutions as they can cause damage to the housing and malfunctioning.
• Keep the air vents at the rear of the engine unit (8) from dust and lint.
• You can use a vacuum cleaner to remove dust and lint from the air vents and the
fan guards.
• Store the product in a cool and dry place if it is not used for a long time.
7. GUARANTEES AND LIMITATIONS OF LIABILITY
This product is guaranteed for a period of 36 months (including the legal guarantee of
24 months as defined by local law as well as a commercial guarantee of 12 additional
months offered by the brand) from the date of purchase, against any failure resulting
from a manufacturing or material defect.
This guarantee does not cover damage resulting from a faulty installation, incorrect use,
or normal wear and tear. More specifically, the guarantee does not cover:
• Damage or problems caused by incorrect use, accidents, modifications or an
electrical connection with the wrong current or voltage.
• Products that have been modified or whose tamper evident seal or serial number
has been damaged, altered, removed or rusted.
• Replaceable batteries and accessories are guaranteed for 6 months.
• Battery failure, as a result of over-charging or non-compliance with the safety
instructions set out in the manual.
• Cosmetic damage, including scratches, dents, or any other element.
• Damage caused by any servicing operations carried out by non-authorised persons.
• Faults caused by normal wear and tear or the normal ageing of the product.
• Software updates as a consequence of changes to network settings.
• Product failure resulting from the use of third party software to modify, change or
adapt the product as supplied.
• Product failure resulting from its use without manufacturer-approved accessories.
• Rusted products.
The manufacturer is not liable for the loss of data stored on the hard drive. Similarly,
the manufacturer is not required to check that SIM/SD cards have been removed from
returned products.
Repaired or replaced products may include new and/or repackaged hardware and
components.
IMPLEMENTATION METHODS
To make a claim under the guarantee, please return your product to the reception desk
of your local sales outlet with the proof of purchase (receipt, invoice, etc.) of the product
and accessories supplied, along with the original packaging.
The following information will be required: date of purchase, model and serial or IMEI
number (this information generally features on the product, the packaging or proof of
purchase).
Failing this, you must return the product with all accessories needed for it to work properly
(power cable, adapter etc.).
If your product is covered by the guarantee, the after-sales service will (within the bounds
of the local legislation):
• Repair or replace the faulty parts.

12
• Exchange the returned product with a product which has the same features or better
and is equivalent in terms of performance.
• Refund the product at the price stated on the proof of purchase.
In the case of a repair covered by the guarantee, your guarantee period will be extended
by 6 months. This period cannot be combined in the event of repeated failures.

1313
FR
1. CONSIGNES DE SÉCURITÉ
Avant d’utiliser cet accessoire, lisez attentivement ces
instructions et conservez la notice d’utilisation comme
référence.
1. Avant de brancher l’appareil à une prise murale,
assurez-vous que le courant électrique local
correspond à celui indiqué sur la plaque signalétique
de l’appareil. Cet appareil ne doit être branché qu’à
une prise mise à la terre.
2. Cet appareil est destiné à un usage en intérieur.
Aucune autre utilisation (professionnelle) n’est
autorisée.
3. Cet appareil peut être utilisé par des enfants âgés de
8 ans et plus ainsi que par des personnes dont les
capacités physiques, sensorielles et mentales sont
réduites, ou des personnes dénuées d’expérience
ou de connaissance, si ceux-ci ont bénéficié d’une
surveillance ou d’instructions préalables concernant
l’utilisation de l’appareil en toute sécurité et
comprennent les dangers encourus. Les enfants ne
doivent pas prendre cet accessoire pour un jouet.
Le nettoyage et l’entretien usuel par l’utilisateur ne
doivent pas être effectués par des enfants sans
surveillance.
4. Assurez-vous que le ventilateur est débranché de
l'alimentation électrique avant de retirer la grille.
SOMMAIRE :
1. CONSIGNES DE SÉCURITÉ P. 13
2. CARACTÉRISTIQUES TECHNIQUES P. 16
3. DESCRIPTION P. 17
4. INSTALLATION P. 17
5. UTILISATION P. 19
6. ENTRETIEN ET NETTOYAGE P. 20
7. GARANTIE ET LIMITES DE RESPONSABILITÉ P. 21

14
FRFR
5. Ne retirez en aucun cas les grilles du ventilateur,
aussi bien pour effectuer une opération d’entretien
que de nettoyage.
6. N’immergez pas l’appareil, le câble d’alimentation
ou la prise dans l’eau ou dans tout autre liquide.
7. MISE EN GARDE : N’utilisez pas cet appareil dans
des baignoires, douches, éviers ou autres sources
d’eau ou autour de ceux-ci.
8. ATTENTION : Ne l’utilisez pas à proximité de l’eau.
9. Cet appareil n’est pas destiné à être utilisé par un
système de télécommande ou une minuterie externe.
10. Ne couvrez pas l’appareil pendant son utilisation.
11. Placez cet appareil sur une surface plane avant de
l’utiliser. Ne pas retourner l’appareil pendant qu’il est
en marche.
12. ATTENTION : Veillez à ce que toutes les sorties de
ventilation autour de cet appareil soient dégagées.
13. MISE EN GARDE : Une mauvaise utilisation de
cet appareil peut entraîner des courts-circuits, des
incendies, des électrocutions ou d’autres risques.
14. MISE EN GARDE : Évitez tout contact avec des
pièces mobiles. N’insérez jamais vos doigts, toute
autre partie du corps ou tout objet à travers la grille du
ventilateur. Les adultes doivent faire particulièrement
attention lorsqu’ils utilisent ce ventilateur à proximité
des enfants.
15. Cet appareil est destiné à un usage domestique et
à une utilisation dans des environnements similaires
tels que :
- des cuisines de personnel dans des boutiques, des
bureaux et d’autres environnements de travail ;
- des fermes ;
- par les clients d’hôtels, de motels et d’autres
environnements résidentiels ;
- des environnements de type chambre d’hôte.
16. Cet appareil n’est pas adapté à une utilisation en
extérieur.

1515
FR
17. Le câble d’alimentation doit être régulièrement
inspecté pour vérifier l’absence de tout dommage ou
détérioration.N’utilisezpasl’appareilsivousconstatez
que le câble d’alimentation est endommagé.
18. Ne laissez pas l’appareil sans surveillance lors de
son fonctionnement.
19. Pour obtenir des informations détaillées sur
l’installation de l’appareil, reportez-vous aux sections
correspondantes de votre manuel d’utilisation.
20. MISE EN GARDE : Montez entièrement l’appareil
avant de l’utiliser.
21. Ne branchez ni ne débranchez la fiche électrique
avec les mains mouillées.
22. Ne changez ni ne modifiez pas l’appareil, car cela
pourrait avoir une incidence sur sa sûreté. Attention,
risque de blessure !
23. Respectez les consignes de sécurité suivantes
relatives à la pile.
- Respectez toujours la polarité correcte lors de
l’insertion de la pile.
- Retirez la pile si elle n’est pas utilisée pendant une
longue période ou si elle est épuisée.
- N’exposez jamais la pile à une chaleur excessive
p. ex. en plein soleil, un incendie ou autre.
- Ne chauffez jamais la pile et ne la jetez jamais
au feu. Évitez de démonter, d’endommager ou de
court-circuiter la pile.
- Risque de brûlure chimique. Ne pas avaler la pile.
- Cet appareil est alimenté par une pile bouton
qui risque d’être avalée. En cas d’ingestion, des
risques de brûlures internes, pouvant être fatales,
peuvent survenir dans les deux heures qui suivent.
- Tenez les piles neuves et usées hors de la portée
des enfants. Si le compartiment de la pile ne
se ferme pas complètement, cessez d’utiliser
l’appareil et tenez-le hors de portée des enfants.
Si une pile a été avalée ou placée dans une partie
du corps, consultez immédiatement un médecin.

16
FRFR
24 . Ce marquage indique que ce produit ne doit
pas ê tre j eté avec les autres dé chets mé nagers.
Par mesure de pré vention pour l’environnement
et pour la santé humaine, veuillez le recycl er
de façon responsable, conformé ment au principe de
ré utilisation des ressources maté rielles. Pour
renvoye r votre ancien accessoire, veuillez utiliser
les syst è mes de renvoi et de collecte ou contacter le
revendeur auprè s duquel vous avez acheté
l’accessoire. I ls pourront procé der au recycl age de
cet accessoire en toute sé curité .
25. Les piles ne doivent pas ê tre j eté es avec les
dé chets mé nagers ordinaires. Recycl ez -les
en les amenant à un point de collecte pré vu à
cet effet. Adressez- vous aux autorité s locales ou à
votre revendeur pour obtenir des conseils sur le
recycl age. U ne é limination correcte des piles usé es
contribue à proté ger l’environnement et la santé
humaine.
2 . C A RA C TÉ RI STI Q UES TEC HN I Q UES
Tension nominale / puissance d’entré e 220 - 24 0 V/CA, 27 W
D é bit d’air maximal ( F) 4 4 ,22 m³ /min
Valeur de service ( SV) 1,87 ( m³ /min) /W
Consommation d’é nergie en veille ( PSB ) 0,266 W
N iveau de puissance acoustique du
ventilateur ( LW A) 58,22 dB ( A) ( vitesse é levé e) ;
32,03 dB ( A) ( vitesse faible)
Vitesse maximale de l’air ( c) 4 ,11 m/s
N orme de mesure de la valeur de service CEI 6087 9:1986
D imensions 4 00 x 365 x 1000 mm
Poids 4 kg
Contenu à la livraison 1 x ventilateur sur pied ;
1 x té lé commande avec pile CR2025 ;
1 x manuel d’utilisation

1717
FR
3. DESCRIPTION
3.1 Unité principale
1. Grille avant
2. Écrou de l’ensemble lame
3. Ensemble lame
4. Écrou de la grille arrière
5. Grille arrière
6. Arbre moteur
7. Poignée de transport
8. Moteur
9. Tube de support
10. Câble d’alimentation avec prise
11. Base
12. Capteur infrarouge
13. Panneau de commande et affichage
14. Vis de sécurité
3.2 Télécommande
15. Bouton d'alimentation
16. Bouton d’augmentation de vitesse
17. Bouton du minuteur de mise en
marche
18. Touche d’oscillation
19. Touche Mode
20. Bouton du minuteur d’arrêt
21. Bouton de réduction de vitesse
22. Bouton de luminosité de l’écran
4. INSTALLATION
Après avoir tout déballé, vérifiez que la livraison est au complet et n’a pas été
endommagée durant le transport. Si votre livraison est endommagée ou incomplète,
veuillez contacter notre service après-vente.
1. Fixez le tube de support (9) à la base (11)
• Insérez fermement et complètement le tube du support (9) sur le connecteur saillant
de la base (11), puis tournez le tube de support jusqu’à ce qu’il s’enclenche. Le clic
indique que le loquet situé au bas de la base a verrouillé le tube de support inséré.
Utilisez ensuite la longue vis fournie pour serrer le tube de support à partir du bas
de la base.
Tube de support
Base
Loquet de fixation
du support
Serrer avec la
longue vis
2. Fixez la grille arrière (5)
• Retirez l’écrou de l’ensemble lame (2) et l’écrou de protection arrière (4) de l’arbre
du moteur (6).
• Positionnez la grille arrière (5) sur l’arbre du moteur (6) en vous assurant que le
repère « I » de la grille arrière (5) est en haut.

18
FRFR
• Ensuite, repositionnez l’écrou de la grille arrière (4) sur l’arbre du moteur (6) et
serrez-le pour fixer la grille arrière (5).
3. Fixation de l’ensemble lame (3)
• Positionnez complètement l’ensemble lame (3) sur l’arbre moteur (6).
• Ensuite, fixez l’ensemble lame (3) en serrant son écrou (2).
4. Fixation de la grille avant (1)
• Positionnez la grille avant (1) sur la grille arrière (5) en veillant à ce que les repères
« I » et « II » de la grille avant (1) soient en haut, et alignez le repère « I » de la grille
avant (1) sur le repère « I » de la grille arrière (5).
• Ensuite, tournez la grille avant (1) dans le sens horaire jusqu’à ce que le repère
« I » sur la grille arrière (5) se trouve au centre du repère « II » sur la grille avant (1).
• Enfin, serrez le dispositif de protection avant (1) à l’aide de la vis de sécurité (14).

1919
FR
5. UTILISATION
Attention :
• Assurez-vous que l’appareil est placé sur un sol plat et stable.
• La prise électrique doit se trouver à proximité du ventilateur et être facilement
accessible.
• Placez toujours le cordon d’alimentation de sorte que personne ne puisse trébucher
ou s’y emmêler.
5.1 Mise en marche/arrêt
• Branchez le câble d’alimentation fourni (10) à la prise de courant de la base du
ventilateur (11) et à la prise murale.
• Pour mettre le ventilateur en marche ou à l’arrêt, appuyez sur la touche du
panneau de commande (13) (ou de la télécommande).
Remarque :
Lorsque vous utilisez la télécommande, pointez-la vers le capteur infrarouge (12)
sur la base du ventilateur, et assurez-vous qu’aucun obstacle n’est présent entre la
télécommande et le capteur infrarouge.
5.2 Réglage de vitesse
• Lorsque le ventilateur est en marche, appuyez sur la touche du panneau de
commande (13) (ou de la télécommande) pour sélectionner un niveau de vitesse
(12 niveaux de vitesse au total). L’indicateur de niveau de vitesse correspondant
s’affiche sur le panneau de commande (13).
5.3 Réglage d’oscillation
• Lorsque le ventilateur est en marche, appuyez sur la touche du panneau de
commande (13) (ou de la télécommande) pour activer ou désactiver l’oscillation.
5.4 Réglage de la luminosité de l’affichage LED
• Appuyez sur la touche du panneau de commande (13) (ou de la télécommande)
pour activer ou désactiver le mode haute luminosité ou basse luminosité de
l’affichage LED du panneau de commande (13).
5.5 Réglage des modes de fonctionnement
Appuyez sur la touche du panneau de commande (13) (ou de la télécommande)
pour sélectionner l’un des trois modes de vitesse de ventilation suivants. L’icône
correspondante s’allume sur le panneau de commande (13).
• Mode Normal ( ) : Le ventilateur fonctionne à la vitesse réglée.
• Mode Naturel ( ) : Le ventilateur change automatiquement de vitesse par intervalles
en fonction de la vitesse initialement réglée, de sorte qu’une circulation d’air naturelle
et agréable puisse être générée.
• Mode Veille ( ) : Le ventilateur fonctionne d’abord à la vitesse réglée, puis la vitesse
passe automatiquement à un niveau inférieur toutes les 30 minutes jusqu’à ce que
le niveau de vitesse le plus bas soit atteint. Le ventilateur reste en marche à moins
qu’il ne soit arrêté manuellement ou par un minuteur d’arrêt.
5.6 Réglage du minuteur d’arrêt
Vous pouvez définir une heure à laquelle le ventilateur s’arrêtera automatiquement.
• Lorsque le ventilateur est en marche, appuyez sur la touche du panneau de
commande (13) (ou sur la touche de la télécommande) pour régler le minuteur
(vous pouvez régler jusqu’à 8 heures). Le minuteur est réglé après que l’heure définie
indiquée par « h » clignote cinq fois et disparaît sur le panneau de commande (13).
Ensuite, le niveau de vitesse actuel s’affiche sur le panneau de commande (13)

20
FRFR
5.7 Réglage du minuteur de mise en marche
Vous pouvez définir une heure à laquelle le ventilateur se mettra automatiquement en
marche.
• Lorsque le ventilateur est à l’arrêt, appuyez sur la touche du panneau de
commande (13) (ou sur la touche de la télécommande) pour régler le minuteur
(vous pouvez régler jusqu’à 8 heures). L’heure réglée indiquée par « h » est affichée
sur le panneau de commande (13).
5.8 Vitesse du ventilateur régulée par la température
Lorsque cette fonction est activée et que la température ambiante détectée est supérieure
à 24 °C, le ventilateur change automatiquement de vitesse en détectant les variations de
la température ambiante.
Remarque : Si cette fonction est activée et que la température ambiante détectée est
inférieure ou égale à 24 ° C, le ventilateur fonctionnera à la vitesse 1.
• Pour activer ou désactiver cette fonction, appuyez sur la touche du panneau de
commande (ou appuyez sur les touches et -de la télécommande et maintenez-les
enfoncées).
• Lorsque cette fonction est activée, l’affichage du panneau de commande (13) affiche
toujours la température ambiante actuelle indiquée par le symbole °C. Lorsqu’elle
est désactivée, aucune température n’est affichée.
5.9 Réglage de la tête de ventilateur
Tournez la tête de ventilateur vers le haut ou vers le bas pour
ajuster l’angle du flux d’air.
5.10 Remplacement de la pile de la télécommande
La télécommande est alimentée par une pile bouton CR2025. Remplacez la pile lorsque
celle-ci s’épuise.
• La porte du compartiment de la pile se trouve à l’arrière de la télécommande. Appuyez
sur la languette (A) et maintenez-la enfoncée, tirez simultanément le support de
pile vers l’extérieur (comme indiqué dans l’illustration ci-dessous), puis insérez une
nouvelle pile CR2025 dans le support avec la polarité indiquée, puis fermez-le.
A
12
6. ENTRETIEN ET NETTOYAGE
• MISE EN GARDE : Arrêtez l’appareil et débranchez-le de la prise de courant avant
chaque nettoyage.
• MISE EN GARDE : Ne retirez pas les grilles du ventilateur pour le nettoyage ou
l’entretien.
• MISE EN GARDE : Laissez l’appareil refroidir avant de le nettoyer.
• Nettoyez l’appareil à l’aide d’un chiffon doux.
Table of contents
Languages:
Other Qilive Fan manuals
Popular Fan manuals by other brands

Greenheck
Greenheck RSF Installation, operation and maintenance manual

AVE
AVE ELICAL TOP installation manual

Vortex
Vortex DBF-DEDPV installation guide

Ruck Ventilatoren
Ruck Ventilatoren EM 100L EC 02 Assembly instruction

Kichler Lighting
Kichler Lighting 52" RENEW DESIGNER instruction manual

Fantech
Fantech PB110 Installation, operation and maintenance guide

Monte Carlo Fan Company
Monte Carlo Fan Company 3JVR44 Series Owner's guide and installation manual

Henley Fan
Henley Fan 6HE84+LK owner's manual

inVENTer
inVENTer iV14-MaxAir CLEANING

Vornado
Vornado 733DC user manual

KDK
KDK S44XU Operating and installation instructions

Hunter
Hunter 20775 Manual de instalación