QOOL QDA-700 User manual

QDA-700 User’s Guide
-1-
1. QDA-700 OVERVIEW ......................................................................................................3
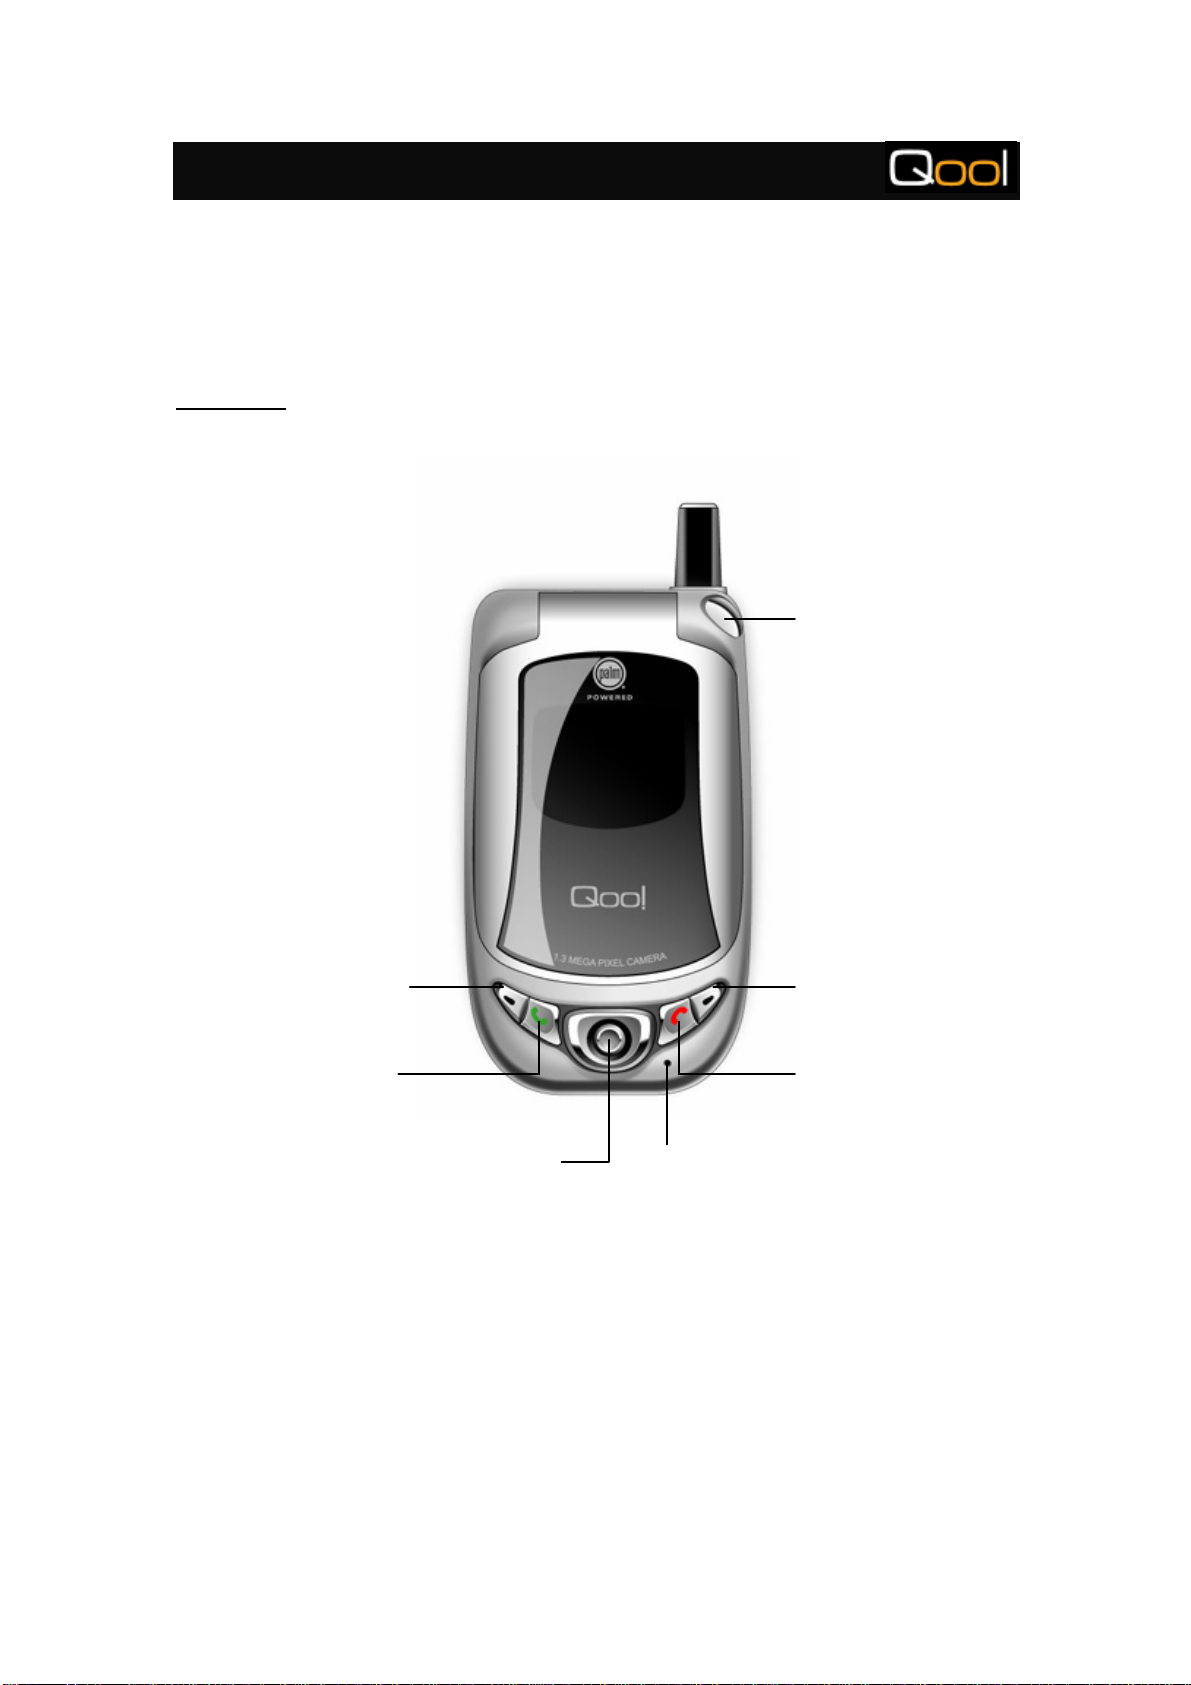
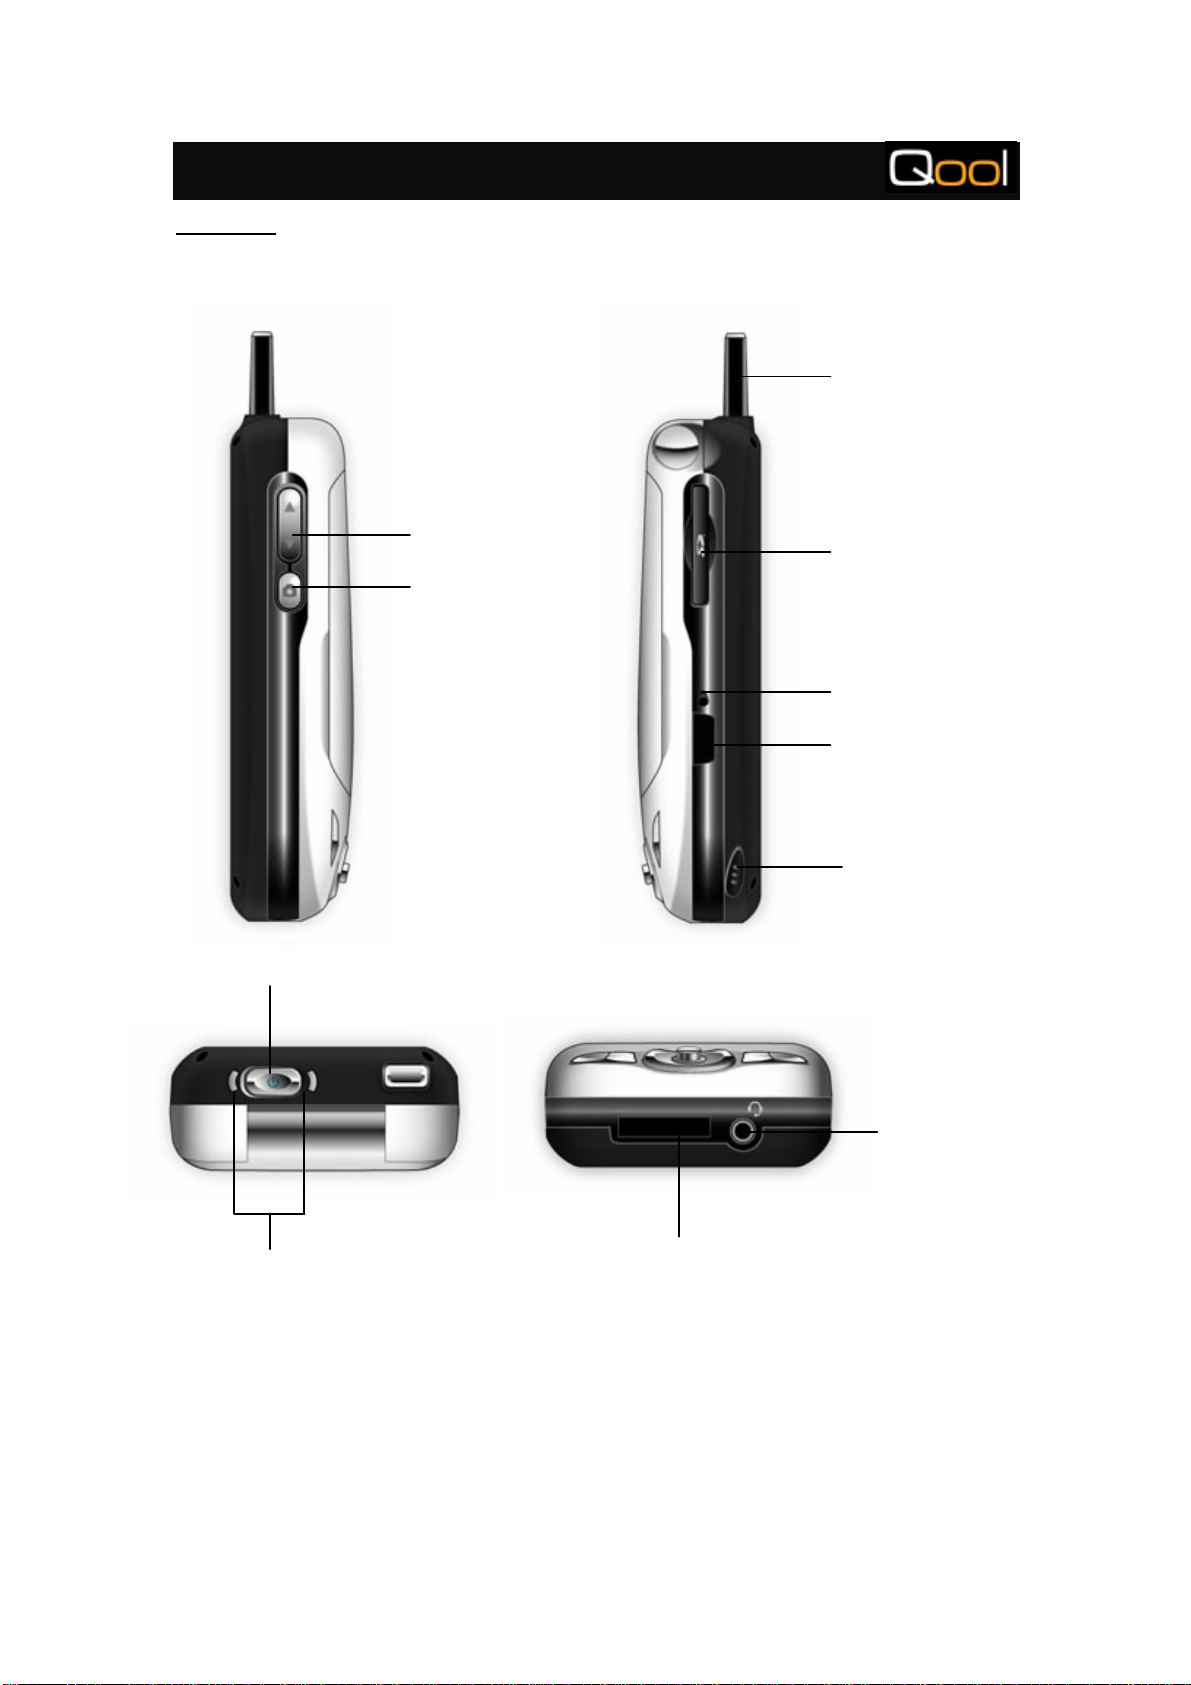
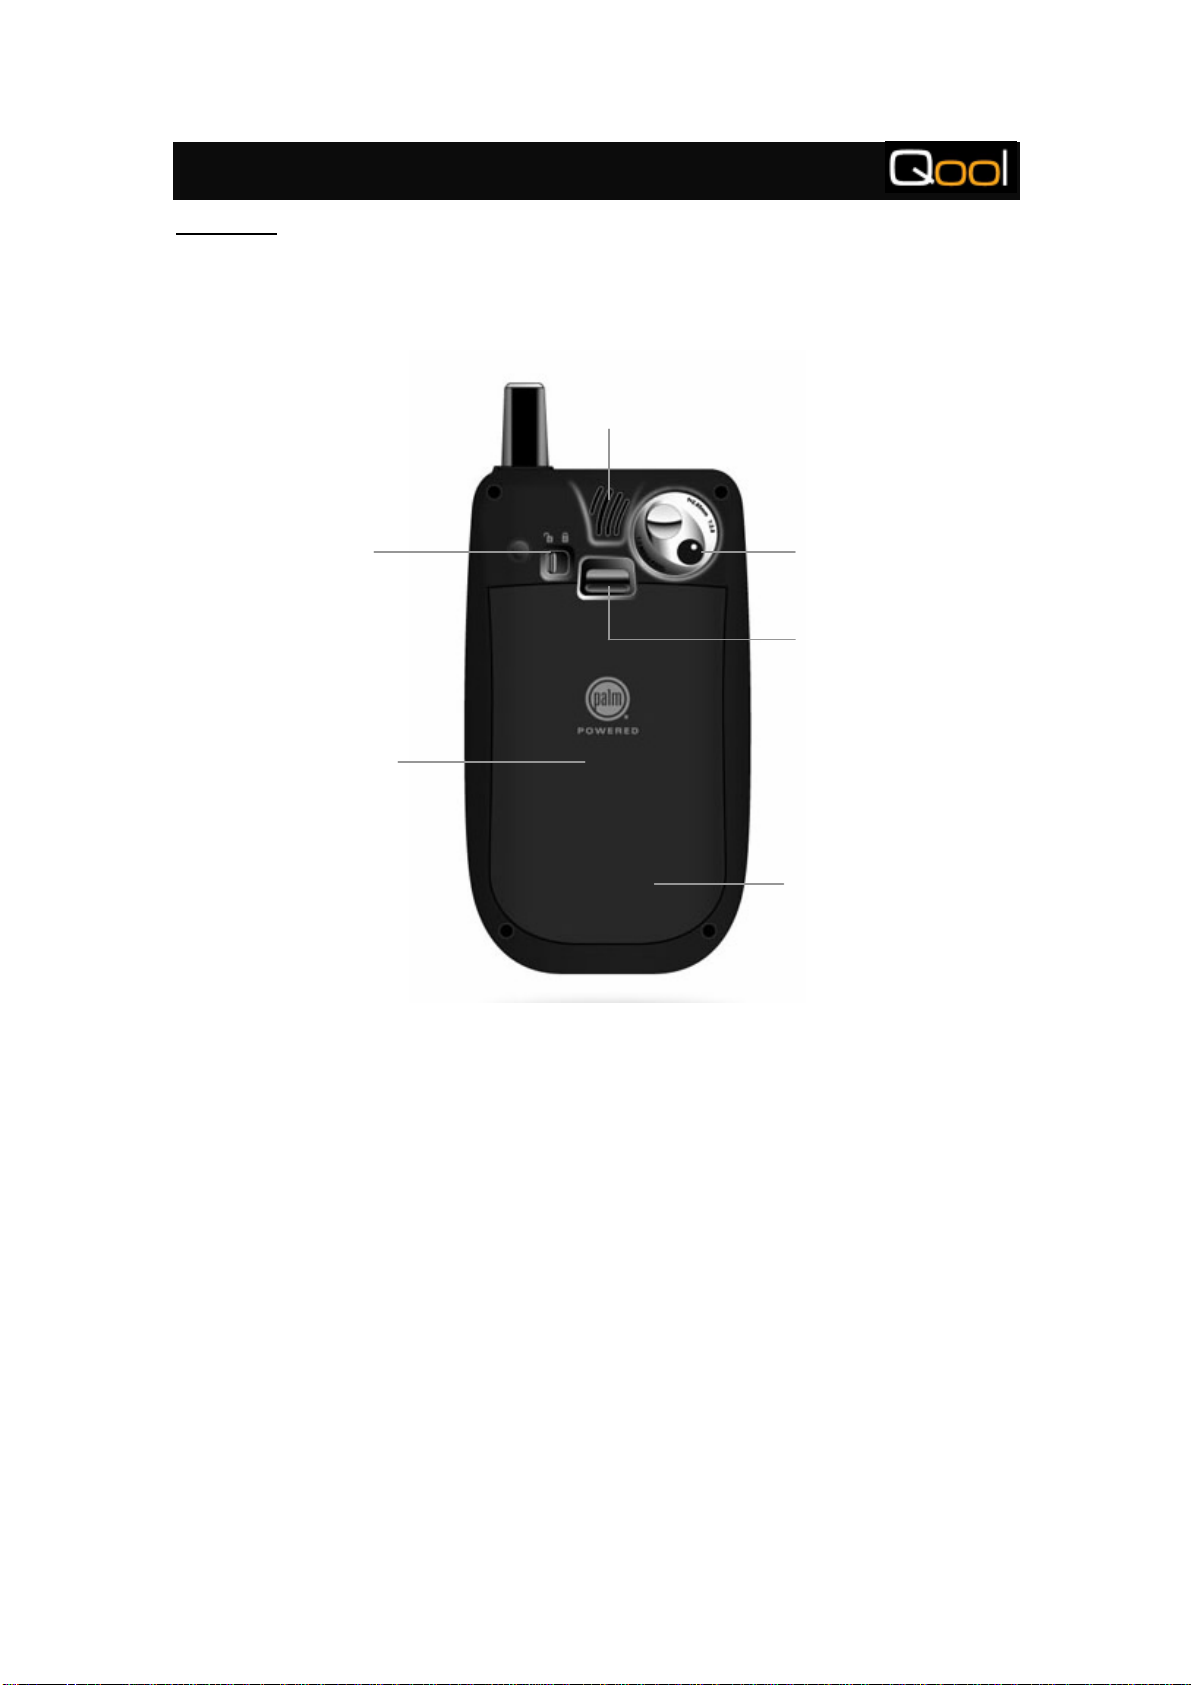
1.1 QDA-700 HANDSET FEATURES .....................................................................................4
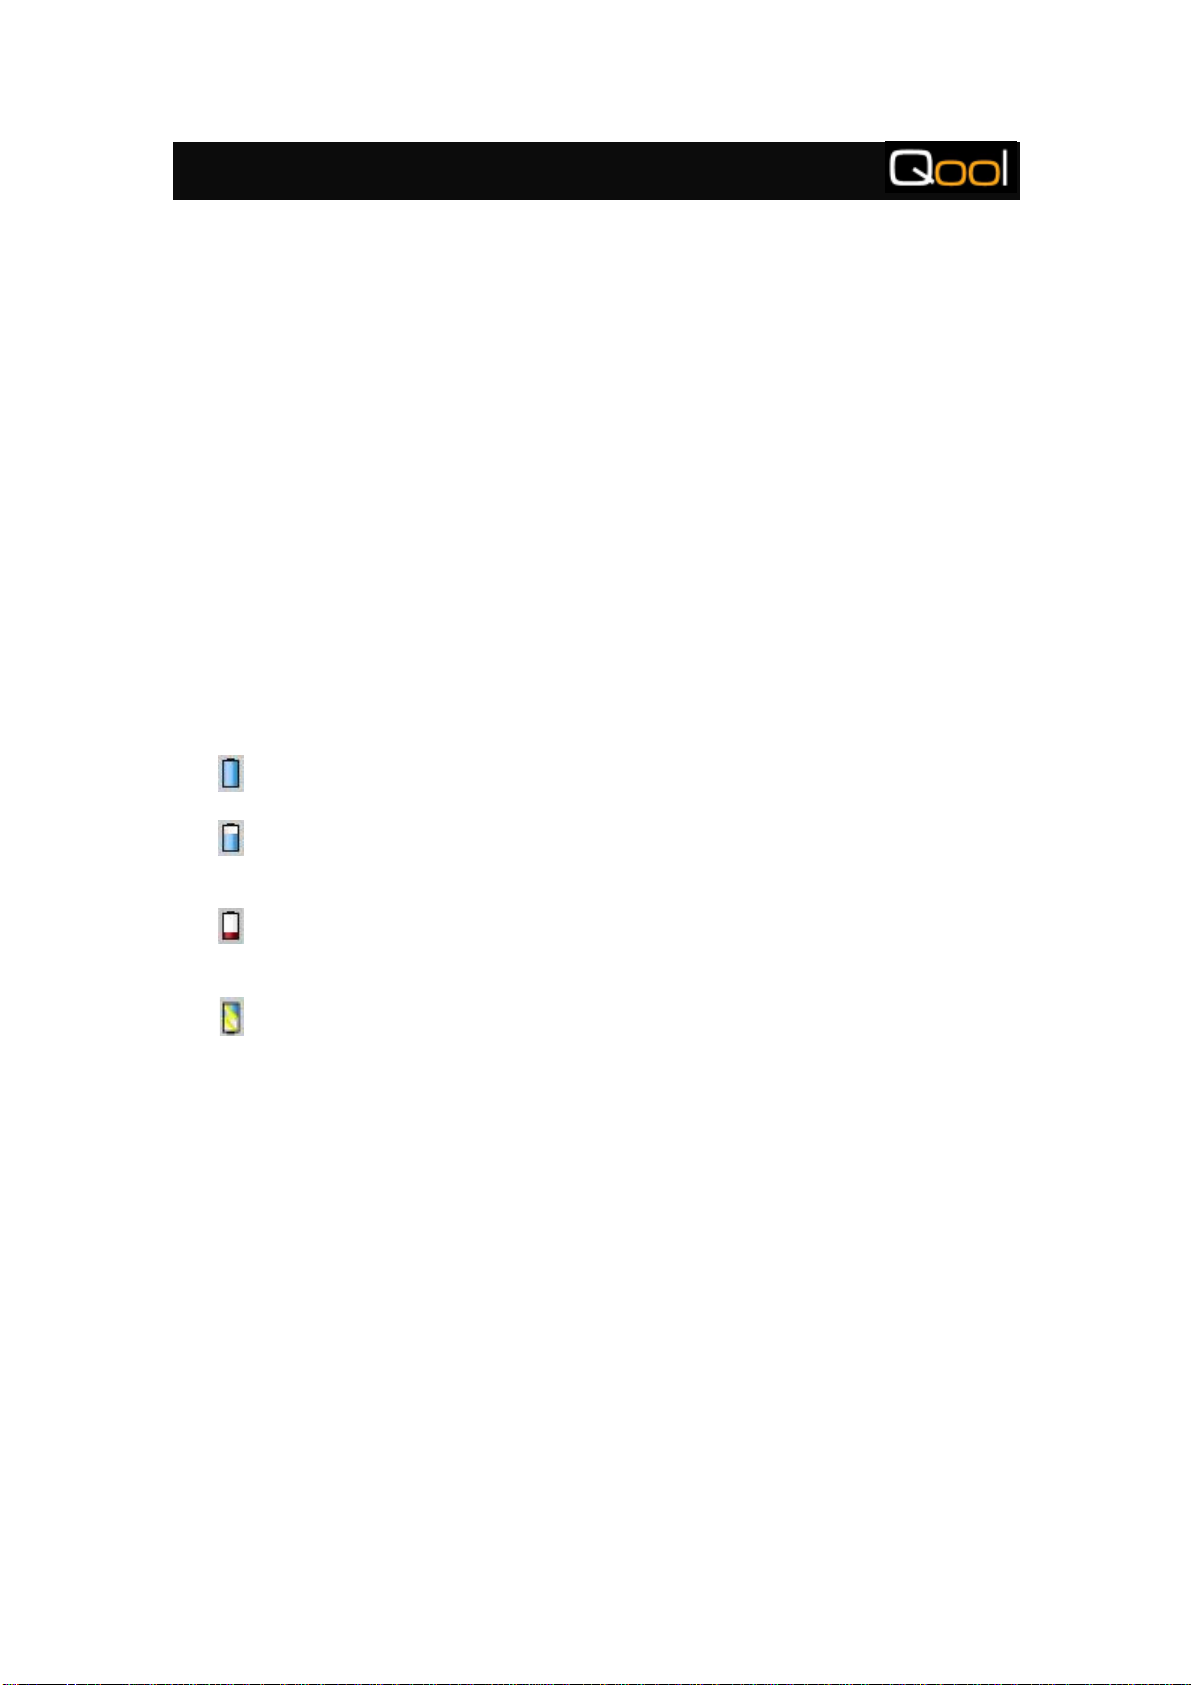
1.2 CHARGING THE BATTERY..............................................................................................7
1.3 INSERTING THE SIM CARD............................................................................................8
1.4 FIRST RUN....................................................................................................................9
1.5 TURNING THE RADIO ONAND OFF..............................................................................15
1.6 MAKING YOUR FIRST PHONE CALL.............................................................................16
1.7 RESETTING YOUR QDA-700 .......................................................................................17
2. INPUT METHOD............................................................................................................19
2.1 USING THE ONSCREEN KEYBOARD..............................................................................20
2.2 USING GRAFFITI 2WRITING........................................................................................22
2.3 USING CHINESE OS &PENPOWER HANDWRITING APPLICATION .................................28
3. PHONE APPLICATION OVERVIEW...........................................................................37
3.1 ON-SCREEN SOFT BUTTONS .......................................................................................39
3.2 DIALING CALLS ..........................................................................................................42
3.3 RECEIVING CALLS ......................................................................................................45
3.4 CONTACTS..................................................................................................................46
3.5 CALL HISTORY ...........................................................................................................52
3.6 SPEED DIAL................................................................................................................54
3.7 TODAY VIEW..............................................................................................................56
4. MESSAGES.....................................................................................................................57
4.1 USING SMS................................................................................................................58
4.2 USING MMS..............................................................................................................67
4.3 USING PALMSOURCE MAIL.........................................................................................72
5. PREFERENCES..............................................................................................................80
5.1 PHONE PREFERENCES.................................................................................................81
5.2 GENERAL PREFERENCES.............................................................................................96
5.3 APPLICATION LAUNCHER SETTINGS..........................................................................123
6. MULTIMEDIA..............................................................................................................125
6.1 USING AUDIO PLAYER ..............................................................................................126
6.2 USING VOICE RECORDER..........................................................................................133
6.3 USING CAMERA........................................................................................................138
6.4 USING VIDEO RECORDER &PLAYER.........................................................................141
6.5 USING PHOTO VIEWER .............................................................................................146
6.6 USING PHOTO EDITOR..............................................................................................162
7. CONNECTION..............................................................................................................166
7.1 BROWSING INTERNET...............................................................................................167
7.2 USING HOTSYNC......................................................................................................171
7.3 USING BEAM............................................................................................................180
7.4 EXCHANGING INFORMATION VIA BEAMING ..............................................................181
7.5 USING PALM DESKTOP .............................................................................................185
8. ORGANIZER ................................................................................................................229
8.1 USING THE DATE BOOK ............................................................................................230

QDA-700 User’s Guide
-2-
8.2 USING MEMO PAD ....................................................................................................244
8.3 USING TO DO LIST ...................................................................................................246
8.4 USING CALCULATOR................................................................................................250
9. DOCUMENTS VIEWER..............................................................................................252
9.1 USING DOCUMENTS TO GO VIEWER .........................................................................253
9.2 USING PALMREADER................................................................................................265
10. UTILITIES.................................................................................................................276
10.1 USING CLOCK.......................................................................................................277
10.2 FILE MOVER...........................................................................................................279
10.3 USING BACKUP.......................................................................................................286
11. MISCELLANEOUS...................................................................................................300
11.1 USING CARD INFO ..................................................................................................301
11.2 USING SECURITY ....................................................................................................303
11.3 WELCOME ..............................................................................................................305
12. GAMES......................................................................................................................307
12.1 BEJEWELED ............................................................................................................308
12.2 FRUIT FROLIC.........................................................................................................309
12.3 RICOCHET...............................................................................................................311
12.4 SPYCHASE 3D ........................................................................................................313
13. DOC OVERVIEW.....................................................................................................314
14. CARD OVERVIEW...................................................................................................315
15. TROUBLESHOOTING.............................................................................................316
16. NOTICE .....................................................................................................................320

QDA-700 User’s Guide
-3-
1. QDA-700 overview
Congratulation on purchase QDA-700. This is a GSM dual-band smartphone which
powered by Palm OS. With QDA-700, you can:
•Communicate with your friends, relatives, partners, etc. by voice calls and
electronic mails.
•Manage your daily life with the built-in Palm OS applications
•Shoot every precious moment with the built-in 1.3M pixels digital camera
•Enjoy your favorite MP3 music.
What’s included in the package
The QDA-700 received all of the following components:
Hardware
• QDA-700 handset
• AC charger
• USB HotSync® cable
• Electrical socket adapter(s)
Documentation and software
• Quick Start Guide
• Application Software CD

QDA-700 User’s Guide
-4-
1.1 QDA-700 handset features
The following illustrations show the locations and names of the physical features of the
QDA-700. Refer back to these illustrations while following the instructions in this guide.
Front View
Home Button
Dial Button
Reject Button
Menu Button
Flip opener
5-way navigator
Microphone

QDA-700 User’s Guide
-5-
Side View
LED (wireless mode
and power indicator)
Power button
Headset jack
HotSync & power supply connector
Camera button / shutter
Volumebuttons
Antenna
SD/MMC memory card slot
Reset button
Infrared (IR) port
Stylus slot

QDA-700 User’s Guide
-6-
Back Side
SIM slot
Power lock
Battery lock
Rechargeable
Battery
Speaker
Camera lens

QDA-700 User’s Guide
-7-
1.2 Charging the battery
Before using your QDA-700, a battery recharging is necessary, especially when you first
remove it from the box. We recommend 3-4 hours for a full charge, or until the red
charging indicator LED switched off.
1. Plug the AC charger into a wall outlet. If necessary, connect an adapter.
2. With a triangle facing the same way as your QDA-700 screen, connect the charger
cable to the power supply connector at the bottom of the QDA-700.
3. To confirm your QDA-700 is charging, check the LED.
• When the LED is solid red, your QDA-700 is charging.
• When the LED is off, your QDA-700 is fully charged.
If the LED does not turn on when the QDA-700 is connected to the charger,
double-check the cable connection and the electrical outlet to which it is connected.
The onscreen battery gauge displays power status after you turn on your QDA-700,
• Full battery icon: Battery is charged (add the dedicated battery icon of status bar)
• Partial battery icon: Battery has power and is not charging (add the dedicated
battery icon of status bar)
• Empty battery icon: Battery needs charging immediately (add the dedicated
battery icon of status bar)
• Red lightning bolt: Charging (add the dedicated battery icon of status bar)
Remarks: Battery consumption may vary due to different usage behavior. Consumption
factors include GSM signal strength, backlight and camera usage, and whether calls are
data or voice calls.

QDA-700 User’s Guide
-8-
1.3 Inserting the SIM card
A valid SIM (Subscriber Identity Module) card for GSM network must be inserted to work
the phone, email and web browsing features of your QDA-700. Please contact and
subscribe to your local mobile phone service provider.
1. Remove the battery from QDA-700 (Note: Don’t forget to unlock the power lock!)
2. Open the SIM tray out.
3. Insert the SIM card into the SIM tray by aligning the notches.
4. Close the SIM tray.
5. If your SIM card has not already been activated, follow the activation steps provided
by your mobile service provider or contact them directly for assistance. Data services
must be activated before using email, web browsing and MMS. For details, please
check with your mobile phone service provider.
Both 3-volt and 5-volt SIM cards can be used with your QDA-700. Please check with your
mobile phone service provider if you have any SIM-related queries.

QDA-700 User’s Guide
-9-
1.4 First Run
Before you can use your QDA-700 for phone calls or general organizer features, the
QDA-700 battery must be fully charged and the QDA-700 must be setup properly during
the first run.
To setup your QDA-700 during the first run:
1. Make sure the battery is fully charged and the power lock is set to the LOCKED
position.
2. Open the flip and the Setup 1 of 4 screen displays.
3. Pick the stylus from the stylus slot and tab twice anywhere on the screen to continue.

QDA-700 User’s Guide
-10 -
4. Tap the center of target shown at the upper-left, bottom-right and the center of the
screen.
5. Tap the arrow and boxes to change the following settings and tap Next to continue.
•Country
•Time Zone
•Daylight Saving
•Date
•Time
6. Tap Doneto exit the setup and Installer screen displays.
You can return to this setup screen and go through the tutorial on how to enter data to
your QDA-700 afterwards.

QDA-700 User’s Guide
-11 -
7. By default, the following programs are selected (with tick displays) and will be
installed on your QDA-700 automatically.
lDocs to Go
Docs to Go (Documents To Go) allows you to use Word and Excel files,
including support for their native file formats, on your QDA-700 anywhere,
anytime.
lPenPower
Penpower Chinese Handwriting Recognition application allows you to input
Chinese characters using conventional Chinese handwriting strokes. You are
advised to install PenPower if you are not familiar with common Chinese input
methods such as Changjei, Quick, PinYin, etc.
lCHOS
CHOS (Chinese Operating System) allows you to view and enter traditional
Chinese characters in most Palm applications (include SMS, MMS, and email)
in your QDA-700. You must install CHOS if you want to read and write Chinese
SMS, MMS and email.
To toggle the selection, tap the box next to the application name.
8. Tap Install to install the selected application(s), or tap Exit to leave the setup screen
without installing any applications.
9. The Launcher II runs and the Home screen displays.
Congratulations! You have setup your QDA-700 successfully!

QDA-700 User’s Guide
-12 -
Launcher II
Launcher II is the starting point (also known as Home) of all applications in your
QDA-700.
You can find and launch most applications by tapping the appropriate icons here.
At the top of Launcher II is the Status Bar which shows the status of time, battery level,
radio signal, etc. At the bottom of Launcher II there are 2 on-screen soft buttons: List and
Menu. The left-most and right-most hard button (i.e., Home Button and Menu Button)
correspond to the 2 on-screen soft buttons respectively.
More details of Launcher II will be discussed in Chapter 5.

QDA-700 User’s Guide
-13 -
Status Bar
Status bar is a convenient area to access many functions and shows essential
information. It is accessible in most applications.
(from left to right)
1. Home (i.e., Launcher II)
2. Time and Battery
3. Input method
4. Input enabler
5. Message alert
6. Network status
7. Volume control
8. Input area
9. Menu
Home Tap to display Home screen of Launcher II
Time and Battery Tap to open the Time and Battery screen, which
shows the date, time, week, battery level and
brightness control.
To adjust screen brightness, tap and drag the slide
left or right. Tap OK when finished.
Input Method Tap the inverted triangle to open the input method
pick list. Tap to select, on-screen keyboard, Graffiti2
and Penpower.
Input Enabler Tap to enable and disable the selected input method.
Disabled input method will be denoted by a dimmed
icon and vice versa. Disabling the input method may
be useful when you are using drawing applications
such as Note Pad.
Message Alert * Red blinking message alert icon will only be shown
if the wireless mode is ON and there is a waiting
message (e.g., SMS, MMS, or email). Tap the
blinking icon to open the message reminder which
shows the number of unread messages. This
message alert icon can only be dismissed after the
message has been opened.

QDA-700 User’s Guide
-14 -
Network Status Network Status icon has two displays:
–when the wireless mode is OFF.
–when the wireless mode is ON.
The number of green bars denotes the strength of
the radio signal. The greener the bar, the stronger
the radio signal. An orange triangle denotes the
availability of GPRS subscription. All Call Divert icon
will appear next to the green bar if it is enabled.
Tap to open the Network Status dialog box where
you can turn on or off the wireless mode, check
name of the mobile phone service provider, status
of roaming and GPRS and the status of Call
Forwarding. Yo u can also connect to the desired
network service at the Connection pick list. Tap OK
when finished.
Volume Control Tap to open the Volume Control screen where you
can adjust the ringer volume, key and system sound
level. Receiver volume (i.e., volume of earpiece
during phone calls) can only be adjusted when the
wireless mode is ON. You can also mute the ringer
or select ringer behavior:
Ring –ring only
Vibration –vibration only
All Off –No ring and no vibration
Ring & Vibration –Both ring and vibration
Ring after Vibration : When there is an
incoming call, your QDA-700 will vibrate for 6
seconds and then ring.
Tap OK when completed.
Input Area Tap to toggle between showing and hiding the input
area.
Menu Tap menu to open the menu bar.
Note: Press Camera Button to launch a simplified status bar while the flip is
closed. A simplified status bar is including Clock, Missed Call Alert, Ringer
Status & All Call Divert Icon.

QDA-700 User’s Guide
-15 -
1.5 Turning the radio On and Off
To cater for your different requirements and minimize power consumption, various
features (e.g., Date Book, Contacts, To Do List, Memo Pad, MP3 playback, Digital
Camera, etc.) of your QDA-700 can be used independently of the wireless features and
applications. The screen and wireless modes are designed to be turned on and off
separately.
Turning the screen on and off
-When the flip is closed: open the flip to turn on the screen, and vice versa.
-When the flip is opened: press the Power button slightly to toggle the on/off of the
screen.
Turning Wireless Mode On
Wireless mode allows your QDA-700 to connect to a mobile network so that you can
make and receive phone calls and use other wireless services (e.g., email, web browsing,
etc.).
To turn on the wireless mode, do one of the following:
lPress and hold the Power button for 2 seconds.
lOpen the flip and press Dial Button once/twice. Then, tap On to confirm.
lOpen the flip and tap the wireless mode icon in the status bar (at the top of the
screen). Tap Mobile: On at the Network Status screen.
Turning Wireless Mode Off
When wireless mode is off, your QDA-700 does not have a connection to any mobile
network. You can still use the organizer and other Palm OS features. This is ideal for
maximizing battery life.
To turn off the wireless mode, do one of the following:
lPress and hold the Power button for 2 seconds.
lOpen the flip and tap the wireless mode icon in the status bar (at the top of the
screen). Tap Mobile: Off at the Network Status screen.
lOpen the flip and press Dial Button, tap Menu (by pressing Menu Button) and
choose “Mobile Off”
* You are advised to switch off the wireless mode when you are in a hospital or in
an aircraft. The GSM radio frequency may interfere with medical instruments and
aircraft systems.

QDA-700 User’s Guide
-16 -
1.6 Making your First Phone Call
Before you make your first phone call with your QDA-700, please make sure:
1. The SIM card has been inserted.
2. The QDA-700 is fully charged.
3. The power lock is in the Locked position.
To make your first phone call:
1. Open the flip, press and hold the Power button for 2 seconds.
2. Allow your QDA-700 to complete an automatic network search which may take
several seconds. When it is completed, the network status icon appears in the top
toolbar.
3. If prompted for a PIN, tab to enter it on the PIN screen. If you do not know the PIN
number or have trouble with the PIN, please contact your mobile service provider for
help.
4. Tap on the onscreen phone pad for the desired phone number and press
to dial.
5. When necessary, press to clear the last tapped digit.
6. When your call is complete, i) press End button , or ii) press Reject Button, or iii) close
the flip, to hang up.
Phone calls can only be made when you are in a wireless coverage area. If “No Service”
appears in the upper left of the screen, you are probably out of a wireless coverage area.
If you believe you are in a wireless coverage area and this problem persists, try turn
on/off your QDA-700 or contact your mobile service provider for assistance.
You can make an emergency call with or without a SIM card inserted, as long as your
QDA-700 is within GSM coverage. Wireless mode can also be turned on without inserting
a SIM card. A message “Emergency call only” displays on the screen. In this situation,
you can only make an emergency call by dialing international emergency number “112” or
the specific emergency number of your location. (Note: Some operations may require a
SIM card to be inserted before making an emergency call. Please check with your mobile
phone service provider for details.)
Adjusting call volume
While a call is in progress, press the volume buttons on the side of your QDA-700 to
adjust call volume.

QDA-700 User’s Guide
-17 -
1.7 Resetting your QDA-700
Your QDA-700 is built to provide stable and reliable organizer and mobile phone functions.
In general, you do not have to use the reset button. Nevertheless, your QDA-700 may fail
to respond to an input on some occasions (e.g., poor program design of 3rd party
software). Performing a reset allows your QDA-700 to run again.
Performing a soft reset
A soft reset will instruct your QDA-700 to start again. No records or information (e.g.,
software, Contact entries, memos, etc.) will be deleted during a soft reset. The Welcome
screen appears after a soft reset, followed by the Date and Time Preferences screen (to
set date and time).
To perform a soft reset
lPerform a soft reset by using an unfolded paper clip or the stylus to gently press the
reset button located at the right side of your QDA-700.
Performing a hard reset
All records and entries stored in your handheld are erased after a hard reset. Never hard
reset your QDA-700 unless a soft reset does not solve your problem. Note: The data
previously synchronized with your computer can be restored on your QDA-700 during its
next HotSync operation.
To perform a hard reset
1. Hold the power button down on the top of your QDA-700.
2. While holding down the power button, press the reset button gently with an unfolded
paper clip or the stylus and release the reset button.
3. Only release the power button when the Palm Powered™ logo appears.
4. When a message appears on the handheld screen warning that you are about to
erase all the data stored on your handheld, do one of the following:
lPush the 5-way navigator to the top to confirm the hard reset and display the
Digitizer screen.
lPush the 5-way navigator to the bottom to perform a soft reset.
The current date and time are not affected during a hard reset. Format Preferences and
other settings are restored to their factory default settings.
To restore your data from a Windows computer after a hard reset:
1. Click the HotSync icon ™ in the Windows system tray (lower-right corner of the
taskbar).
2. Select Custom in the HotSync Manager menu.
3. Select the username from the list.
4. Select an application in the Conduit list.

QDA-700 User’s Guide
-18 -
5. Click Change and select Desktop overwrites the handheld.
6. Changing the HotSync setting from the default only affects the next HotSync
operation. Thereafter, HotSync Actions revert to their default settings. To use a new
setting on an ongoing basis select the Set As Default box. Thereafter, whatever you
selected as the default setting is used when you click the Default button in the
Custom dialog box.
7. Click OK.
8. Repeat steps 4 through 6 to change conduit settings for other applications.
9. Click Done to activate your settings.
10. Perform a HotSync operation.

QDA-700 User’s Guide
-19 -
2. Input Method
The chapter illustrates several ways to input data (e.g. memo, address, etc) on your
QDA-700.
Available input methods include:
lOnscreen keyboard
lGraffiti 2 Handwriting
lPenPower Handwriting

QDA-700 User’s Guide
-20 -
2.1 Using the onscreen keyboard
You can open the onscreen keyboard anytime you need to enter text or numbers on your
handheld.
To access the onscreen keyboard, open any application such as Memo and do one of the
following:
lIf the input area (also called graffiti area) is disabled, tap theicon in the status bar at
the bottom of the screen.
lIf the graffiti area is enabled, tap abc or 123 to pop up the keyboard.
Tap here
Tap here for
alphabetic keyboard Tap here for
numeric keyboard
Table of contents