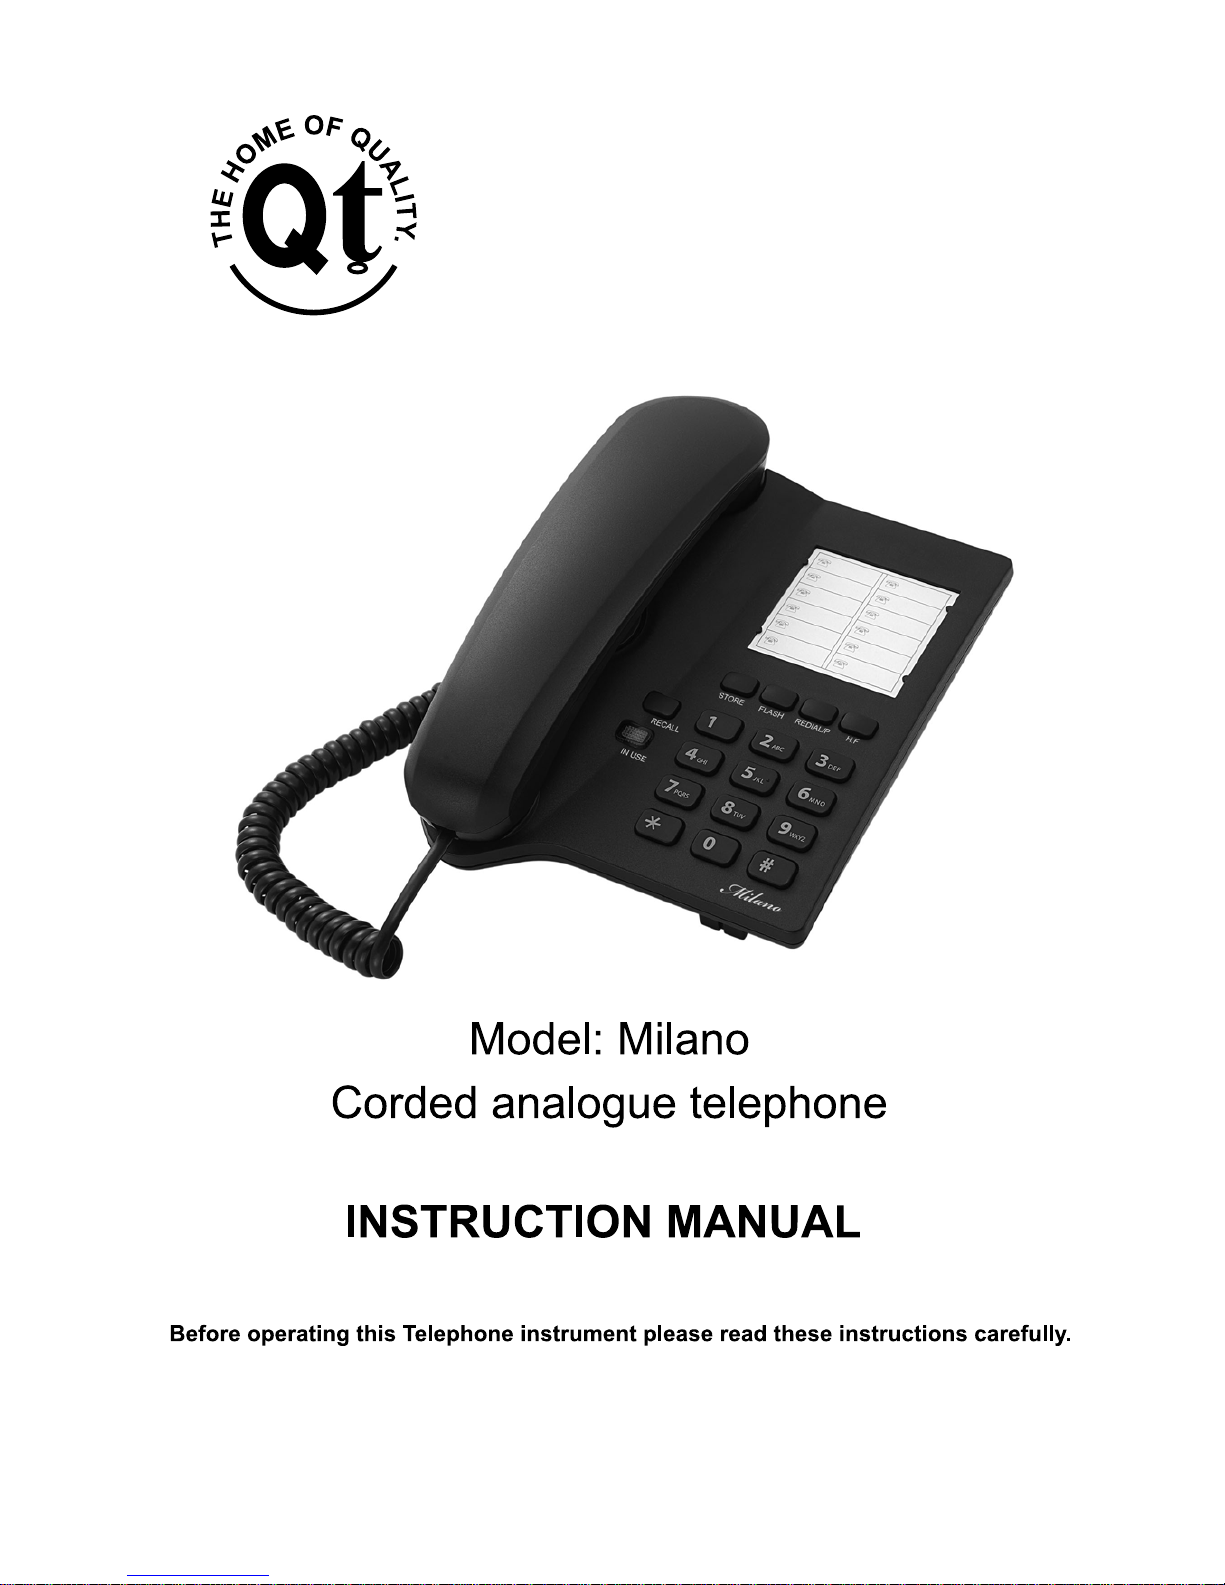
Qualitel Milano User manual


1
INTRODUCTION
Thank you for purchasing our product which adopts excellent workmanship and exceptional
reliability.
Your telephone is designed to give you flexibility in use and high quality performance. To get the
most from your new telephone, we suggest that you take a few minutes to read through this
instruction manual to familiarize yourself with all the features of the product.
The product is guaranteed for 12 months from the date of purchase shown on your sales receipt.
The guarantee does not cover damage caused by misuse or negligence or by excessive voltage.
For example, faults on the telephone line or lightning.
SAFETY INSTRUCTIONS
When using your telephone instrument, the following basic safety precautions should always be
followed to reduce the risk of fire, electric shock and injury to persons:
1. Read, understand and follow all warnings and instructions
2. Unplug the product from the wall outlet before cleaning. Do not use liquid cleaning materials
nor aerosols. Use a soft damp cloth for cleaning.
3. Do not place this product on unstable surfaces. The product may drop, causing serious
damage to the product.
4. Do not overload wall outlets and extension cords as this can result in fire or electric shock.
5. Never push foreign objects of any kind into this product through the cabinet slots as it may
affect dangerous voltage points or short circuit parts that could result in fire or electric shock.
Never spill any liquids on the product.
6. Avoid moving or disconnecting this unit during a heavy storm, as there may be a risk of
electric shock from lightning. Avoid conversations during electric storms.
7. Do not use this product in the vacinity of a gas leak
FEATURES
¾10 two-touch memories
¾Last number redial
¾Flash, Pause function for use behind a PABX
¾2-step lock function
¾Pulse/Tone dialling
¾Ringer volume adjustable
¾In use LED indicator
¾Hands-free speakerphone
¾Desk/wall mountable

2
LOCATION DESCRIPTION

3
INSTALLATION
1. Plug one end of the line cord into the connector marked “line” on the base of the telephone
and the other end into the wall socket.
2. Connect the handset to the base of the telephone with the curly cord.
3. Select your preferred ringer volume (High or Low).
4. Set the dial mode to PULSE or TONE dialling according to your local network.
WALL MOUNT INSTALLATION
1. Mark two points on the wall that are 72mm apart to drill the fixing centers as shown below,
check carefully that there are no pipes or electrical wires hidden in the wall where you are to
drill the holes.
2. Fix two screws (not supplied) at the marked locations, leaving approximately 7mm between
the wall and the screw head.
3. Hang the base unit on the screws using the wall mount slots.
4. You may need to remove the telephone from the wall and tighten the screws so that the base
is securely fixed and does not wobble. Place the handset on the cradle with the parking hook
on the cradle arranged to fit in the parking recess under the earpiece on the handset.
RECEIVING A CALL
¾From handset
1. When the telephone rings, pick up the handset and talk to the other party.

4
2. End the call by replacing the handset on the base of the telephone.
¾Switching to speakerphone
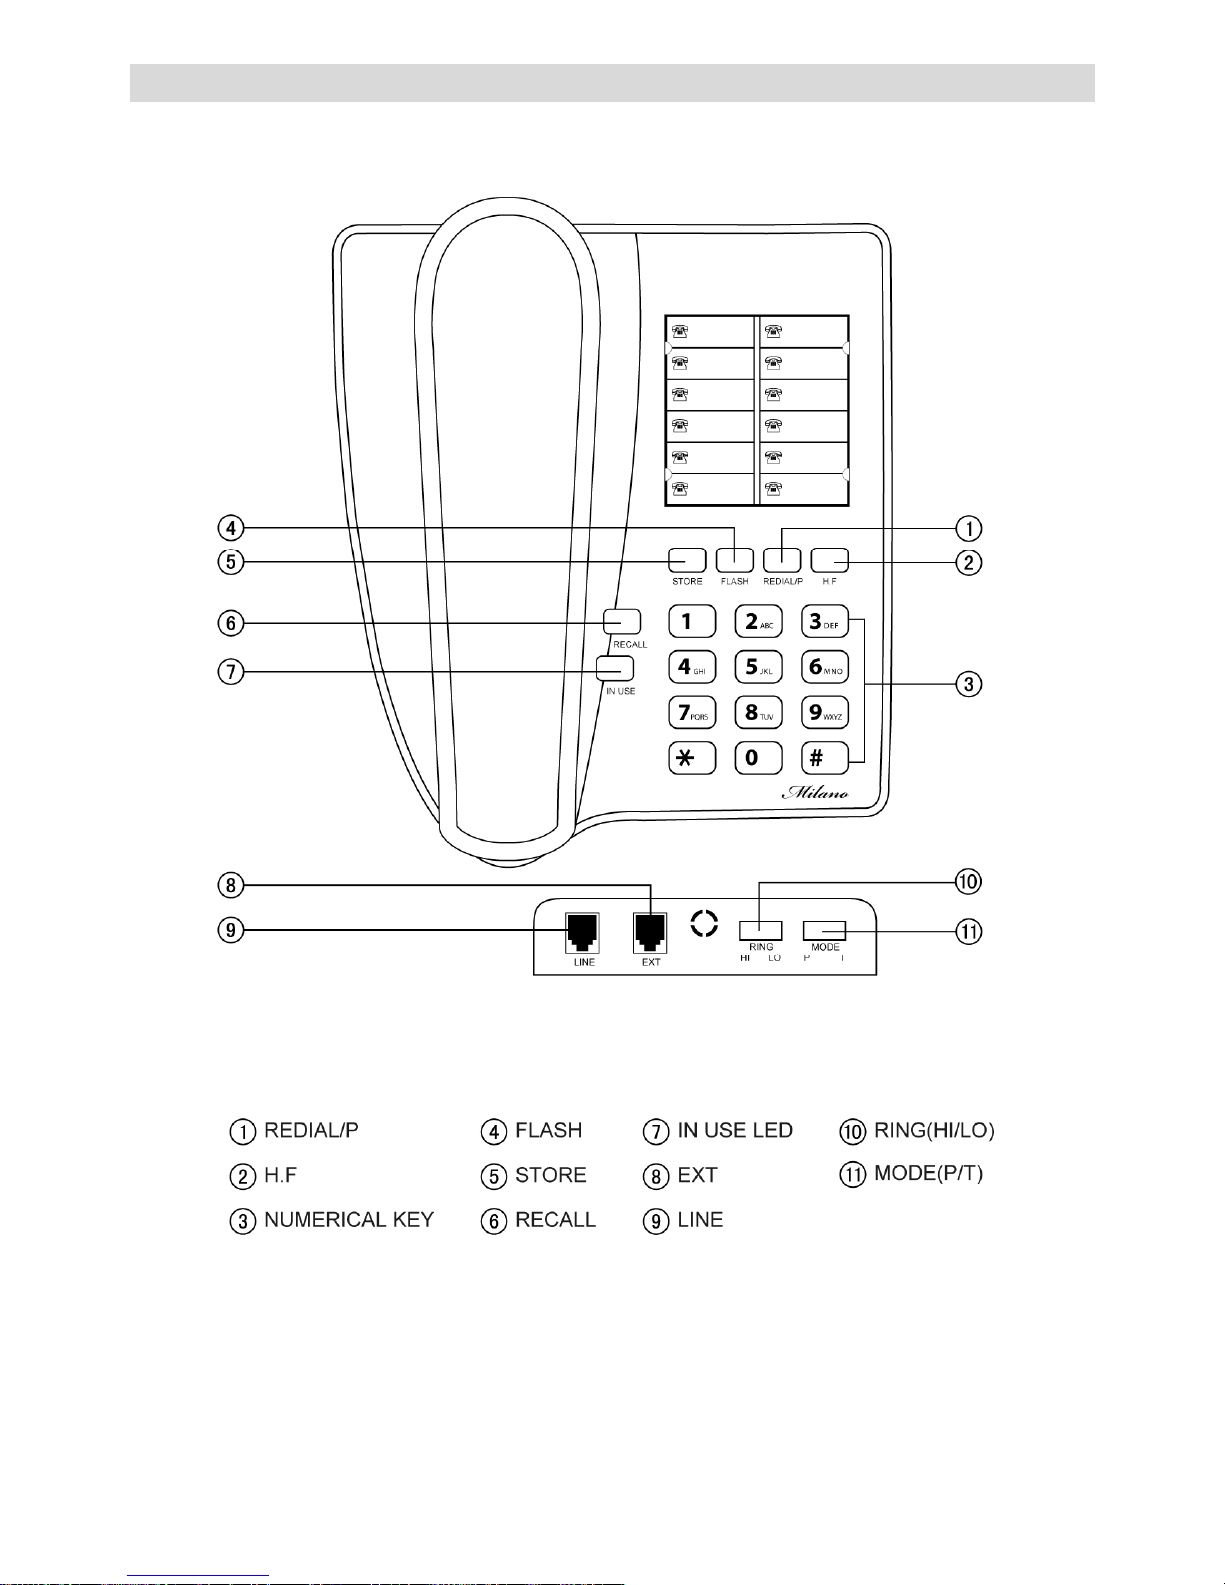
1. When using the handset, press the H.F button and return the handset to the base.
2. Press the H.F button again to end the call.
¾From speakerphone
1. When the telephone rings, press the H.F button and talk to the calling party. For the other
party to hear your voice clearly, speak into the speaker from a distance of not more than
32cm from the telephone.
2. Press the H.F button again to end the call.
MAKING A CALL
¾From Handset
1. Pick up the handset.
2. When you hear dial tone, dial the desired number.
3. To end the call, return the handset to the base.
¾From Speakerphone
1. Press the H.F button.
2. When you hear dial tone, dial the desired number.
3. To end the call, press the H.F button again.
¾Redial
1. Pick up the handset or press the H.F button.
2. Press the REDIAL/P button, the last dialled number will be dialled again
TWO-TOUCH MEMORY OPERATION(SEE PAUSE FUNCTION)
¾To store the number in two-touch memory
1. Pick up the handset or press the H.F button, then press the STORE button.
2. Enter the phone number you want to store using the numeric keypad.
3. Press the STORE button again.
4. Press one of digit keys (0-9) to store the number under that chosen digit.
¾Make a call from two-touch memory
Pick up the handset or press the H.F button, press the RECALL button and then press one of the
digit keys (0-9) to dial the stored number.
FLASH FUNCTION
When you dial a number to make a call, and you receive busy tone, you could press the FLASH
button and the REDIAL/P button to dial the number again.

5
PAUSE
When dialling, press the REDIAL/P button to insert a 3.6s pause time between digits. This
function is used behind a PABX. Insert the PAUSE between the PABX access digit (usually 0 or
9) and the number to be dialled.
LOCK
Turn the key to green, all numbers starting with “0” are locked.
Turn the key to red, all numbers are allowed to be dialed out.
* Emergency numbers starting with "1" such as 10111, 10177 can be dialled on both lock positions.
P-TSWITCH
Set the slide switch on the side of the telephone to T(TONE) or P(PULSE) to select the dialling
mode.
ADJUSTING RINGING VOLUME
Set the RING switch to HI or LO to select the desired ringer volume.
TROUBLESHOOTING TIPS
No Dial Tone * Check hook switch to make sure it pops up
Can’t dial out * Make sure Tone/Pulse is set to correct position according to
telephone exchange requirement
* Unplug the phone, wait 30 seconds and plug the phone back in
* Check the phone line cord
*Check that all connectors are firmly inserted in their sockets
Phone does not ring * Check the phone line cord
*Could have too many phones on one line (the total REN of all
phones should not be greater than the maximum for your area,
usually 5).
Last number redial and/ *When you first make a call try pressing the Pause Button
or Memory dialling don’t for a pause between the outside line access digit (eg: 9 or 0)
work on a PABX and the telephone number, you should later be able to
redialthenumber.
* If your PABX requires you to wait for a second dial tone before
dialling the telephone number, press the Pause Button for a pause
between the access digit and number.
Table of contents
Other Qualitel Telephone manuals