Quality Commercial Macines QCM-1200E User manual

QCM-1200E DESKTOP PAPER CUTTER
USER'S MANUAL
QUALITY COMMERCIAL MACHINES CORPORATION
NAPERVILLE, ILLINOIS U.S.A.

INTRODUCTION
Congratulations on your purchases of the Quality Commercial Machines' QCM-1200E desktop
paper cutter. Your QCM-1200E desktop paper cutter is a heavy-duty, durable, and precise cutter
equipped with a hardened steel blade assembly that cuts up to 280 sheets of 20 lb paper with a
single stroke. It has an adjustable paper backstop and a positive paper clamp to lock-down paper
stacks for precise cuts. It has a safety latch that automatically locks the cutting blade until released.
The maximum cutting width is 12 inches. With a heavy-duty all-steel base, a solid steel side gauge
and paper clamp, a solid aluminum alloy backstop and clamp wheel, it is designed to last. The
cutter is ideal for schools, churches, small print shops, photo shops, and businesses. Please read
this manual carefully before putting the cutter into operation.
PREMIUM FEATURES
•Cuts a stack of up to 280 sheets 20 lb paper with a single stroke.
•Maximum cutting width: 12 inches.
•Hardened steel cutting blade assembly.
•Automatic safety blade locker prevents cutting until released.
•Positive steel paper clamp.
•Solid steel side gauge.
•Solid aluminum alloy backstop.
•Solid aluminum alloy clamp wheel.
•Heavy-duty all-steel base.
•Non-skid feet.
PRODUCT DESCRIPTION
A.
B.
C.
D.
E.
Cutting Bar Head
Safety Lock Knob
Blade Assembly
Side Gauge Bar
Steel Base
F.
G.
H.
I.
J.
Cutting Bar Lever
Clamp Wheel
Clamp Wheel Handle
Paper Clamp
Backstop Bar
A
B
C
D
E
F
G
H
I
J

INSTALLATION
Open the package, carefully take out the blade assembly. Put the assembly on a steady
flat table top in such a way that the red safety knob faces upwards. Take out the steel
base, align the holes between those of the blade assembly and the steel base. Fasten the
base onto the blade assembly with three (3) sets of bolts, nuts, and washes.
Mount the side gauge bar onto the steel base. Make sure that the gauge aligns with the
grid marks on the base.
Mount the paper clamp wheel onto the shaft at the end of the blade assembly. Tighten the
wheel mounting screw. Mount the wheel handle onto the wheel.
Take off the blade coating paper tapes. Slide the cutting bar lever onto the cutting bar
head and you are ready to go.
OPERATION
Align the paper stack to the appropriate cutting position guided by the gauge bars, turn the paper
clamp wheel clockwise to clamp the paper stack down tight, pull out the safety lock knob, press
the cutting bar lever all the way down and the job is done. Caution: after each cutting operation,
make sure to lift the cutting bar lever back to the top position until the lever is locked.
MAINTENANCE
The paper cutter may only be used for cutting paper or similar materials. Do not use the cutter to
cut any hard substances or materials that may splinter. Hard materials such as paper clips will
damage the cutting blade. To ease the cutting, wax the blade edge with white candle wax.
Lubricate the motion parts of the blade assembly once in a while. If you are not going to use the
cutter for a long period of time, before you store it, make sure to coat the blade with anti-rust
lubricants. The cutter must not be placed outdoor. Do not operate the cutter in the vicinity of
inflammable liquids or gasses.
The blade can be sharpened or replaced. The blade may only be sharpened by qualified
workshops.
Even a dull blade is a very dangerous item. Extra caution has to be taken in handling the blade to
prevent personnel injury and blade-edge damage in the process of removal and reinstallation.
Read all instructions carefully before proceeding.
The following instructions are intended for qualified technicians only. Quality Commercial
Machines Corporation assumes no responsibility for any accident or injury incurred while
attempting to repair the QCM-1200E.
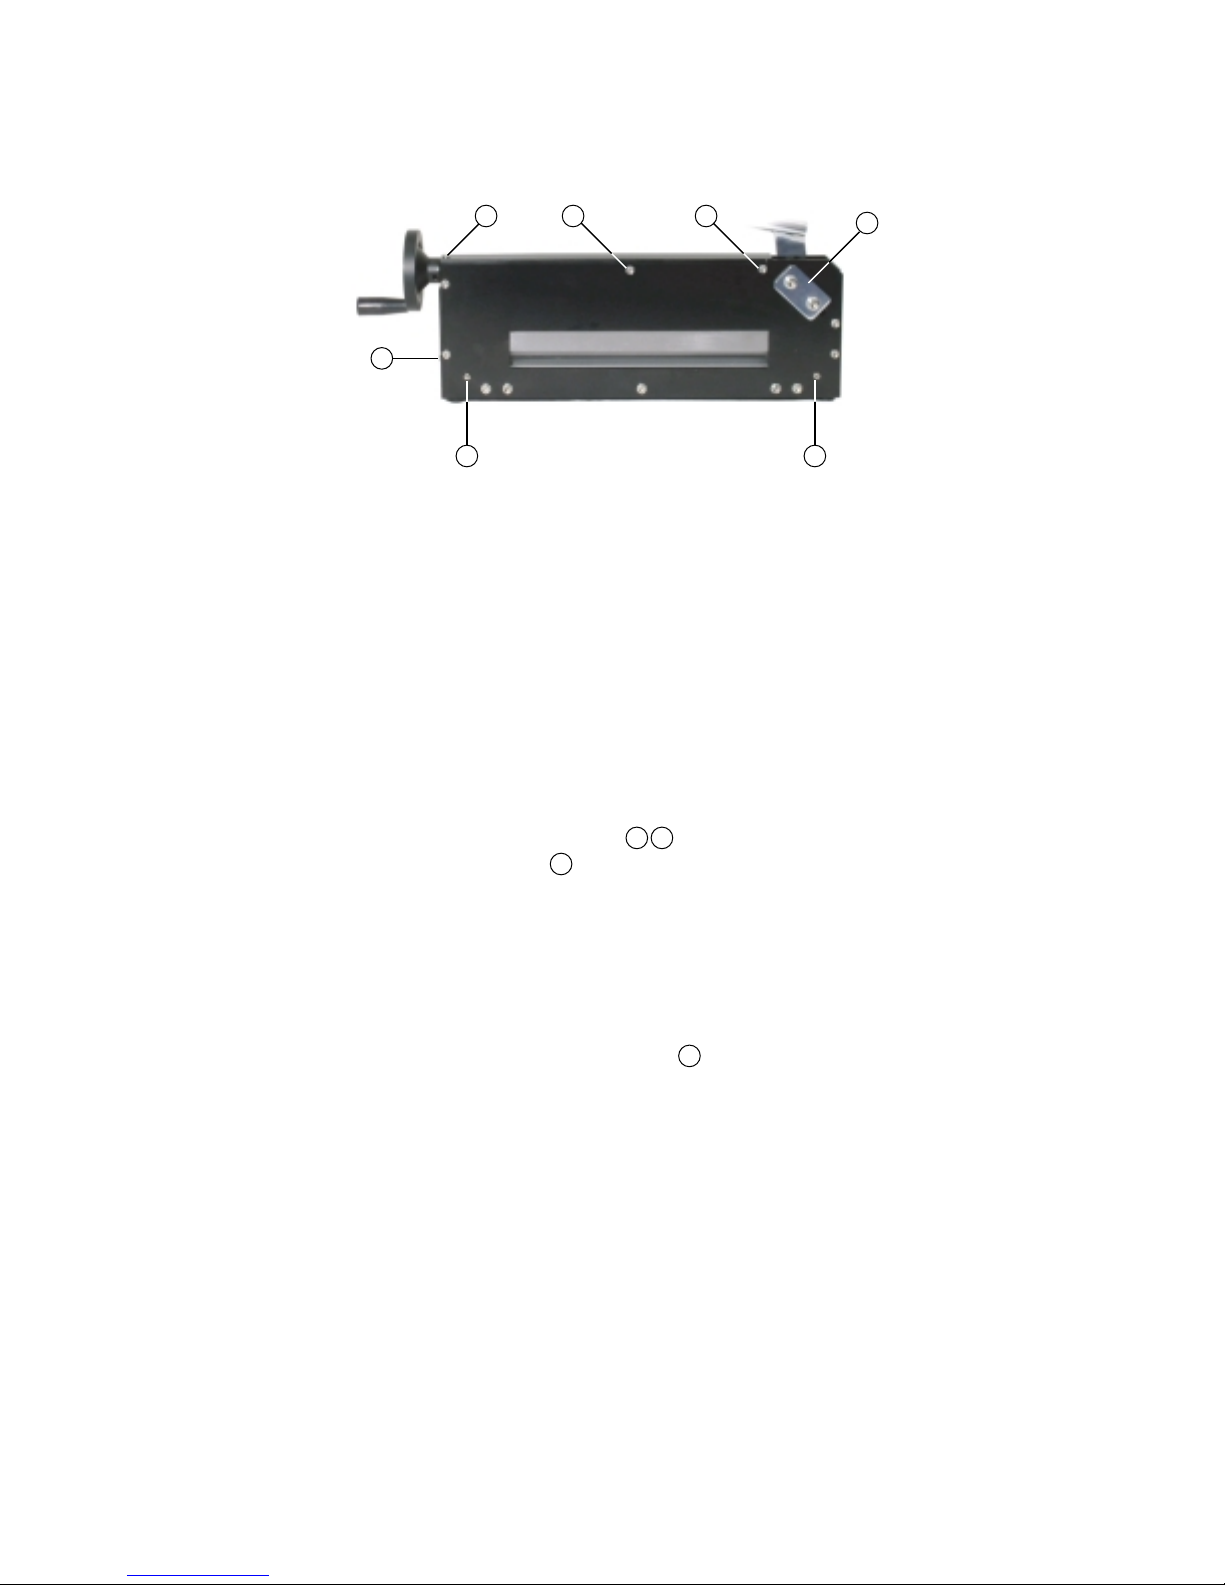
Blade Removal and Installation
Put the cutter on a flat, steady, and traffic free surface. Remove the cutting bar from the
cutting head.
Remove the screw shown in the diagram. Slide the blade cover towards the paper
clamp wheel to remove it.
Remove the two spacer bolts from the blade frame.
Take off the rectangular safety plate shown in the diagram by loosening the two bolts
on the piece. Set the bolts and plate aside.
1.
2.
3.
4.
1.
2.
3.
4.
1
2 3
4

Once the safety plate bolts have been removed, pull the safety lock knob and the handle,
lift the blade into a vertical position and slide it out of the frame. You will see a pin in the
cutting bar head that goes through a hole in the blade. The pin holds the entire assembly
together. Separate the cutting bar head from the blade and put aside.
Place the blade on a flat surface free from traffic.
Replace the blade and the black roller cam. Follow the above listed steps in reversed order
to reinstall the blade back to the blade assembly.
Once the blade has been replaced, it is necessary to rotate the cutting stick and level the blade.
Cutting Stick Rotation
Raise the cutting bar head until the safety knob engages.
Loosen the two cutting stick holding screws .
Remove the painted metal end cap , set the cover aside.
Slide the white cutting stick out. Rotate or turn the cutting stick to another surface or side.
Each cutting stick can be rotated up to eight times.
Reinstall the cutting stick back by following the above listed steps in reversed order. Hand
tight the two cutting stick holding screws.
Blade Leveling
Loosen both bolts on the rectangular safety plate . Hand tight the bolts.
Press the cutting bar head to level the blade-edge with the white cutting stick and tighten
the bolts.
Raise the cutting head until the safety knob engages. Insert a piece of paper on the cutting
stick and make a cut. It may be necessary to use excessive pressure the first time to place
a groove into the cutting stick surface.
TECHNICAL SPECIFICATIONS
•Model number: QCM-1200E.
•Cutting width: 12 inches.
•Cutting capacity: 280 sheets of 20 lb.
•Unit weight: 35 pounds.
•Dimensions: 19w x 15d x 10h inches.
5.
6.
7.
1.
2.
3.
4.
5.
1.
2.
3.
5 6
7
4
4
7
31 2
5 6
Table of contents