manuals.online logo
Brands
  1. Home
  2. •
  3. Brands
  4. •
  5. Quatreau
  6. •
  7. Plumbing Product
  8. •
  9. Quatreau QT553 Quick start guide

Quatreau QT553 Quick start guide

COMMISSIONING MANUAL
QT/QST553 Water Heater Control Unit
CS20 Chiller Carbonator
BOILIN G CHILLED SPARKLING HOT & COLD
BOILIN G CHILLED SPARKLING
110V/60Hz
1
CONTENTS
QUATREAU COLLECTION
COMMISSIONING MANUAL
QT/QST553 Water Heater Control Unit
CS20 Chiller Carbonator
QUATREAU COLLECTION
BEFORE YOU START
Note: Before you start, the following in-
ter-connections must be made between the
water heater and the chiller and the returns
from the chiller to the water heater unit.
1. The H20 (left side of the water heater) is
connected to the WATER IN on the chiller.
4. For TouchTap™ models, you will also con-
nect the COLD WATER SUPPLY and ther-
mostatically controlled hot to the inlets found
on the lower part of the water heater unit at
the back left side marked HOT WATER SUP-
PLY and COLD WATER SUPPLY.
5. CHLORINATION: The chiller / chiller car-
bonator unit must be sanitized 30 minutes
before commissioning. This can be done be-
fore you start the installation.
To sanitize, run a feed of chlorinated water
(approx. 5ppm)
through the chiller
inlet to the outlet(s).
Leave the solution in
the chiller and pro-
ceed to commission-
ing.
2. The STILL WATER OUT on the right of the
chiller is connected to the CHILLED IN on the
left of the water heater.
3. The SODA WATER OUT on the right of the
chiller is connected to the CARB IN on the left
of the water heater.
x
WARNING: DO NOT POWER THE
SYSTEM UP UNTIL INSTRUCTED TO
DO SO
• QUATREAU COLLECTION BEFORE YOU START 1
• SECTION A: COMMISSIONING SEQUENCE 2
• SECTION B: WATER HEATER VENTING PROCEDURE 2, 3
• SECTION C: COMMISSIONING THE CHILLER CARBONATOR 3, 5
• SECTION C: ADJUSTING CARBONATION IN CHILLER 6
• SECTION D: CONVERSION TO PURIFIED WATER 6
• SECTION E: QUATREAU TOUCH TAP
OPTIMUM SETTING FOR MAINS HOT & COLD 6
MAINS
HOT
MAINS
COLD
CHILLED IN
CARB IN
H20C 02
WATER IN
STILL WATER OUT
SODA WATER OUT
SODAFLOW RATE
ADJUSTMENT
CO2GAS IN
WATER HEATERCHILLER
MAINS
HOT
MAINS
COLD
CHILLED IN
CARB IN
H20C 02
WATER IN
STILL WATER OUT
SODA WATER OUT
SODAFLOW RATE
ADJUSTMENT
CO2GAS IN
WATER HEATERCHILLER
MAINS
HOT
MAINS
COLD
CHILLED IN
CARB IN
H20C 02
WATER IN
STILL WATER OUT
SODA WATER OUT
SODAFLOW RATE
ADJUSTMENT
CO2GAS IN
WATER HEATERCHILLER
BEFORE YOU START
2 3
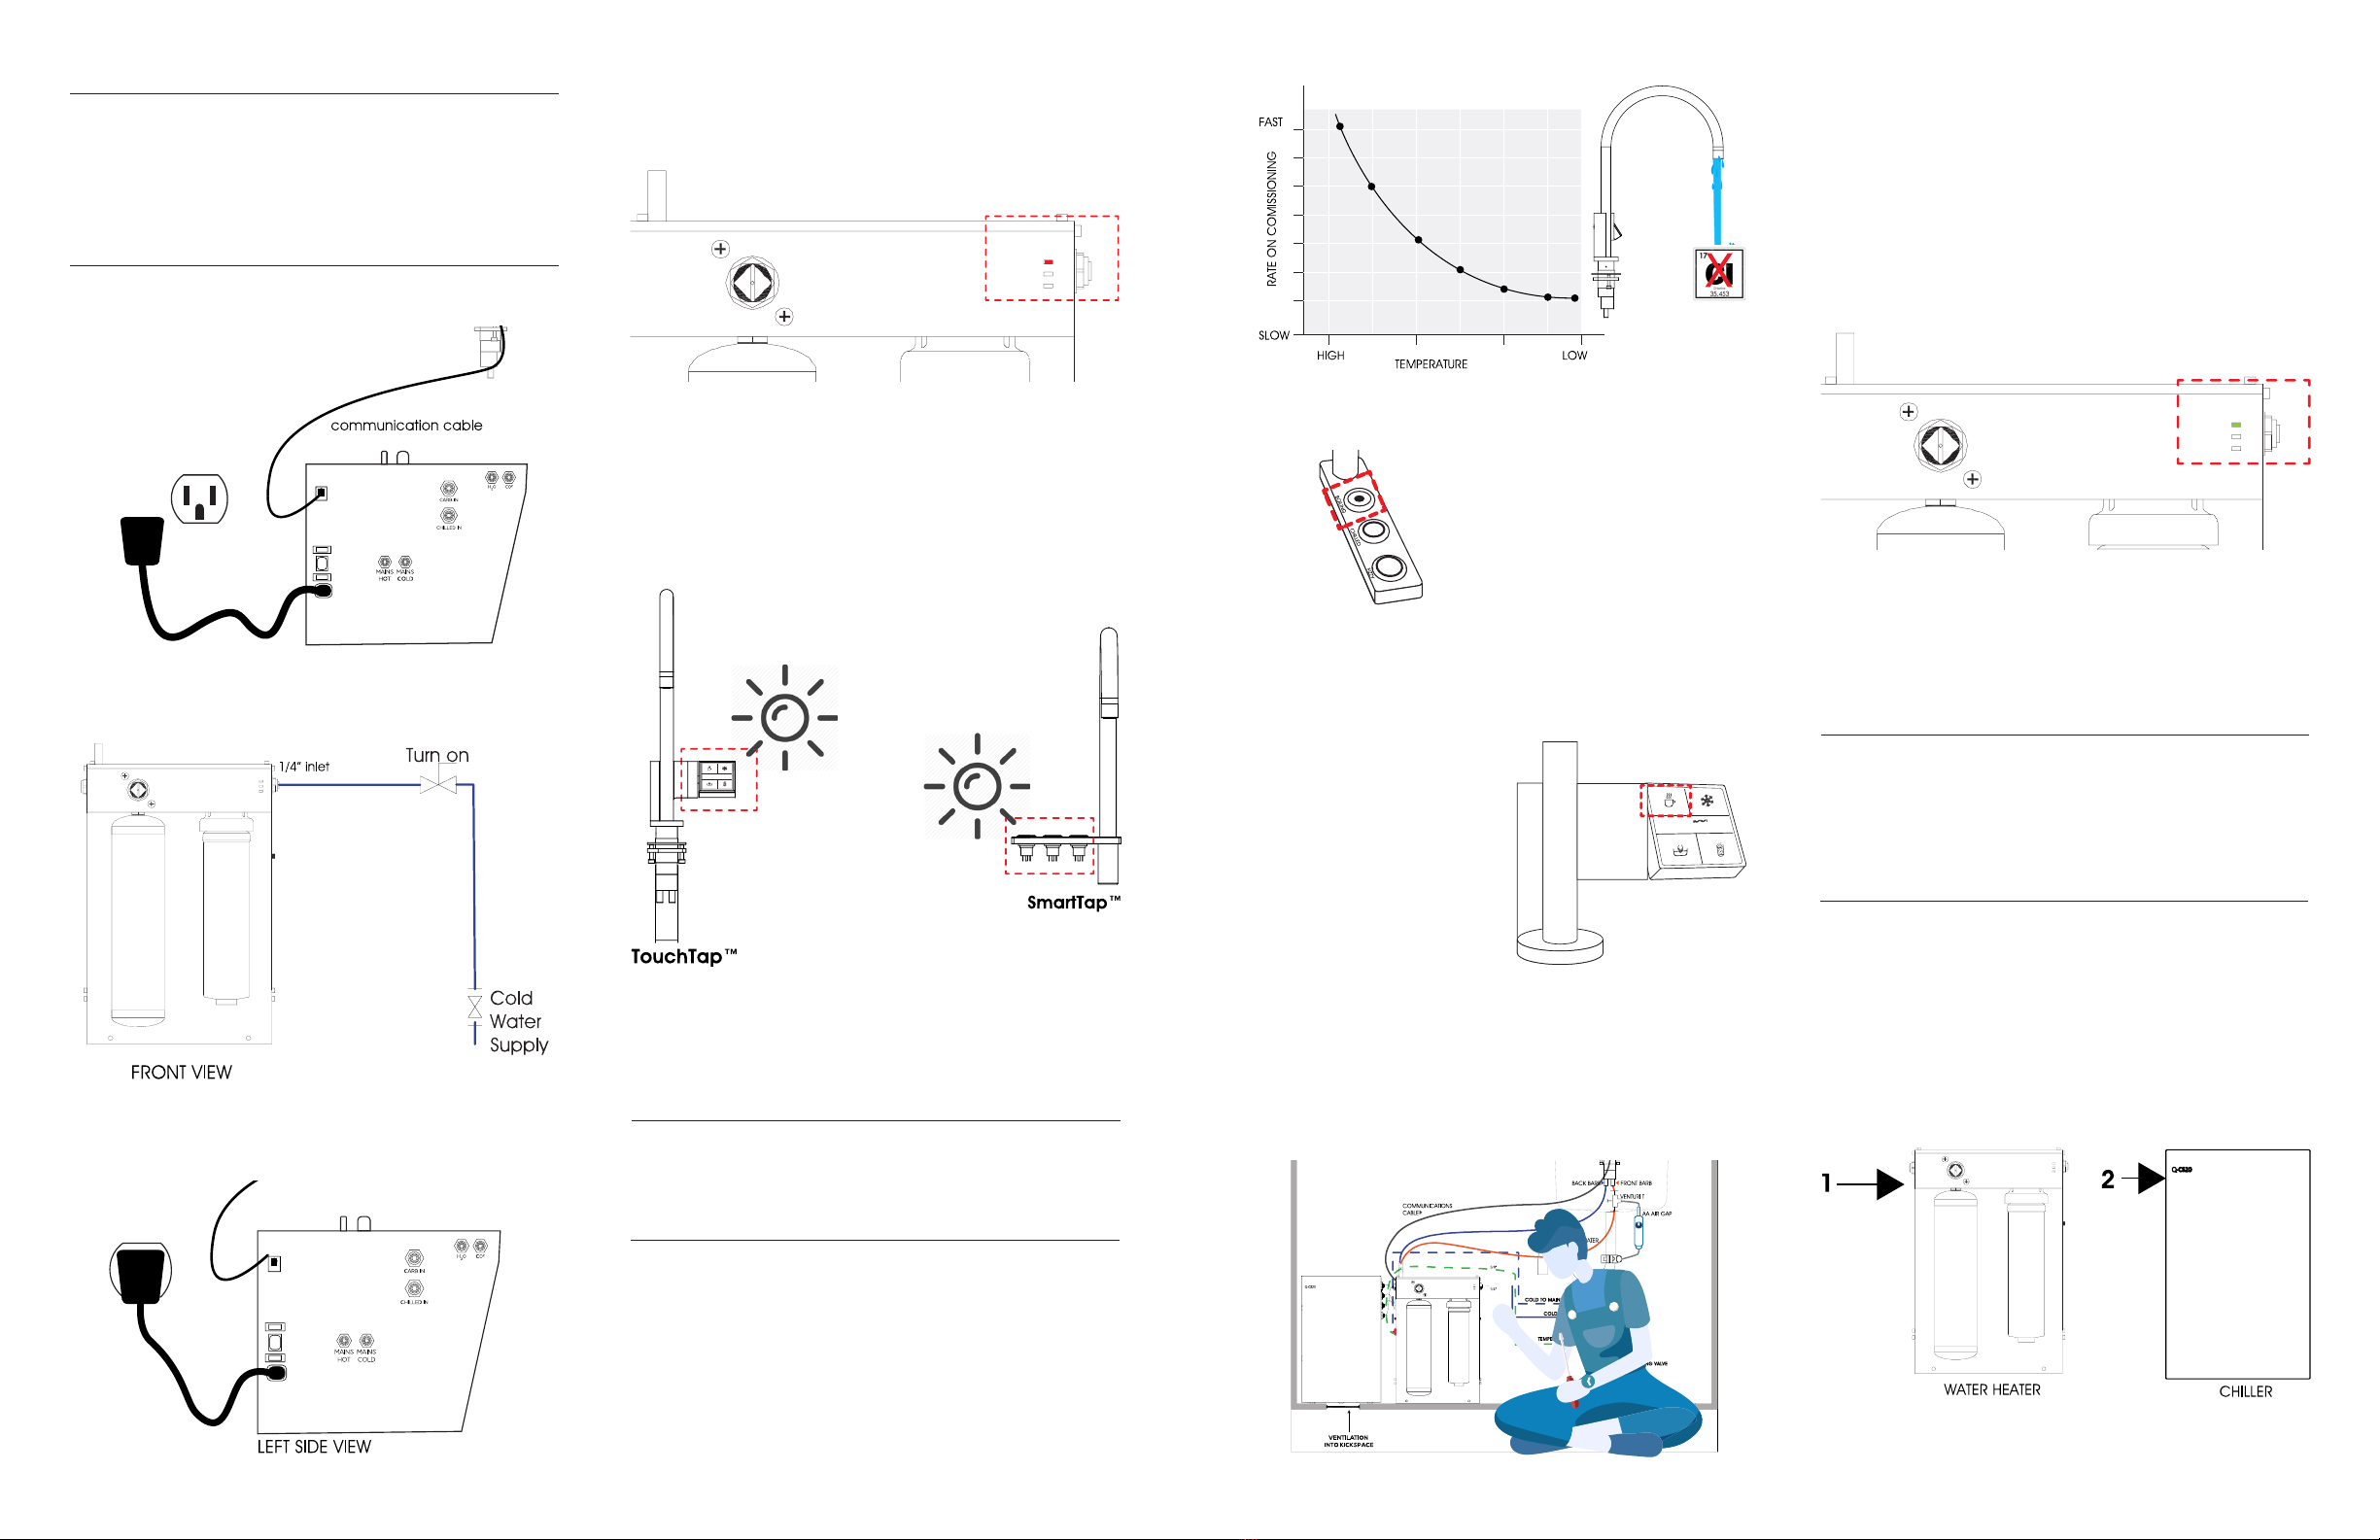
1. Connect the communications cable
from the tap to the water heater.
WARNING: To not damage the water heater,
especially for the first time turning the water
heater on, you must run the water through
the boiling function five times. (for the touch
tap this is the 3 step sequence).
When the water heater lights turn green, the
system has the correct temperature and
ready to use.
4. Power up the water heater. A red light will
show on the top right of the water heater.
5. Look for the SmartTap™ buttons on the
panel to light up.
6. Look for the TouchTap™ panel four (4)
quadrants to illuminate and then turn off.
1. Activate the boiling flow at the tap control
within 2 minutes of powering up.
• If you have the Smart-
Tap™ this will be the red il-
luminated button.
• If you have the TouchTap™, this has a sim-
ple three (3) touch sequence - top left quad-
rant, then the bottom left, then top left again.
Please refer to the TouchTap™ installation
manual.
2. Allow water to run for approx. Thirty (30)
seconds, then deactivate.
3. Wait for 1 minute and repeat, allowing wa-
ter to flow for 30 seconds. Repeat this pro-
cess three (3) times.
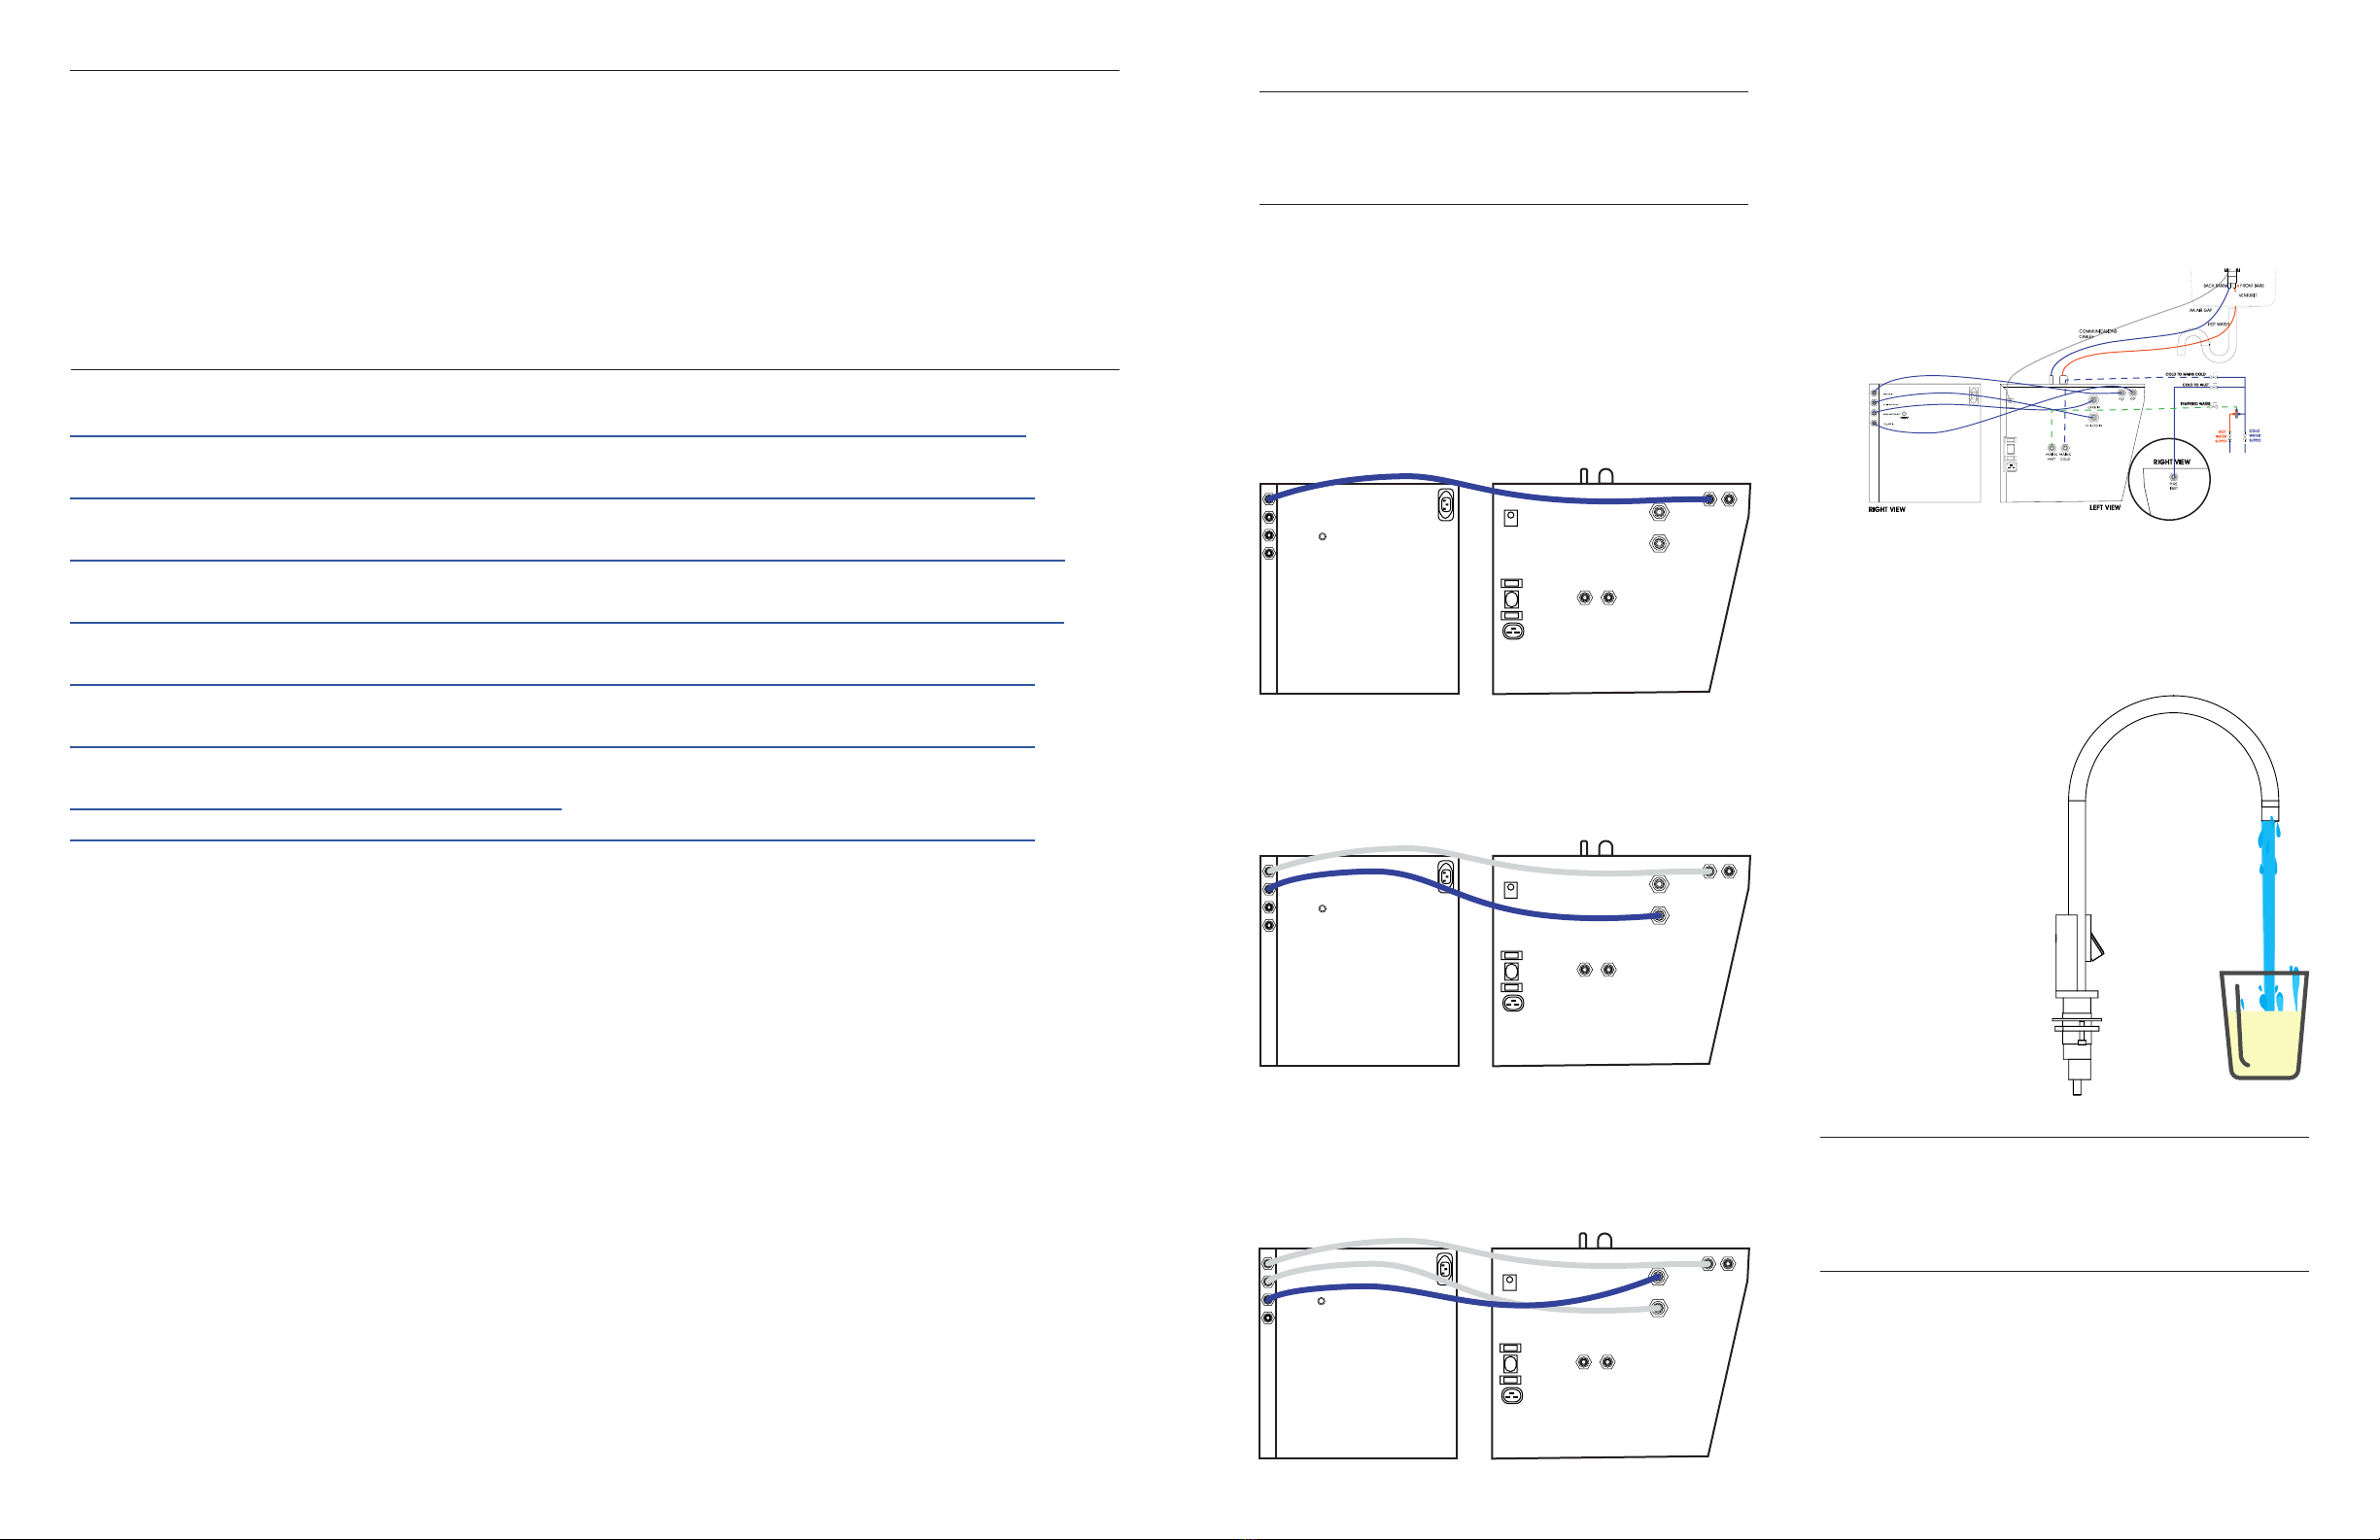
1. Note: It is essential to understand the inlet
solenoid that controls the flow of water into
the chiller carbonator from the water heater
unit. The inlet solenoid has to be open when
we do this commissioning sequence because
running the pump dry will lead to failure. To
activate the solenoid, activate the sparkling
water.
4. When the green light on the water heater
unit appears and the red light goes out, the
water heater has reached its temperature.
Your water heater unit is now commissioned
and ready for use.
Note: If you do not see the panels light up
check the communication cable is connected
properly.
Note: The SmartTap™ required 6 activations
every minute. Repeat every minute for 5 min-
utes.
NOTE: that you will see water running through
the venturiT™ to drain during this process.
This unique device enables the water heater
to vent safely to drain during expansion and
also removes any water left in the spout af-
ter use.
2. Turn on the cold water supply to the ¼” in-
let on the front right side of the water heater.
3. Connect the power cable provided for the
water heater.
(Note: that this is rated 110 Volts/ 15Amp)
SECTION A:
Commissioning sequence for
Quatreau Touch™ and SmartTap™
Boilers (553-B)
SECTION B:
Water Heater Venting Procedure
SECTION C:
Commissioning the Chiller
Carbonator
CS20
DO NOT TURN ON POWER TO CHILLER
UNTIL INSTRUCTED TO DO SO.
COMMISSIONING WATER HEATER & CHILLER
4 5
2. Turn off the mains cold water feed to the
water heater Inlet.
3. Connect the CO2 bottle to the regulator
found on the front of the water heater unit.
Listen for gas escaping and keep twisting the
bottle until it stops. Stop when the bottle is
hand tight.
5. Now re-open the mains cold water supply
to the water heater Inlet.
6. Activate the sparkling function on the tap
and allow water to run.
7. While the water is running, turn on the
chiller carbonator. The pump will turn on, and
you will hear it.
8. Deactivate the Sparkling option.
9. Activate the sparkling option again for a
couple of seconds and then deactivate.
10. The compressor and fan in the chiller unit
will continue to run until the temperature is
reached. This should take approx. 5-10 min-
utes depending upon the temperature of the
incoming mains water supply.
11. When the fan and compressor have
stopped, activate the sparkling function again
and run off one (1) glassful of water. Deacti-
vate the sparkling and wait for the pump to
stop.
NOTE: If you don’t hear the air escaping,
there’s no gas in the bottle.
4. DO NOT POWER UP YET.
• Run the Sparkling option on the tap until gas
comes out.
• Deactivate the Sparkling function
so that the pump can continue to feed pres-
surized water into the chamber where it mix-
es with the gas. The pump will be damaged if
it is starved of water (this is why the solenoid
has a delay).
If you hear the pump running beyond 20 sec-
onds simply activate the sparkling for 1-2 sec-
onds to open the solenoid. DO NOT ALLOW
SYSTEM TO RUN DRY. 12. At this point, let’s look at the quality of the
water. Activate the sparkling water button.
You will hear the pump kick in letting you know
the system is working correctly.
When you turn off the sparkling function the
pump should turn off.
13. See if it is fizzy enough by tasting it. If not,
you will be able to adjust using the CO2 reg-
ulator.
We are going to wait now for a few minutes
until the chiller fan turns off - and the com-
pressor turns off until it drops to 40 degrees
Fahrenheit.
NOTE: Do not go by what the water looks like
in the glass you need to taste it.
NOTE: Listen for the pump to activate during
this process. The pump pressurizes the gas
into the water. Activating the sparkling func-
tion opens the solenoid that feeds water
into the chiller carbonator. When deselecting
sparkling, the inlet solenoid remains open for
30 seconds .
Repeat this process for two (2) more
glasses of water. (The saturation of CO2 is at
its optimum below 4degreesC.)
TURN ON
CHILLER
CHILLER CHILLER
CO2
6
14. On the front of the water heater unit, you
will find the gas regulator and instructions for
increasing the level of carbonation.
If you wish to feed your QT/QTS553-BCS
from an RO system.
1. First ensure that the storage tank is full.
2. Change the mains feed into the front right
side of the water heater to your RO feed.
3. The Optimum operating pressure from the
RO system to the water heater and chiller is
3Bar / 45psi.
4. Some RO systems have a maximum pres-
sure of 30 psi from the tank when full. You will
therefore need to install a delivery pump set
at 3Bar/45 psi to maintain optimum perfor-
mance.
15. When adjusting, make 1/4 turn adjust-
ments in the desired direction (+/-).
16. After an adjustment, repeat process 11
and 12.
Finally, adjust the flow rate of the mains hot
and cold down to a point where it doesn’t
splash when washing hands. The flow should
be smooth, calm and have the appearance
of a cone at the point where it falls from the
faucet.
SECTION C:
Adjusting the level of carbonation in
the Chiller Carbonator CS20
CS20
SECTION D:
Conversion to Purified Water
SECTION E:
QUATREAU TOUCH TAP ONLY
Optimum setting for mains Hot
& Cold
NOTE: If you do not hear the pump activate
during this process, power off the chiller and
repeat processes 6-9.
NOTE: Starvation of water will damage the
chiller carbonator pump. Do not run the
sparkling function if the RO system has run
out of water or pressure drops below 15psi.
This invalidates the 12 month warranty.
Distributed by: Global Water Solutions
QT553/CS20 - 06022021 © gws June 2021
Find out more at: www.Quatreau.com
ADJUSTING CARBONATION

This manual suits for next models

2

Other Quatreau Plumbing Product manuals

Quatreau SmartTap User manual

Quatreau

Quatreau SmartTap User manual

Quatreau Touch 553-B User manual

Quatreau

Quatreau Touch 553-B User manual

Quatreau SMARTTAP 553-B User manual

Quatreau

Quatreau SMARTTAP 553-B User manual

Quatreau QST-553BCS User manual

Quatreau

Quatreau QST-553BCS User manual

Quatreau QT-553BCS User manual

Quatreau

Quatreau QT-553BCS User manual

Quatreau SmartTap User manual

Quatreau

Quatreau SmartTap User manual

Quatreau SMARTTAP QST-B Operating instructions

Quatreau

Quatreau SMARTTAP QST-B Operating instructions

Popular Plumbing Product manuals by other brands

Speakman SF-9102 instructions

Speakman

Speakman SF-9102 instructions

Helvex SPACIO HSTRWDSP installation guide

Helvex

Helvex SPACIO HSTRWDSP installation guide

Moen BAMBOO TS881 Series Specifications

Moen

Moen BAMBOO TS881 Series Specifications

Hans Grohe AXOR Starck 10720 1 Series Installation/User Instructions/Warranty

Hans Grohe

Hans Grohe AXOR Starck 10720 1 Series Installation/User Instructions/Warranty

Vente Unique MARIBO JM-3LAF manual

Vente Unique

Vente Unique MARIBO JM-3LAF manual

BATHSELECT BS24BRUSHED installation instructions

BATHSELECT

BATHSELECT BS24BRUSHED installation instructions

Mira Advance installation guide

Mira

Mira Advance installation guide

Pfister Kaylon F-049-KY Quick installation guide

Pfister

Pfister Kaylon F-049-KY Quick installation guide

Kohler K-2098 Homeowner's guide

Kohler

Kohler K-2098 Homeowner's guide

Intra INT 04PA Mounting instructions

Intra

Intra INT 04PA Mounting instructions

Weka 508.2020.00.00E ASSEMBLY, USER AND MAINTENANCE INSTRUCTIONS

Weka

Weka 508.2020.00.00E ASSEMBLY, USER AND MAINTENANCE INSTRUCTIONS

Heritage Bathrooms SSAC02 Installation instructions & user guide

Heritage Bathrooms

Heritage Bathrooms SSAC02 Installation instructions & user guide

Kohler 23510-BL installation guide

Kohler

Kohler 23510-BL installation guide

Nuie Arvan GENERAL FITTING GUIDE

Nuie

Nuie Arvan GENERAL FITTING GUIDE

KWC Roman Tub Rough-in Z.534.804.931 Specifications

KWC

KWC Roman Tub Rough-in Z.534.804.931 Specifications

KWC Vesuno K.26.VB.40.700.38 Specification sheet

KWC

KWC Vesuno K.26.VB.40.700.38 Specification sheet

NIMO TB 1000 T Installation

NIMO

NIMO TB 1000 T Installation

Toto TLP01701 instruction manual

Toto

Toto TLP01701 instruction manual

manuals.online logo
manuals.online logoBrands
  • About & Mission
  • Contact us
  • Privacy Policy
  • Terms and Conditions

Copyright 2025 Manuals.Online. All Rights Reserved.