Quipall 2000EPWKIT User manual

1
ELECTRIC PRESSURE WASHER
INSTRUCTION MANUAL
2000EPWKIT
WARNING: Do not use the appliance without having read the instruction manual.

2
IMPORTANT SAFEGUARD
INSTRUCTIONS:
SAFETY WARNINGS AND
PRECAUTIONS
When using this product basic
precautions should always be
followed, including the
following:
•Read all the instructions
before using this product.
•To reduce the risk of injury,
close supervision is necessary
when a product is used near
children.
•Know how to stop the product
and bleed pressures quickly. Be
thoroughly familiar with the
controls
•Stay alert-watch what you are
doing.
•Do not operate the product
when fatigued or under the
influence of alcohol or drugs.
•Keep operating area clear of
all persons.
•Do not over reach or stand on
unstable support. Maintain
solid footing and balance at all
times.
•Follow the maintenance
instructions specified in the
manual.
•This product is provided with
A Ground Fault Circuit
Interrupter built into the power
cord plug. If replacement of the
plug or cord is needed use
only identical replacement
parts.
•Warning-Risk of skin
puncture and injury. Do not
direct spray stream at a person.
•Keep all connections dry and
off the ground.
SAVE THESE
INSTRUCTIONS
SERVICING OF A
DOUBLE-INSULATED
APPLIANCE
In a double-insulated product,
two systems of insulation are
provided instead of grounding.
No grounding means is
provided on a double insulated
product, nor should a means
for grounding be added to the
product. Servicing a double-
insulated product requires
extreme care and knowledge of
the system, and should be done
only by qualified service
personnel.

3
Replacement parts for a double
insulated product must be
identical to the parts they
replace. A double-insulated
product is marked with the
words “DOUBLE
INSULATION” or “DOUBLE
INSULATED.” The symbol
“ ” may also be marked on
the product.
EXTENSION CORDS
Use only extension cords that
are intended for outdoor use.
These extension cords are
identified by a marking
“Acceptable for use with
outdoor appliances; store
indoors while not in use.” Use
only extension cords having an
electrical rating not less than
the rating of the product. Do
not use damaged extension
cords. Examine extension cord
before using and replace if
damaged. Do not abuse
extension cord and do not yank
on any cord to disconnect.
Keep cord away from heat and
sharp edges. Always
disconnect the extension cord
from the receptacle before
disconnecting the product from
the extension cord.
WARNING – To reduce the
risk of electrocution, keep all
connections dry and off the
ground. Do not touch plug with
wet hands.
GENERAL SAFETY
REGULATIONS
WARNING: Keep operating
area clear off all persons
WARNING: Before each use
pressure must be released!
Trigger on wand then start the
washer
WARNING: Do not overreach
or stand on unstable support.
Maintain solid footing and
balance at all times.
WARNING: Follow the
maintenance instructions
specified in the manual.
WARNING: To reduce the
risk of electrocution, don’t start
and run the machine in the rain
or storm. Keep all connections
dry and off the ground. Do not
touch plug with wet hands. It is
strictly prohibited to let water
leak into the machine.

4
WARNING: When the
machine is turned on, the
interior pumps start and
continue to run even if the
pressure wand trigger has not
been depressed.
Running the machine for more
than 3 minutes without
depressing the pressure wand
trigger could cause heat
damage to the motor and
pumps. Please do not leave the
machine running unattended or
unused for more than 3 minutes.
WARNING: When the
machine is running, please
maintain a constant water
supply. Without water
circulation will damage the
sealing rings of the machine.
WARNING: It is necessary to
turn on the spray lance within
one or two minutes after the
machine has been started.
Otherwise, the temperature of
the circulating water within the
machine will soon rise to a
critical point, which will cause
damage to the sealing rings
inside the machine.
WARNING: Don’t start and
run the machine in a place
excessively cold so as to
prevent the machine from the
freezing current.
WARNING: This appliance
has been designed to clean
using only water. Do not use
corrosive chemicals.
WARNING: Do not use the
appliance within the range of
persons unless they wear
protective clothing.
WARNING: Do not direct the
jet against yourself or others in
order to clean clothes or
footwear.
WARNING: Disconnect from
the electrical power supply
before carrying out user
maintenance.
WARNING: To ensure the
appliance safety use only
original spare parts from the
manufacturer or approved by
the manufacturer. Do not
use the machine before
damaged parts are replaced.

5
Thank you for choosing this
Electric pressure washer
Chapter Page
1 Safety instructions 2
2. Instructions when using for the first time 6
3. Operating instructions 6
4. Instructions after use 9
5. Environmental protection 9
6. Maintenance, cleaning and repair 9
7. Troubleshooting/ Repairs 10
Rated Pressure
1600psi
Max. pressure
2000psi
Flow
1.5GPM
Current
13A
Voltage
120V/60Hz
Protection Class
Ⅱ
Max Water
Temperature
60℃
1.Pressure gun with adjustable nozzle
2. Outlet connector
3. Inlet connector
4. Short pressure hose
5. Pressure hose
6. Hose reel
7. Switch
8. Build-in detergent bottle
9. Short pressure hose connector
10. Machine body
11. Cable
12. GFCI Plug
13. Inlet water hose
14. Water tap
15. Wheels
Contents
Technical data
Product assembly diagram

6
1.Machine
2.Turbo Nozzle
3.Gun Lance
4.Spray Gun Body
5.Normal Nozzle
6.Cleaning Pin
7.Detergent Nozzle
8.Garden Water Inlet Connector
9.Wrench
10.Cable tractor
11.Gun holder
12.Angle Nozzle
13.Car brush
14.Patio cleaner
This section will explain in detail how to
prepare this Electric Pressure Washer
for first time use.
SAFETY DEVICES
The unload valve can reduce pressure if
it exceeds pre-set values.
Locking device on trigger gun (see
illustration at the beginning of this manual):
The trigger gun features a locking device.
When the knob is activated, the trigger gun
cannot be operated.
THERMAL SENSOR
A thermal sensor protects the motor against
overloading. The machine will restart after
a few minutes when the thermal sensor has
cooled.
Screw the water inlet coupling (3) tight on
to the water inlet Note: The inlet filter (A)
must always be fitted in the water inlet pipe
to filter out sand, lime stone and other
impurities as these will damage the pump
valves.
Caution: Failure to fit the filter will
invalidate the guarantee.
Connect the garden hose with a standard
garden connector (18).
2. First time instructions
3.1 Connection of garden hose
3. Operation instructions
GB
Spare parts list
①
②
③
④
⑤
⑥
⑦
⑧
⑨
⑩
⑪
⑫
⑭
⑬

7
Attach the high pressure hose to the trigger
gun and machine.
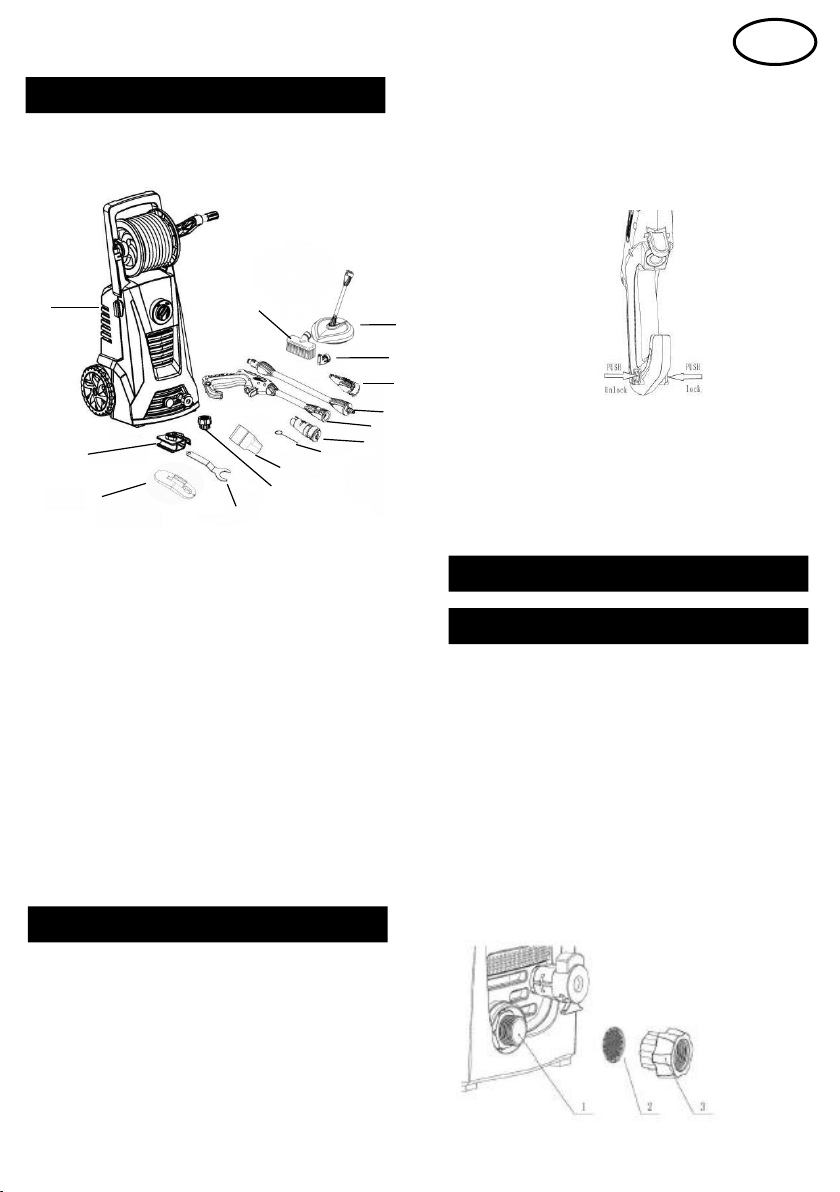
Detach the high pressure hose by pressing
the pawl (A) or button (B)
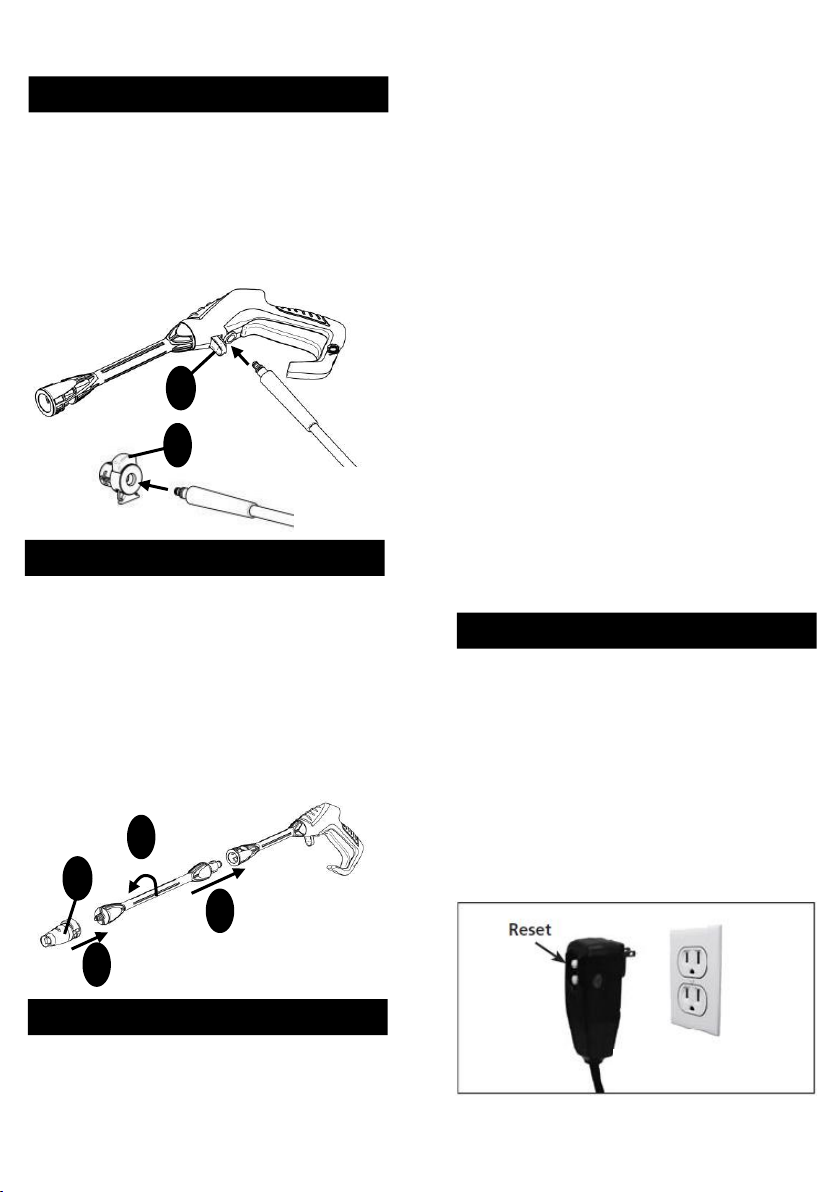
Push the lance into the trigger gun
When inserted turn it. Caution: Make sure
the lance is properly fixed to the gun
Attach the nozzles. Caution: When
attaching the nozzle, the button (A) on the
nozzle should come out again. Check before
activating the trigger that the nozzle is
properly fixed.
Connecting the water supply pipe
Follow your water supplier’s instructions.
For connection information, see the data
plate/technical specifications
Use a reinforced hose (not supplied) with a
standard connection (ext. diameter:
16mm/int. 12mm, maximum length: 25m).
IMPORTANT! Only use water without
any impurities. If there is a risk of sand
particles in the inlet water (i.e. from your
own well), an additional filter should be
mounted.
Let the water run through the water hose
before connecting it to the machine to
prevent sand and dirt from penetrating the
machine. Note: Check that the filter is fitted
in the water inlet pipe and that it is not
clogged up.
Connect the water hose to the water supply
by means of the quick connector (inlet
water, max. pressure: 145psi, max.
temperature: 40°C).
Turn on the water.
The trigger gun (1) and lance is affected by
a thrust during operation - therefore always
hold it firmly with both hands.
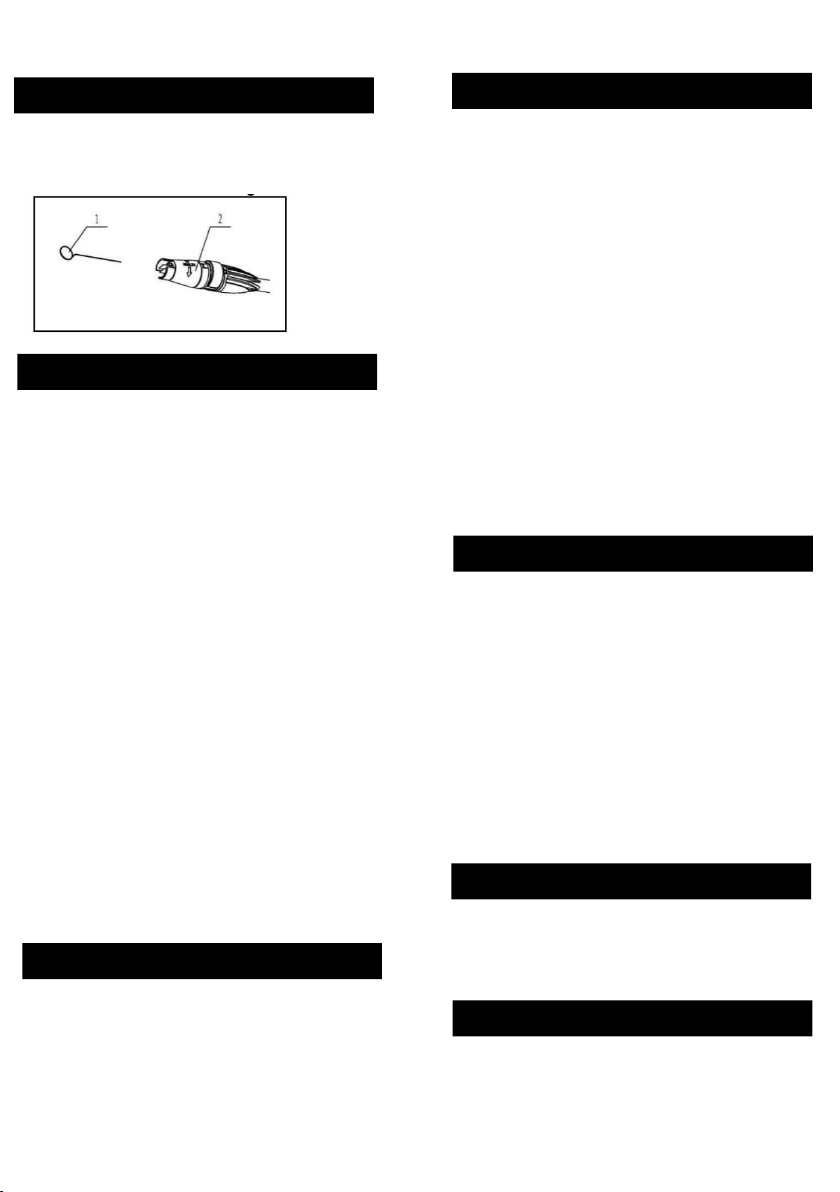
Plug the power cord into a grounded 120V
outlet, that is on a dedicated circuit. Do not
use extension cord. Press the reset button on
the GFCI plug adapter. This must be done
each time the unit is plugged into an outlet.
Grounded plug/reset button
3.2 Mounting of high pressure hose
3.3 Mounting of lance and nozzle
3.4 Water connection
3.5 Start/stop the machine
A
B
1
2
A
3
12

8
IMPORTANT: Point the nozzle at the
ground.
Check that the machine is in upright
position. NOTE: Do not place the machine
in high grass!
Release the trigger lock.
Activate the trigger of the trigger gun (1)
and let the water run until all air has
escaped from the water hose.
Press the Start/stop switch (7).
Activate the trigger of the trigger gun (1).
Always adjust the distance and thus the
pressure of the nozzle to the surface, which
is to be cleaned.
Do not cover the machine during operation
or use it in a room without adequate
ventilation!
NOTE: If the machine is left or not used
for 5 minutes, it must be switched off on the
start/stop switch (7) "O":
To stop: Press the start/stop switch (7) "O".
Disconnect the electrical plug (12) from the
socket.
Shut off the water supply and activate the
trigger of the trigger gun (1) to relieve the
machine of pressure.
Lock the trigger gun (1)
When releasing the trigger of the trigger
gun (1), the machine automatically stops.
The machine will start again when you re-
activate the trigger gun (1)
The pressure of the normal nozzle can be
adjusted by tuning it. WARNING: Do not
do this while the machine is being operated
to avoid the jet hitting the hand and causing
injury.
1.Gun hook assembly:
2.Cable hook assembly
3.6 Adjustable Nozzle
3.7 Install indicator diagram

9
1. Unscrew the lid built-in detergent
bottle.
2. Add detergent to Built-in detergent
bottle (A)
3. Replace the nozzle of the spray gun
to the detergent nozzle (16) as below:
4. And then spray detergent.
The angle nozzle can be used for many
applications e.g cleaning the underbody of a
car , underneath a lawn mover without
being splashed back with debris, etc
After attaching the angle nozzle be aware of
the moment on the lance trigger gun and
lance as the jet is coming out perpendicular
to these.
Your pressure washer comes with a fixed
brush (13), mainly intended
cleaning cars. The use of a brush eliminates
any pressure effect of the jet.
Attach the brush directly to the spray lance.
Mounting of Patio Cleaner :
1. Insert the extension lance into to the
housing
2. Fix the extension lance with the two
screws to the housing
3. Insert the rotor arm into the extension
lance
4. Insert the U-pin to fix the rotor arm.
NOTE: Make sure the rotor arm is
properly fixed to the extension lance
with the U-pin
The patio cleaner is a powerful accessory
for cleaning patio, driveways, etc.
Attach the Patio Cleaner to the lance.
NOTE: Do not use the Patio Cleaner as a
broom but let is surf smoothly over the
surface
3.8 Use of built-in detergent bottle
3.9 Angle Nozzle
3.11 Patio Cleaner
3.10 Car brush

10
The Cleaning Pin can be used if the gun has
jammed.
The machine should be stored in a frost-free
room!
Pump, hose and accessories should always
be emptied of water prior to storing as
follows:
Stop the machine (press the start/stop
switch, “O” and detach water hose, high
pressure hose and nozzle
Restart the machine and activate the trigger
of the trigger gun. Let the machine run until
no more water runs through the trigger gun
Stop the machine, unplug and wind up hose
and cable.
Place trigger gun, lance, nozzles and other
accessories in the holders of the machine.
The hook can be used for storage of the
hose and cord. All accessories can be stored
in the washer after use.
WARNING: Never start up a frozen
machine. Frost damages are not covered by
the guarantee.
Old appliances contain valuable materials
that can be recycled. Please arrange for the
proper recycling of old appliances. Please
dispose of your old appliances using
appropriate collection systems.
WARNING! Always disconnect the
electrical plug from the socket prior to
maintenance or cleaning.
To ensure a long and problem free working
life, please follow these guidelines:
Wash out water hose, high pressure hose,
spray lance and accessories before
mounting.
Clean the connectors of dust and sand.
Rinse the detergent spraying attachment
after use.
Clean the nozzles.
Any repair should always be made in an
authorized workshop with original spare
parts.
Clean the water inlet filter regularly once a
month or more frequently according to use.
Carefully loosen the filter with a
screwdriver and clean the filter. Check that
it is intact before re-mounting it.
The inlet filter must always be fitted inside
the water inlet pipe to filter out sand,
limestone and other impurities, as they will
damage the pump valves.
CAUTION: Failure to fit the filter will
invalidate the warranty
The machine should be kept clean so as to
let cooling air pass freely through the
machine vents.
To ensure an easy connection and that O-
rings do not dry up; the couplings should be
greased regularly.
5. Environmental protection
4. After use instructions
6. Maintenance, cleaning and repair
6.1 Cleaning of inlet filter
6.3 Greasing of couplings
6.2 Cleaning of air vents
3.12 Use of cleaning pin

11
Symptom
Cause
Recommended action
The machine will not
start
The machine is not plugged-in
Plug the machine in
Faulty receptacle
Try another receptacle
The fuse has blown
Replace the fuse Unplug other appliances
Faulty extension cable
Try without the extension cable
Fluctuating pressure
The pump is drawing in air
Check that hoses and connections are airtight.
Valves dirty, worn or sticking
Contact your service center
The water supply is not
sufficient
Increase water pressure, check for blockages
and / or change the large pipe.
Pump seals worn
Contact your nearest service center
The machine stops
The fuse has blown
Replace the fuse
Incorrect mains voltage
Unplug other appliances
Check that the mains voltage corresponds to the
specifications on the nameplate
Thermal sensor activated
Leave the machine to cool for 5 minutes
Partially blocked jet
Clean the jet with a needle and by spraying
water rearward through the jet
Fuse blown
Fuse too small
Replace it with a fuse with higher amp
consumption than the washer.
Increase in the amperage
Try without the extension cable
Pulsing machine
Air in inlet hose / pump
Allow machine to run with open trigger until
regular working pressure resumes.
Inadequate supply of water
generated
Increase water pressure, check for blockages
and / or change the large pipe.
Partially blocked jet
Clean the jet with a needle and then spray water
backwards through the jet
Water filter blocked
Clean the filter
Folded pipe
Unfold the pipe
The machine turns on
and off by itself
Pump fuse and/or trigger out of
order
Contact your nearest service center
No water supply
Connect the inflow water.
The machine is on
but no water comes
out
Water filter blocked
Clean the filter
Blocked jet
Clean the jet with a needle and by spraying
water rearward through the jet
7. Troubleshooting

13
LAVADORA A PRESIÓN ELÉCTRICA
MANUAL DE INSTRUCCIONES
2000EPWKIT
ADVERTENCIA: no utilice este artefacto sin haber leído el manual de instrucciones.

14
INSTRUCCIONES
PREVENTIVAS
IMPORTANTES:
ADVERTENCIAS Y
PRECAUCIONES
DE SEGURIDAD
Al utilizar este producto deben
observarse siempre las
precauciones básicas, como las
siguientes:
• Lea las instrucciones en su
totalidad antes de utilizar este
producto.
• Para reducir el riesgo de
lesiones, es necesaria una estricta
supervisión cuando el producto se
utilice cerca de niños.
• Sepa cómo detener el producto
y descargar las presiones
rápidamente. Familiarícese bien
con los controles.
• Permanezca alerta; preste
atención a lo que está haciendo.
• No opere el producto si siente
fatiga o si está bajo la influencia
de alcohol o drogas.
• Mantenga a todas las personas
fuera del área de operación.
• No trate de alcanzar algo que
está lejos, ni se pare sobre un
soporte inestable. Manténgase en
todo momento en equilibrio, con
los pies bien asentados.
• Observe las instrucciones de
mantenimiento especificadas en
el manual.
• Este producto está provisto de
un Interruptor de falla a tierra
(GFCI) incorporado en el enchufe
del cable de alimentación
eléctrica. Si se necesita
reemplazar el enchufe o el cable,
utilice únicamente piezas de
reemplazo idénticas.
• Advertencia: riesgo de
perforación y lesión de la piel. No
dirija el chorro de aspersión a
ninguna persona.
• Mantenga todas las conexiones
secas y por encima del suelo.
GUARDE ESTAS
INSTRUCCIONES
SERVICIO DE UN
ARTEFACTO
DE DOBLE AISLAMIENTO
En un producto de doble
aislamiento se proporcionan dos
sistemas de aislamiento en lugar
de la puesta a tierra. En un
producto de doble aislamiento no
se proporciona ningún medio para
la puesta a tierra, ni se le debe
agregar uno. El servicio de un
producto de doble aislamiento
requiere extremo cuidado y
conocimiento del sistema, y debe

15
estar exclusivamente a cargo de
personal de servicio calificado.
Las piezas de reemplazo para un
producto de doble aislamiento
deben ser idénticas a las piezas a
las que reemplazan. Un producto
de doble aislamiento está
marcado con las palabras
'DOBLE AISLAMIENTO'
('DOUBLE INSULATION') o
'CON DOBLE AISLAMIENTO'
('DOUBLE INSULATED').
También puede estar marcado en
el producto el símbolo '' ''.
CABLES DE EXTENSIÓN
Utilice únicamente cables de
extensión aptos para el uso en
exteriores. Estos cables de
extensión están identificados por
una marcación que dice
'Aceptable para el uso con
artefactos para exteriores;
almacénelo en interiores cuando
no lo use'. Utilice solo cables de
extensión que tengan una
especificación eléctrica no menor
de la especificación del producto.
No use cables de extensión
dañados. Examine los cables de
extensión antes de utilizarlos, y
reemplácelos si están dañados.
No maltrate al cable de extensión;
no tire de él para desconectarlo.
Mantenga el cable lejos del calor
y de los bordes aguzados.
Desconecte siempre el cable de
extensión del tomacorriente antes
de desconectar el producto del
cable.
ADVERTENCIA: para reducir
el riesgo de electrocución,
mantenga todas las conexiones
secas y por encima del suelo. No
toque el enchufe con las manos
húmedas.
NORMAS GENERALES DE
SEGURIDAD
ADVERTENCIA: mantenga a
todas las personas fuera del área
de operación.
ADVERTENCIA: antes de cada
uso se debe descargar la presión.
Pulse el gatillo de la pistola y
luego arranque la lavadora.
ADVERTENCIA: no trate de
alcanzar algo que está lejos, ni se
pare sobre un soporte inestable.
Manténgase en todo momento en
equilibrio, con los pies bien
asentados.
ADVERTENCIA: observe las
instrucciones de mantenimiento
especificadas en el manual.
ADVERTENCIA: para reducir
el riesgo de electrocución, no

16
arranque ni opere la máquina con
lluvia o tormenta. Mantenga
todas las conexiones secas y por
encima del suelo. No toque el
enchufe con las manos húmedas.
Está estrictamente prohibido
dejar que penetre agua en la
máquina.
ADVERTENCIA: cuando se
enciende la máquina, las bombas
interiores arrancan y continúan
funcionando aunque no se haya
pulsado el gatillo de la pistola de
presión.
Si se deja que la máquina
funcione durante más de 3
minutos sin pulsar el gatillo de la
pistola de presión, podría haber
daño por calentamiento del motor
y las bombas. No deje la máquina
funcionando sin atención ni la
deje sin usar durante más de 3
minutos.
ADVERTENCIA: cuando la
máquina esté funcionando,
mantenga un suministro de agua
constante. Sin circulación de agua,
se dañarán los anillos de
estanqueidad de la máquina.
ADVERTENCIA: una vez que
la máquina arranca, es necesario
activar la lanza de aspersión
dentro de uno o dos minutos. De
lo contrario, la temperatura del
agua circulante dentro de la
máquina aumentará rápidamente
hasta un punto crítico que causará
daños a los anillos de
estanqueidad que están dentro de
la máquina.
ADVERTENCIA: no arranque
ni opere la máquina en un lugar
excesivamente frío, a fin de
prevenir la congelación.
ADVERTENCIA: este artefacto
está diseñado para limpiar solo
con agua. No utilice productos
químicos corrosivos.
ADVERTENCIA: no utilice el
artefacto si hay personas dentro
de su alcance, a menos que usen
ropas protectoras.
ADVERTENCIA: no dirija el
chorro contra usted ni contra
otras personas con el fin de
limpiar ropas o calzado.
ADVERTENCIA: desconecte el
equipo de la fuente de
alimentación eléctrica antes de
realizar el mantenimiento del
usuario.
ADVERTENCIA: para
garantizar la seguridad del
artefacto, use solo piezas de
repuesto originales del fabricante
o aprobadas por él. No use la
máquina sin haber reemplazado
las piezas dañadas.

17
Gracias por haber elegido esta
lavadora a presión eléctrica
Capítulo Página
1. Instrucciones de seguridad 13
2. Instrucciones para el uso por primera vez 17
3. Instrucciones de operación 17
4. Instrucciones para después del uso 20
5. Protección ambiental 20
6. Mantenimiento, limpieza y reparación 20
7. Localización de fallas / Reparaciones 22
Presión nominal
1600 psi
Presión máx.
2000 psi
Caudal
1.5 gpm
Corriente
13 A
Tensión
120 V/60 Hz
Clase de protección
Ⅱ
Temperatura del
agua máx.
60 ºC
1. Pistola de presión con boquilla ajustable
2. Conector de salida
3. Conector de entrada
4. Manguera de presión corta
5. Manguera de presión
6. Carrete de manguera
7. Interruptor
8. Botella de detergente incorporada
9. Conector de la manguera de presión corta
10. Cuerpo de la máquina
11. Cable
12. Enchufe con Interuptor de falla a tierra
(GFCI)
13. Manguera de agua de entrada
14. Grifo
15. Ruedas
Índice
Datos técnicos
Diagrama de conexión del producto

18
1.Máquina
2.Boquilla Turbo
3.Lanceta
4.Cuerpo de la pistola de rocío
5.Boquilla normal
6.Alfiler de Limpieza
7.Boquilla de Detergente
8.Conector de Entrada de Agua del Jardin
9.Llave
10.Tracción de Cable
11.Soporte de Pistola
12.Boquilla en ángulo
13.Cepillo
14.Limpiador de terrazas
Esta sección explica en detalle cómo preparar
esta Lavadora a presión eléctrica para el uso
por primera vez.
DISPOSITIVOS DE SEGURIDAD
La válvula de descarga puede reducir la
presión si se superan los valores
preestablecidos.
Dispositivo de bloqueo en la pistola (vea la
ilustración al comienzo de este manual): la
pistola de gatillo cuenta con un dispositivo de
bloqueo. Cuando se acciona la perilla, se impide
la operación de la pistola.
SENSOR TÉRMICO
Un sensor térmico protege el motor contra
sobrecargas. La máquina volverá a arrancar
después de unos minutos, cuando el sensor
térmico se haya enfriado.
Atornille firmemente el acoplador (3) a la
entrada de agua.
Nota: Siempre debe estar instalado el filtro de
entrada (A) en la tubería de entrada de agua a fin
de filtrar la arena, caliza y otras impurezas, ya
que podrían dañar las válvulas de bomba.
Precaución: si no se instala el filtro, se invalidará
la garantía.
Conecte la manguera tipo jardín con un conector
tipo jardín (18) estándar.
2. Instrucciones para el uso por
primera vez
3.1 Conexión de la manguera tipo
jardín
3. Instrucciones de operación
ES
EMPUJAR
EMPUJAR
Bloqueo
Desbloqueo
Lista de Piezas de Repuesto
④
⑥
⑧
①
③
⑤
⑨
⑩
⑪
②
⑦
⑬
⑫
⑭

19
Conecte la manguera de alta presión a la pistola
de gatillo y a la máquina.
Para desconectar la manguera de alta presión,
oprima el retén (A) o el botón (B).
Inserte la lanza en la pistola de gatillo. Una vez
insertada, gírela. Precaución: asegúrese de que la
lanza esté correctamente fijada a la pistola.
Conecte las boquillas. Precaución: al conectar la
boquilla, el botón (A) de la boquilla debe salir
nuevamente. Antes de activar el gatillo, verifique
que la boquilla esté correctamente fijada.
Conexión a la tubería de suministro de agua
Siga las instrucciones de su proveedor de agua.
Para ver la información sobre conexión, vea la
placa de datos o las especificaciones técnicas.
Utilice una manguera reforzada (no suministrada)
con una conexión estándar (diámetro ext.: 16
mm / diámetro int.: 12 mm; longitud máxima: 25
m).
¡IMPORTANTE! Use únicamente agua sin
impurezas. Si existe un riesgo de la presencia de
partículas de arena en el agua de entrada (es
decir, de su propio pozo), debe montarse un
filtro adicional.
Deje correr el agua a través de la manguera de
agua antes de conectarla a la máquina, a fin de
prevenir que penetren arena y tierra en la
máquina. Nota: Verifique que el filtro esté
instalado en la tubería de entrada de agua y que
no esté obstruido.
Conecte la manguera de agua al suministro de
agua por medio del conector rápido (agua de
entrada: presión máx. 145 psi, temperatura máx.
40 °C).
Abra el paso de agua.
La pistola (1) de gatillo y la lanza son afectadas
por un empuje durante la operación; por lo tanto,
sujételas siempre firmemente con ambas manos.
Enchufe el cable de alimentación eléctrica en un
tomacorriente de 120 V con puesta a tierra, en un
circuito dedicado. No use cables de extensión.
Oprima el botón de reposición del adaptador de
enchufe con GFCI. Esto debe hacerse cada vez
que se enchufa la unidad en un tomacorriente.
Enchufe con toma a tierra/botón de reposición
3.2 Montaje de la manguera de alta
presión
3.3 Montaje de la lanza y la boquilla
3.4 Conexión de agua
3.5 Arranque/parada de la máquina
A
B
1
2
A
3
12
Reposición

20
IMPORTANTE: apunte la boquilla hacia el
suelo.
Verifique que la máquina esté en posición
vertical. NOTA: No coloque la máquina en un
lugar con hierba alta.
Suelte el bloqueo del gatillo.
Active el gatillo de la pistola (1) y deje correr el
agua hasta que todo el aire haya escapado de la
manguera de agua.
Oprima el interruptor de arranque/parada (7).
Active el gatillo de la pistola (1).
Ajuste siempre la distancia, y con ello la presión
de la boquilla, a la superficie que se va a limpiar.
No cubra la máquina durante la operación ni la
use en un ambiente que no tenga una ventilación
adecuada.
NOTA: Si la máquina se deja o no se usa
durante 5 minutos, se la debe apagar llevando el
interruptor de arranque/parada (7) a la posición
'O'.
Para detener la máquina: lleve el interruptor de
arranque/parada (7) a la posición 'O'.
Desconecte el enchufe eléctrico (12) del
tomacorriente.
Cierre el paso de agua y active el gatillo de la
pistola (1) para descargar la presión de la
máquina.
Bloquee la pistola (1) de gatillo.
Al soltar el gatillo de la pistola (1), la máquina se
detiene automáticamente. La máquina arrancará
de nuevo una vez que usted active la pistola (1)
de gatillo.
La presión de la boquilla normal puede ajustarse
haciéndola girar. ADVERTENCIA: no haga esto
mientras esté operando la máquina, para evitar
que el chorro alcance la mano y cause lesiones.
1. Montaje del gancho de la pistola:
2. Montaje del gancho del cable:
1. Desenrosque la tapa de la botella de
detergente incorporada.
2. Agregue detergente a la botella
incorporada (A).
3.6 Boquilla ajustable
3.7 Diagrama indicador de la
instalación
3.8 Uso de la botella de detergente
incorporada
Table of contents
Languages:
Other Quipall Pressure Washer manuals
Popular Pressure Washer manuals by other brands

Craftsman
Craftsman 580.768331 Operator's manual

Landa
Landa SEA3-1100 Operator's manual

Briggs & Stratton
Briggs & Stratton BPW3000PX manual

HSS Hire
HSS Hire 59134 Operating & safety guide

Hotsy
Hotsy 797SS Operating instructions and parts manual

Briggs & Stratton
Briggs & Stratton ELITE Series owner's manual