QUIPPLAN Q20 User manual

SX0011.C
USER MANUAL
BICYCLE

1SX0011.CSX0011.C 1
I T A
E N G E S P
P O R
Congratulations and thank you for purchasing a bicycle!
The bicycle and all its components have the certificate CE. They
have been validated, certified and homologated according to the
normative EN 15194:2009 for EPAC (Electrically Power Assisted
Cycles).
Therefore, Quipplan bicycles meet the strictest levels of safety and
quality.
They also meet the national and European legislation:
- Real Decreto 2822/1998 - Directive 2002/24/EC
- Directive 2004/108/EC - Directive 2006/42/EC
ABOUT THIS MANUAL
This manual is a reference for a correct and safe use of the bicycle.
Every person who uses, cleans or repairs the bicycle must read and know the contents of this manual.
If after Reading this manual there are still some queries, please ask an official dealer or contact us at
www.quipplan-mobility.com.
In this manual you will find warning and recommendation notes:
¡Warning! Messages written in this format content critical safety instructions. Ignoring them might
cause damage.
Notes: Messages written in this format are recommendations, interesting information or useful data
for a correct use of the bicycle.
This manual is updated at the publishing moment. Quipplan keeps the right of modifying it
without prior notice.
This manual is for all models
It is supposed that the user of this bicycle has a general and basic knowledge about the use of bicycles.

2SX0011.CSX0011.C 2
P O R
I T A
E N G E S P
CONT
E
NT
SAFETY INSTRUCTIONS 3
PREVIOUS INSTRUCTIONS 3
COMPONENTS DESCRIPTION 4
TECHNOLOGIES 5
TECHNICAL SPECIFICATIONS 7
UNPACKING AND ASSEMBLING INSTRUCTIONS 8
DECLARATION OF CONFORMITY 9
QUICK GUIDE 10
FOLDING 11
CONTROL UNIT 12
BATTERY 16
CHARGER 18
BRAKES 20
TRANSMISSION 21
CARE AND MAINTENANCE 22
WARRANTY 24
REVISSIONS 26

3SX0011.CSX0011.C 3
I T A
E N G E S P
P O R
SAFETY INSTRUCTIONS
Please read carefully this manual, all its guidelines and safety advices before using the bicycle and
keep it close for possible queries.
This bicycle contents electric and electronic elements. Please read carefully all safety instructions
before using the bicycle and keep them close for possible queries.
This bicycle contents a lithium battery. Please read carefully all safety instructions before using the
bicycle and keep them close for possible queries.
Do not exceed maximum weight limit of the bicycle or its components. They might damage ore ven
break.
Replace every damaged component or element before using the bicycle again. The correct
maintenance of the bicycle must be assigned to a specialized dealer.
Ride always at a legal velocity, appropriate to the ground as well as to your skills.
PREVIOUS INSTRUCTIONS
The stickers which show this symbol content critical safety instructions.
Ignoring them might cause damage.
1. Use only the original charger. If the battery is not used in a long period of time, keep
it in a fresh and dry place and charge it every 2 months.
2. For your own safety, do not place the battery near a heating place and do never throw
it to a fireplace. Do not place it either near an explosive or inflammable material during the charging
time.
3. Avoid the use of the bicycle if it is partial or totally covered by water, as the electric and electronic
components might damage.
4. Do not dismantle the battery, the motor, the control unit or any other component by yourself. If a
component needs to be replaced, please contact your nearest dealer or contact us at
www.quipplan-mobility.com. Do not remove the stamp of guarantee; otherwise, it will be
cancelled.

4SX0011.CSX0011.C 4
DESCRIPCI
Ó
N DE
CO
MPON
E
NT
ES
COMPONENT DESCRIPTION
P O R
I T A
E N G E S P
29
30
4 3 2 1 28
27
5
6 26
7
8 25
9
24
23
22
17 21
10 12 13
14 15
11
16 18 19 20
1.- Frame
2.- Charging point
3.- Saddle
4.- Seatpost
5.- Seatpost locker
6.- Rear Wheel brake
7.- Elastic band (s/model)
8.- Rack (s/mode)
9.- Rear Wheel mudguard (s/model)
10.- Rear wheel
11.- Rear wheel hub - Gear
12.- Chain / Belt (s/modelo)
13.- Leg (s/model)
14.- Crank
15.- Folding pedal
16.- Control unit (built in the frame)
17.- Locker and folding mechanism (on the
other side, not seen)
18.- Battery (built in the frame)
19.- Front wheel
20.- Front wheel hub ʹMotor
21.- Fork
22.- Front Wheel brake
23.- Front Wheel mudguard
(s/model)
24.- Front light (s/modelo)
25.- Folding handlebar mechanism locker
26.- Bar
27.- Brake lever
28.- Shifter (s/model)
29.- Control unit
30.- Stem (s/model)

T
ECNOLOG
Í
AS
I T A
E N G E S P
P O R
T
ECHNOLOGIES
5 SX0011.C

TECHNOLOGIES
6SX0011.C
P O R
I T A
E N G E S P

TECHNOLOGIES
7SX0011.C
T
ECHNICAL SPECIFICATIONS
BICYCLE
Wheel size 20 in
Dimensions (unfolded) 1550 x 1100 x 570 mm
Dimensions (folded) 810 x 720 x 450 mm
Distance between axles 1031 mm
Weight 16.0 kg - 18.5 kg (F02 urban - F08 city)
Autonomy* 60 - 120 km
Maximum loading rack 25 kg
Maximum loading bicycle 120 kg
Maximum velocity (with assistance) 25 km/h
BATTERY
Type qiE36 10.5 Ah Ion Lithium - NMC
Capacity 378 W·h
Nominal voltage 36 V
Charging voltage 42 V ± 0.05 V
Charging intensity 2.35 A
Discharging intensity 15 A (peak: 18 A)
Operating temperature ʹdischarging -20 °C ʹ60 °C
Operating temperature ʹcharging 0 °C ʹ45 °C
MOTOR
Type qiE36 MINI: PM-BLDC without brushes, with
permanent magnets and continuous electricity
Nominal power 220 W
Power peak 340 W
Voltage 36 V
Maximum turn velocity 255 rpm
Control System #1 integrated velocity sensor
Control System #2 cadence sensor qiE36 IBS32 in bottom bracket
* for a medium user in an urban mixed tour at a maximum level of assistance (3) ʹminimum (1) (more info: www.quipplan-mobility.com)

TECHNOLOGIES
SX0011.C 88 SX0011.C
P O R
I T A
E N G E S P
UNPACKING AND ASSEMBLYING
if you have acquired your in an official dealer, this section does not
affect you.
If you have received the complete bicycle in the box, you should follow some previous steps to start
using it.
1. CONTENT VERIFICATION
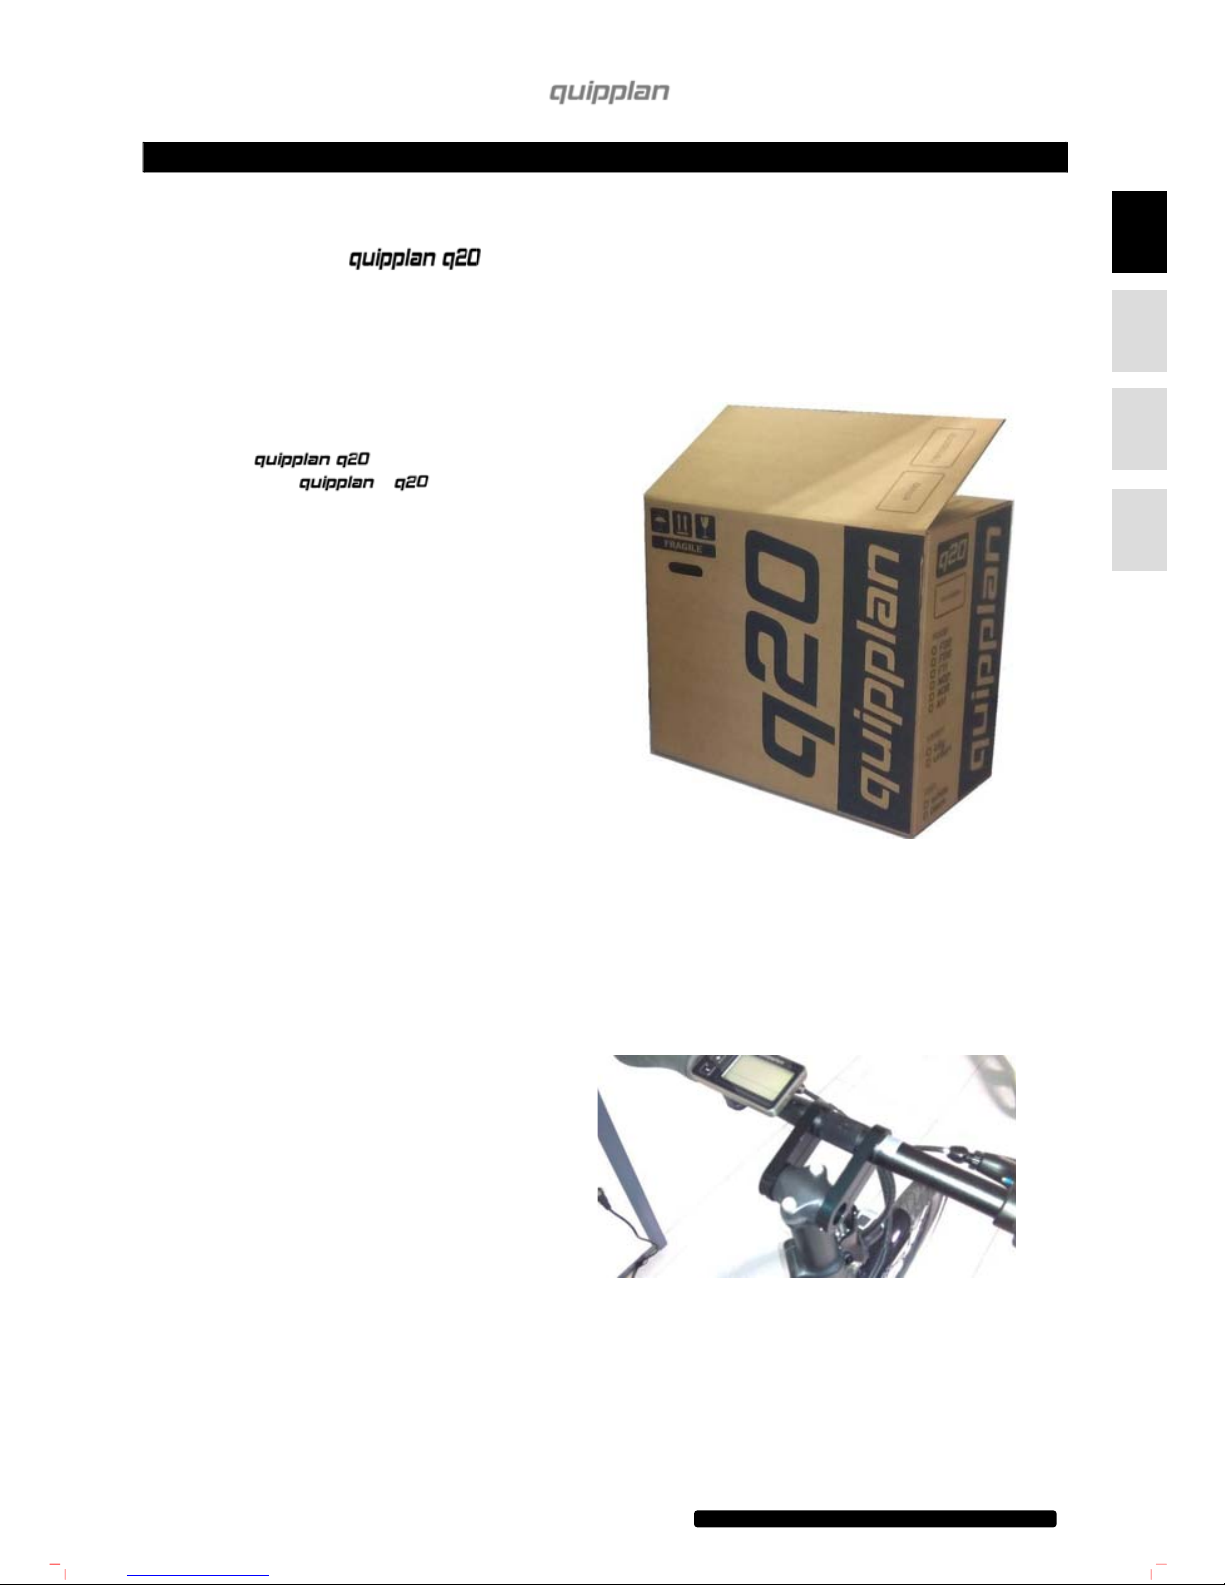
1.1. Box (820x420x720 mm).
1.2. Folded and correctly packed bicycle.
1.3. qiE36 10.5 Ah battery. Completely
charged and inside the frame.
1.4. qiE36 charger inside its packing.
1.5. QuippůĂŶ ĐĂƐĞ ǁŚŝĐŚ ĐŽŶƚĞŶƚƐ ƵƐĞƌƐ
manual, Guarantee activation, technical
guides from the manufacturers, battery
ůŽĐŬ ŬĞLJ ĂŶĚĂůůĞŶ ŬĞLJ ƚŽ ĂƐƐĞŵďůĞ ƚŚĞ
handlebar (s/model).
Place all the elements out of the box and verify
there are all of them. In case there is something
missing, please contact us at www.quipplan-
mobility.com.
2. UNPACKING
The bicycle is correctly packed in order to protect it during the transport period. Please remove all those protective
elements before assemble the bicycle.
2.1. Remove the plastic protective elements from the profusions.
2.2. Remove the fastener from the components.
2.3. Remove the elastic elements, foams and general protective elements.
3. ASSEMBLING
The bicycle is sent completely assembled and
adjusted. However, in some models, the
handlebar is sent separately to prevent it from
damage during transport. tŝƚŚƚŚĞĂůůĞŶŬĞLJ
sent in the case, it is simple to assemble the stem
at the end of the bar and tighten the clamp.

SX0011.C 99 SX0011.C
DECLARACI
Ó
N CE DE
C
ONFOR
MID
AD
QUICK GUIDE
I T A
E N G E S P
P O R
DECLARATION OF CONFORMITY
QUIPPLAN TUCKER, S.L,
Sociedad Limitada con domicilio social en Ctra. Madrid km24 ʹ31350 Peralta (Navarra) ʹEspaña, inscrita
en el Registro Mercantil de Navarra, Tomo 1125, Folio 101, Hoja NA-22563, Inscripción 1ª, CIF B-31848179
declares that under our sole responsibility the products:
Bicycle EPAC brand: quipplan, models: q20 ó q26 variants: F02 y F02 PLUS, F08 y F08 PLUS, F11 y F11 PLUS
or R10 y R10 PLUS, homologated by SGS
are in conformity with the provisions of the following EC Directives, including all amendments, and with the national
legislation implementing these directives:
- Directive 2006/42/EC on machinery
-
Directiva2004/108/EC on electromagnetic compatibility
and that the following harmonized standards have been applied
- EN 15195:2009 Ciclos. Ciclos con asistencia eléctrica. Bicicletas EPAC
and they have approved the quality assurance system (ISO 9001).
Identificación de la persona apoderada para redactar la declaración en nombre del fabricante o su
representante autorizado:
Nombre y apellidos:
Jesús Barcos Ibáñez
Cargo:
Director
Gerente
Firma y Sello:
Location, date
:
Peralta (Navarra), January
2016

SX0011.C 101SX0011.C
DECLARACI
Ó
N CE DE
C
ONFOR
MID
AD
QUICK GUIDE
P O R
I T A
E N G E S P
1. PREVIOUS SAFETY VERIFICATIONS
1.1. Verify the battery has an appropriate level of charge.
1.2. Verify that the brakes work properly.
1.3. Verify the correct pressure of the wheels.
1.4. Verify that all the locks from the folding mechanism are closed and blocked.
1.5. Verify that the shifter Works properly.
2. DURING THE RIDE
2.1. Switch on the control unit if the electric assistance is required.
2.2. This bicycle includes a support assistant function that will only work until the velocity of 6 km/h is approached.
Then it will stop.
2.3. La asistencia eléctrica es dependiente de la cadencia del pedaleo y cesará en el momento en que el usuario deje
de pedalear (desfase máximo < 2 s).
2.4. The electric assistance will decrease when the velocity of 20 km/h is approached and it will completely disappear
when the maximum velocity is reached (25 km/h).
2.5. The level of assistance is chosen by the user. It might be switched off and the bicycle is ridded as a conventional bicycle.
2.6. En situaciones de arrastre de la bicicleta es también recomendable apagar el sistema para evitar una activación
del motor accidental originada por la rotación de las bielas.
2.7. Although the bicycle includes a self-switch off system, it is always recommended to turn off the system when it is not being
used.
3. BATTERY CHARGE
3.1. Use only the original charger sent with the bicycle.
3.2. Connect the charger to the power point. The light of the charger will turn Green, which means that the
charger works correctly.
3.3. Connect the charger to the battery. The light of the charger will be read during the charging period.
Remember that the battery can be charged inside the bicycle, through the charging point located in the
right side of the frame, or out of the bicycle.
or
3.4. When the battery is completely charged, the light from the charger will turn Green, as in the beginning.
3.5. The electricity consumption on each charging period is 320 W·h aprox.
3.7. Do not cover the charger during the charging process.
3.8. Place the charger in a safety and stable place during the charging process.
3.9. Use the charger always in low humidity conditions.
3.10. Keep away from children.

SX0011.C 111SX0011.C
PLEGADO
CONTROL UNIT
I T A
E N G E S P
P O R
FOLDING
1. FOLDING
1.1. Step 1: open the seatpost lock, introduce it completely in the frame and close the lock again.
1.2. Step 2: open the frame folding mechanism lock by lifting the internal plastic part. This part secures the lock and it
wŽƌŬƐĂƐĂŶŽŶŽƉĞŶŝŶŐƐĂĨĞƚLJŵĞĐŚĂŶŝƐŵ/ĨŝƚŝƐŶŽƚĐŽŵƉůĞƚĞůLJůŝĨƚƚŚĞůŽĐŬǁŽŶƚďĞŽƉĞŶĞĚ To lift the piece,
put the fingers on the piece and push.
Keeping the interior piece lifted, pull from the principal aluminum lever outwards until the lock is opened.
1.3. Step 3: Fold the front part of the bicycle to the right until both
wheels are parallel. The bicycle stays by the base of the
seatpost.
Turn the crank until the pedals are in an appropriate position to
be folded: the left pedal in upper and the right one in down
position. Fold the pedals.
Note: it is recommended to block the lock once the frame is
folded, so all the pieces are static in their position.
1.4. Step 4: Open the safety lock of the folding handlebar system and fold the handlebar downwards.
2. UNFOLDING
Proceed in inverse order: Step 4, Step 3, Step 2 y Step 1.

SX0011.C 121SX0011.C
PLEGADO
CONTROL UNIT
P O R
I T A
E N G E S P
1. PANEL qiE36 LED+ (Models )
1.1. Description of the panel and the buttons
Button
(ON/OFF):
Button ( + ):
Button ( - ):
- Switching the assistance on and off
- Rising the level of assistance
between N0*, N1, N2 y N3
- Switching the light son and off
(pressed for 1 s)
- Decreasing the level of
assistance between N0*, N1, N2
and N3
- Activating the support
assistance function (pressed for
1 s)
*N0: "without assistance", it is "shown" with LOW, MED y HIGH lights Off
2. PANEL qiE36 LDCalu (Models Y )
2.1.
Description of the panel and the buttons
Button [M], Button [ + ], Button [ - ] and screen
2.2. Switching on and off
Press the button [M] and keep it pressed until the device and the whole bicycle switch on.
Press the button MODE and keep it pressed to switch the device and the whole bicycle off. IF the bicycle is not used in 3
minutes, the device, as well as the bicycle, will turn off automatically.
2.3. Main indicator
As the device is on, the present velocity (SPEED) will be shown automatically.
Press the button [M] to see the velocity (SPEED) data, average velocity (AVG), m aximum velocity (MAX),
accumulated distance (ODO), partial distance (TRIP ) and partial distance time (TRIP TIME).

SX0011.C 131SX0011.C
I T A
E N G E S P
P O R
2.4. Support assistance (6 km/h)
Once the panel i son, keep the button [ - ] pressed to activate this
function. The screen will show the letters PUS. When this mode is on,
the bicycle reaches 6 km/h. The support assistance function stops
when the button [ - ] is pressed.
¡Warning! The support assistance function should only be used as a
support when the bicycle is being dragged. It must never be used
during the ride.
2.5. Switching the lights on and off
Keep the button [ + ] pressed for 2 seconds to switch the light son. When
the lights are on, the panel brights and the symbol of the lights will be
shown on the screen.
Keep the button [ + ] pressed for 2 seconds to switch the lights off.
Turning the device and the bicycle off as the point 2.2 explains, the lights
will switch off automatically.
2.6. Selection of the level of assistance
When the device is turned on, the level of assistance is automatically
fixed in level 1. Press the buttons [ + ] and [ - ] to select the desired level
of assistance:
Nivel 0: Without
assistance
Level 1: Minimum assistance (ECO)
Level 2: Medium assistance (TOUR)
Level 3: Maximum assistance
(BOOST)
The bicycle migh also be used when the device is off. In that case, the bicycle is ridded as a conventional bike and it will
not register the velocity and distance data, as well as the other functions of the odometer.
2.7. Battery charge level indicator

SX0011.C 141SX0011.C
P O R
I T A
E N G E S P
The panel shows 7 stages of battery level.
When the indicator shows the 5 bars, the battery is full of charge.
When the indicator shows any bar, then the battery has no charge. If the indicator flicks, then the level of charge is critic.
2.8. Power indicator
The power given by the motor is always shown on the low and right side
of the screen.
2.9. Error messages
In case that an error occurs, the bicycle will not work and an error code
will be shown on the low and right side of the panel. Errors must be
subsanated, otherwise, the bicycle will not work correctly. Error
messages correspond to these phenomenons:
06 ʹToo low voltage protection
07 ʹToo high voltage protection
08 - Sensors Hall error
09 - Error of phase of Motor
10 ʹControl unit overheating
11 ʹTemperature sensor in Control Unit
12 ʹIntensity sensor
13 ʹMotor overheating
14 ʹError of the Temperature sensor of the Motor
21 - Error of the velocity sensor of the Motor
22- Communication error in BMS
23 ʹFront light error
24 - Error of the front light sensor
30 ʹSystem communication Error
3. CONFIGURATION AND ADJUSTMENTS
De serie la bicicleta eléctrica incorpora la Configuración Por Defecto. In order to Access to the configuration meu, with
the panel on, press and keep pressed the buttons [ + ] and [ - ] at the same time:
3.1. 1 SET: Setting up TRIP and TRIP TIME
TC: "Trip Clearance" shows two options TC-n: does NOT
set to 0 and TC-y: dos YES set to 0. Changes are done
with the buttons [ + ] and [ - ].
Press the button [M] to save and go on or keep it pressed
to save and escape.
3.2. 2 SET: Screen bright level
BL: Back Light. It has three options of screen light bL-1, bL-2 y bL-3.
Select the desired one with the buttons [ + ] and [ - ].
Press the button [M] to save and go on or keep it pressed to save
and escape.
3.3. 3 SET: Wheel size

SX0011.C 151SX0011.C
I T A
E N G E S P
P O R
The panel shows the size of wheel it is configured for in inches. With the buttons [ + ]
and [ - ] , select between the following:
16 in, 18 in, 20 in, 22 in, 24 in, 26 in, 28 in and 700C
Press the button [M] to sabe and go on or keep it pressed to sabe and escape.
3.4. 4 SET: Speed limit
The panel shows the speed it is configured for in km/h. That speed is automatically set
in 25 km/h.

SX0011.C 161SX0011.C
P O R
I T A
E N G E S P
BA
T
TERY
1. DESCRIPTION
The battery qiE36 10.5 Ah Lithium Ion Battery is
composed by latest generation Ion Lithium cells type NMC
by Panasonic.
The nominal voltage of the battery is 36 V, which
combined to its capacity 10.5 A·h , has an energy storage
capacity of 378 W·h.
The battery has been designed and built to be completely integrated inside the frame. This is possible due to a metallic
capsule and two plastic terminations. In one of them are the communication terminals of the BMS (Battery Management
System), the lock, the charging point and the handle for getting the battery out of the frame. This handle includes an
automatic fixation mechanism which maintains the battery in its position.
2. SAFETY INSTRUCTIONS
Use only the battery qiE36 10.5 Ah Lithium Ion Battery approved by Quipplan in your bicycle Charge the
battery only with the charger approved by .
When it is not being used, disconnect the charger from the power point and from the
battery.
When the battery is completely charged, disconnect the charger from the power point as an overcharge might cause
damages in the battery.
Do not let the battery drop and avoid it from being blowed or impacts, as it might damage.
Do never use the battery if it is damaged.
Do never short-circuit the
battery.
¡Warning! There might be an accidental short-circuit if a metallic object connects the positive (+) and negative (-)
terminals of the battery. This short-circuit might damage the battery or the object connected to it.
If you place the battery in hot or cold places as, for example, a closed car in summer or in Winter, the battery might
damage; which means that its capacity and duration will be reduced. Although the battery might safely operate between -
20 °C y 60 °C, make sure to keep it between 0 °C y 45 °C in a dry environment. The performance of the battery is
particularly limited in below 0 °C temperatures.
Keep the battery away from children and pets, as there is a risk of electric discharge. Do not throw the battery away
by throwing it to a fireplace, as it might explode. The battery might also explode if it is damaged.

SX0011.C 171SX0011.C
I T A
E N G E S P
P O R
Throw the battery away following the local normatives about elimination of contaminating residues. If there is any query
about its recycling, ask an official dealer or contact us at
www.quipplan-mobility.com.
Do not throw the battery away in the
dustbin.
Do not dismantle or grind the battery. If there are any leak in the battery, avoid the contact with the eyes or skin. If the
contact has already been produced, clean the zone immediately with water and ask for medical assistance
3. OPERATING INSTRUCTIONS
The battery is sent conditioned and charged at the maximum level. There is not necessary to charge before the first use.
To charge the battery, connect first the charger to the power point and then connect the charger to the
battery.
Note: More info about the charging proccess in QUICK GUIDE and CHARGER sections.
The charging process takes between 3 and 6 hours, depending on the charger used.
The autonomy of the battery relies on multiple factors as the selected level of assistance, the orography of the tour, the
weight of the user, the pedal, etc. The atonomy of the battery for a medium person in an urban mixed tour is until 60 km
(level 3 selected) or until 120 km (level 1 selected).
Note: More info about autonomy in www.quipplan-mobility.com
If the battery will not be used in a long period of time (more than 2 months), make sure the level of charge is at an optimal
in a conservation state. In that case, charge the battery for 1 approx. one hour every two months. It is also recommended
to revise the level of charge periodically.
If the battery will not be used in a long period of time, take it out of the bicycle.
When the loosing charge times or the autonomy of the bicycle are significantly lower as usual, replace the battery.
4. ADDITIONAL INSTRUCTIONS
The presence of this symbol in the batteries, manual, package of a product or other devices means that,
when their shelf life is over, they must not be eliminated by throwing them away into the dustbin. If the
chemical symbols Hg, Cd o Pb are shown, they indicate that the device includes mercury, cadmium or
lead in higher levels tan the reference values admitted by the Directive 2006/66/CE of the European
Union. If the device is not eliminated conveniently, these substances might cause personal injuries or
damage the environment.

SX0011.C 181SX0011.C
CHARGER
P O R
I T A
E N G E S P
1. DESCRIPTION
LEFT: Charger 100 W (charge 2.35 A) in models . RIGHT: Charger 60 W (charge 1.35 A) in modelos "not "
CE Label
The products designed for sale in the European Union must be
marked with the symbol CE, which indicates that they fulfill the
applicative normative and the European standards.
2. SAFETY INSTRUCTIONS
For your own safety and in order to avoid possible damages, please read these instructions carefully.
The charger must only be used whith the qiE36 10.5 Ah Lithium Ion Battery approved by Quipplan and sent with the bicycle. Its use
with other type of batterys might cause damages in the charger and even material and personal injuries.
2.1. About the instalation
Do not install the product in outside or exposed to humidity places as there is risk of electrical shock.
Avoid the exposition of your body to the heat of the charger when it is connected to the power and working, as
you might get burnt.
The power point must be installed near the device and must be also easily accessible.
The charger is designed to be placed horizontal on a solid surface. During its working time, the charger
must not be covered, as there is conflagration risk.
2.2. About the power supply

SX0011.C 191SX0011.C
CHARGER
I T A
E N G E S P
P O R
Do not exceed the standard capacity (voltage/electricity) of a multiple power point or an electrical extension when is
being used with the product, as there is risk of electrical shock.
The charger has been designed to be used with an disconnectable power supply cable that will be used in a current
power point. The power unit is able to work with different voltages without the need of any user adjustments.
If the power supply cable or the power point makes noise, disconnect the cable from the power point and contact an
official dealer. There might be risk of electrical shock.
If you see that the charger is damaged, contact an official dealer or contact us at
www.quipplan-mobility.com . For
throwing it away, do never throw it into the dustbin
Do not use a principal power point, a power supply cable or a power point when it is loose or damaged, as there is
conflagration and electrical shock risk.
Connect the power supply cable to a power point and then to the charger. If this is not done, it might cause a
conflagration
Do not disconnect the power supply cable by pulling it out. If the cable is damaged, this might cause an electrical
discharge.
Do not over bend the power supply cable and do not place a heavy object on it.
Keep the power supply cable away from children and pets. If the cable is damaged, it might cause an electrical
discharge.
3. INSTRUCTIONS FOR USE
For a correct use of your charger, please follow these steps:
3.1. Connect the charger to the power point. The light of the charger
will turn Green, which means that the charger works correctly.
3.2. Connect the charger to the battery. The light of the charger will be read during the charging period. Remember
that the battery can be charged inside the bicycle, through the charging point located in the right side of the frame, or
out of the bicycle.
ó
3.3. When the battery is completely charged, the light from the charger will turn Green, as in the
beginning
3.4. For disconnecting the charger, first do it from the battery and then from the power point.
Table of contents