manuals.online logo
Brands
  1. Home
  2. •
  3. Brands
  4. •
  5. Quoizel
  6. •
  7. Personal Care Product
  8. •
  9. Quoizel QR3703 User manual

Quoizel QR3703 User manual

1of3
For Style QR3703
Pleasegoto forproductcleaningtips.Gotothe selection.
markingpen,1/ ”
drillbit drill.
IntegratedLED30W
30-45minutes
Identifyandinspectallpartsbeforebeginninginstallation.Checkpackagecontentlistanddiagramsbelowtobesureallpartsare
present.Ifanypartsaremissingordamaged,donotattempttoassemble,install,oroperatethefixture.MissingParts?Contactyouroriginalplaceof
purchase.
www.quoizel.com Care+Maintenance
LightSource:
EstimatedAssemblyTime:
Preparation:
ToolsRequired:Flatheadscrewdriver, Phillips screwdriver,pliers,wirecutters,wirestrippers,electricaltape,safetyglasses, 8
and
Note:This mirrorcan bemounted overan electricaloutlet boxor onthe walland pluggedinto anoutlet.
Warnings and Cautions
Turn off electricity at circuit breaker or main fuse box before installation. Consult a licensed electrician if in doubt.
These instructions are provided for your safety. It is very important you read them completely before installing the fixture. We strongly
recommend that a licensed, professional electrician perform the installation.
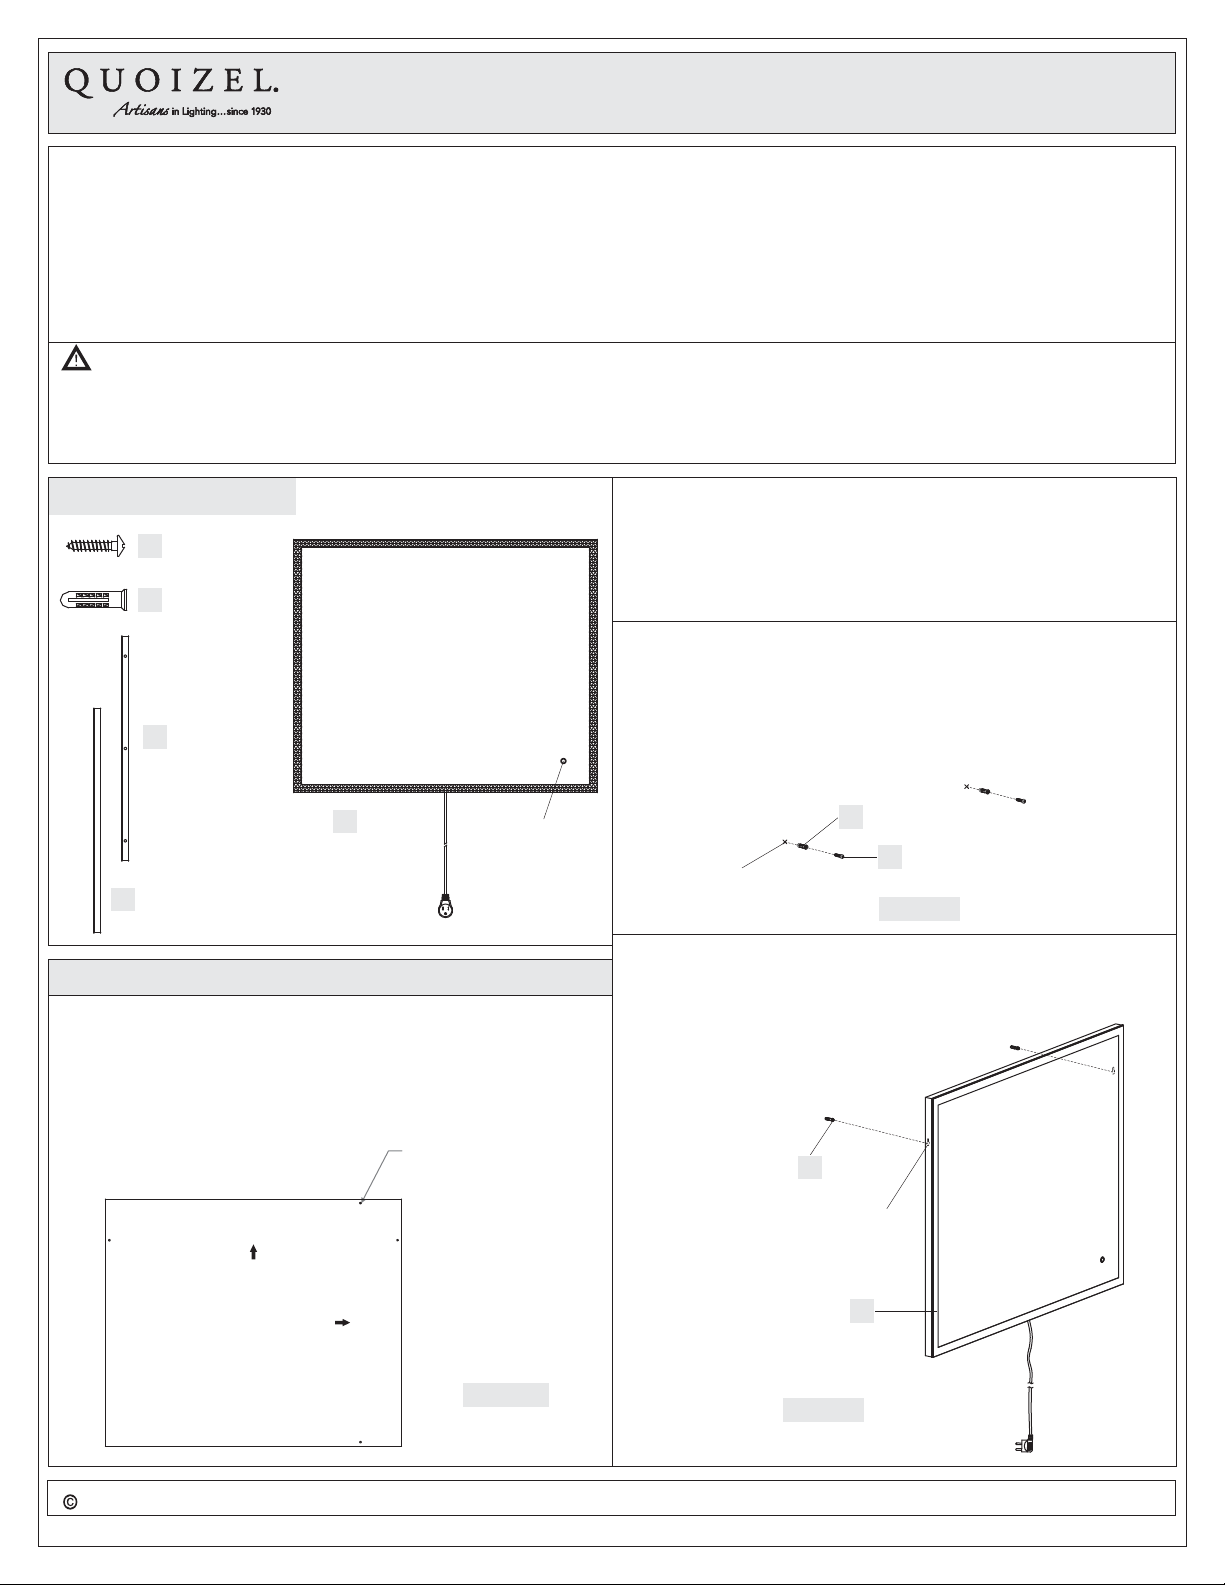
Package Contents
A
E
Screw
x5
Mirror
x1
BWall Anchor
x5
C
Cord Cover
Backplate
x1
DCord Cover
x2
SEPARATE MIRROR AND BACKPLATE
Figure 1A
Installation Guide #IS-QR3703
2018 QuoizelInc. ReleasedDate:2018-04-18
visit us on-line at www.quoizel.com
Step 1A - Identify Locations for Wall Anchors
A. The template is provided to assist you in mounting the mirror. The
template is a full size drawing of your mirror and includes the wall
anchor mounting locations that can easily be transferred to the wall,
or use the mirror backplate.
Mark Wall Anchor
Locations On The Wall
At Arrow Locations
Step 2A - Installing 4 Wall Anchors and Screws
A. Using a 1/8” drill bit, drill holes at each (2) locations marked on the
wall surface.
B. Insert Wall Anchors (B) into drilled holes completely.
C. Thread Screws (A) into Wall Anchors (B) and leave approximately
3mm extending from wall surface.
A
B
Mark
Figure 2A
TEMPLATE
(Step 1A Continued)
Place the template or the mirror back plate on the wall in the location
selected for the mirror. Make sure the template or mirror back plate
is level and in the correct position. Secure the template to the wall
then mark the locations of the 4 wall anchors as indicated on the
template. Remove the template from the wall.
STEP 3A Final Mirror Assembly-
A. With the help of another person place the
keyholes on the back of the mirror onto
the Screws (A). Making sure each hole is
securely hung onto the Screws (A)
before letting go of the mirror backplate.
A
Figure 3A
E
Keyhole
Touch Switch
2of3
2018 QuoizelInc. ReleasedDate:2018-04-18
visit us on-line at www.quoizel.com
STEP 4A Install Cord Cover Backplate and Cover Covers-
A. Align the Cord Cover Backplate (C) to your desired location on the
wall. Mark the mounting locations on the wall from the holes on the
Cord Cover Backplate (C).
B. Drill a hole for Wall Anchors (B) at each location identified with a 1/8”
drill bit. Place the Wall Anchor (B) into each hole.
C. Attach the Cord Cover Backplate (C) by using Screws (A). Tighten
B
A
Cord
C
D
E
Figure 4A
until snug with screwdrivers.
D. Place the plug cord inside the
Cord Cover Backplate (C).
Press Cord Covers (D) onto
the Cord Cover Backplate (C)
in the desired location.
Clean glass with household
glass cleaner. Your
installation is completed and
ready to use. Enjoy!
MOUNTING MIRROR IN THE VERTICAL AND
RELOCATE THE CORD PLUG
Step 1B Changing the Cord From the Horizontal Mounting to
Vertical Mounting When Using the Cord to Plug into an Outlet
-
Figure 1B
Step 2B Insert Cord for Vertical Mounting and Making the Wire
Connections
-
A. Place the cord to the new location for vertical mounting. Pass the
cord through the cord grip and insert it into the junction box.
B. Twist (3) wire nuts until wires are tightly joined together. Wrap each
connection with approved electrical tape.
C. Tight the cord grip on the junction box.
D. Follow Step 1B to attach the cover back onto the junction box.
E. Go to Steps 1A - 3A to hang mirror on the wall.
F. Go to Step 4A to install the cord covers.
(3) Wire Nuts
Tape
Cord
REMOVE
Cover
Screw
E
Cord Grip
A. Place the Mirror (E) onto a
flat working surface with the
back facing you. By using
screwdriver, loosen screws
to remove the cover from
the junction box on the back
of the Mirror (E).
(Step 1B Continued)
B. Tear off tape on (3) wire nuts and untwist wire nuts to separate wires.
C. Loosen cord grip on the junction box and carefully pull the cord out
of the mirror backplate.
INSERT
Cord
(3) Wire Nuts
Tape
Junction Box Cord Grip
Cover
Screw
Figure 2B
White wire from
mirror backplate White wire from cord
Green Ground
wire from Cord
Wire Nut
Black wire from
mirror backplate Black wire from cord
Green ground wire
from mirror backplate
Cord
3of3
Figure 1C
DIRECT WIRE OVER AN ELECTRICAL OUTLET BOX
2018 QuoizelInc. ReleasedDate:2018-04-18
visit us on-line at www.quoizel.com
Step 1C Cut Cord-
A. Use wire cutter, cut the cord near the mirror and discard the plug
end. Carefully pull the other end of the cord into the mirror
backplate.
B. Determine the electrical outlet box location behind the mirror.
Leave approximately 8” cord extending to the outlet box location.
C. Go to Step 2C to connect wires.
D. Go to Steps 1A - 3A to mount the mirror to the wall.
REMOVE Cord
Wire Cutter
8” Min.
Cord
Mirror Back
E
Figure 2C
STEP 2C - Wire Connections
A. Wrap bare or green ground wire around green ground screw on the
crossbar, no less than 2 inches from the end of the wire. Tighten the
green ground screw.
B. Strip back the wire covering the 3 fixture wires as far as you need to.
This will expose each fixture wire individually. Strip each end of 3
fixture wires.
C. Use standard wire connectors (not included) to make all wire
connections. Twist connectors until wires are tightly joined together.
Wrap each connection with approved electrical tape and carefully
stuff all the connected wires into the Outlet Box.
Green Ground Screw
on the Crossbar
White wire
from outlet box White wire
from mirror
Black wire from
outlet box (or Red)
Black wire
from mirror
Bare, or Green
Ground wire
from outlet box
Ground wire
from mirror
Clean glass with household glass cleaner. Your installation is
completed and ready to use. Enjoy!
QR3703
NOTE: ALL DIMENSIONS ARE ROUNDED UP
TO THE NEAREST 1/4"
36”
30”
1”
TOUCH SWITCH OPERATIONS
The touch switch has a light to make
it easier to find in the dark.
A) To turn on the light touch the
switch briefly. To turn off touch the
switch briefly again.
B) While the light is on hold your
finger on the switch to dim or
increase the light.
C) When the light is turned off and
turned back on the mirror will
return to the previous dimming
level.
Touch Switch
Mirror

Other Quoizel Personal Care Product manuals

Quoizel QR1857BN User manual

Quoizel

Quoizel QR1857BN User manual

Quoizel QR3326 Mounting instructions

Quoizel

Quoizel QR3326 Mounting instructions

Quoizel QR3328 User manual

Quoizel

Quoizel QR3328 User manual

Quoizel QR1419BN User manual

Quoizel

Quoizel QR1419BN User manual

Quoizel DH43024AN Mounting instructions

Quoizel

Quoizel DH43024AN Mounting instructions

Quoizel QR3699 User manual

Quoizel

Quoizel QR3699 User manual

Quoizel QR5201 User manual

Quoizel

Quoizel QR5201 User manual

Popular Personal Care Product manuals by other brands

BBC Bircher CareMat Ax1T L433 Original instructions

BBC Bircher

BBC Bircher CareMat Ax1T L433 Original instructions

Beurer ELLE FCE 79 quick start guide

Beurer

Beurer ELLE FCE 79 quick start guide

Sota MP5 manual

Sota

Sota MP5 manual

EZY WRAP THE BOXER ORTHOSIS quick start guide

EZY WRAP

EZY WRAP THE BOXER ORTHOSIS quick start guide

Beurer MP 62 instruction manual

Beurer

Beurer MP 62 instruction manual

Ruck Podolog Eco operating instructions

Ruck

Ruck Podolog Eco operating instructions

Steeper Myo Kinisi Technical manual

Steeper

Steeper Myo Kinisi Technical manual

Philips BSC111 user manual

Philips

Philips BSC111 user manual

Planmeca Proline CC Technical manual

Planmeca

Planmeca Proline CC Technical manual

Evaife Twinkle user manual

Evaife

Evaife Twinkle user manual

AstraZeneca Precision PRESSURIZED METERED-DOSE INHALER quick start guide

AstraZeneca

AstraZeneca Precision PRESSURIZED METERED-DOSE INHALER quick start guide

Paingone Paingone Plus manual

Paingone

Paingone Paingone Plus manual

Volt Heat 5v Instruction booklet

Volt Heat

Volt Heat 5v Instruction booklet

Buki Professional Studio Nail Art manual

Buki

Buki Professional Studio Nail Art manual

CareicaHealth Auto-CPAP quick start guide

CareicaHealth

CareicaHealth Auto-CPAP quick start guide

medi protect.Dorsofix manual

medi

medi protect.Dorsofix manual

DeRoyal WARRIOR quick start guide

DeRoyal

DeRoyal WARRIOR quick start guide

Otto Bock Dorso Carezza Posture 50R49 Instructions for use

Otto Bock

Otto Bock Dorso Carezza Posture 50R49 Instructions for use

manuals.online logo
manuals.online logoBrands
  • About & Mission
  • Contact us
  • Privacy Policy
  • Terms and Conditions

Copyright 2025 Manuals.Online. All Rights Reserved.