QUPIT 160-01 User manual

DA16-0400-00
Installation manual
plug
Model 160-01
Nederlands | English

2 | plug
Copyright 2016, Plugwise.
Alle rechten voorbehouden.
Dit document bevat belangrijke informatie over
de installatieprocedure en de functionaliteiten
van dit product. Omdat Plugwise de producent
is van dit product vermelden wij alle relevante
functionaliteiten in deze handleiding.
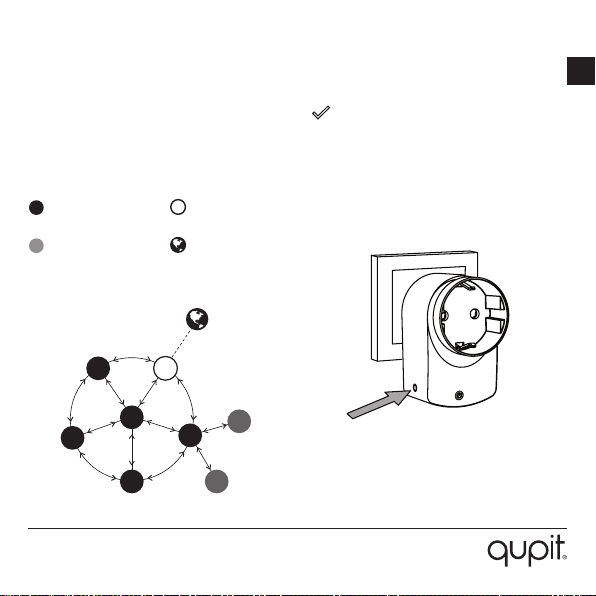
De beschikbare functionaliteiten binnen jouw
Home Automation-systeem zijn afhankelijk van
de ZigBee-gateway waarop de plug is
aangemeld.
Plugwise B.V. verklaart hierbij dat dit product
voldoet aan de benodigde vereisten van de
desbetreffende Europese richtlijnen,
waaronder 1999/5/EC (R&TTE). Een exemplaar
van de Europese conformiteitsverklaring is
beschikbaar op:
www.plugwise.nl/product-conformity.
Oude elektrische en elektronische apparaten
bevatten vaak waardevolle materialen. Plaats
een afgedankt apparaat dan ook nooit bij het
gewone afval. Lever altijd het apparaat in bij
een gemeentelijk inzameldepot voor
elektrische en elektronische apparatuur.

3 | plug
NL
Vooraf
Dit is de installatiehandleiding voor de Qupit
plug. De plug kan elektrische apparaten
schakelen, het energieverbruik meten en
doorgeven aan andere ZigBee Home
Automation producten, zoals een gateway.
De plug kun je installeren binnen jouw
bestaande ZigBee-netwerk. De plug
communiceert volgens de ZigBee-standaard
“Home Automation 1.2”. Controleer vooraf hoe
je de plug moet toevoegen aan jouw systeem.
Gebruik hiervoor de handleiding van het
systeem waarop je de plug wilt aanmelden.
Uitleg symbolen:
Let op, waarschuwing
Deze stap moet je uitvoeren
Tip
Inhoud pakket
In het pakket vind je de plug en een
handleiding.
Let op
De maximaal toegelaten stroomsterkte
van de plug is 16 Ampère.
Maak geen gebruik van het product als
deze is beschadigd of niet goed
functioneert.
Breng de plug nooit in contact met water
of een andere vloeistof.
Meer informatie over de plug vind je op onze
website: www.getqupit.com/plug.

4 | plug
Druk kort op de knop zodat de plug zichtbaar
wordt voor het ZigBee-netwerk. Als de plug nog
niet op een ander netwerk is aangemeld, zal de
plug zich nu aanmelden op het beschikbare
netwerk.
ZigBee-router
ZigBee-end-device
Het netwerk
De plug gedraagt zich als een “ZigBee router”
(ZR). Een ZigBee-router is altijd bereikbaar voor
andere ZigBee-modules. Bovendien vergroot de
plug de kwaliteit van het ZigBee-netwerk.
Installatie
Plaats de plug.
Plaats de plug in het stopcontact
Voeg toe aan het ZigBee-netwerk
Gebruik voor de juiste procedure de handleiding
van het systeem waaraan je de plug wilt
toevoegen. Op de zijkant van de plug zit een
drukknop met de tekst “join/leave”.
ZigBee-gateway
Internet

5 | plug
NL
Bediening
Drukknop bovenkant
De drukknop op de bovenkant van de plug
gebruik je om de plug aan of uit te schakelen.
Drukknop zijkant
De knop op de zijkant van de plug gebruik je
voor verschillende doeleinden. De LED in de
knop geeft je terugkoppeling. In de tabel op de
volgende pagina vind je het gedrag van de LED
terug.
Het lampje knippert elke seconde dat je de
knop ingedrukt houdt rood. Zo kun je
eenvoudig de seconden meetellen.
Verwijder de plug uit het netwerk
Druk de knop op de zijkant 5 seconden in
en laat los. De LED brandt 5 seconden
rood om aan te geven dat deze het
netwerk verlaat.
Knopcombinatie niet herkent
Als de plug de combinatie die wordt
ingedrukt met de knop niet herkent, zal
de LED een 0,5 seconde kort aan gaan.
Knop voorkant Knop zijkant

6 | plug
Het gedrag van de LED
Kleur Patroon Beschrijving
Groen 5 seconde Het is gelukt om de plug toe te voegen aan het
netwerk of de plug is al aan het netwerk
toegevoegd.
Groen Knippert langzaam De plug probeert zich aan te melden op het
netwerk.
Oranje-G
Oranje-R
2 seconden afwisselend Oranje-groen: aangesloten apparaat op de plug
schakelt aan.
Oranje-rood: aangesloten apparaat op de plug
schakelt uit.
Oranje Knippert langzaam Er vindt een update plaats.
Oranje 0,1 seconde/seconde Identicatieproces is bezig.
Oranje Aan De overbelastingsbeveiliging is van kracht. Om te
resetten: haal de plug uit het stopcontact en
plaats deze terug.
Rood 5 seconde Het is mislukt om aan te melden op het netwerk,
of de netwerkinstellingen zijn gewist.
Rood 1 keer knipperen (0,5
seconde)
De plug begrijpt het patroon niet dat wordt
ingedrukt met de knop.
Rood Snel knipperen
(aan: 0,1 seconde/seconde)
De knop is ingedrukt.

7 | plug
EN
Copyright 2016, Plugwise.
All rights reserved.
This document contains the installation
procedure and functional description of this
product. Because Plugwise is the manufacturer
of this product, we include all relevant
functionalities in this manual.
The provided functionalities within your Home
Automation system depend on the ZigBee
gateway to which the plug is connected.
Plugwise B.V. hereby declares that this product
is in compliance with the applicable essential
requirements of the appropriate EC-Directives,
including 1999/5/EC (R&TTE). A copy of the
EU declaration of Conformity is available at
www.plugwise.com/product-conformity.
Old electrical and electronic appliances very
often contain valuable materials. Therefore,
never dispose discarded appliances with
normal household waste. Always hand your old
appliances in at the municipal collection points
for electrical and electronic equipment.

8 | plug
Preface
This is the installation manual for the Qupit plug.
The plug can switch electrical devices, measures
their energy usage and communicate this to
other Zigbee Home Automation products, such
as a gateway.
The plug can be added to your existing Zigbee
network. The plug communicates via the
ZigBee-standard “Home Automation 1.2”.
Please consult the manual of the system you
want to connect the plug to, in order to nd the
right procedure.
Explanation symbols:
Be aware, warning
You must carry out this step
Advice
In the package
This package contains a plug and a manual.
Be aware
The maximum electrical current allowed
through the plug is 16A.
Do not use this product when it is
damaged or if it is malfunctioning.
Avoid contact with water or other liquids.
More information about the plug can be found
on our website: www.qupit.com/plug

9 | plug
EN
Press the button briey allowing the plug to be
visible for the ZigBee network. When the plug
is not paired, it will try to join an available
network after pressing this button.
ZigBee router
ZigBee end device
The network
The plug will behave like a “ZigBee Router”
(ZR). A ZigBee router has the advantage that it
is always reachable for other ZigBee modules.
In addition, the plug will improve the mesh
quality of the ZigBee network.
Installation
Place the plug
Place the plug in the electrical socket.
Join the ZigBee-network
Please consult your home automation system’s
manual to connect it with the plug.
The plug contains a push button on the side
with the text join/leave.
ZigBee gateway
Internet

10 | plug
Controls
Top button
The push button on top can be used for
switching the plug on and off.
Side button
The button on the side of the plug is used for
various purposes. The LED in the push button
shows you feedback.
An overview of the different LED behaviours is
provided in the table on the next page of this
manual.
The LED will ash red every second while the
button is pressed. This helps you counting the
seconds.
Removing the plug from the network
Press and hold the button on the side for
5 seconds and release. After you have
released the button, the LED will burn
solid red for 5 seconds: the plug has left
the network.
Button sequence not recognized
When the plug does not understand the
button pattern, the LED will ash red for
0,5 seconds.
Top button Side button

11 | plug
EN
LED behaviour
Colour Pattern Description
Green 5 seconds The plug has successfully joined the network or has
already joined the network.
Green Slowly blinking The plug is joining a network (in progress).
Orange-G
Orange-R
2 seconds alternating Orange-green: the device connected to the plug
switches on.
Orange-red: the device connected to the plug
switches off.
Orange Slowly blinking Update in progress.
Orange 0,1 second/second Identify operation in progress.
Orange Solid Overload has been triggered. To reset: remove the
plug from the socket and place it back.
Red 5 seconds Joining the network has failed or the network
settings have been erased.
Red 1 blink (0,5 second) The plug does not understand the pattern that has
been pressed.
Red Briey blinking (on: 0,1
second/second)
The button is pressed.

Plugwise B.V.
Wattstraat 56
2171 TR Sassenheim
The Netherlands
www.plugwise.com
Support: www.plugwise.com/technical-contact
Table of contents
Languages:
Popular Accessories manuals by other brands

Liberty Safe
Liberty Safe Safe Power Outlet Kit Installation and operation manual

ROSE DISPLAYS
ROSE DISPLAYS ECONOFRAME ASSEMBLED WITH WALL HANGERS instruction sheet

HEMS Technology
HEMS Technology HEMS 220 user manual

MUBVIEW
MUBVIEW Bell-J9 quick start guide

LINDR
LINDR AS-80 manual

Kensington
Kensington Pocket Media Center quick start guide