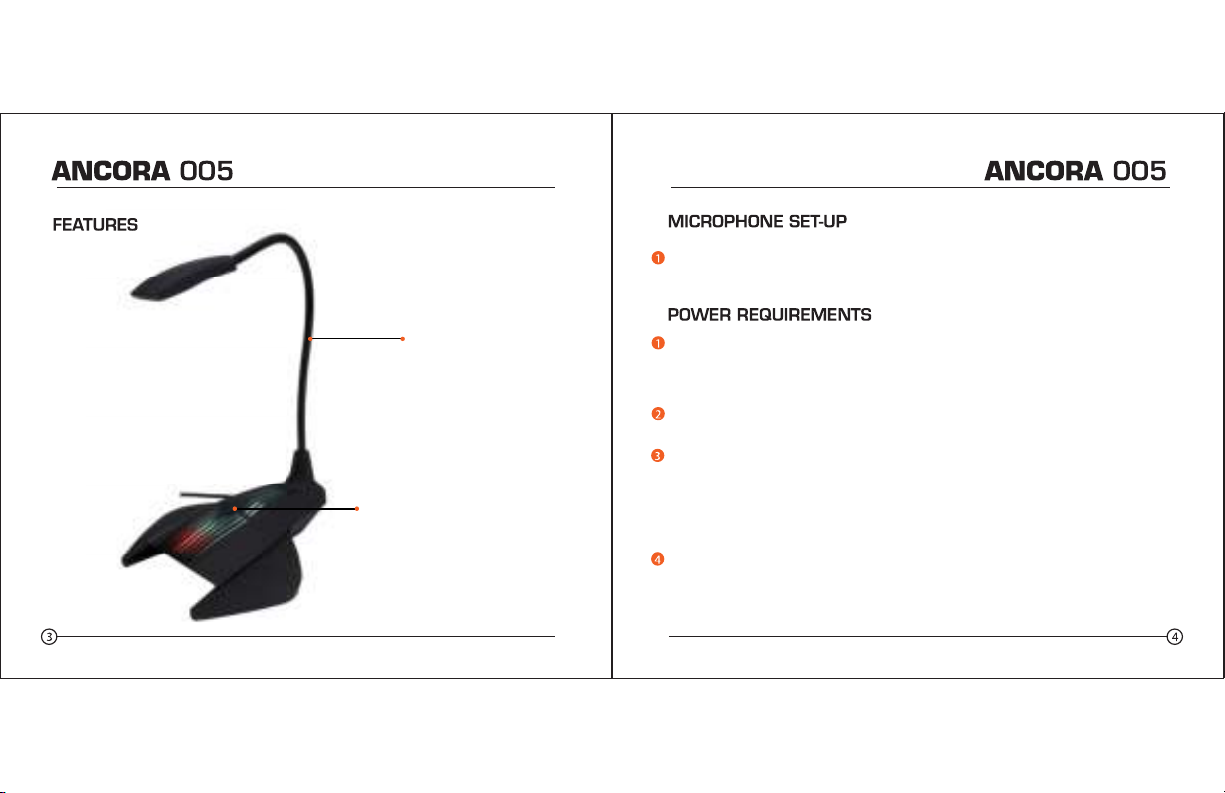
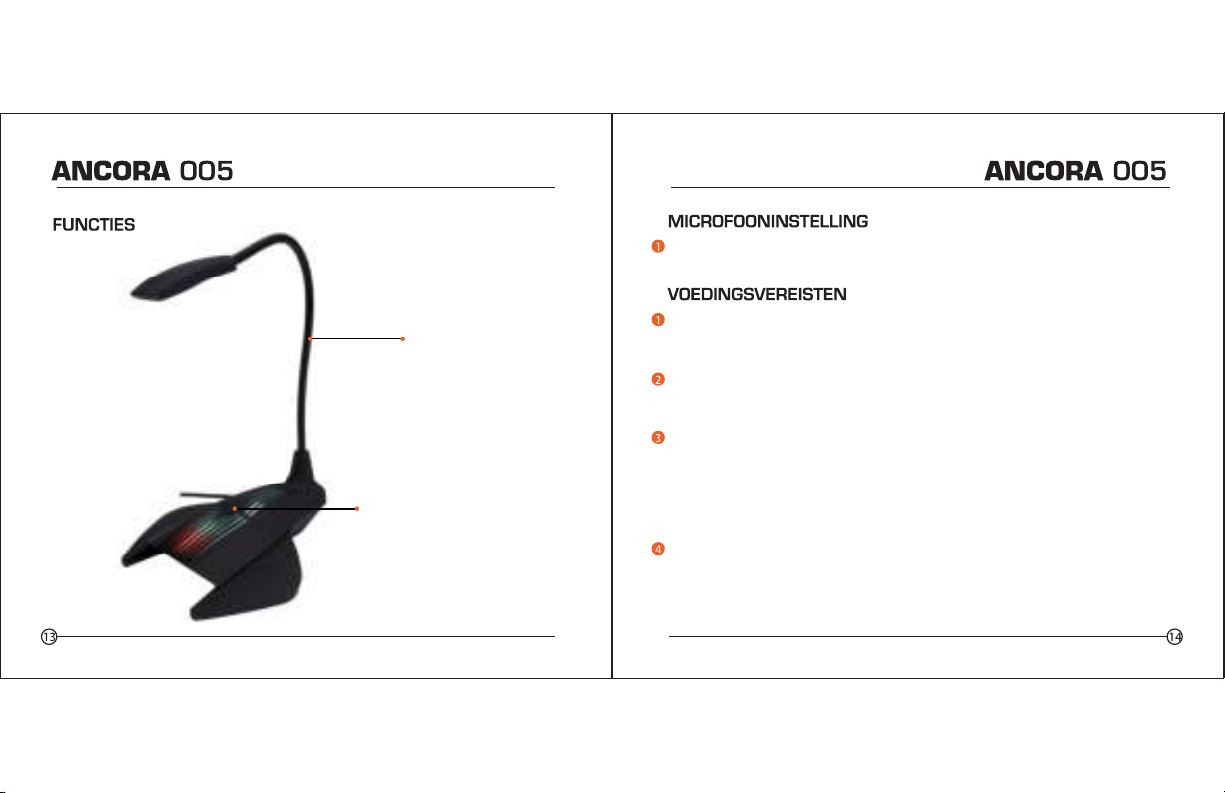
Qware ANCORA 005 User manual

Thank you for purchasing the Qware streaming mic ANCORA 005.
The product has warranty for two years. Our customer service will reply
to you as soon as possible.
For questions and information: qware.nl
Model: QW GMI-005
Distributed by:
Pirox International B.V.
www.qware.nl
Blaak 6, 3011 TA Rotterdam
The Netherlands
Specifications are subject to change
without prior notice. Made in China

Microphone capsule: Electret condenser
Frequency response: 1000Hz-10kHz
Directivity: Omnidirectional
Sensitivity: -34dB ± 3dB
Audio output line: Ø3mm x 1.5m
USB cable: USB and 3.5mm connection
Power supply: DC 5V
LED light colors: RGB
• Built-in desktop with microphone
• 1.5-meter USB cable
• PC or laptop with USB port
• Windows 7, 8, 10 or Mac OS x 10.5 (Leopard) or higher

Plug the USB cable into the computer. After connecting the audio cable,
you can start working directly.
The microphone is powered by your device's USB port, meaning that in most
situations you can just plug the microphone in and get started.
For non standard USB ports, a powered USB hub may be required.
This is a "plug & play" USB device, compatible for both Windows and Mac
computers. Placement of the microphone can cause different recording results.
An ideal starting point for the reference is to place the MIC directly in front of the
user at 15 cm (6") distance. Moving the MIC a little closer will make the
vocal sound more intimate and full, while moving the MIC back will give the
vocal sound a little more 'air' or room-sound and will reduce the proximity effect
(increased bass or low frequency response when the sound source is very close).
Experimenting can be done with the angle, how the microphone is
placed, as different results can be achieved when the user is 'off-axis'
to the microphone.
Flexible neck
Light on/off and
microphone power on/off

To manually adjust your input level via your computer's system preferences,
use the following instructions relevant to your device platform/operating system.
Adjusting the input level on a Mac OS computer:
Click on the Apple symbol at the top left of your screen, and select System
Preferences.
Click on 'Sound' to open the sound options
Open the 'Input tab'.
From here, select the 'USB Audio Device' from the list devices,
and adjust the input level using the slider.
Adjusting the input level on a
Windows computer:
Open the Start menu and
click on 'Control panel'

Open the 'Sound' preferences from within the ‘Control panel’ folder
Choose the MIC in the input display
Adjust the input level using the slider.

Do not cover the microphone grille
with your hand.
Regular maintenance is recommended
to avoid short circuit.

• Ingebouwde desktop met microfoon
• 1,5-meter USB-kabel
• PC of laptop met USB-poort
• Windows 7, 8, 10 of Mac OS x 10.5 (Leopard) of hoger
Microfooncapsule:
Frequentierespons:
Richting:
Signaal-ruisratio:
Gevoeligheid:
Audio-uitgangskabel:
USB-kabel:
Voeding:
LED-lichtkleuren
Elektret-condenser
1000Hz-10kHz
Omni-directioneel
-34dB ± 3dB
Ø3mm x 1,5m
USB en 3,5mm verbinding
DC 5V
RGB

Flexibele hals
Licht aan/uit en microfoon
aan/uit
Sluit de USB-kabel aan op de computer. Na het aansluiten van de audiokabel
kunt u direct beginnen.
De microfoon wordt gevoed door de USB-poort van uw apparaat, wat
betekent dat u meestal de microfoon alleen maar hoeft aan te sluiten.
Voor non-standaard USB-poorten, kan een gevoede USB-hub vereiste zijn.
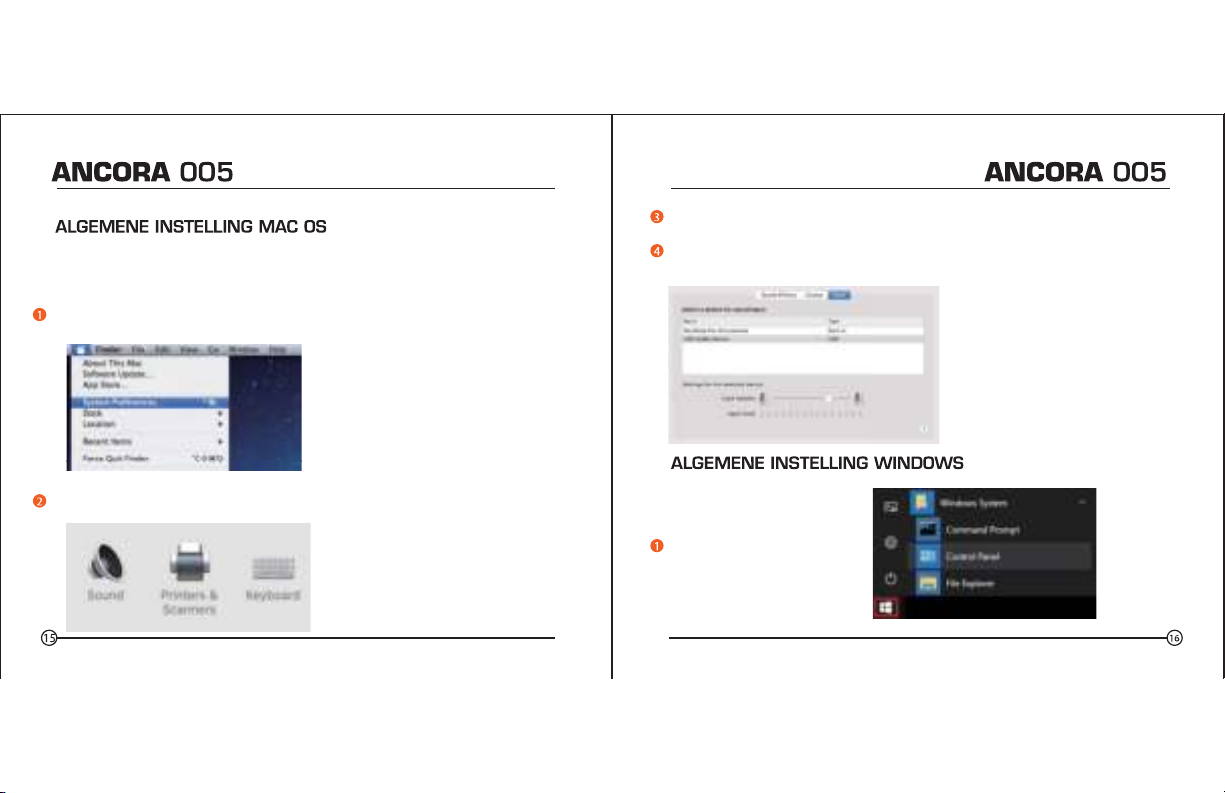
Dit is een "plug & play" USB-apparaat, compatibel voor zowel Windows- als
Mac-computers. Plaatsing van de microfoon kan verschillende
opnameresultaten veroorzaken.
Een ideaal startpunt de referentie is om de MIC direct voor de gebruiker, op
een afstand van 15 cm (6") te plaatsen. Als de MIC iets dichterbij wordt
geplaatst, wordt het stemgeluid intiemer en voller. Als de MIC verder weg
wordt geplaatst, krijgt het stemgeluid meer 'lucht’ of wordt het ruimtelijker en
wordt het nabijheidseffect gereduceerd (verhoogde bass of lagere
frequentierespons als geluidsbron dichtbij is).
Er kan met de hoek worden geëxperimenteerd, hoe de microfoon wordt
geplaatst, omdat er verschillende resultaten kunnen worden bereikt als de
gebruiker een andere hoek tot de microfoon heeft.

Klik op het Apple-symbool linksboven in uw scherm en selecteer
Systeemvoorkeuren.
Klik op ‘Geluid’ om de geluidsopties te openen
Open het tabblad ‘Ingang’.
Van hieruit, selecteer ‘USB audio-apparaat’ uit de lijst met apparaten en pas
het ingangsniveau met de schuif aan.
Het ingangsniveau op een
computer met Windows
aanpassen:
Open het menu Start en klik
op ‘Configuratiescherm’
Om het ingangsniveau via de systeemvoorkeuren van uw computer aan te
passen, gebruik de volgende instructies voor uw platform/besturingssysteem.
Het ingangsniveau op een computer met MAC OS aanpassen:

Selecteer de MIC in het scherm
Open ‘Geluid’ binnen de map ‘Configuratiescherm’ Pas het ingangsniveau met de schuif aan.

Dek de microfoon-grill niet af met uw hand.
Regelmatig onderhoud is raadzaam om kortsluiting te voorkomen.

• Integrierter Desktop mit Mikrofon
• USB-Kabel mit 1,5 m Länge
• PC oder Laptop mit USB-Anschluss
• Windows 7, 8, 10 oder Mac OS x ab 10.5 (Leopard)
Mikrofonkapsel:
Frequenzgang:
Richtcharakteristik:
Signal-Rausch-Verhältnis:
Empfindlichkeit:
Tonausgangskabel:
USB-Kabel:
Spannungsversorgung:
LED-Leuchtenfarben:
Elektret-Kondensator
1000 Hz - 10 kHz
Ungerichtet
-34 dB ± 3 dB
Ø 3 mm x 1,5 m
USB- und 3,5-mm-Anschluss
5 VDC
RGB

Flexibler Ansatz
Leuchte ein/aus und
Mikrofonspannung ein/aus
Stecken Sie das USB-Kabel in den Computer ein. Nach Anschluss des
Tonkabels können Sie sofort mit dem Betrieb beginnen.
Das Mikrofon erhält seine Spannung über den USB-Anschluss, d. h. in den
meisten Fällen können Sie es einfach an Ihrem Gerät einstecken und mit der
Aufnahme beginnen.
Bei nicht standardisierten USB-Anschlüssen kann ein gespeister USB-Hub
erforderlich sein.
Es handelt sich um ein „Plug & Play“-USB-Gerät für Windows- und
Mac-Computer. Die Positionierung des Mikrofons kann bei der Aufzeichnung
unterschiedliche Ergebnisse hervorrufen.
Es ist ein idealer Bezugspunkt, wenn das Mikrofon in einem Abstand von 15
cm vor dem Sprecher steht. Wenn Sie es etwas näher aufstellen, wirkt die
Tonaufnahme intimer und voller, während eine Verlagerung nach hinten ihr
etwas mehr „Luft“ oder Raumklang verleiht und den Nahbesprechungseffekt
(bei sehr naher Schallquelle erhöhte Bässe oder niedriger Frequenzgang)
reduziert.
Ein Experimentieren mit dem Aufstellwinkel bietet sich an, denn die
Ergebnisse sehen anders aus, wenn der Sprecher „außermittig“ zum Mikrofon
steht.

Klicken Sie auf das Apple-Symbol oben links auf Ihrem Bildschirm und
wählen Sie „Systemeinstellungen“.
Klicken Sie auf „Sound“, um die Klangoptionen zu öffnen.
Öffnen Sie die Registerkarte „Eingang“.
Wählen Sie hier das „USB-Audiogerät“ aus der Geräteliste aus und stellen Sie
mit dem Schieberegler den Eingangspegel ein.
Regelung des Eingangspegels
an einem Windows-Computer:
Öffnen Sie das Start-Menü
und klicken Sie auf
„Systemsteuerung“
Zur manuellen Regelung des Eingangspegels über die Systemeinstellungen
Ihres Computers beachten Sie die folgenden Anleitungen zu Ihrem
Betriebssystem bzw. Ihrer Geräteplattform.
Regelung des Eingangspegels an einem Mac-OS-Computer:

Wählen Sie bei der Auswahl des Eingangs das Mikrofon
Öffnen Sie darin die „Sound“-Einstellungen Stellen Sie mit dem Schieberegler den Eingangspegel ein.

Decken Sie das Mikrofongitter nicht mit Ihrer Hand ab.
Zur Vermeidung eines Kurzschlusses wird eine regelmäßige Wartung
empfohlen.

• Ingebouwde desktop met microfoon
• 1,5-meter USB-kabel
• PC o portátil con puerto USB
• Windows 7, 8, 10 o Mac OS x 10.5 (Leopard) o superior
Cápsula de micrófono:
Respuesta de frecuencia:
Directividad:
Relación señal-a-ruido:
Sensibilidad:
Línea de salida de audio:
Cable USB:
Fuente de alimentación:
Colores de luz LED:
Condensador electreto
1000Hz - 10kHz
Omnidireccional
-34dB ± 3dB
Ø3mm x 1,5m
Conexión USB y 3,5mm
5V CC
RVA

Cuello flexible
Encendido/apagado de luz y
encendido/apagado del micrófono
Conectar el cable USB al ordenador. Después de conectar el cable de audio,
puede comenzar a trabajar directamente.
El micrófono es alimentado por el puerto USB de su dispositivo, lo que
significa que en la mayoría de situaciones puede simplemente conectar el
micrófono y comenzar.
Para puertos USB no estándar, es posible que se requiera un concentrador
USB con alimentación
Este es un dispositivo USB "plug & play", compatible con ordenadores
Windows y Mac. La ubicación del micrófono puede provocar resultados de
grabación diferentes.
Un punto de partida ideal para la referencia es colocar el micrófono
directamente frente al usuario a una distancia de 15 cm (6"). Mover el
micrófono un poco más cerca hará que el sonido vocal sea más íntimo y
completo, mientras que mover el micrófono hacia atrás le dará al sonido
vocal un poco más 'aire' o sonido ambiente y reducirá el efecto de
proximidad (aumento de los graves o respuesta de baja frecuencia cuando la
fuente de sonido está muy cerca).
Se puede experimentar con el ángulo, cómo se coloca el micrófono, ya que
se pueden lograr diferentes resultados cuando el usuario está "fuera del eje"
del micrófono.

Haga clic en el símbolo de Apple en la parte superior izquierda de su pantalla
y seleccione Preferencias del sistema.
Haga clic en 'Sonido' para abrir las opciones de sonido
Abra la 'pestaña Entrada'.
Desde aquí, seleccione el 'Dispositivo de audio USB' de la lista de dispositi-
vos y ajuste el nivel de entrada utilizando el control deslizante.
Ajuste del nivel de entrada en
un ordenador con Windows:
Abra el menú Inicio y haga clic
en 'Panel de control'
Para ajustar manualmente su nivel de entrada a través de las preferencias del
sistema de su ordenador, use las siguientes instrucciones acordes a la
plataforma/sistema operativo de su dispositivo.
Ajuste del nivel de entrada en un ordenador Mac OS:

Elija el micrófono en la pantalla de entrada
Abra las preferencias de 'Sonido' desde la carpeta 'Panel de control’ Ajuste el nivel de volumen utilizando el control deslizante.
This manual suits for next models
1
Table of contents
Languages:
Other Qware Microphone manuals