manuals.online logo
Brands
  1. Home
  2. •
  3. Brands
  4. •
  5. RAB
  6. •
  7. Outdoor Light
  8. •
  9. RAB HID Post Top LED Series User manual

RAB HID Post Top LED Series User manual

Other RAB Outdoor Light manuals

RAB WPLED13N User manual

RAB

RAB WPLED13N User manual

RAB LUMINATOR LightAlert! LU300 User manual

RAB

RAB LUMINATOR LightAlert! LU300 User manual

RAB LFLED 4LV User manual

RAB

RAB LFLED 4LV User manual

RAB Lightcloud ST19 User manual

RAB

RAB Lightcloud ST19 User manual

RAB W17-30L User manual

RAB

RAB W17-30L User manual

RAB A17 User manual

RAB

RAB A17 User manual

RAB A19-9-E26-9RGB-SS-2P-2/LCB User manual

RAB

RAB A19-9-E26-9RGB-SS-2P-2/LCB User manual

RAB GoodNight Light User manual

RAB

RAB GoodNight Light User manual

RAB WPLED20 User manual

RAB

RAB WPLED20 User manual

Popular Outdoor Light manuals by other brands

Kichler Lighting HELEN 37536 instructions

Kichler Lighting

Kichler Lighting HELEN 37536 instructions

Thorn OXANE L installation instructions

Thorn

Thorn OXANE L installation instructions

esotec Solar Globe Light multicolor 20 operating instructions

esotec

esotec Solar Globe Light multicolor 20 operating instructions

mitzi HL200201 ELLIS Assembly and mounting instructions

mitzi

mitzi HL200201 ELLIS Assembly and mounting instructions

HEPER TILA S AFX 3 Module Installation & maintenance instructions

HEPER

HEPER TILA S AFX 3 Module Installation & maintenance instructions

Designplan TRON 180 installation instructions

Designplan

Designplan TRON 180 installation instructions

Sealey LED37 instructions

Sealey

Sealey LED37 instructions

nordlux VEJERS Mounting instruction

nordlux

nordlux VEJERS Mounting instruction

SImx ELITE LED LHTC637 installation instructions

SImx

SImx ELITE LED LHTC637 installation instructions

GEV CAROLINE 10833 manual

GEV

GEV CAROLINE 10833 manual

WE-EF PFL540 LED Installation and maintenance instructions

WE-EF

WE-EF PFL540 LED Installation and maintenance instructions

HEPER DOGO Side LW6048.585-US Installation & maintenance instructions

HEPER

HEPER DOGO Side LW6048.585-US Installation & maintenance instructions

BEGA 84 253 Installation and technical information

BEGA

BEGA 84 253 Installation and technical information

HEPER LW8034.003-US Installation & maintenance instructions

HEPER

HEPER LW8034.003-US Installation & maintenance instructions

HEPER MINIMO Installation & maintenance instructions

HEPER

HEPER MINIMO Installation & maintenance instructions

LIGMAN BAMBOO 3 installation manual

LIGMAN

LIGMAN BAMBOO 3 installation manual

Maretti TUBE CUBE WALL 14.4998.04 quick start guide

Maretti

Maretti TUBE CUBE WALL 14.4998.04 quick start guide

Maxim Lighting Carriage House VX 40428WGOB installation instructions

Maxim Lighting

Maxim Lighting Carriage House VX 40428WGOB installation instructions

manuals.online logo
manuals.online logoBrands
  • About & Mission
  • Contact us
  • Privacy Policy
  • Terms and Conditions

Copyright 2025 Manuals.Online. All Rights Reserved.

INSTRUCTIONS
HID Post Top LED Series
RAB Lighting is committed to creating high-quality, affordable, well-designed and energy-efficient LED lighting and controls that make it easy for electricians to install
and end users to save energy. We’d love to hear your comments. Please call the Marketing Department at 888-RAB-1000 or email: [email protected]
PRODUCT FEATURES INSTALLATION INSTRUCTIONS (cont’d)
·U L c e r t i fi e d
·Product applications: mainly apply for post top, street light,
garden light and other suitable light fixtures
INSTALLATION INSTRUCTIONS
1. Remove old ballast or disconnect from existing lamp holder.
Remove and dispose of ballast in correct manner.
Shown as Figure 1. (North America 100-277VAC)
SAFETY PRECAUTIONS
WARNINGS:
Please read the instructions carefully and observe installation details. Mainly apply for post top, street light, garden light
and other suitable light fixtures. When using electrical equipment, basic safety precautions should always be followed
including:
• Make certain power is OFF before installing or maintaining fixture.
• Operating temperature: -30°C to 60°C (-22°F to 140°F).
• These LED Lamps require all ballasts, capacitors, and ignitors to be bypassed or removed. Do not operate lamps on
existing ballasts.
• RISK OF FIRE OR ELECTRIC SHOCK. Luminaire wiring and electrical parts may be damaged when drilling for installation
of LED retrofit kit. Check for enclosed wiring and components. LED Retrofit lamp installation requires knowledge of
luminaires electrical systems. If not qualified, do not attempt installation. Contact a qualified electrician.
FOR USE IN ENCLOSED FIXTURES
PRODUCT IS NOT DIMMABLE
NOT FOR EMERGENCY LIGHTING
When using in portable table luminaires, ensure the distance from the bottom of the base to the top of the lampholder does not
exceed three (3) times the base diameter.
2. Reconnect directly to the existing lamp holder. Shown as Figure 2.
(North America 100-277VAC)
3. Install new LED replacement lamp. Shown as Figure 3.
Please make sure the old fitting is correctly earth.
(North America 100-277VAC)
INSTRUCTIONS
HID Post Top LED Series
RAB Lighting is committed to creating high-quality, affordable, well-designed and energy-efficient LED lighting and controls that make it easy for electricians to install
and end users to save energy. We’d love to hear your comments. Please call the Marketing Department at 888-RAB-1000 or email: mark[email protected]
WARRANTY
Five years warranty for each lamp, we will supply warranty based
on this period. If you have any inquiries, please do not hesitate
to contact us or our engineers if you do not understand these
instruction.
INSTALLATION INSTRUCTIONS (cont’d)
HID POST TOP LED-0119
Easy Answers
rablighting.com
Visit our website for product info
Tech Help Line
Call our experts: 888 722-1000
e-mail
Answered promptly - sal[email protected]
Free Lighting Layouts
Answered online or by request
© 2019 RAB LIGHTING Inc.
Northvale, New Jersey 07647 USA
RAB WARRANTY: RAB’s warranty is subject to all terms and conditions found at rablighting.com/warranty.
4. Securely fasten the earth fly lead cable to the main body
structure. If the cable are damaged in any way please replace.
(Do not use existing burnt out cables. The cable if need
replacement must be 1.0 mm in size and insulated from heat.)
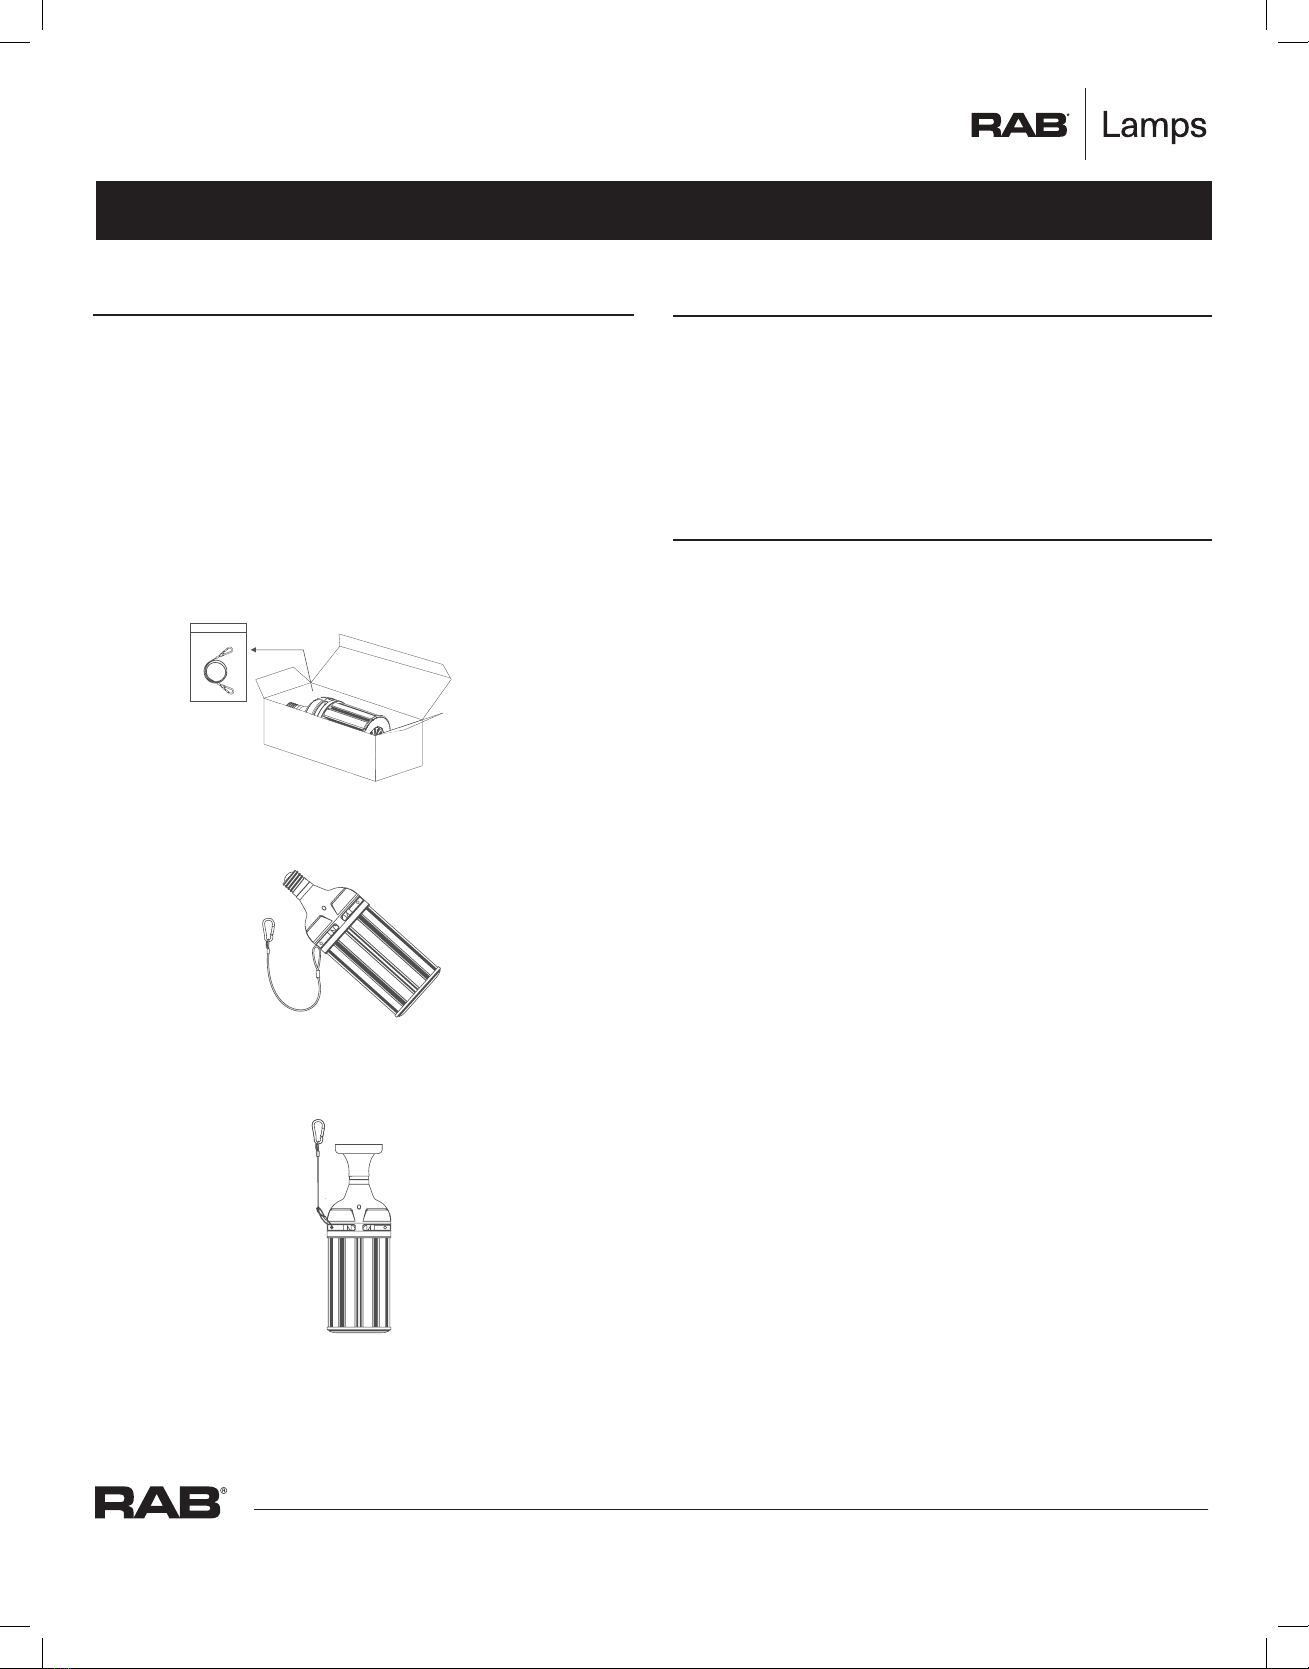
SAFETY ROPE INSTALLATION INSTRUCTION
You must use the safety rope to tight the lamps over 80W in case
of falling down due to old socket.
1. Take out the safety rope we put in box.
2. Fix the safety rope one end through the hole.
3. Fasten the other end on the luminaire.
WARNING
RISK OF FIRE OR ELECTRIC SHOCK. LED Retrofit Kit installation
requires knowledge of luminaires’ electrical systems. If not qualified,
do not attempt installation. Contact a qualified electrician.
RISK OF FIRE OR ELECTRIC SHOCK. Install this kit only in
luminaires that have the construction features and dimensions
shown in the photographs or drawings and where the input rating
of the retrofit kit does not exceed the input rating of the luminaire.
To prevent wiring damage or abrasion, do not expose wiring to
edges of sheet metal or other sharp objects.
Do not make or alter any open holes of the wiring enclosure or
electrical component enclosure during installation. Only those
open holes indicated in the photographs or drawings may be
added or altered as a result of kit installation.
Do not leave any other open holes in the wiring enclosure or
electrical component enclosure during installation.
Installers should not disconnect existing wires from lampholder
terminals to make new connections at lampholder terminals. In-
stead installers should cut existing lampholder leads away from the
lampholder and make new electrical connections to lampholder
lead wires by employing applicable connectors.
THIS RETROFIT KIT IS ACCEPTED AS A COMPONENT OF A
LUMINAIRE WHERE THE SUITABILITY OF THE COMBINATION
SHALL BE DETERMINED BY AUTHORITIES HAVING JURISDICTION.