manuals.online logo
Brands
  1. Home
  2. •
  3. Brands
  4. •
  5. RAB
  6. •
  7. Outdoor Light
  8. •
  9. RAB W17-30L User manual

RAB W17-30L User manual

INSTRUCTIONS
W17 WALL PACK INSTALLATION
RAB Lighting is committed to creating high-quality, aordable, well-designed and energy-ecient LED lighting and controls that make it easy for electricians to install
and end users to save energy. We’d love to hear your comments. Please call the Marketing Department at 888-RAB-1000 or email: [email protected]
IMPORTANT
READ CAREFULLY BEFORE INSTALLING FIXTURE. RETAIN THESE INSTRUCTIONS FOR FUTURE REFERENCE.
RAB xtures must be wired in accordance with the National Electrical Code and all applicable local codes. Proper grounding is required
for safety. THIS PRODUCT MUST BE INSTALLED IN ACCORDANCE WITH THE APPLICABLE INSTALLATION CODE BY A PERSON FAMILIAR
WITH THE CONSTRUCTION AND OPERATION OF THE PRODUCT AND THE HAZARDS INVOLVED.
WARNING:
• Make certain power is OFF before installing or maintaining xture.
NOTE:
• No user maintenance or cleaning required.
Fixture should not be recessed, surface mount only.
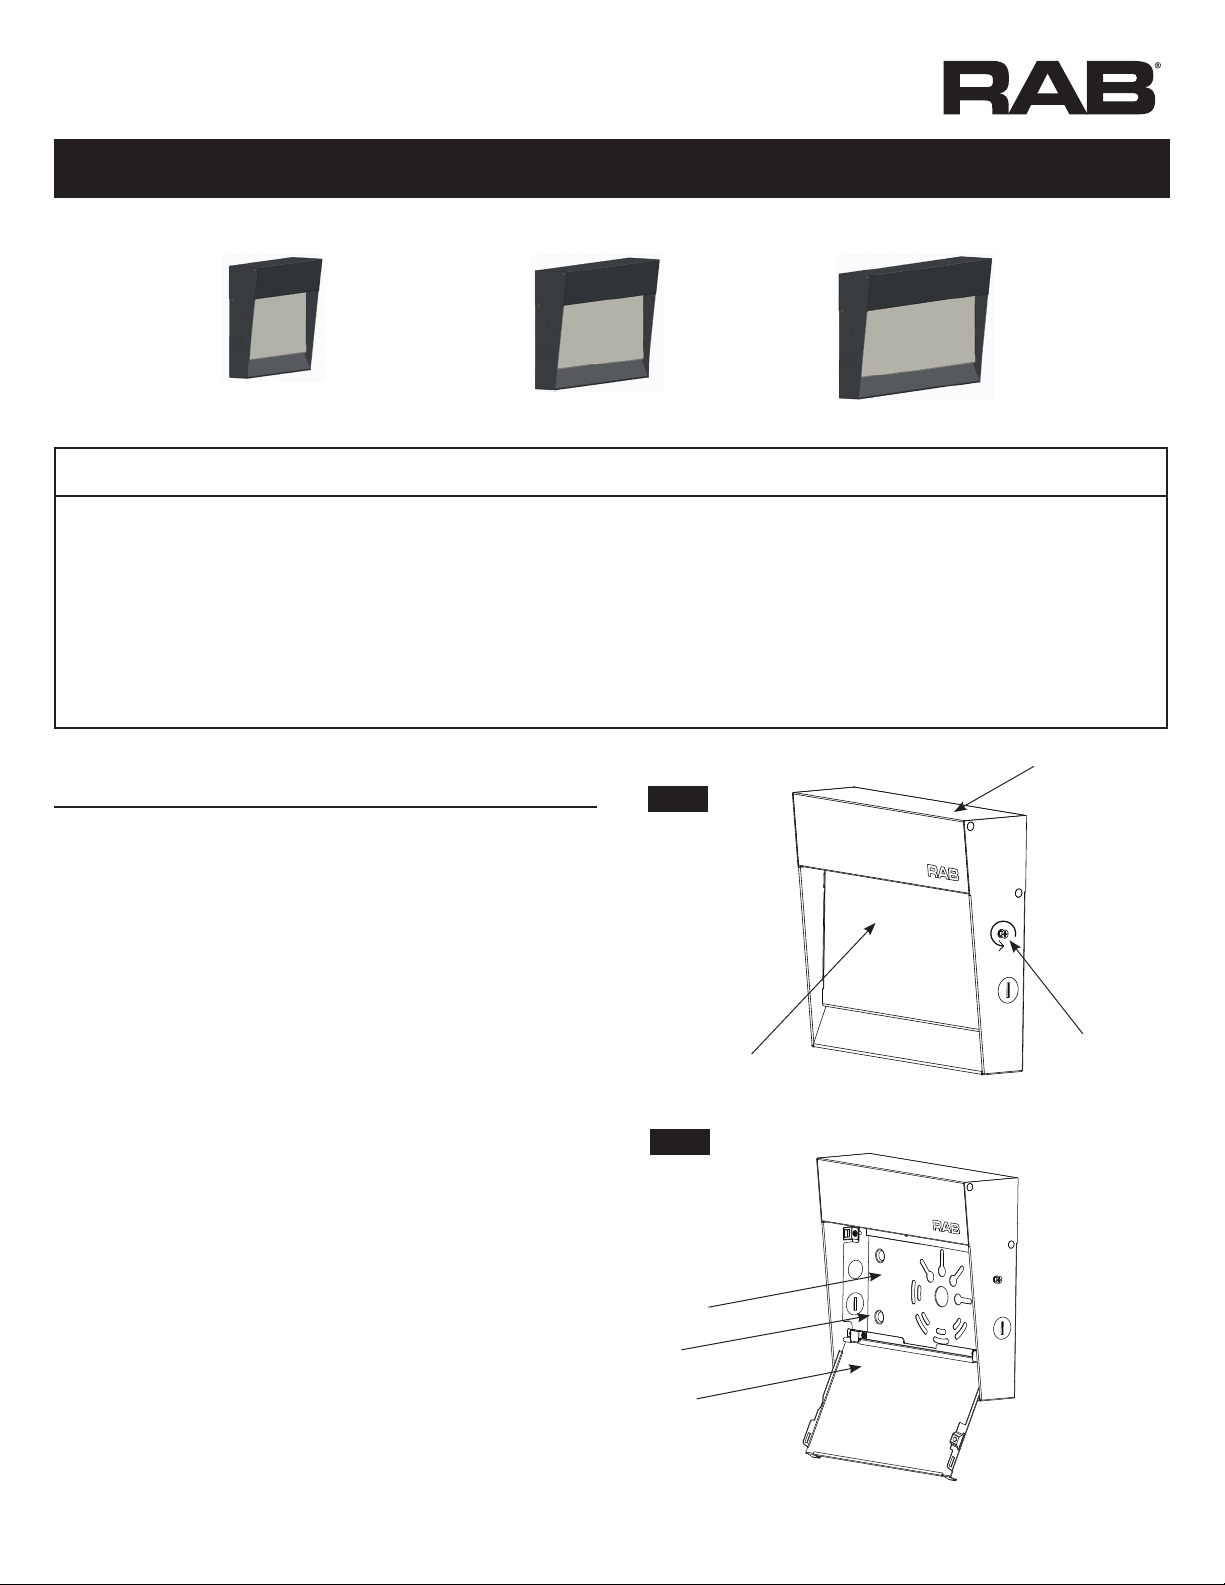
1. Open Reector Door by loosening Reector Door Screw (1),
see Fig. 1.
2. Reector Dooreector Door will hinge downward and remain attachedwill hinge downward and remain attached
during installation as shown induring installation as shown in Fig 2Fig 2..
3.3. Line up theLine up the FixtureFixture to desired location. Use theto desired location. Use the Drill TemplateDrill Template
(Fig. 2)(Fig. 2) on the inside back surface of theon the inside back surface of the FixtureFixture to matchto match
most standard junction boxes.most standard junction boxes. Secure theSecure the FixtureFixture in place within place with
screwsscrews (supplied by others)(supplied by others)..
4.4. Complete the wiring to the supply wires and groundComplete the wiring to the supply wires and ground (see wiring(see wiring
instructionsinstructions Fig. 3Fig. 3))..
5.5. Pivot thePivot the ReectorReector DoorDoor back into place and push until it snapsback into place and push until it snaps
closed. Tightenclosed. Tighten Reector Door ScrewReector Door Screw (1) to secure(1) to secure Reector
Door to Fixture.
6. Apply weatherproof silicone sealant around the edge of the wall
box. This is especially important with an uneven wall surface.
MOUNTING FIXTURE TO THE WALL
W1730L /36L W1755L/75L/90L W17150 L
FIG. 1
FIG. 2
Fixture
Drill Plate
Reector
Door
Reector Door
Screw
Reector
Mounting Screws (4)
(supplied by others)
INSTRUCTIONS
W17 WALL PACK INSTALLATION
RAB Lighting is committed to creating high-quality, aordable, well-designed and energy-ecient LED lighting and controls that make it easy for electricians to install
and end users to save energy. We’d love to hear your comments. Please call the Marketing Department at 888-RAB-1000 or email: mark[email protected]
TROUBLESHOOTING
CLEANING & MAINTENANCE
1. Check that the line voltage at the xture is correct. Refer to
wiring directions.
2. Be sure the xture is grounded properly.
3. Is the photocell, if used, functioning properly?
CAUTION: Be sure xture temperature is cool enough to touch.
Do not clean or maintain while xture is energized.
1. Clean tempered glass lensglass lens with non-abrasive, glass cleaning
solution.
2. Do not open xture to clean the LEDs. Do not touch the LEDs.
3. No user maintenance or cleaning required.
ONOFF WIRING
Note: These instructions do not cover all details or variations in equipment nor do they provide for every possible situation during installation, operation or maintenance.
FIG. 3
Universal voltage driver permits operation at 120V thru 277V, 50 or
60 Hz, follow the wiring directions below.
1. Connect the black xture lead to the LINE supply lead.
2. Connect the white xture lead to the COMMON supply lead.
3. Connect the GROUND wire from xture to supply ground.
DIMENSIONAL DRAWINGS
W17-IN-0720 RAB WARRANTY: RAB’S warranty is subject to all terms and conditions found at rablighting.com/warranty.
73695-RAB
Easy Answers
rablighting.com
Visit our website for product info
Tech Help Line
Call our experts: 888 722-1000
e-mail
Answered promptly - sal[email protected]
Free Lighting Layouts
Answered online or by request
© 2020 RAB LIGHTING Inc.
Northvale, New Jersey 07647 USA
W17-30L/36L W17-55L/75L/90L
W17-150L
2 3/4"
8 5/8”
16 1/2"
2 3/4" 12 1/2"
8 5/8”
2 3/4" 9"
8 5/8”

This manual suits for next models

5

Other RAB Outdoor Light manuals

RAB WPLED13N User manual

RAB

RAB WPLED13N User manual

RAB WPLED20 User manual

RAB

RAB WPLED20 User manual

RAB A19-9-E26-9RGB-SS-2P-2/LCB User manual

RAB

RAB A19-9-E26-9RGB-SS-2P-2/LCB User manual

RAB A17 User manual

RAB

RAB A17 User manual

RAB Lightcloud ST19 User manual

RAB

RAB Lightcloud ST19 User manual

RAB LFLED 4LV User manual

RAB

RAB LFLED 4LV User manual

RAB GoodNight Light User manual

RAB

RAB GoodNight Light User manual

RAB LUMINATOR LightAlert! LU300 User manual

RAB

RAB LUMINATOR LightAlert! LU300 User manual

RAB HID Post Top LED Series User manual

RAB

RAB HID Post Top LED Series User manual

Popular Outdoor Light manuals by other brands

Soltech SATELIS PRO 50W installation manual

Soltech

Soltech SATELIS PRO 50W installation manual

JONATHAN Y JYL5042A quick start guide

JONATHAN Y

JONATHAN Y JYL5042A quick start guide

LI-TIAN LIGHTING LT-XT-06 installation instructions

LI-TIAN LIGHTING

LI-TIAN LIGHTING LT-XT-06 installation instructions

Addington Park 30812087 instructions

Addington Park

Addington Park 30812087 instructions

EKVIP 023789 operating instructions

EKVIP

EKVIP 023789 operating instructions

inVue Mesa installation instructions

inVue

inVue Mesa installation instructions

EE Systems Group eLEDing EE812W-AI8 manual

EE Systems Group

EE Systems Group eLEDing EE812W-AI8 manual

LUCIDE ARUBA 11871/01/30 manual

LUCIDE

LUCIDE ARUBA 11871/01/30 manual

LUDECO PL2001 manual

LUDECO

LUDECO PL2001 manual

Portfolio 00907 manual

Portfolio

Portfolio 00907 manual

Cooper HALO ALB2A40GY instruction manual

Cooper

Cooper HALO ALB2A40GY instruction manual

BTR B1012UP SOLAR installation manual

BTR

BTR B1012UP SOLAR installation manual

Garden Trading Fairford installation instructions

Garden Trading

Garden Trading Fairford installation instructions

Maxim 6102 quick start guide

Maxim

Maxim 6102 quick start guide

brennenstuhl SOL 04 PLUS Installation and operating instructions

brennenstuhl

brennenstuhl SOL 04 PLUS Installation and operating instructions

urban ambiance UQL1171 installation instructions

urban ambiance

urban ambiance UQL1171 installation instructions

Opitec Pety Four Seasons manual

Opitec

Opitec Pety Four Seasons manual

Larson Electronics VPLHL-7WLED-PC-GR50 instruction manual

Larson Electronics

Larson Electronics VPLHL-7WLED-PC-GR50 instruction manual

manuals.online logo
manuals.online logoBrands
  • About & Mission
  • Contact us
  • Privacy Policy
  • Terms and Conditions

Copyright 2025 Manuals.Online. All Rights Reserved.