manuals.online logo
Brands
  1. Home
  2. •
  3. Brands
  4. •
  5. Race Dynamics
  6. •
  7. Motorcycle Accessories
  8. •
  9. Race Dynamics PowerTRONIC Himalayan 452 User manual

Race Dynamics PowerTRONIC Himalayan 452 User manual

FuelX Installation Manual
Royal Enfield Himalayan 452 (2024)
Document Version
1
Release Date
18 Jan 2024
Application information
Vehicle Specific
Vehicle
Royal Enfield
Model
Himalayan 452
Year of manufacture
2024
Note:
●Read through all instructions before installation and use.
●Ensure that the bike is switched off and the key is out of the ignition before proceeding with the
installation.
●Some parts of the bikes might be hot/sharp and may cause burns/cuts. Proceed with extreme
caution or wait until the bike has cooled down. Always wear safety gloves.
●When the installation is complete, make sure to secure the wiring loom away from the movable parts
or components which tend to heat up during the normal operation of the vehicle at any chance.
●FuelX is intended for motorsport use on a closed course, please check with your local laws before
using this product. Race Dynamics / PowerTRONIC is not liable for consequences arising out of using
the product.
Support:
North & South America : +1 267 214 9292 (Call) +91 9606 044 178 (WhatsApp)
India, Bangladesh, Bhutan, Srilanka & Nepal : +91 9916 229 292 (Call & WhatsApp)
Rest of the world : +91 9606 044 177 (Call & WhatsApp)
Email : [email protected]
Website : www.powertronicECU.com
1
SL No
Chapter
Page
1
About FuelX and Kit Contents
3
2
FuelX Variants
4
3
FuelX Connectors
5
4
FuelX Installation
7-23
5
FuelX Configuration and Settings
24
6
FuelX LEDs
25
Tools required
Serial No
Main tools
Optional tools
1
4mm, 5mm Hex bit
Spinner handle
2
10mm, 8 mm T bar Hexagonal Socket wrench
Ratchet handle
3
Wirecutter
Extension bar or Sliding T-bar
2
1. FuelX
FuelX is an electronic, plug-in, fuel-injection optimizer for
modern engines. It either enriches or decreases the AFR in all
operating regions according to the rider requirement. It
autotunes the engine to best operational parameters,
constantly monitoring, learning, and adapting to the engine
condition, wear and tear, riding style, add-ons (such as air filter
and/or exhaust), etc as well as the environmental conditions
such as temperature, humidity, altitude, etc. always ensuring
the engine performs in the safest and most optimal zones.
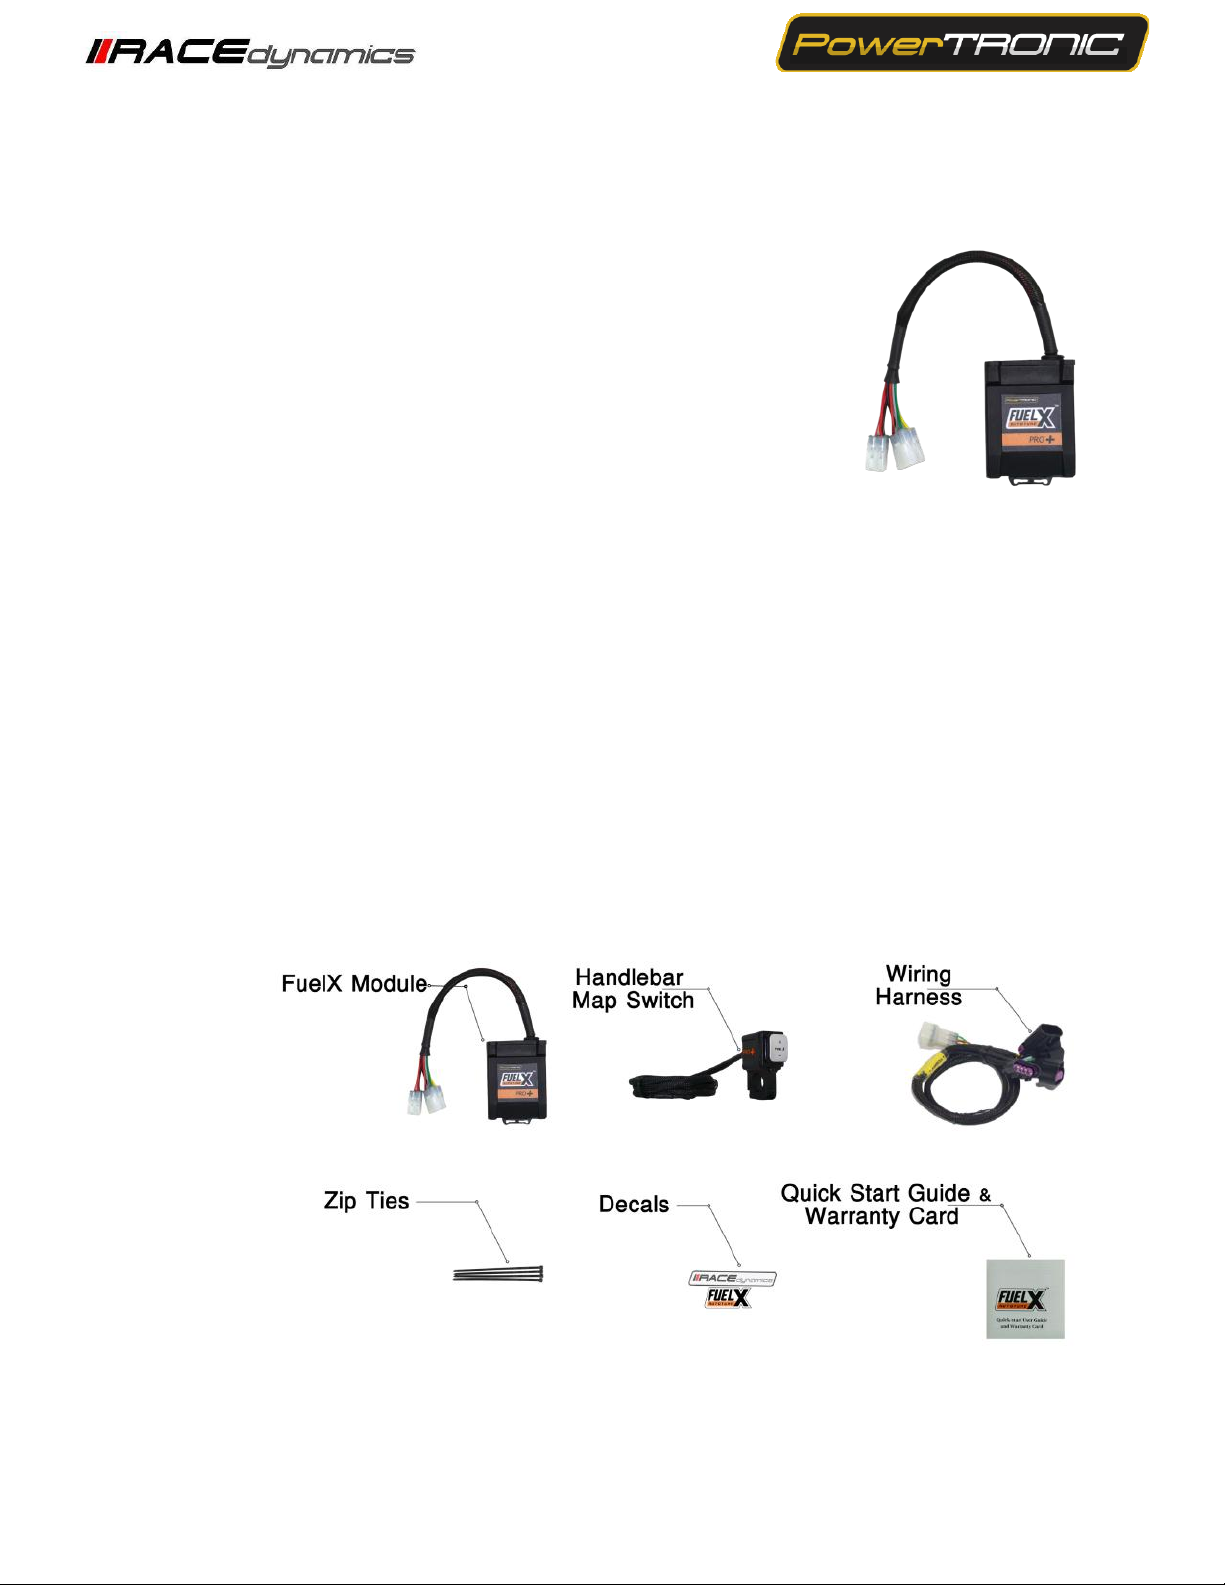
FuelX kit contains the following items
● FuelX Module
● Wiring Harness
● Handlebar map switch (Pro and Pro+ version only)
● Zip ties
● Decals
● Quick start guide and Warranty card
Image 1.1
3
2. FuelX Variants:
FuelX Pro+
The FuelX Pro+ variant has 10 maps that can be changed depending on the preference of the rider. For
the Pro+ version, the FuelX contains an additional connector (Refer to Image 2.3) for the Handlebar
Map switch (Refer to Image 2.2).
Image 2.1 Image 2.2 Image 2.3
FuelX Pro
The FuelX Pro variant has 10 maps that can be changed depending on the preference of the rider. For
the Pro version, the FuelX contains an additional connector (Refer to Image 2.6) for the Handlebar Map
switch(Refer to Image 2.5 m )
Image 2.4 Image 2.5 Image 2.6
4
FuelX Lite
The FuelX Lite variant has a single autotune map and only one connector for the harness.
Image 2.7 Image 2.7
5
3. FuelX Harness Connectors
The harness contains
● The Lambda connector (O2)
● FuelX connector
● Ground/battery negative connector.
The FuelX is connected between the Lambda sensor connector and the ECU. The male connector of
FuelX is connected to the female of the Lambda sensor and vice versa.
Image 3.4
6
4. Installation procedure
4.1 Removing panels and tank.
Begin at the right side of the bike.
Park the bike using the center stand on a level surface (Or a paddock stand). Refer to Image 1
Image 1
4.1.1 Detach the pillion seat by inserting the key into the keyhole shown in Image 2 and unlock the pillion seat. Image 3
shows the pillion seat detached.
7
Image 2
Image 3
4.1.2 Detach the rider seat. (Gently lift and slide it towards the rear end) - Refer to Image 4.
8
Image 4
4.1.3 Unscrew the front end tank panel bolt using the 4 mm Hexagonal bit. Refer to Image 5.
Image 5
4.1.4 Gently detach the tank front panel. Refer to Image 6.
9
Image 6
4.1.5 Locate the rear end mounting bolts, (3 Nos). Refer to Image 7.
Image 7
4.1.6 Unscrew the rear end mounting bolts using the 5 mm Hexagonal bit. Refer to Image 8.
10
Image 8
4.1.7 Gently lift the rear end of the tank and locate the vacuum hoses. Detach the hoses carefully. Refer to Image 9.
Image 9
4.1.8 Locate the Fuel line and detach the connector carefully. Refer to Image 10.
11
Image 10
4.1.9 Locate the Fuel Pump connector and detach the connector carefully. Refer to Image 11
Image 11
4.1.10 Locate the Fuel Float connector and disconnect the coupler. Refer to Image 12.
12
Image 12
4.1.11 Once all the connectors are detached from the tank, gently lift and place it carefully. Refer to Image 13
Image 13
4.1.11 Locate the air box assembly and the mounting bolts. (2 on the left side and 1 on the right side) Unscrew them with
an 8 mm Hex socket. Refer to Image 14
13
Image 14
4.1.12 Carefully unplug the hose from the throttle body. Refer to Image 15.
Image 15
4.1.13 Loosen the bolt of the throttle body clamp. Refer to Image 16.
14
Image 16
4.1.14 Disconnect the battery negative terminal of the vehicle. Refer to Image 17 below.
Image 17
4.1.14 Unplug the ECU connector carefully. Refer to Image 18 below.
15
Image 18
4.1.13 Carefully unplug the spark plug chord. Refer to Image 19.
Image 19
4.1.14 Gently lift the air box and place it carefully as shown in Image 20 below.
16
Image 20
4.2 Routing the harness
Important notes:
1) In this installation manual, the air box is removed for better routing demonstration.
During the air box removal, unplug the ignition coil Ground as shown in the image
below, and make sure to connect the Ground back while fitting the air box back.
17
4.2.1 Locate the stock lambda sensor connector. Refer to Image 21.
Image 21
4.2.2 Disconnect the stock Lambda sensor connector. Refer to the Image 22.
Image 22
18
4.2.3 Connect FuelX female Lambda sensor connector to stock male connector. Refer to Image 23.
Image 23
4.2.4 Connect FuelX male Lambda sensor connector to stock female connector. Refer to Image 24.
Image 24
19
4.2.5 Connect the FuelX Handlebar map switch on the Handlebar. Refer to Image Image 25
Image 25
4.2.6 Using a 2.5 mm Allen key, tighten the bolts. Refer to Image Image 26.
Image 26
20

Other Race Dynamics Motorcycle Accessories manuals

Race Dynamics PowerTRONIC User manual

Race Dynamics

Race Dynamics PowerTRONIC User manual

Race Dynamics FuelX Lite User manual

Race Dynamics

Race Dynamics FuelX Lite User manual

Race Dynamics Dominar User manual

Race Dynamics

Race Dynamics Dominar User manual

Popular Motorcycle Accessories manuals by other brands

SRC H-ADV150-04-01AL quick start guide

SRC

SRC H-ADV150-04-01AL quick start guide

DMD P1 owner's manual

DMD

DMD P1 owner's manual

GIVI Airflow AF1110 manual

GIVI

GIVI Airflow AF1110 manual

Suzuki 99143-00A1 000 Series installation instructions

Suzuki

Suzuki 99143-00A1 000 Series installation instructions

Cardo Systems FREECOM 4+ Pocket guide

Cardo Systems

Cardo Systems FREECOM 4+ Pocket guide

Shark S 700 user manual

Shark

Shark S 700 user manual

R&G CR0081 Fitting instructions

R&G

R&G CR0081 Fitting instructions

SRC B-TRK502-01-01-SL quick start guide

SRC

SRC B-TRK502-01-01-SL quick start guide

hepco & becker 6307520 00 01 manual

hepco & becker

hepco & becker 6307520 00 01 manual

HOMCOM AA0-077 user manual

HOMCOM

HOMCOM AA0-077 user manual

hepco & becker 6307558 00 01 manual

hepco & becker

hepco & becker 6307558 00 01 manual

SHOEI JO Instructions for use

SHOEI

SHOEI JO Instructions for use

Wunderkind Custom 106503-F15 Installation and safety

Wunderkind Custom

Wunderkind Custom 106503-F15 Installation and safety

Suzuki 57100-05881 installation instructions

Suzuki

Suzuki 57100-05881 installation instructions

SIKH HELMETS Y-61 quick start guide

SIKH HELMETS

SIKH HELMETS Y-61 quick start guide

Dräger HPS 3500 Instructions for use

Dräger

Dräger HPS 3500 Instructions for use

M-WAVE SKI manual

M-WAVE

M-WAVE SKI manual

Kuryakyn 6212 installation instructions

Kuryakyn

Kuryakyn 6212 installation instructions

manuals.online logo
manuals.online logoBrands
  • About & Mission
  • Contact us
  • Privacy Policy
  • Terms and Conditions

Copyright 2025 Manuals.Online. All Rights Reserved.