RainFlo 480 User manual

MODEL 480
RAISED BED PLASTIC MULCH LAYER
OPERATING
MANUAL

Auto-Start. . . . . . . . . . . . . . . . . . . . . ......8,10,16
Bed Height. . . . . . . . . . . . . . . . . . . . ............6
Bed Press................................7
Bed Width . . . . . . . . . . . . . . . . . . . . ............6
Compression Rate. . . . . . . . . . . . . . . . . . . ......7
Crowned Bed . . . . . . . . . . . . . . . . . . . . .........7
Cutter (Plastic & Driptape) ..................16
Dirt Shield...............................12
Disk (Cover) . . . . . . . . . . . . . . . . . . . . ......12,13
Disk (Front). . . . . . . . . . . . . . . . . . . . ..........13
Drip Irrigation Attachment....................9
Drip Tape Down Pipe .......................9
Features .................................4
Getting Started .. . . . . . . . . . . . . . . . . . . . . . . . . . . 5
Helpful Tips............................5, 17
Options ..................................4
Parts Breakdown, Descriptions .....Coming Soon
Parts Breakdown, Exploded Views...Coming Soon
Plastic Rolls, Installing ......................8
Plastic Tensioning.........................10
Preparation Of Soil . . . . . . . . . . . . . . . . . . . . . . . . 4
Press Wheel . . . . . . . . . . . . . . . . . . ..........10
Ro-Trak, Maintenance. . . . . . . . . . . . . . . . . . . . . 15
Ro-Trak, Sensor. . . . . . . . . . . . . . . . . . . . . . . . . . 14
Ro-Trak, Trouble Shooting ..................15
Safety First ...............................3
Trench Opener . . . . . . . . . . . . . . . . ..........11
Trouble Shooting. . . . . . . . . . . . . . . . . . . . . . . . . 18
Warranty . . . . . . . . . . . . . . . . . . . . . . . . . . . . . . . 17
2
Table Of Contents

Read and understand all caution labels on the machine.
No riders beyond the speed of 3 MPH.
Double check that everyone is clear before lowering the machine.
Use caution when turning around; machine is 9’ long.
Do not crawl under the machine when lifted.
Disk blades are sharp; stay clear.
Do not sit on machine except designated seat.
Tractor operator is responsible for extra worker(s) around machine.
Rain-Flo is not responsible for accidents if any should occur.
3
!
!
!
!
!
!
!
!
!! Safety First !!
!

Soil Preparation
4
* To build a full rm bed with no hollow spots, soil has to be
prepared properly.
* Proper soil moisture is important to form nice rm beds. For best
results, soil should not be powder dry or in muddy condition.
* There are many dierent types of soil. You will need to know what
soil preparation works best with your soil.
* Machine performs the best if plowed 6” to 8” deep.
* Soil should be harrowed or roto-tilled until free of sod lumps.
* Sandy loam soils are the easiest to make square, uniform beds.
480 Features
Options
• Automatic steering correction (Ro-trak)
• 60” row centers, 80 hp FWD Minimum
• Adjustable bed height; 4” or 8”
• Automatically starts plastic lm
• Manual plastic & drip tape cutters
• On the go plastic roll change
• On the go cover disks adjustment
• Adjustable crowned or at bed top
• Adjustable brake tension on plastic roll carriers
• Adjustable row markers
• Category II, 3-point hitch
• With operator seat
• Replaceable, reversible plow share blades
• UHMW (replaceable) poly lined bed press
• Quality powder coated paint
• Lays standard 48” plastic only
• Single or double drip attachment
• Hydraulic kit for cover disk adjustment

5
* Before laying plastic, we reccommend using the machine without mulch or
driptape. Make adjustments as needed for your soil type and become familiar
with the machine. Spread moldboards as far as possible when making the
second pass to lay the plastic mulch.
* Let full weight of machine down and regulate amount of soil between
moldboards using the compression rate turnbuckle.
* It is not necessary to pull more soil than needed to ll the bed. Pulling too much
soil may cause tractor slippage / side drifting.
* Moldboards can be adjusted closer or farther apart depending on soil type.
Getting Started
1. Adjust 3-point top link to level machine.
2. Load plastic roll into bottom roll cradle and spare roll into top
cradle.
3. Feed plastic through rollers (page 8).
4. Load driptape roll(s) onto carrier and feed through guides (page 9).
5. Compression rate regulates amount of soil between moldboards
and can be adjusted using turn buckle on the left* (page 7).
6. Bed crown (peak) can be adjusted by turning center turn buckle
(page 7).
7. Bed top width/bed height is adjusted by removing 4 hand pins
on each side press plate, move plates to the desired height/width,
and installing pins again. i.e For tall beds both side plates need
to be dropped down. NOTE; double check both sides are
adjusted equally (page 6).
8. Bed height can be ne tuned by using the turn buckle on
the right* to raise or lower the press pan and adjusting the
compression rate accordingly (page 6).
* Standing in back
Helpful Tips
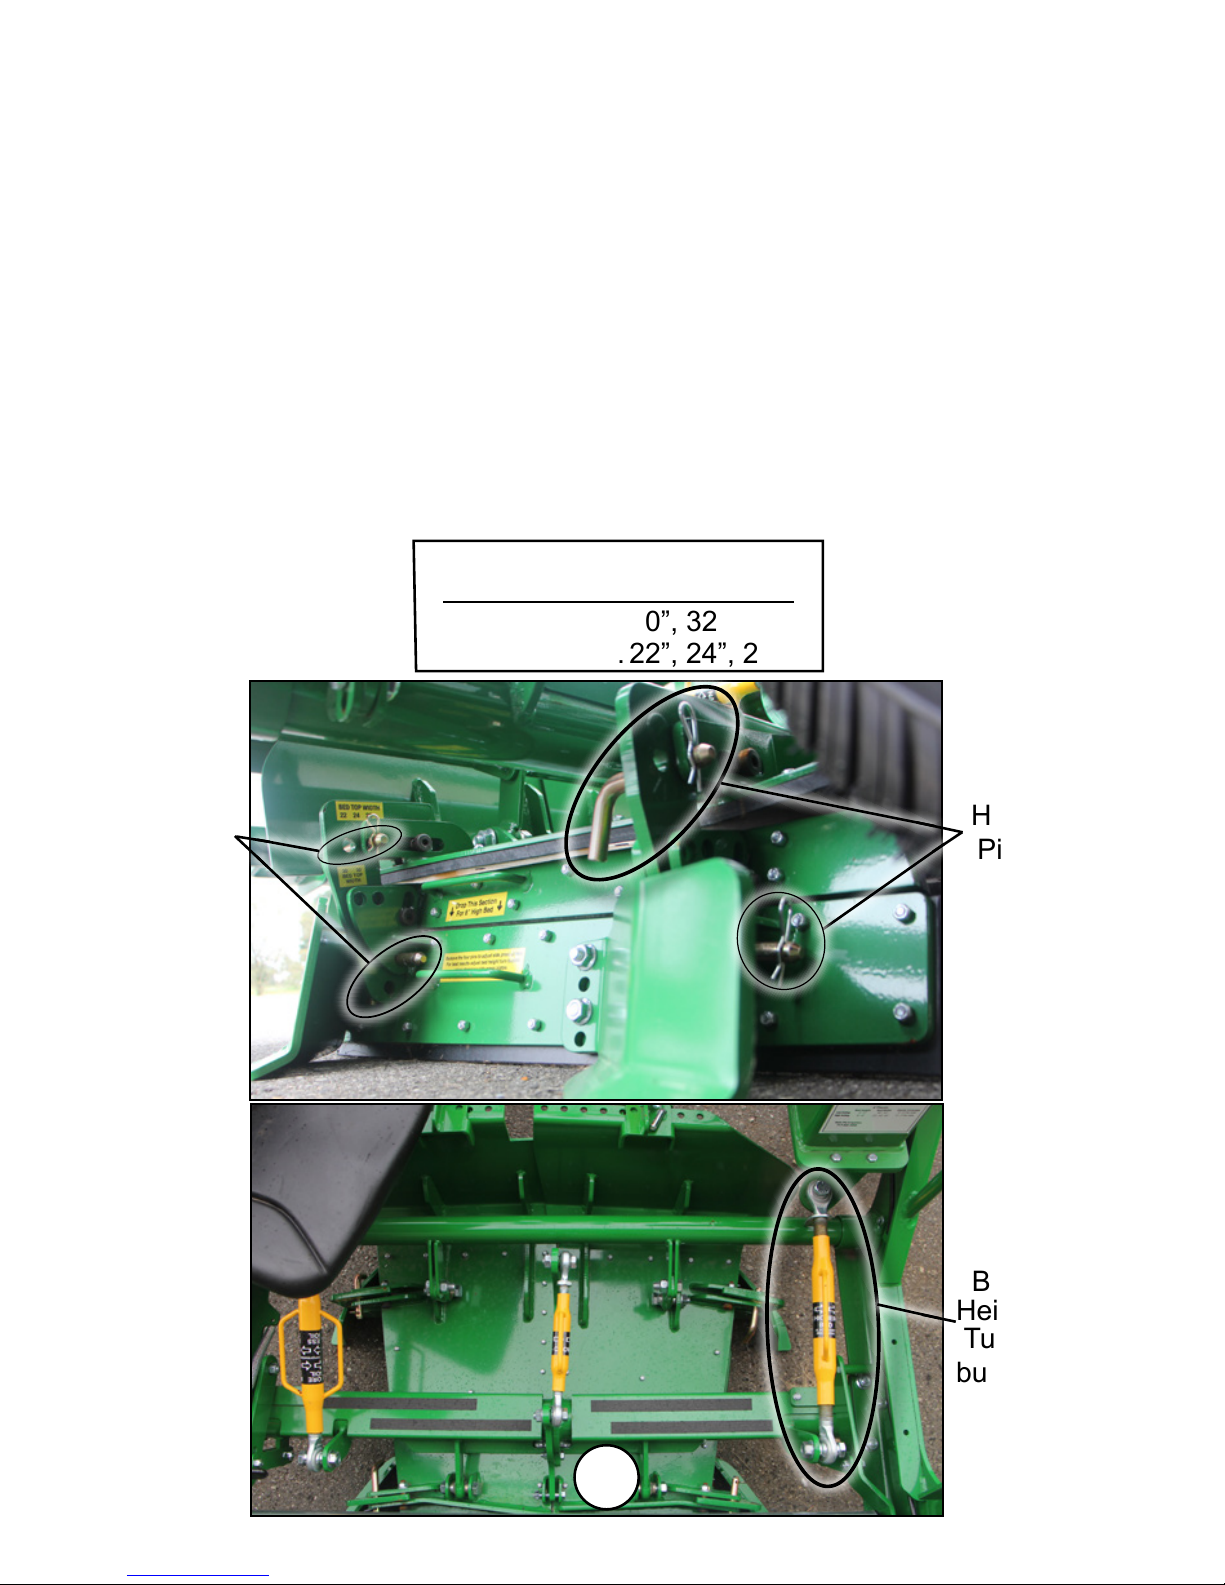
Bed Height & Width Adjustment
Bed height and width is adjusted with four hand pins located on each
side of the bed press (See below).
To change from the 8” setting (pictured below) to a 4” setting use the
steps below.
1. Using the tractor, raise the machine approx 12” o the ground.
2. Remove the four hand pins.
3. Use the handles on the side plates to lift the bottom section until
the top section is in a at position.
4. Reinstall the hand pins in the bed width setting preferred.
5. Repeat steps 1-4 for the other side.
6. Fine tune bed height using the turn buckle on the right side (see
picture below).
7. Adjust press wheels to match new bed width (page 10).
4 Ft. Plastic
Bed Height Bed Top Width
4” .................. 30”, 32”
8” .................. 22”, 24”, 26”
Hand
Pins
Hand
Pins
6
Bed
Height
Turn-
buckle
7
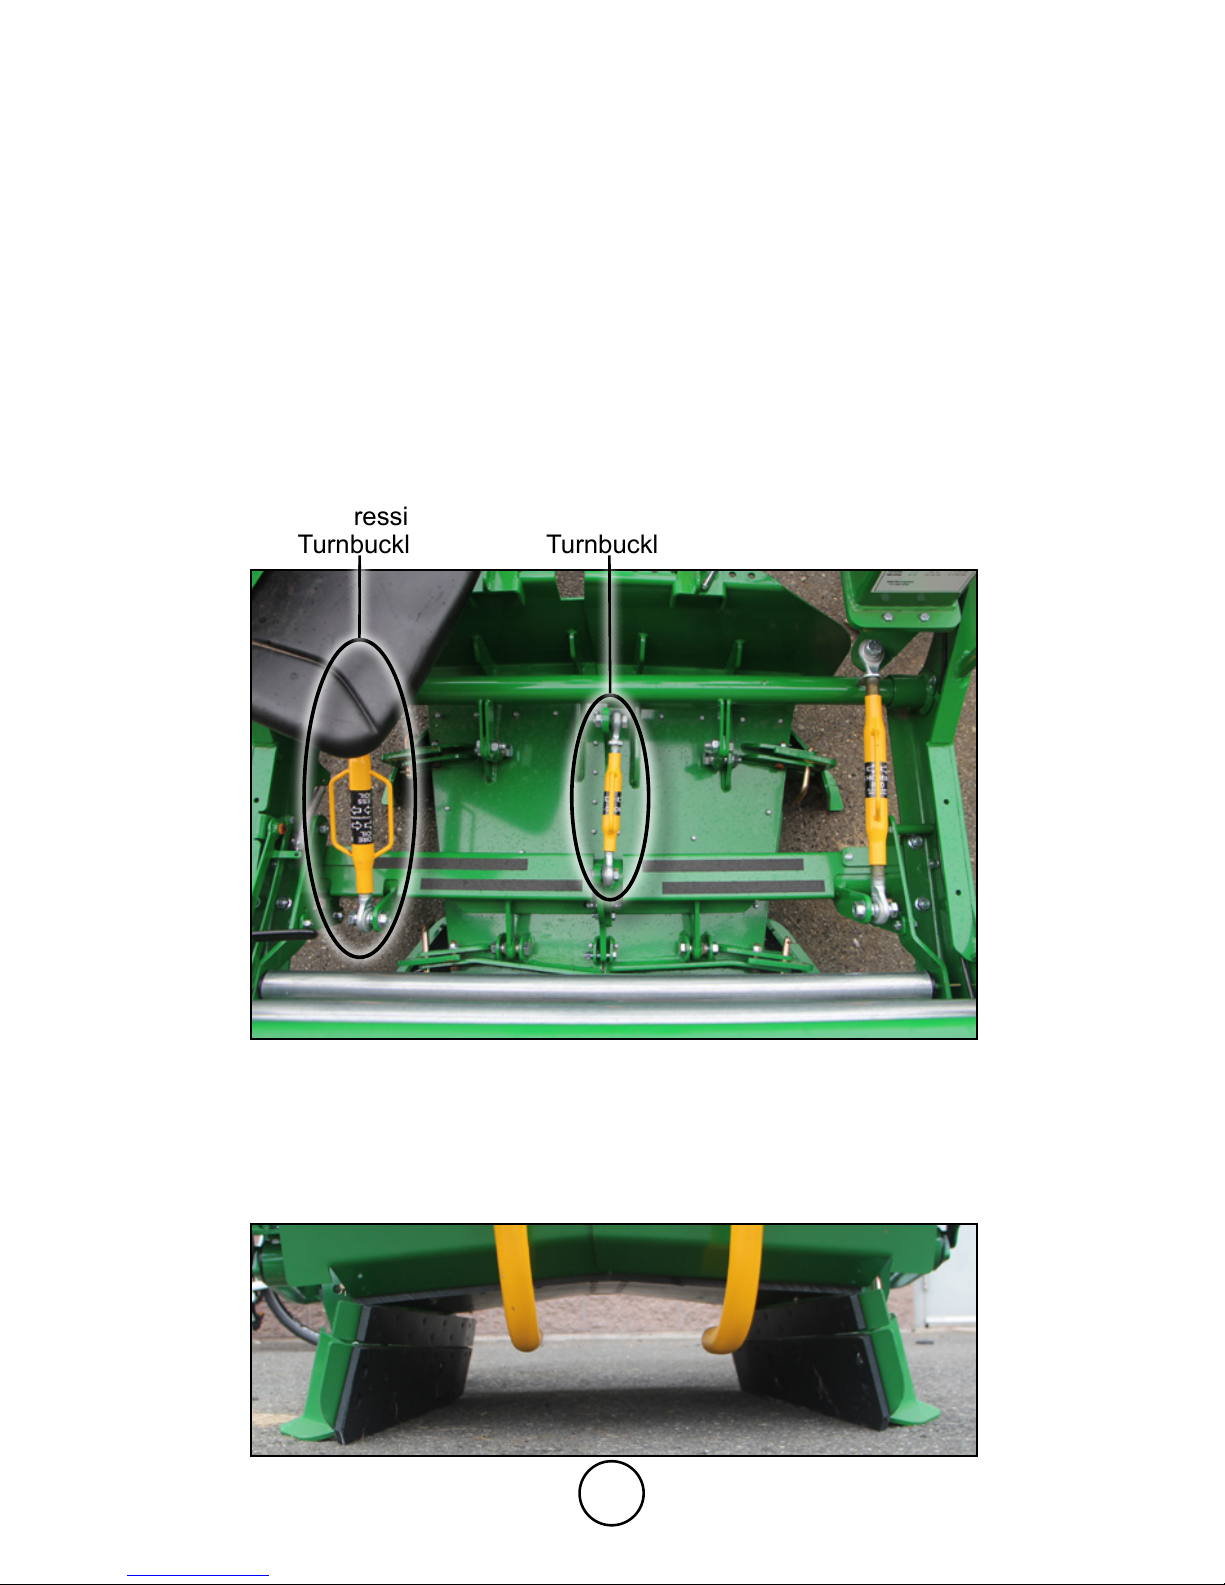
Compression Rate Adjustment
Compression rate or angle of the bed press regulates the amount of soil
between the moldboards. It is adjusted using the turnbuckle on the left (see
below).
If you have insucient soil or a hollow bed use less compression by
lowering the front of the bed press. If there is too much soil building up
use more compression by raising the front of the bed press. Excessive
compression does not form a rm bed and is not reccommended.
Compression can be changed while laying as soil type and conditions
change.
Important; Changing compression will change driptape bury depth.
Crowned Bed Adjustment
Compression
Turnbuckle
The crown or peak of the bed (see below) is useful to drain water o
the top of the bed in leval elds. It can be adjusted using the center
turnbuckle (see above).
Crowned Bed
Turnbuckle
8
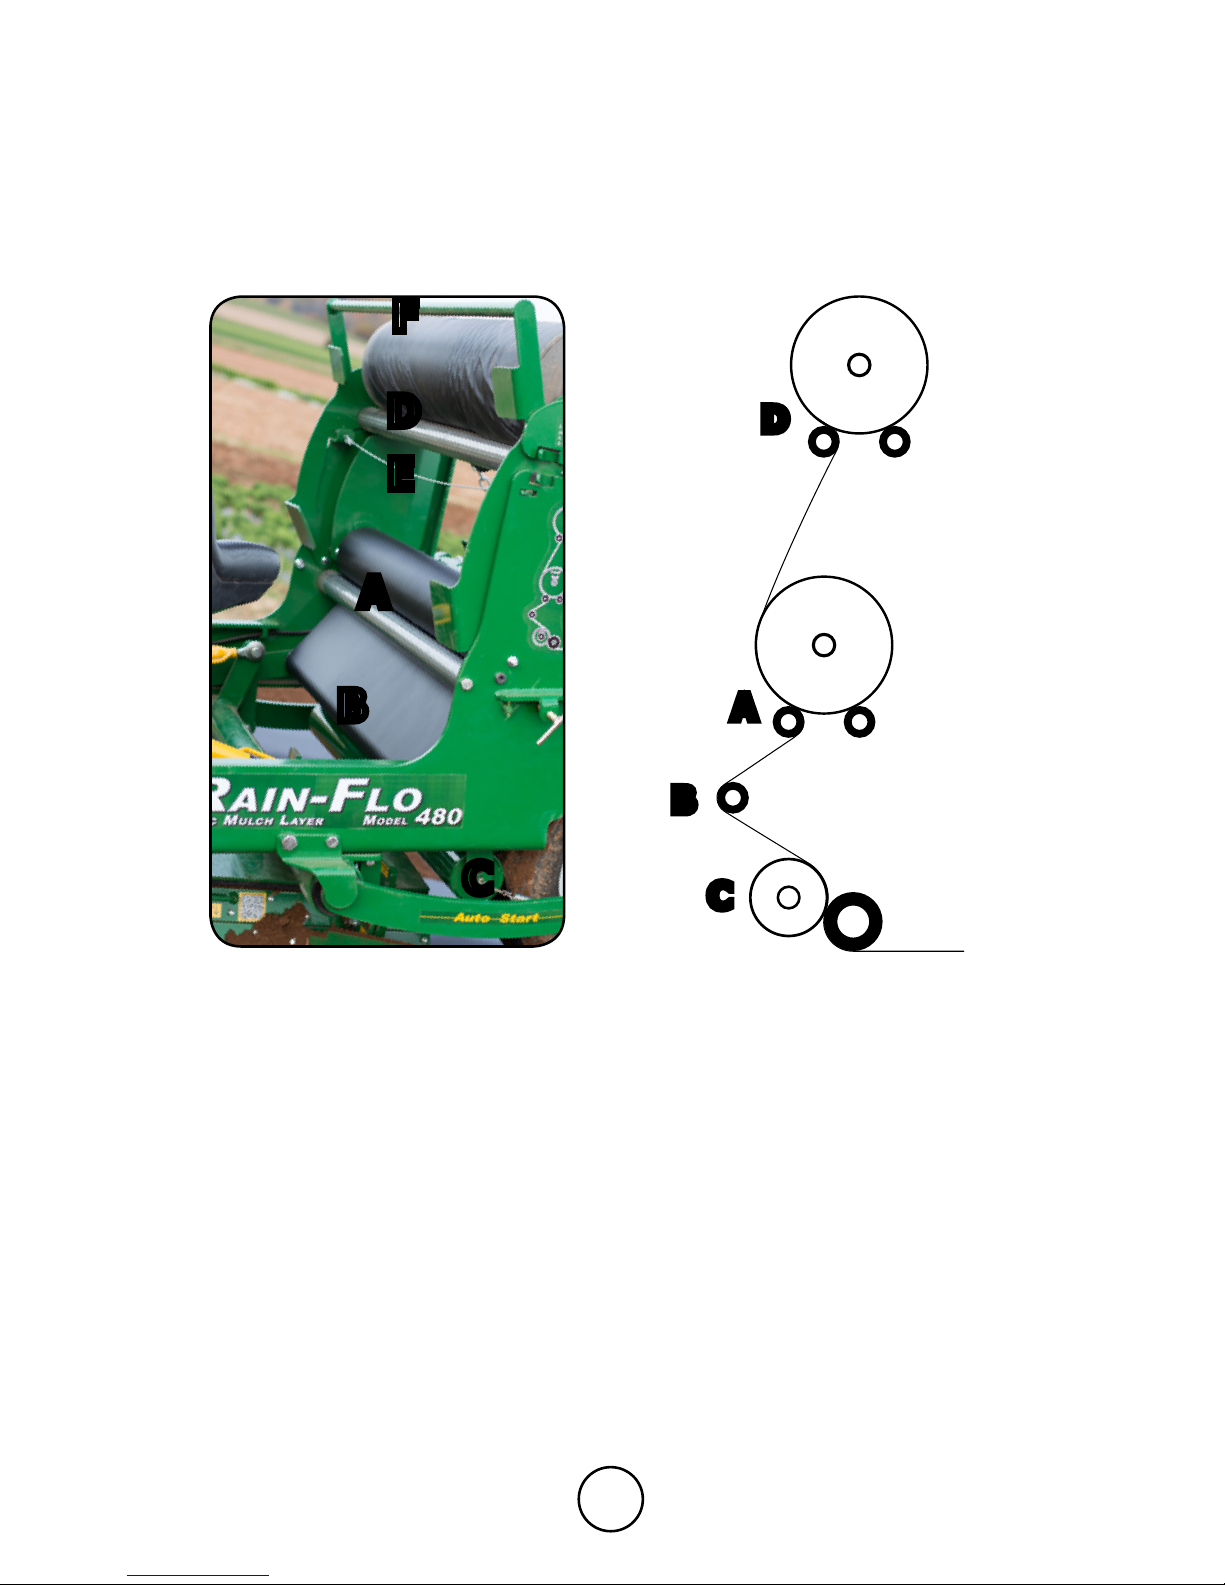
Installing Plastic Rolls
To install plastic rolls, place feed roll on top of rollers (A) and spare roll
on rollers (D). Pull end of plastic down between rollers and in front of 2”
roller (B). Next feed it between the 4” green and 3” silver rollers (C). See
illustration below.
Make sure plastic mulch is between tires and green roller for Auto-Start.
A
B
C
Plastic
Spare
Plastic
Roll
Feed
Roll
Drive
Roller
A
B
C
On The Go Roll Change
When the feed roll is almost empty the spare roll can be started
without stopping. This leaves only a seam across the bed.
1. Adjust the spare roll tension so it can spin freely (page 10).
2. Feed plastic through rollers (D) and pull out approx. 2’ of plastic.
3. Feed wad of plastic through rollers (A) and (C). Plastic will now
be feeding o of both rolls.
4. When feed roll is empty remove core from cradle.
5. Pull cable (E) to release latch.
6. Slowly pull handle (F) forward toward tractor to drop the plastic
roll to the feed postion. After it has dropped push handle back
until it latches.
7. Place new spare roll on top rollers (D).
Caution; keep ngers clear of spinning rollers.
D
E
D
F
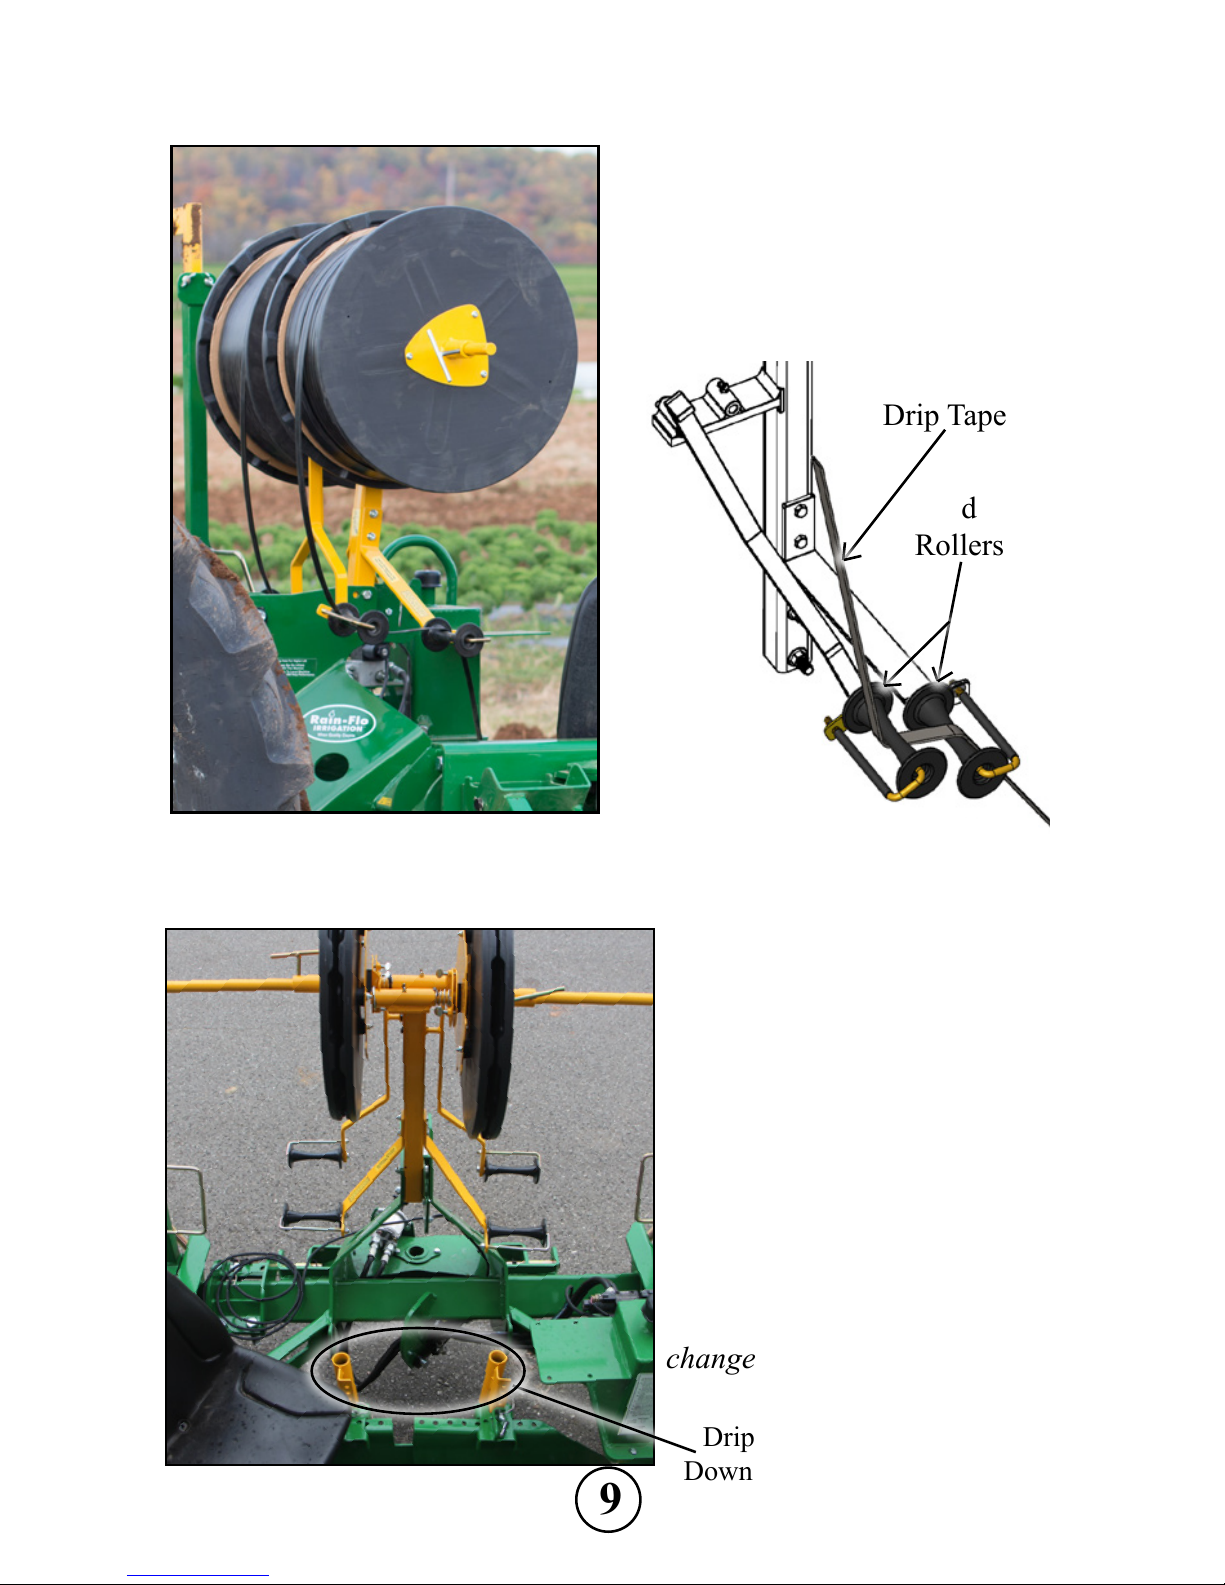
Installing Drip Tape Roll
9
Drip Irr. Tape Placement
Driptape
Down Pipes
Slide drip roll onto roll carrier rod so
that drip emitter will be turned up toward
plastic (for less clogging).
Feed drip tape through the rst guide
on the swing arm and through the second
guide that’s bolted on the drip roll carrier
frame. (See illustration below.)
NOTE;
Make sure
drip roll is
compressed rmly
between plates,
for positive braking eect.
Feed driptape through the
guides on the spool carrier and
into the driptape down pipe.
To avoid damaging driptape
with the press pan, adjust top
of down pipe about 1” to 2”
below the plastic mulch.
Turn drip emitters up toward
the plastic for less clogging.
Changing compression will
change driptape bury depth.
Drip Tape
Guides /
Rollers
Shown with optional double drip attachment.
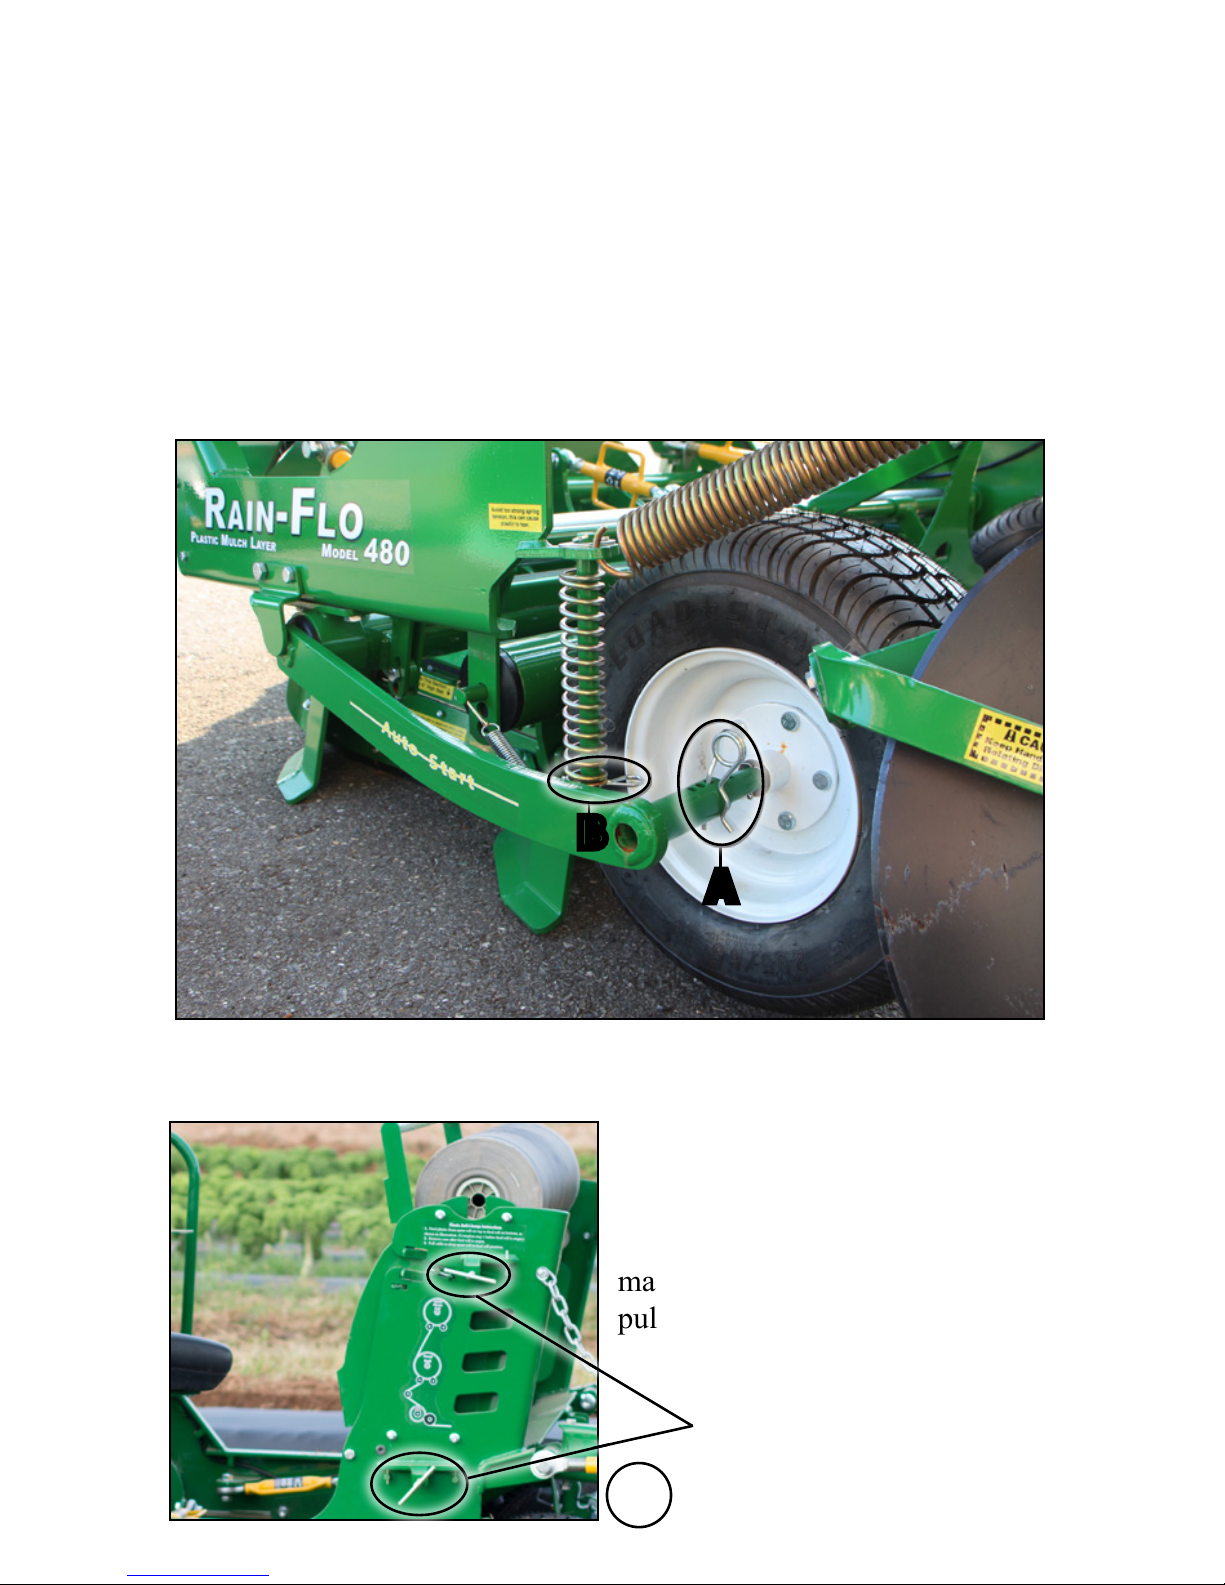
Press Wheel Adjustment
Press wheels need to run at the bottom of the trench and not on the
side to stretch the plastic properly. Adjust the position of the press
wheel using pin (A).
After bed height/width is changed press wheels need to be adjusted
according.
The spring provides down pressure on the press wheel and is
important for Auto-Start. Adjust the down pressure by using pin (B).
Avoid excessive spring tension which can cause the plastic to tear.
Plastic Tension
Plastic rolls have a tension brake.
Just a slight tension is needed.
Setting brake tension too tight
may aect the performance of the
machine and can cause plastic to
pull out from under press wheels.
Tension
Brake
Adjustment
10
A
B
Table of contents


