RAM PRODUCTS Mystisa 2 User manual

182 Ridge Road, Suite D, Dayton, N.J 08810 Phone: 732.651.5500
OWNER’S MANUAL
Please take a moment to read this manual prior to operation!
LAB
SLIM
E-TYPE
1219 – Rev0
Brushless Portable Micromotor Set
Brushless Table Top Micromotor Set

1
BRUSHLESS PORTABLE SET INCLUDES
Brushless Handpiece ( Lab Type, Slim Type or E-Type)
Brushless Portable Controller (Gray or Pink Color)
AC Charger
Controller Holder with Belt Clip and Handpiece Holder
Rubber Stand
Set-Up
Please carefully inspect upon setting up.
There is a protective plastic film over the LCD which can be removed.
Do not wipe LCD screen with any abrasives or chemicals.
We suggest a microfiber cloth or isoprophyl alcohol.
FRONT
Motor: Handpiece motor cord plugs into the male motor connector on the
left side. Simply align the groove on the black plastic handpiece connector
to the motor connector.
1
On-Off, Standby / Pause, Speed Control: Turn the speed dial knob clockwise
(to the right) to turn the Mystisa 2 power on and off. Turning the speed dial
can adjust the speed on the display from 0-35.
Push the speed dial in to pause, stopping the motor rotation
2
LCD Color Display
Battery Level Remaining:
4 Bars: 100% Full Charge
3 Bars: 75%
2 Bars: 50%
1 Red Bar: 25%
Battery Meter
will Start to
Flash if Low
Battery
Green Arrow:
Reverse Direction
Red Arrow:
Forward Direction
Speed:
2 Digits
x1,000rpms
3
TOP
RPM
3
If Speed
is Flashing,
Indicates
Pause or
Standby
1 2

Plastic Controller Holder: Convenient acrylic plastic securely holds the
controller by sliding in the rear and gently pulling back the 2 front clips, one by
one to lock in the controller. On the left side is the handpiece holder which can
be adjusted by the Phillips screw to angle upward if resting on the table or
desktop. Bottom plastic clip can fit over a belt or pants.
4
Forward/Reverse: Change speed direction by pressing the F/R button on the
left side.
5
Only 16mm in diameter is now our smallest and thinnest handpiece designed for
comfort. Available for 3/32” chuck type only.
Twist the knurled ring counter clockwise to conveniently change bits.
Mystisa 2
Slim Type
Mystisa 2
Lab Type
Mystisa 2
E-Type
18mm diameter with heavy-duty front-end bearings for extended working hours.
Turn the knurled ring ¼turn clockwise to conveniently change bits.
Available for either 3/32” chuck type or 1/8” chuck type.
Allows for versatility to
connect standard e-type
handpieces which can
also be autoclaved for
intraoral use
Connect the A/C Charger adapter to charge or to use A/C power by plugging
in the proper adapter on the right side.
6
4 5 6
HANDPIECES
HOLDER LEFT RIGHT
2

3
ERROR CODES
E1 —Check handpiece connection or no connection.
E2 —Battery low power. Needs to recharged.
E3 —Controller has electronical problem.
BRUSHLESS TABLE TOP SET INCLUDES
Brushless Handpiece ( Lab Type, Slim Type or E-Type)
Brushless Table Top Controller (White Color)
AC Universal Power Supply with Cord (100-240V)
Set-Up
1
3
7
5
2
4
6
LCD Color Display: Operation indicator, speed display and error alerts.
3
Hand/Foot: When set in the hand position, the hand indicator light will turn on,
the speed is completely controlled by the speed dial knob. When set in the foot
pedal mode, the foot indicator light will turn on, the speed is controlled by the
settings of the knob when using the on/off pedal.
4
Forward/Reverse: Change handpiece direction to forward or reverse.
5
Bits Holder: Convenient built-in 6 bits holder.
6
Handpiece Holder: Convenient built-in handpiece holder.
7
Motor: Handpiece motor cord plugs into the male motor connector on the
left side. Simply align the groove on the black plastic handpiece connector
to the motor connector.
1
On-Off, Standby / Pause, Speed Control: Turn the speed dial knob clockwise
(to the right) to turn the Mystisa 2 power on and off. Turning the speed dial
can adjust the speed on the display from 0-35.
Push the speed dial in to pause, stopping the motor rotation.
2
Compact Size is Ideal for Table Top (3.6”x3.3”)
Fits Mystisa 2 Brushless Handpieces Only

4
•Keep the handpiece clean of dust and grindings as best as possible.
•Wipe the handpiece down only with isopropyl alcohol gently and avoid getting
the inside components wet. It is normal for the handpiece to feel slightly warm
after continued usage.
•Do not oil the handpiece and do not clean with water (bearings are grease sealed).
•Clean gently with a can of compressed air.
•1 Year on Control Box and 6 Months on Handpiece
(Warranty does not include misuse or normal wear of consumable parts)
•Controller uses a Li-on Lithium Ion battery which can be recharged
approximately 500 times or has an approximate 5 years life.
Use the battery and enjoy the freedom and flexibility.
•In case of contact with liquids or body skin or eyes wash immediately.
•In case of shorter operating time between charging or if slower
speeds, it could indicate the battery is wearing or not charging
properly. Li-on batteries do not have a memory affect and do not
need complete discharge.
The battery is user replaceable.
Suggested Maintenance
Battery Warning
Warranty
Use bits conforming to ISO standards
Transport and storage conditions:
Temperature: -4 ~ 140 °F
Humidity: 0 ~ 90% RH
Atmospheric Pressure: 500hPa to 1060xhPa
Caution:
1Be careful not to drop
the handpiece as it may
damage the bearings.
2If dropped, check if the
bit is bent or if any
excessive heat or nois
is generated, operating
it slowly and carefully.
5Do not put
the handpiece
down before
it stops rotating
completely.
6Use safe
rotating speeds
suggested by
the bur
manufacturer.
7Keep the
workplace
clean. Debris
may cause an
accident.
Always wear
proper eye
protection.
4Always keep a bur or
blank mandrel in the
handpiece.
3Do not turn on the
power of the controller
while the collet of the
handpiece is in the
unlocked open position.

WARRANTY PERIOD
PRODUCT WARRANTY
WARRANTY CLAIMS
Warranty is valid within the United States only.
ELECTRICAL EQUIPMENT - These products are under warranty for a
period of ONE YEAR from the date of original installation by the
purchaser.
HANDPIECES - These products are under warranty for a period of SIX
MONTHS from the date of original installation by the purchaser. IT DOES
NOT COVER MISUSE, NORMAL BEARING, OR CARBON BRUSH WEAR.
IN HOUSE OR FACTORY REPAIR - Repairs made under warranty will
be honored until the completion of the original product warranty
period. SHIPPING AND HANDLING CHARGES ARE NOT COVERED
WITHIN THE WARRANTY.
All returned items shall be free from defects/alterations in material,
workmanship and original product design.
• The product shall have been used under the conditions for which it
has been intended, and in a manner for which it has been designed.
• The product shall have been operated in a manner for which it was
intended and in the proper environmental conditions.
• The customer must maintain the product as specified within the
individual product instruction booklet.
Electrical and mechanical equipments and accessories which are
mishandled, used incorrectly, and/or used for a purpose other than
that for which they were designed and intended, will void the product
warranty.
Should your product require service attention within the warranty
period, we will elect to make the necessary repair or replacement at
no charge and providing the product is delivered prepaid to the
proper address. However it is recommended that returns be
adequately insured against carrier loss or damage.
All claims should describe the specific problem for accurate analysis
and evaluation, the return date of the warranty card along with the
supply house and/or dealer name.
No product replacement is permitted without prior authorization.
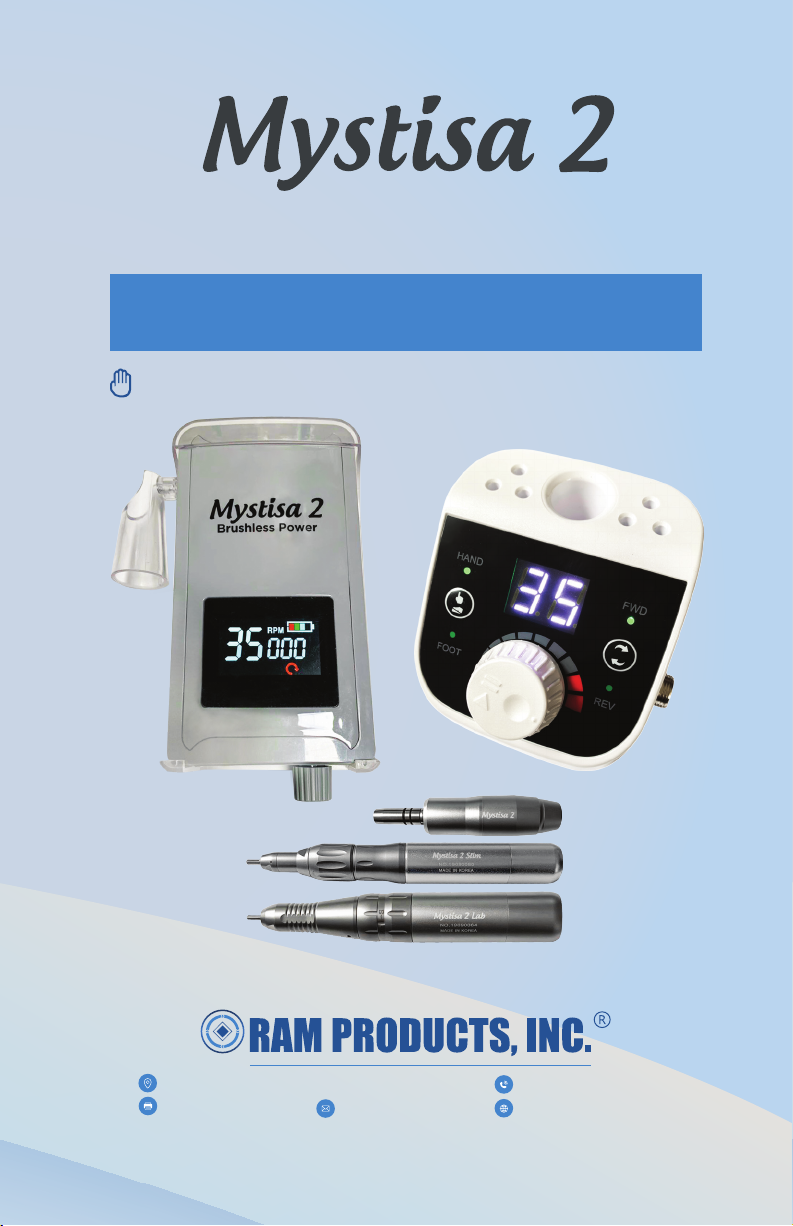
PRODUCT:
SERIAL NO.:
PURCHASE FROM:
PURCHASE DATE:
INSTALLATION DATE:

www.ramhp.com
1-732-651-5500 www.ramhp.com
1-732-651-6688
182 Ridge Road Suite D, Dayton, NJ 08810
WARRANTY REGISTRATION
REGISTER ONLINE at www.ramhp.com/warranty
In order to validate your warranty, this card must be filled out
completely and mailed within 10 days of purchase/installation.
PLEASE PRINT OR TYPE
NAME:
ADDRESS.:
CITY:
STATE: ZIP CODE:
PRODUCT:
CITY:
SERIAL NO(S).:
PURCHASE DATE:
INSTALLATION DATE:
DEALER OR SUPPLY HOUSE NAME AND ADDRESS:
The short survey below is designed to improve the service and quality
of product supplied to our customers. Please take a few minutes to
complete the survey.
Did the item arrive in a satisfactory condition? YES or NO?
If NO please explain:
Did the instruction manual provide all details clearly for proper
installation and operation? YES or NO? If NO please explain:
What factor(s) were involved in your decision to purchase this product:
Advertisement Previous Purchase of a Ram Product
Distributor Recommendation Recommendation by Colleague
Any feedback, comments or suggestions:
Thank you for your feedback.

Table of contents
Popular Power Tools manuals by other brands

Bosch
Bosch GBH 36 V-EC Compact Professional Original instructions

Challenge Xtreme
Challenge Xtreme J-123 quick start guide

Ferm
Ferm prm1015 Original instructions

Stanley
Stanley SJ45 manual

Milwaukee
Milwaukee K?500?ST Original instructions

PCB Piezotronics
PCB Piezotronics J353B34 Installation and operating manual