RAM TRX 2022 Specification sheet

2022 RAM TRX
PERFORMANCE FEATURES GUIDE
P68565555AA
SECOND EDITION
©2021 FCA US LLC. All Rights Reserved. Tous droits réservés. Ram is a registered trademark of FCA US LLC.
Ram est une marque déposée de FCA US LLC. App Store is a registered trademark of Apple Inc. Google Play Store is a registered trademark of Google.
SCAN TO ACCESS YOUR
VEHICLE’S VIDEO PLAYLIST


TABLE OF CONTENTS
1
2
3
4
5
6
7
8
9
10
1 INTRODUCTION ..............................................................................................................................4
2 GETTING TO KNOW YOUR VEHICLE ................................................................................... 7
3 GETTING TO KNOW YOUR INSTRUMENT PANEL ..........................................................9
4 STARTING AND OPERATING ..................................................................................................17
5 MULTIMEDIA .................................................................................................................................37
6 SAFETY ........................................................................................................................................... 61
7 IN CASE OF EMERGENCY ...................................................................................................... 64
8 SERVICING AND MAINTENANCE ........................................................................................ 74
9 TECHNICAL SPECIFICATIONS ...............................................................................................87
10 INDEX ............................................................................................................................................... 90
22_DT_TRX_SU_EN_USC_t.book Page 1

2
INTRODUCTION
SYMBOLS KEY...........................................................5
SLIDE-IN CAMPERS .................................................5
Camper Applications ..........................................5
VEHICLE MODIFICATIONS/ALTERATIONS.............5
SYMBOL GLOSSARY.................................................5
GETTING TO KNOW YOUR VEHICLE
EXTERIOR LIGHTS.....................................................7
Headlight Switch.................................................7
INTERIOR STORAGE AND EQUIPMENT..................7
Storage................................................................7
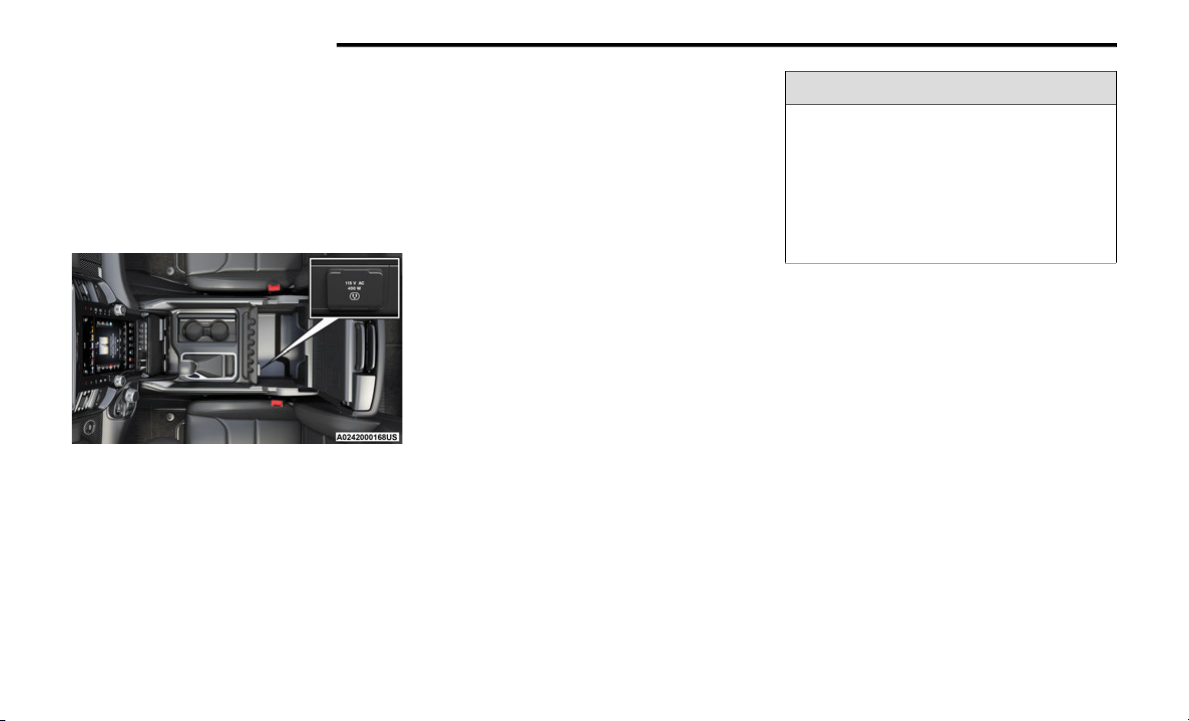
Power Inverter — If Equipped ............................8
GETTING TO KNOW YOUR
INSTRUMENT PANEL
INSTRUMENT CLUSTER............................................9
Premium Instrument Cluster Descriptions —
Gasoline ............................................................10
INSTRUMENT CLUSTER DISPLAY ........................ 10
Instrument Cluster Display Controls ...............11
Display Menu Items .........................................11
TRX Drive Mode ................................................15
WARNING LIGHTS AND MESSAGES ................... 15
Drive Mode Indicator Lights.............................16
STARTING AND OPERATING
ENGINE BREAK-IN RECOMMENDATIONS 6.2L
SUPERCHARGED ENGINE ....................................17
AUTOMATIC TRANSMISSION ...............................17
Ignition Park Interlock......................................18
Brake/Transmission Shift Interlock (BTSI)
System .............................................................18
8–Speed Automatic Transmission .................19
FOUR-WHEEL DRIVE OPERATION ........................23
Four-Position Electronically Shifted Transfer
Case .................................................................23
Selec-Speed Control (SSC) .............................26
TRX Modes........................................................27
AXLE LOCKER SYSTEM..........................................30
DRIVING TIPS..........................................................30
On-Road Driving Tips........................................30
Off-Road Driving Tips .......................................31
MULTIMEDIA
PERFORMANCE PAGES.........................................37
Timers ...............................................................38
Gauges..............................................................39
G-Force..............................................................40
Dynamometer (Dyno)/Engine..........................40
Vehicle Dynamics .............................................42
DRIVE MODES ........................................................ 43
On-Road ............................................................44
Off-Road............................................................48
Custom Mode ...................................................50
Guidelines For A Session Or Extreme
Off-Road Use ....................................................59
Valet Mode .......................................................60
SAFETY
SAFETY FEATURES ................................................ 61
Electronic Stability Control (ESC) ...................61
ESC Operating Modes......................................62
SAFETY TIPS........................................................... 62
Fluid Leaks .......................................................62
IN CASE OF EMERGENCY
JACKING AND TIRE CHANGING .......................... 64
Preparations For Jacking.................................64
Jack Location....................................................64
Removal Of Jack And Tools .............................65
Removing The Spare Tire ................................66
Jacking Instructions .........................................67
To Stow The Flat Or Spare ..............................71
Reinstalling The Jack And Tools......................72
FRONT AND REAR TOW HOOKS.......................... 73
22_DT_TRX_SU_EN_USC_t.book Page 2

3
SERVICING AND MAINTENANCE
SCHEDULED SERVICING ...................................... 74
Maintenance Plan ............................................75
ENGINE COMPARTMENT ...................................... 79
6.2L Supercharged Engine (Beauty Cover
Removed)..........................................................79
VEHICLE MAINTENANCE ......................................80
Engine Oil — Gas Engine .................................80
Engine Oil Filter ................................................80
Engine Air Cleaner Filter ..................................81
Cooling System ................................................83
Fuses.................................................................84
INTERIORS .............................................................86
Suede Steering Wheel Cleaning......................86
TECHNICAL SPECIFICATIONS
FUEL REQUIREMENTS........................................... 87
6.2L Supercharged Engine..............................87
FLUID CAPACITIES ................................................ 87
ENGINE FLUIDS AND LUBRICANTS .................... 88
GENERAL INFORMATION...................................... 89
22_DT_TRX_SU_EN_USC_t.book Page 3

4
INTRODUCTION
Dear Customer,
This Supplement has been prepared with the assistance of service and engineering specialists to acquaint you with the operation and maintenance of your Ram.
Within this information, you will find a description of the services that FCA US LLC offers to its customers. Please take the time to read all of this publication
carefully before driving your vehicle for the first time. Following the instructions, recommendations, tips, and important warnings in this manual will help ensure
safe and enjoyable operation of your vehicle. For additional information, refer to your vehicle’s Owner’s Manual.
Following the instructions and recommendations provided herein will help ensure safe and reliable operation of your vehicle. After you have read the booklet, it
should be stored in the vehicle for convenient reference and remain with the vehicle when sold.
When it comes to service, remember that authorized dealers know your Ram best, have factory-trained technicians, genuine Mopar® parts, and care about your
satisfaction.
22_DT_TRX_SU_EN_USC_t.book Page 4

5
SYMBOLS KEY
If you do not read the entire Owner’s Manual, you may miss important
information. Observe all Cautions and Warnings.
SLIDE-IN CAMPERS
CAMPER APPLICATIONS
This vehicle is not recommended for slide-in camper applications.
VEHICLE MODIFICATIONS/ALTERATIONS
SYMBOL GLOSSARY
Some car components have colored labels with symbols indicating
precautions to be observed when using this component. It is important to
follow all warnings when operating your vehicle. See below for the definition of
each symbol Úpage 15.
NOTE:
Warning and Indicator lights are different based upon equipment options and
current vehicle status. Some telltales are optional and may not appear.
WARNING!
These statements are against operating
procedures that could result in a collision, bodily
injury and/or death.
CAUTION! These statements are against procedures that
could result in damage to your vehicle.
NOTE:
A suggestion which will improve installation,
operation, and reliability. If not followed, may result
in damage.
TIP: General ideas/solutions/suggestions on easier
use of the product or functionality.
PAGE REFERENCE
ARROW Follow this reference for additional information on
a particular feature.
FOOTNOTE
Supplementary and relevant information
pertaining to the topic.
WARNING!
Any modifications or alterations to this vehicle could seriously affect its
roadworthiness and safety and may lead to a collision resulting in serious
injury or death.
Drive Mode Indicator Lights
Sport Mode Indicator Light
Úpage 16
1
22_DT_TRX_SU_EN_USC_t.book Page 5

6
Snow Mode Indicator Light
Úpage 16
Tow Mode Indicator Light
Úpage 16
Baja Mode Indicator Light
Úpage 16
Mud/Sand Mode Indicator Light
Úpage 16
Drive Mode Indicator Lights
Rock Mode Indicator Light
Úpage 16
Custom Mode Indicator Light
Úpage 16
Valet Mode Indicator Light
Úpage 16
Drive Mode Indicator Lights
22_DT_TRX_SU_EN_USC_t.book Page 6

7
GETTING TO KNOW YOUR VEHICLE
EXTERIOR LIGHTS
HEADLIGHT SWITCH
The headlight switch controls the clearance lamps
and the front and rear identification lamps. The
clearance lamps and the front and rear
identification lamps will turn on when the switch is
in the On, AUTO, or parking lights position. These
lamps are activated to allow other drivers to spot
and identify the vehicle.
Headlight Switch
Refer to “Exterior Lights” in “Getting To Know Your
Vehicle” in the Owner’s Manual for further
information.
INTERIOR STORAGE AND EQUIPMENT
STORAGE
Center Console Storage Area
The center console storage area consists of a
cubby bin (located in front of the gear selector) and
two cupholders (located to the right of the gear
selector). If equipped with a wireless charging pad,
it will be located within the cubby bin.
To access the cupholders, push on the cover to
open it.
Center Console Storage Area
NOTE:
The metal badge on the top of the center console
lid will get hot to the touch if the console lid is
exposed to direct sunlight, or if the vehicle is
exposed to an extremely high temperature envi-
ronment.
1 — Parking Lights Position
2 — Headlights On Position
3 — AUTO Position
1 — Cubby Bin (With Wireless Charging Pad)
2 — Cupholders
2
22_DT_TRX_SU_EN_USC_t.book Page 7

8GETTING TO KNOW YOUR VEHICLE
POWER INVERTER — IF EQUIPPED
A 115 Volt (400 Watt maximum) inverter may be
located inside the center console storage area.
This inverter can power cellular phones,
electronics and other low-power devices requiring
power up to 400 Watts. Certain video game
consoles exceed this power limit, as will most
power tools.
Center Console Power Inverter Outlet
The outlet remains off when no device is plugged
in. To turn on the power outlet, simply plug in a
device.
NOTE:
The power inverter only turns on if the ignition is
in the ACC or ON/RUN position.
Due to a built-in overload protection, the power
inverter shuts down if the power rating is
exceeded.
WARNING!
To avoid serious injury or death:
Do not insert any objects into the receptacles.
Do not touch with wet hands.
Close the lid when not in use.
If this outlet is mishandled, it may cause an
electric shock and failure.
22_DT_TRX_SU_EN_USC_t.book Page 8

9
GETTING TO KNOW YOUR INSTRUMENT PANEL
INSTRUMENT CLUSTER
3
22_DT_TRX_SU_EN_USC_t.book Page 9

10 GETTING TO KNOW YOUR INSTRUMENT PANEL
PREMIUM INSTRUMENT CLUSTER
D
ESCRIPTIONS — GASOLINE
1. Tachometer
Indicates the engine speed in revolutions
per minute (RPM x 1000).
2. Instrument Cluster Display
When the appropriate conditions exist, this
display shows the instrument cluster
display messages.
3. Speedometer
Indicates vehicle speed.
4. Temperature Gauge
The pointer shows engine coolant tempera-
ture. The pointer positioned within the
normal range indicates that the engine
cooling system is operating satisfactorily.
The pointer will likely indicate a higher
temperature when driving in hot weather,
up mountain grades, or when towing a
trailer. It should not be allowed to exceed
the upper limits of the normal operating
range.
5. Fuel Gauge
The pointer shows the level of fuel in the
fuel tank when the ignition is in the ON/RUN
position.
The fuel pump symbol points to the
side of the vehicle where the fuel
door is located.
INSTRUMENT CLUSTER DISPLAY
Your vehicle is equipped with an instrument cluster
display, which offers useful information to the
driver. With the ignition in the OFF mode, opening/
closing of a door will activate the display for
viewing, and display the total miles, or kilometers,
in the odometer. Your instrument cluster display is
designed to display important information about
your vehicle’s systems and features. Using a driver
interactive display located on the instrument
panel, your instrument cluster display can show
you how systems are working and give you
warnings when they are not. The steering wheel
mounted controls allow you to scroll through the
main menus and submenus. You can access the
specific information you want and make selections
and adjustments.
WARNING!
A hot engine cooling system is dangerous. You or
others could be badly burned by steam or boiling
coolant. It is recommended to call an authorized
dealer for service if your vehicle overheats
Úpage 83.
CAUTION!
Driving with a hot engine cooling system could
damage your vehicle. If the temperature gauge
reads “H,” pull over and stop the vehicle. Idle the
vehicle with the air conditioner turned off until
the pointer drops back into the normal range. If
the pointer remains on the “H,” turn the engine
off immediately and call an authorized dealer for
service.
22_DT_TRX_SU_EN_USC_t.book Page 10

GETTING TO KNOW YOUR INSTRUMENT PANEL 11
INSTRUMENT CLUSTER DISPLAY
C
ONTROLS
The instrument cluster display features a driver
interactive display that is located in the instrument
cluster.
Instrument Cluster Display/Controls Location
The instrument cluster display menu items may
consist of the following:
Vehicle Info
Performance
Off Road
Diagnostics
Speed Warning
Settings
DISPLAY MENU ITEMS
Push and release the up or down arrow
button until the desired selectable menu icon is
highlighted in the instrument cluster display.
Vehicle Info
Push and release the up or down arrow
button until the Vehicle Info menu icon is displayed
in the instrument cluster display. Push and release
the left or right arrow button to scroll
through the information submenus and push and
release the OK button to select or reset the
resettable submenus.
See below for gauges your vehicle may be
equipped with:
Performance Features — If Equipped
Push and release the up or down arrow
button until the Performance icon/title is
highlighted in the instrument cluster display. Push
and release the left or right arrow button to
scroll through the performance feature submenus.
1 – Instrument Cluster Display Controls
2 – Instrument Cluster Display Screen
Tire Pressure
Monitor
System
Oil Life InterCooler
Temp
Trans
Temperature
Intake Air
Temp Oil Pressure
Coolant
Temperature Engine Torque Oil
Temperature
Battery
Voltage Air-Fuel Ratio Engine Power
Gauge
Summary
Coolant
Temp
Trans Temp
Oil Temp
Oil Pressure
Boost
Pressure Engine Hours
WARNING!
Measurement of vehicle statistics with the
Performance Features is intended for
off-highway or track use only and should not be
done on any public roadways. It is recommended
that these features be used in a controlled
environment and within the limits of the law. The
capabilities of the vehicle as measured by the
performance pages must never be exploited in a
reckless or dangerous manner, which can
jeopardize the user’s safety or the safety of
others. Only a safe, attentive, and skillful driver
can prevent accidents.
3
22_DT_TRX_SU_EN_USC_t.book Page 11

12 GETTING TO KNOW YOUR INSTRUMENT PANEL
The Performance Features include the following:
Braking Distance
Distance
From Speed
G-Forces
Current
Peak
Lap Timer
Current lap time
Lap History
Will list the last four laps with the best lap high-
lighted in green.
Top Speed
Top speed reached
Off Road
Push and release the up or down arrow
button until the Off Road menu icon is displayed in
the instrument cluster display. Push and release
the left or right arrow button to scroll
through the information submenus.
Drivetrain
Front Wheel Angle: displays the graphical
and numerical value of calculated average
front wheel angle from the steering wheel
orientation.
Transfer Case Lock Status: displays “Lock”
graphic only during 4WD Low status.
Axle Lock Status: displays rear only axle
locker graphic.
Pitch And Roll
Displays the pitch and roll of the vehicle in
the graphic with the angle number on the
screen.
NOTE:
When vehicle speed becomes too high to display
the pitch and roll, “- -” will display in place of the
numbers, and the graphic will be greyed out. A
message indicating the necessary speed for the
feature to become available will also display.
Wheel Articulation
Displays the range of vertical height.
When height is normal, axle half shaft is
gray. When any level above or below
normal, axle half shaft is yellow.
When Min or Max wheel height is reached,
the max/min vertical height level indicator
will become yellow.
Speed Timers
0-60 MPH
(0-100 km/h) Timer
Best
Last
Current
0-100 MPH
(0-160 km/h) Timer
Best
Last
Current
Drag Timers
0-60 feet
(0-20 meters)/
Reaction Timer
Best
Last
Current
NOTE:
Reaction Time result is
shown only on the 60 ft
timer tab.
0-330 feet
(0-100 meters) Timer
Best
Last
Current
1/8 Mile (200 meters)
Timer
Best
Last
Current
0-1000 feet
(0-300 meters) Timer
Best
Last
Current
1/4 Mile (400 meters)
Timer
Best
Last
Current
Drag Timers
22_DT_TRX_SU_EN_USC_t.book Page 12

GETTING TO KNOW YOUR INSTRUMENT PANEL 13
Diagnostics
Push and release the up or down arrow
button until the Diagnostics icon/title is
highlighted in the instrument cluster display. Push
and release the OK button to display the diagnostic
trouble codes and descriptions. When the end of
the list is reached, “No or End of Diagnostic Code”
will appear in the instrument cluster display.
Speed Warning
Push and release the up or down arrow
button until the Speed Warning Menu icon/title is
displayed in the instrument cluster display. Push
and release OK to enter speed warning. Use the
up or down arrow button to select a desired
speed, then push and release OK to set the speed.
The white passive speed limiter telltale will light up
with a notification text message (Speed Warning
Set to XX, followed by the selected unit). When the
set speed is exceeded, an audible chime will sound
until the speed is no longer exceeded. The white
passive speed limiter telltale will turn yellow and
will flash, and a pop-up message of “Speed
Warning Exceeded” will display.
NOTE:
You can turn the Speed Warning off by using the
up /down arrow button to scroll through
speed list and select OFF at the bottom of the list.
Settings
Head-Up Display (HUD)
NOTE:
The HUD feature Settings are available at any
vehicle speed. Some information like speed limit or
Driver Assist may not appear on the HUD unless
your vehicle is equipped Traffic Sign Assist or
Driver Assist systems.
Push and release the up or down arrow
button until the Settings Menu icon/title is
highlighted in the instrument cluster display. Push
and release the left or right arrow button
until the HUD Menu icon/title is highlighted in the
instrument cluster display. Push and release the
OK button to enter HUD. Use the up or down
arrow button to select a setting, then push and
release the OK button to adjust the setting.
ON/OFF
HUD ON/OFF
When “Display On” is selected, the HUD will
display on the windshield. When it is not
selected, no display on the windshield.
Content and Layout
Simple: Speed, Speed Limit
Standard: Speed, Speed Limit, Navigation
Standard Mode
3
22_DT_TRX_SU_EN_USC_t.book Page 13

14 GETTING TO KNOW YOUR INSTRUMENT PANEL
When “Standard” mode is selected, the
HUD image is split into thirds with the speed
limit indicator shown to the left, vehicle
speed in the center, and turn-by-turn navi-
gation to the right.
Advanced: Speed, Speed Limit, Navigation,
Driver Assist (ACC/Cruise, LaneSense,
Highway Assist/Highway Assist+), Gear
Advanced Mode
When “Advanced” mode is selected, the HUD
displays the vehicle speed, turn-by-turn naviga-
tion, speed limit, driver assist function(s), and
current gear.
Custom 1: Speed, Speed Limit
Custom 2: Speed, Speed Limit, Navigation
Custom 3: Speed, Speed Limit, Navigation,
Driver Assist (ACC/Cruise, LaneSense,
Highway Assist/Highway Assist+)
Custom 4: Speed, Speed Limit, Navigation,
Driver Assist (ACC/Cruise, LaneSense,
Highway Assist/Highway Assist+), Gear
Display Height
Brightness
Expanded Example of HUD Display
NOTE:
The HUD basic settings (Brightness, Display Height
and Non Custom layouts), are controlled through
the Settings Screen in the Instrument Cluster
Úpage 10.
Screen Setup Driver Selectable Items
Push and release the up or down arrow
button until the Settings Menu Icon/Title is
highlighted in the instrument cluster display. Push
and release the OK button to enter the submenus
and follow the prompts on the screen as needed.
The Settings feature allows you to change what
information is displayed in the instrument cluster
as well as the location that information is
displayed.
NOTE:
The Settings feature is only available when the
vehicle speed is less than 5 mph (8 km/h).
Upper Left or Right
None Compass Outside Temp
Time Range Average Econ
Current Econ Trip A Distance Trip B Distance
Trailer Trip – If
Equipped
Trailer Brake –
If Equipped
Oil Pressure –
If Equipped
Coolant
Temp – If
Equipped
Battery
Voltage – If
Equipped
Oil Life – If
Equipped
Oil
Temperature –
If Equipped
Transmission
Temperature –
If Equipped
Favorite Menus
Speedometer Vehicle Info Performance
Off Road
Driver Assist
(show/hide) –
If Equipped
Fuel Economy
(show/hide)
22_DT_TRX_SU_EN_USC_t.book Page 14

GETTING TO KNOW YOUR INSTRUMENT PANEL 15
Current Gear
Off (D)
On (D1, D2, D3,...)
Odometer
No Decimal Point
Decimal Point
Defaults (Restores All Settings To Default Settings)
Cancel
Restore
TRX DRIVE MODE
Drive Mode Buttons
Push and release the left or right drive mode
arrow button to change between the different Drive
Modes. A pop-up will appear in the instrument
cluster display to assist with choosing the desired
drive mode. A drive mode status indicator will
appear in the instrument cluster display
Úpage 16. You can also double push on the TRX
button to go directly to Custom Mode Úpage 50.
NOTE:
The selected drive mode will be applied once the
instrument cluster pop-up times out due to lack of
additional presses of the left or right arrow
button Úpage 43.
WARNING LIGHTS AND MESSAGES
The warning/indicator lights will illuminate in the
instrument panel together with a dedicated
message and/or acoustic signal when applicable.
These indications are indicative and precautionary
and as such must not be considered as exhaustive
and/or alternative to the information contained in
the Owner’s Manual, which you are advised to read
carefully in all cases. Always refer to the
information in this chapter in the event of a failure
indication. All active telltales will display first if
applicable. The system check menu may appear
different based upon equipment options and
current vehicle status. Some telltales are optional
and may not appear.
Trip Info
(show/hide)
Trailer Tow
(show/hide)
Audio (show/
hide)
Diagnostics Settings Messages
(Stored)
Left and Right Side
None Transmission
Temp Oil Temp
Range To
Empty Coolant Temp Menu Icon
Average Econ Oil Life
Lower Left and Right – If Equipped
None Compass Outside Temp
Time Range To
Empty Average Econ
Current Econ Trip A Distance Trip B Distance
Trailer Trip – If
Equipped
Trailer Brake –
If Equipped Oil Pressure
Coolant
Temperature
Oil
Temperature
Battery
Voltage
Transmission
Temperature Oil Life
Favorite Menus
1 – Left Drive Mode Arrow
2 – Right Drive Mode Arrow
3
22_DT_TRX_SU_EN_USC_t.book Page 15

16 GETTING TO KNOW YOUR INSTRUMENT PANEL
DRIVE MODE INDICATOR LIGHTS
Sport Mode Indicator Light
This light will turn on when Sport Mode is
active Úpage 44.
Snow Mode Indicator Light
This light will turn on when Snow Mode is
active Úpage 46.
Tow Mode Indicator Light
This light will turn on when Tow Mode is
active Úpage 45.
Baja Mode Indicator Light
This light will turn on when Baja Mode is
active Úpage 50.
Mud/Sand Mode Indicator Light
This light will turn on when Mud/Sand
Mode is active Úpage 48.
Rock Mode Indicator Light
This light will turn on when Rock Mode is
active Úpage 49.
Custom Mode Indicator Light
This light will turn on when Custom Mode
is active Úpage 50.
Valet Mode Indicator Light
This light will turn on when Valet Mode is
active Úpage 60.
22_DT_TRX_SU_EN_USC_t.book Page 16

17
(Continued)
STARTING AND OPERATING
ENGINE BREAK-IN RECOMMENDATIONS
6.2L SUPERCHARGED ENGINE
The following tips will be helpful in obtaining
optimum performance and maximum durability for
your new vehicle.
Engine break-in occurs mainly during the first
500 miles (805 km) and continues through the
first oil change interval.
It is recommended for the operator to observe the
following driving behaviors during the break-in
period:
0 to 100 miles (0 to 161 km):
Do not allow the engine to operate at idle for an
extended period of time.
Press the accelerator pedal slowly and not more
than halfway to avoid rapid acceleration.
Avoid aggressive braking.
Drive with the engine speed below 3,500 RPM.
Maintain vehicle speed below 55 mph
(88 km/h) and observe local speed limits.
100 to 300 miles (161 to 483 km):
Press the accelerator pedal slowly and not more
than halfway to avoid rapid acceleration in lower
gears (FIRST to THIRD gears).
Avoid aggressive braking.
Drive with the engine speed below 5,000 RPM.
Maintain vehicle speed below 70 mph
(112 km/h) and observe local speed limits.
300 to 500 miles (483 to 805 km):
Exercise the full engine RPM range, shifting
manually (paddles or gear shift) at higher RPM
when possible.
Do not perform sustained operation with the
accelerator pedal at wide open throttle.
Maintain vehicle speed below 85 mph
(136 km/h) and observe local speed limits.
For the first 1,500 miles (2,414 km):
Do not participate in towing, high-speed
off-roading or similar activities.
NOTE:
Check engine oil with every refueling and add if
necessary. Oil and fuel consumption may be higher
through the first oil change interval. Running the
engine with an oil level below the add mark can
cause severe engine damage.
AUTOMATIC TRANSMISSION
You must press and hold the brake pedal while
shifting out of PARK.
WARNING!
Never use the PARK position as a substitute
for the parking brake. Always apply the
parking brake fully when exiting the vehicle to
guard against vehicle movement and possible
injury or damage.
Your vehicle could move and injure you and
others if it is not in PARK. Check by trying to
move the transmission gear selector out of
PARK with the brake pedal released. Make
sure the transmission is in PARK before
exiting the vehicle.
The transmission may not engage PARK if the
vehicle is moving. Always bring the vehicle to a
complete stop before shifting to PARK, and
verify that the transmission gear position indi-
cator solidly indicates PARK (P) without
blinking. Ensure that the vehicle is completely
stopped, and the PARK position is properly
indicated, before exiting the vehicle.
4
22_DT_TRX_SU_EN_USC_t.book Page 17

18 STARTING AND OPERATING
(Continued)
IGNITION PARK INTERLOCK
This vehicle is equipped with an Ignition Park
Interlock which requires the transmission to be in
PARK before the ignition can be turned to the OFF
position. This helps the driver avoid inadvertently
leaving the vehicle without placing the
transmission in PARK. This system also locks the
transmission in PARK whenever the ignition is in
the OFF position.
NOTE:
The transmission is NOT locked in PARK when the
ignition is in the ACC position (even though the
engine will be off). Ensure that the transmission is
in PARK, and the ignition is OFF (not in ACC
position) before exiting the vehicle.
BRAKE/TRANSMISSION SHIFT
I
NTERLOCK (BTSI) S YSTEM
This vehicle is equipped with a BTSI system that
holds the transmission gear selector in PARK
unless the brakes are applied. To shift the
transmission out of PARK, the engine must be
running and the brake pedal must be pressed.
The brake pedal must also be pressed to shift from
NEUTRAL into DRIVE or REVERSE when the vehicle
is stopped or moving at low speeds.
It is dangerous to shift out of PARK or
NEUTRAL if the engine speed is higher than
idle speed. If your foot is not firmly pressing
the brake pedal, the vehicle could accelerate
quickly forward or in reverse. You could lose
control of the vehicle and hit someone or
something. Only shift into gear when the
engine is idling normally and your foot is firmly
pressing the brake pedal.
Unintended movement of a vehicle could
injure those in or near the vehicle. As with all
vehicles, you should never exit a vehicle while
the engine is running. Before exiting a vehicle,
always come to a complete stop, then apply
the parking brake, shift the transmission into
PARK, and turn the ignition OFF. When the
ignition is in the OFF position, the transmis-
sion is locked in PARK, securing the vehicle
against unwanted movement.
When exiting the vehicle, always make sure
the ignition is in the OFF position, remove the
key fob from the vehicle, and lock the vehicle.
WARNING!
Never leave children alone in a vehicle, or with
access to an unlocked vehicle. Allowing chil-
dren to be in a vehicle unattended is
dangerous for a number of reasons. A child or
others could be seriously or fatally injured.
Children should be warned not to touch the
parking brake, brake pedal or the transmis-
sion gear selector.
Do not leave the key fob in or near the vehicle
(or in a location accessible to children), and do
not leave the ignition in the ACC or ON/RUN
position. A child could operate power
windows, other controls, or move the vehicle.
CAUTION!
Shift into or out of PARK or REVERSE only after
the vehicle has come to a complete stop.
Do not shift between PARK, REVERSE,
NEUTRAL, or DRIVE when the engine is above
idle speed.
Before shifting into any gear, make sure your
foot is firmly pressing the brake pedal.
WARNING!
22_DT_TRX_SU_EN_USC_t.book Page 18
Table of contents
Other RAM Automobile manuals

RAM
RAM DACOTA 2011 User manual

RAM
RAM RAM 3500 User manual

RAM
RAM 2011 Ram Truck Chassis Cab User manual

RAM
RAM 2500 2017 User manual

RAM
RAM 2500 CNG Owner's manual

RAM
RAM 1500 2020 User manual

RAM
RAM 2014 RAM PROMASTER User manual

RAM
RAM 2500 2021 User manual

RAM
RAM 2013 2500 Tradesman Manual

RAM
RAM promaster 2017 User manual

RAM
RAM TRUCK 1500 2014 Manual

RAM
RAM 1500 2018 Owner's manual

RAM
RAM TRUCK 1500 2014 User manual

RAM
RAM RAM 3500 User manual

RAM
RAM Promaster 2016 User manual

RAM
RAM Ram 3500 2012 User manual

RAM
RAM 2015 1500 User manual

RAM
RAM RAM 2500 User manual

RAM
RAM Ram Dodge 2010 User manual

RAM
RAM CHASSIS CAB 3500 2017 User manual