Ramblegard Jill Pager User manual

Jill Pager
(RG41)
User Instructions


The Ramblegard cordless Jill-LCD pager is a versatile
tool for a caregiver in either a facility or home care
environment.
The large display is convenient for caregivers to read
with easily cleanable buttons for a hospital setting.
Options include tone selection for the hard of hearing,
out-of-range check for emergency devices, cordless
reset function for monitors, and direct signalling from
cordless devices for use in homecare environments.
Straightforward programming allows users to quickly
configure the settings to match their needs.

1.0 Initial Configuration
Open battery case with a Phillips screwdriver and insert 2 x AA
alkaline batteries. Replace battery cover and secure the screw.
Select alarm indication to either “Vib” or “Vib + Tone” to turn the
pager on.
NOTE: In most instances, the Jill will be sent out as part of a
Ramblegard Kit and therefore will be preprogrammed for ease of
use. If you do need to program an additional device, go straight to
step 3.
2.0 Normal Operation
When the RG41 receives a wireless alarm signal, it will vibrate
to indicate the alarm (sound optional), and display the alarm type
with a device ID to help the caregiver determine where to go.
For cordless devices signaling directly, the RG41 will display 1-9.;
Signals sent from the optional central monitor will display 01-99.
For Example, PAD 01 could be a cordless bed pad alarm coming
from Rm 1.
The RG41 can be used directly with a cordless bed/chair pad
or a floor mat.
NOTE: When the pager is receiving signals
directly from a cordless device, holding CANCEL for ~3s will
remove the alarm from memory. If a central monitor is used,
press Cancel to silence the alarm.
Alarm Type Display
Cordless Pad Pad XY
Bathroom Alarm bAth XY
Pendant Alarm Pndt XY
Door Monitor dXYPXYZ (door#, patient#)

3.0 Programming
Default settings are for a LOW alarm tone pitch, device
supervision turned OFF, direct signaling ON and RESET turned ON.
This will allow the pager to be paired 1-to-1 with a cordless nurse
call handset or with a cordless bed, seat or floor sensor pad.
To enter programming mode, first switch the device OFF.
Simultaneously press and hold the OPTION button (for ~3s) and
switch the pager ON again.
Once the pager is in programming mode, the display will show a
two-letter prefix on the left side to indicate the setting that is to
be adjusted, with the current setting shown on the right side of
the screen. To exit programming see Note under point 8.
Use the MENU button to navigate the pager options, looking at the
LCD to choose the appropriate setting from the above table to
adjust. Pressing the OPTION button will allow the current setting
to be adjusted, and it will begin flashing on the LCD. Use MENU to
adjust the setting, and confirm by pressing OPTION again.
3.1 Read-in Devices (rd)
This is used when you want to add or delete a cordless pad,
wristband transmitter, or other cordless device from the pager
memory. The pager has memory for maximum 9 devices. If you
have more than 9 devices in an area you should instead use the
optional central monitor.
Jill Pager Setting LCD Indicator
Read-in Devices rd [1-9] [O/F]
Select Tone to [LO/HI]
Direct Signaling dS [On/OFF]
Supervision Su [On/OFF]
Reset rE [On/OFF]
Pager Code PC [0-9]
Site Code SC [0-7]
Clear Memory CI

3.1 Read-in Devices (rd) cont.
In the programming menu select “rd”
These include:
• Press OPTION to enter the menu, and a digit from 1-9 will
start flashing in the center of the screen.
• Use MENU to choose a memory slot from 1-9.
• The right side of the LCD will indicate the memory slot is Open
(O) or Full (F).
• Trigger cordless device to add into the memory slot – the LCD
will update to show ‘F’.
• Hold CANCEL ~3 to remove device from memory slot – the
LCD will update to show ‘O’.
• Press OPTION again to exit pairing and return to
programming menu.
3.2 Select Tone (to)
A high frequency setting for the alarm is available to aid the hard-
of-hearing.
In the programming menu select “to”
• Press OPTION to highlight the setting, and HI/LO will start
flashing
• LO = Low frequency
• HI = High frequency
• Use MENU to change tone setting – the RG41 will play the new
tone when it is changed.
• Press OPTION again to confirm the setting.

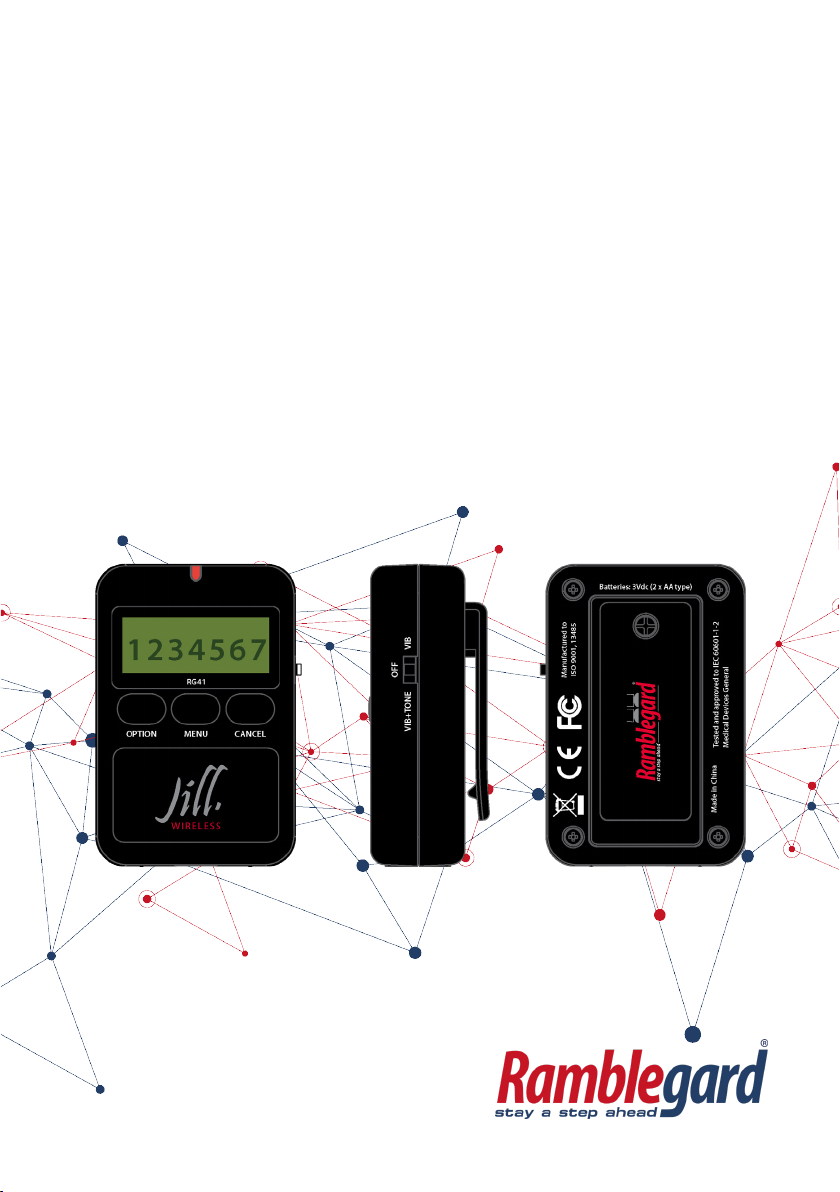
3.3 Direct Signaling (dS)
This setting allows the pager to receive a signal directly from
a cordless device, and has a factory default to ON. If a central
monitor is used, this must be changed to OFF.
The Doorgard anti-wandering system does not need to be “read-
in”, but this setting must still be set to ON or the pager will
ignore signal from it. Other devices must first be paired to assign
the display ID.
In the programming menu, first select “dS” – the right side of the
LCD will display the current setting.
• Press OPTION to highlight the setting, and On/OFF will start
flashing
• On = will receive signal directly from device
• OFF = must receive signal from central monitor
• Use MENU to change the current setting
• Press OPTION again to confirm the setting.
3.4 Supervision (Su)
This is used when a cordless device is considered high-priority
and would require a signal-lost alert if the pager is out of range.
Note that active supervision will decrease the battery life of the
pager, so should be turned OFF if the paired device does not send
a tracking signal. It is not recommended to use supervision with
more than TWO devices.
In the programming menu, first select “Su” – the right side of the
LCD will display the current setting.
• Press OPTION to highlight the setting, and On/OFF will begin
flashing
• OFF = pager will ignore tracking signals
• On = pager will alarm if a device in memory is not detected
• Use MENU to change the current setting
• Press OPTION again to confirm the setting.

3.5 Reset (rE)
Some facilities require that alarms be reset at the point of origin.
This setting determines whether the RG41 can reset alarms for
anti-wandering systems, bathroom alarms, or bed exit alarms.
In the programming menu first select “rE”
• Press OPTION to highlight the setting, and On/OFF will begin
flashing
• OFF = alarms can only be reset at point of origin
• ON = pager can delete/reset alarms from memory
• Use MENU button to change the current setting
• Press OPTION again to confirm the setting.
3.6 Pager Code (PC)
Setting a pager code can be useful if several cordless systems
are in use, and will ensure pagers only receive alarms from their
area.
In the programming menu, first select “PC”
• Press OPTION to highlight the setting, and (0-9) will begin
flashing
• 0 = Receive all signals
• 1-9 = Receive only from matching Pager ID
• Use MENU button to adjust the pager code from 0-9
• Press OPTION again to confirm the setting.

3.7 Site Code (SC)
This is used for facilities that may have more than one cordless
system in operation. The site code will ensure the pager only
receives signals for alarms in its own area.
In the programming menu first select “SC”
• Press OPTION to highlight the setting, and (0-7) will begin
flashing
• 0 = Receive all signals
• 1-7 = Receive only from matching site ID
• Use MENU button to adjust the site code from 0-7
Press OPTION again to confirm the setting.
3.8 Clear Pager Memory (CI)
It is recommended to erase the memory before programming.
To clear the memory select “Cl” – for clear – and then hold
CANCEL for ~5s. The screen will flash 0000000 several times and
automatically exit the MENU.
NOTE: Once you have correctly configured the Jill pager, press
and hold the OPTION button for ~3s to exit program menu, then
go back to Step 2 for normal operation.

4.0 Troubleshooting
• Check whether the programming settings are configured
correctly
• Erase the pager memory and reprogram the settings
• Contact your local distributor with details for further
assistance


T: 028 9448 3971
www.ramblegard.com
S&E CareTrade t/a Ramblegard
Elmfield House
Rathenraw Industrial Estate
Greystone Road
Antrim
BT41 2SJ
This manual suits for next models
1
Table of contents
Popular Personal Care Product manuals by other brands

ABTECH SAFETY
ABTECH SAFETY SLIX 100 Instruction & maintenance manual

Conair
Conair NE153QCS use and care manual

Jarven Health Care
Jarven Health Care SCHAMPI CUSHION user guide

TherAdapt
TherAdapt ASB-100 quick start guide

MaxiMist
MaxiMist Pro ST867 TNT Instruction manual and users guide

iHealth
iHealth ALD-602 Intended use