rastar LaFerrari User manual

08.06.827000.001460
Produced under license of Ferrari S.p.A. The name FERRARI, the PRANCING HORSE device,
all associated logos and distinctive designs are property of Ferrari S.p.A. The body designs of
the Ferrari cars are protected as Ferrari S.p.A. property under design, trademark and trade
dress regulations.
Licensee: RASTAR (HK) INDUSTRIAL COMPANY LIMITED
Manufacturer: FUJIAN XINGHUI BABY SUPPLIES CO., LTD
Add : North Area, Zhaoan Industrial Park, Zhangzhou, Fujian, China.
Http://www.rastar. com

Ride-on Instruction
The packing has to be kept since it contains important information.

121.9 x 60.4 x 51.3 cm
37 - 96 months old
30 kg
18.08 kg
300 +
(5-35) Celsius degree
DC12V 25Wx2
Steering Wheel
Windshield
Seat
Screw
Protector
Storage Battery
Battery Locker
Battery Cover
Screw Pin
Hexnut
Charger
Transmitter
Lubricant
AUX Input line
Car Body
Wheel
Wheel Core(backup)
Instruction
Rechargeable
D1 (2-3)km/h | D2 (3-4)km/h
12V 7Ah lead-acid
Input:AC100-240V 50Hz/60Hz | Output:DC15V 1000mA
Subject to the nameplate of the charger
Charged for (8-10)h/time | Can be used more than 60 minutes
Size
For child
Max.weight loaded
Net Weight
Power
Speed
SPECIFICATION
PARTS
Battery
Power supply
Charging period
Rechargeable times
For temperature
Power of Motor
NO. Desc. Qty NO. Desc. Qty

The serial number of all spare parts showed as “(NO.)” in the following descriptions.
If the quantity and shape of some spare parts in this manual are different
from that of products you buy, it might be because some parts of the car
you buy already have been installed or because we reduce setup steps
and quantities of spare parts for making the installing easier. Please
check and review.

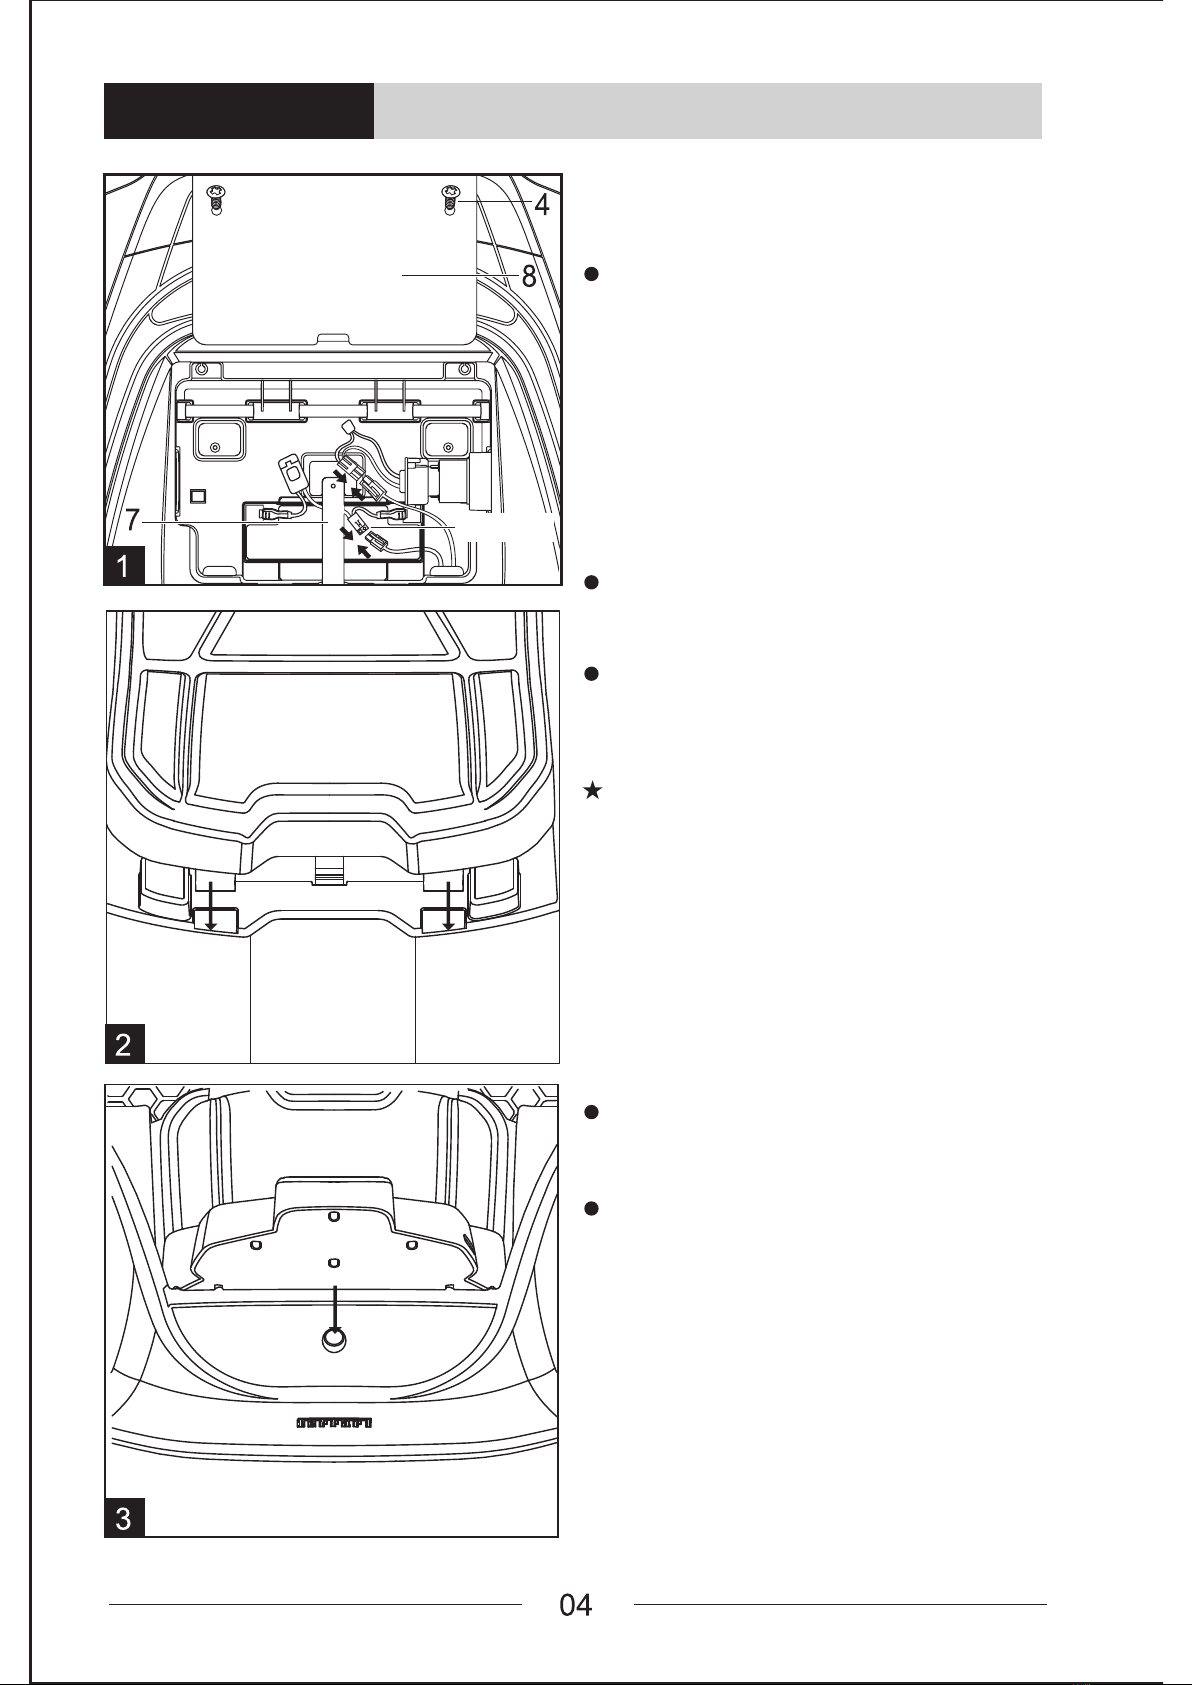
Put the storage battery into the
battery compartment. Plug the
interface to the jack connect the
red terminal and the black
terminal respectively to the
anode andcathode of battery.
(Notice: make sure they are
correctly connected,red to red,
black to black, otherwise, it will
cause short-circuit.)
Install the battery locker(7) to the
designated position, and fix it
with 2 screws(4)
Install the battery cover(8) to the
designated position, and fix it
with 2 screws(4)
Put the seat (3) to the designated
position, fix the front buckles of seat
to the grooves of car body.
Press down the button behind the
seat and lay down the seat, then
release the button and the seat
will be locked. To unlock the seat,
press down the button and raise
the seat.
Notice: This seat is equipped with
seat belt, which is only a decoration
to develop the safety sense of
children, it can not provide any
substantial protection.
Replace or take out the storage
battery and power.
Loosen the 2 screws(4) on battery
cover(8)
Unplug the interface and jack,
loosen the 2 screws(4) on battery
locker(7), then the storage battery
can be taken out.
1.Install battery and power
supply
2.lnstall seat
ASSEMBLY
Jack Interface

Remove the protector (5) at the upside
of the axes, which is non-functional but
only for protecting use during the
transportation. Please dispose properly.
Install windshield(2) to the designated
position, and fasten it.
Puch the windshield forward and downward
to lock it. And do reversely to uninstall it. See
picture 5.
Please install the steering wheel (1) to
the specific place and use Screw (9)
and Hexnut (10) to screw it tightly after
you make sure the steering wheel is in
the right place. Please see picture 4.
3.lnstall steering wheel
4.lnstall windshield and wing
mirror

Steps of Wheel Installation: Set the wheel into the iron shaft straight until you hear a "click"
sound and unable to pull the wheel back. It means the wheels
are successfully installed. If you want to dismantle the wheel,
pressing the wheel cover to remove the wheel.
Put the antenna into the controllersocket.
Open the lid and put the 9V battery according
to its polarity,then dose the lid.
Rechargeable batteries are to be removed
from the toy before being charged.
Different types of batteries or new and
used batteries are not to be mixed.
Exhausted batteries are to be removed
from the toy.
Only batteries of the same or equivalent
type as recommended are to be used.
Please take out batteries in case of leakage
Batteries replaced by children should
be under adults’supervision.Please do not
swap the batteries, poles over.Short circuit
should not occur to the electrical source.
Non-rechargeable batteries are not to be
recharged.
Please fake down the battery cover according
to the indicating arrow in the picture.
Properly put two “AA” batteries into steering
wheel and then cover it.
and corrosion if long terrin storage.
Please take out batteries when it is power off.
Remote control is only applicable to
adults or under the guardiance of adults
(a safe distance is 10M).
1.Replace battery of transmitter
2.Replace battery of steering wheel
3.Notice while replacing battery
1.5V AA
1.5V AA
BATTERY
Replace battery of transmitter and steering wheel
BATTERY
SCREW

Every one hour’ s running needs 10 to 15 hours’ charging. Every single
charging can not over 24 hours.
Both charger and storage batteries will occur mildly warm during charging.
Do not use mal-functioned adapter or storage battery unless they are
repaired.
Please turn off the switch when the ride-on is not in use. Please make full
charging after long-term suspended.
Please charge 20 to 24 hours before first time use.
Please use the suitable adapter to charge storage battery, otherwise
the ride-on will be damaged.
Please charge the car once the speed is slower than normal,
otherwise it will derease storage battery life.
Please fully charge the battery before you put your ride-on away,
and remember to recharge the battery every 30 days. This will
ensure the normal use of the battery,otherwise,the battery can
not be charged.
For safety, please ONLY use the battery supplied by Rastar or
Rastar Baby, whichhas been protected with polarity anti-reverse
structure.
ONLY use the charger supplied by Rastar or Rastar Baby.
Charger and storage batteries are not considered as toys.
Please make periodical inspection for storage battery, especially for adapter
wires and plugs.
This manual has to be kept since it contains important information.
NORMAL OPERATION
STORAGE BATTERY MAINTENANCE
Please check If the power
cable Is connected before
charging,the indicator light
turns green when the adapter
is inserted to the AC power
socket, and the light turns red
when charging.
The indicator light will turn
green again when the battery
Is fully charged.
electric
socket

Overcurrent protector is installed under
the seat.
Motherboard is equipped with automatic
recovery fuse. When it is overloaded or
improper used, disabling the motor, the
fuse will automatically disconnect the
power.
To reset, just turn off the key switch and
wait 30 seconds, the fuse will automatically
recovered.
Power device is equipped with blown
fuze. When short-circuit happens, the
fuze will be blown. Therefore, after
solve the circuit problem, you need to
replace the blown fuze.
Transmitting signal can cover about
20-30meters across. If transmitter
does not perform properly within this
coverage, please check its battery.
Install the batteries and turn on the
controller, when the indicator light
starts flashing, it is ready to match
frequency. Then turn on the
Ride-on car, when the indicator
light turns off, matching is
complete.
Remark: in order to protect the
motor, the power of left/right button on
the transmitter will be cut off if you press
left/right button for over 2 seconds.
Therefore, a continuous turning will
require you to press left/right button
repeatedly.
Switch: switch of controlling horn
Horn:Horn sound can be activated
when press.
1.Transmitter
2.Steering wheel
Right
Left
Forward
Reverse
brake
OVERCURRENT PROTECTOR
OPERATING FUNCTION
Blown
fuze
Switch
Horn

AUX
Press the Start button to start the vehicle.
Forward at high speed: put the Gear Switch in D2 gear and step on pedal
switch, the ride-on will move forward at high speed.
Forward at low speed: put the Gear Switch in D1 gear and step on pedal switch,
the ride-on will move forward at low speed.
Stop: put the Gear Switch in STOP gear, the ride-on will stop moving.
Reverse: put the Gear Switch in R gear and step on pedal switch, the ride-on
will move backward.
Left: steer left the steering wheel when ride-on is moving forward.
Right: steer right the steering wheel when ride-on is moving forward.
under voltage indicator: After 80% of battery capacity had been consumed , the
indicator will be light.lf continued to use, the power will be automatically shut
off. Need to be full charged.
If indicator light is on, which means the battery is of low voltage, the ride-on
won’t work. Only when indicator light is out, which means battery is fully
charged, can ride-on work.
There is a spare switch underneath the dashboard. This switch is functionally
equivalent to the keyless start button, switch upward is off and downward is open.
Please note that when the keyless start button OR spare switche opens, the
function of car is opened. Only when two switches are both off, the function of
car can be turned off.
Radio control /Battery operated Mode Switch
The pedal switch, gear shift will be inactive when you switch to Remote Control
Mode.To avoid scaring the child while ride-on starts to run forward/reverse, the
remote control operation is equipped with low speed start function.
Ride-on Function
NOTICE!
When not playing AUX, please pull the AUX Input Wire out of AUX
socket. Otherwise, all other sound effect will be mute.
Volume
Switch
Indicator
Headlight
Switch
Accelerator/
Play built-in
Sound
under voltage
indicator
Spare Switch
is under the
dash board
Pedal Switch
Keyless
start button
Gear Shift
Radio control/
Battery operated
Mode Switch

Red (yellow) button inside is for
OPEN/CLOSE function of car
door. When pushing the button
backward and pulling the button
upward to the top, the door will
open (Please see Picture 15).
If you want to close the door, pis
gently push the door downward,
when you hear the click sound and
cannot not pushing/pulling the
button at the same time, that the
door is closed(Please see Picture
16).
Children are not allowed to operate charging. It should be operated by adult.
Ride-on operation should be under adults’ supervision.
This product should be assembled by adult; or checked by adult to make sure proper
assembly.
It is prohibited to run this ride-on in public streets, roads, slope, near swimming pool, or
any other dangerous area.
ON/OFF function
WARNING

This ride-on can not be overloaded. The maximum loading capacity is 30 kilograms.
This ride-on is for children age between 37months old - 96months old.
This product is made of plastics. Please keep it away from fire.
Re-start of the motor may occur sparkles. It is prohibited to run in flammable
and explosive area such as gas station.
Do not let children touch wheels in case being trapped or crushed. Please keep
other children away from the ride-on during running.
Flat ground is good for ride-on running. Please avoid running on sand or any
other rough ground.
The package of ride-on is not toy for children.
Adults are required to read this instruction carefully and give correct guideline
to children before playing.
This seat belt is only a decoration to develop the safety sense of children, it can
not provide any substantial protection.
Please guide children how to start and relax the pedal, how to handle
malfunctions and how to stop ride-on.
Do not use the malfunctioning ride-on until it is well repaired.
The antenna and wire are not to be inserted into socket-outlets.
Battery replacement should be operated by adults.
Install batteries correctly according to their polarity.
Storage battery can be removed from the ride-on and recharged, but can NOT
be heated or disposed of in fire.
Non-rechargeable batteries are not to be recharged. Rechargeable batteries
can be recharged under adults* supervision; Rechargeable batteries are to be
taken out from ride-on during charging.
When batteries are short of power, the remote control distance will be shorten.
Please replace with new batteries.
Take out batteries if ride-on is not in use for an extended preriod in case liquid
leakage. Remove batteries when they are used up.
Supply terminals are not to be short-circuit.
This ride-on is not for children under 36 months since it may have small parts
that can detach during running.
Transmitter can only be operated by adults or under adults supervision.
Some accessories of ride-on may be damaged by improper operation.
Swab ride-on with cloth. Do not flush the ride-on with water in case damage.
Charger is not considered as toy. Please put it away after charging.
Do not suddenly use forward-reverse switch during running. It can only be used when
the ride-on is stopped.
CAUTION!
You may find battery damage, liquid leakage and other dangerous
phenomenon during replacement. Please pay attention to the following:
Table of contents
Other rastar Motorized Toy Car manuals