ratiotec TowerBank User manual

1
Bedienungsanleitung TowerBank®
Instruction manual TowerBank®
TowerBank®

2
Contents | Inhalt
Bedienungsanleitung TowerBank®.............................................
Instructions for use TowerBank®................................................
Istruzioni per l’uso TowerBank®................................................
Instrucciones de uso TowerBank®.............................................
Mot d’emploi TowerBank®.......................................................
3
6
9
12
15
DE
EN
IT
ES
FR

3
Einleitung
Sicherheitshinweise
DE
Sehr geehrter Kunde,
vielen Dank, dass Sie sich für die TowerBank®von ratiotec entschieden
haben. Bitte lesen Sie die Bedienungsanleitung sorgfältig durch, um einen
reibungslosen und fehlerfreien Betrieb zu gewährleisten. Die TowerBank®
besteht aus einer Ladestation, Powerbanks mit verschiedenen Anschlüs-
sen, sowie einem Netzteil.
Das Nichtbeachten und Befolgen dieser Sicherheitshinweise kann zu
Bränden, Explosionen, Stromschlägen oder anderen Gefahren führen und
schwere Verletzungen und/oder Sachschäden verursachen.
Die Powerbank enthält Lithium-Polymer-Akkus und darf nicht geönet
werden, da diese auslaufen und Explosionen hervorrufen könnten. Die
Powerbank darf nicht zerlegt und erschüttert werden. Setzen Sie die Power-
bank weder Regen noch Wasser aus.
Halten Sie die Powerbank von Feuer und hohen Temperaturen (mehr als
˚C/˚F) fern und verwenden Sie das Produkt nicht in der Nähe von
Geräten mit Hochspannung.
Hinweis: Halten Sie das Produkt von Kindern fern!

4
Ladestation Übersicht
Powerbank Übersicht
. Kontaktstift
. LED-Anzeige
. V/ A Input
. Kontaktstift
. Startknopf
. Ladekabel
. microUSB-/
USB-C-/
Lightning*-Anschluss
. USB-Ausgang
. LED-Anzeige
*Lightning ist eine Marke der Apple Inc., die in den USA und weiteren
Ländern eingetragen ist.
6.
DE

5
Inbetriebnahme
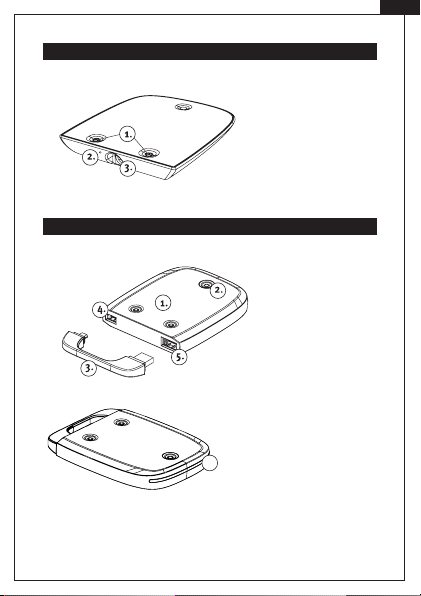
Verbinden Sie das mitgelieferte Netzteil mit der Ladestation und stecken
Sie den Netzstecker in eine Steckdose. Anfänglich leuchtet die blaue
LED auf. Laden Sie die Powerbank vor dem ersten Gebrauch vollständig
auf, indem Sie die Powerbank auf die Ladestation platzieren, sodass der
Kontaktstift der Powerbank, den Kontaktstift der Ladestation berührt.
Wenn die Verbindung der Kontaktstifte hergestellt ist, leuchten die LEDs
der Powerbank.
Zum Aufladen Ihres Smartphones, verwenden Sie bitte ausschließlich das
Originalzubehör. Verbinden Sie, anhand des Ladekabels, die Powerbank
mit Ihrem Smartphone und drücken Sie den Einschaltknopf „START“, um
den Ladevorgang zu starten. Betrachten Sie die Akkustandanzeige Ihres
Smartphones, um zu überprüfen, ob die Powerbank Ihr Smartphone lädt.
Sobald Ihr Smartphone vollständig geladen ist, entfernen Sie bitte das
Ladekabel.
Hinweis: Schließen Sie Ihr Smartphone nicht an die Powerbank an,
während diese auf der Ladestation liegt.
DE

6
Ladestatus
Statusanzeige
Während die Powerbank auf derStation geladen wird, kann der Ladestatus
wie folgt abgelesen werden:
ROT: < % geladen
VIOLET: >= % geladen
BLAU: % geladen
Während die Powerbank in Gebrauch ist, kann derStatus durch kurzes
Drücken des Startknopfes, wie folgt abgelesen werden (Beleuchtung
erlischt automatisch nach Sekunden):
ROT: < % geladen
VIOLET: >= % geladen
BLAU: > % geladen
DE

7
Technische Daten
Technische Daten Powerbank
Kapazität Akku mAh
Batterietyp wiederaufladbarer Lithium-Polymer-Akku
USB Output V/. A
Volle Ladezeit ca. Stunden (bei Betrieb mit
Powerbanks)
Betriebstemperatur O˚C - ˚C
Abmessungen (in mm) x x
Anzahl Powerbanks pro Set (optional erweiterbar auf pro
Ladestation)
Anschlüsse Smartphone x microUSB, x USB-C, x Lightning*
Technische Daten Ladestation
Input/Output V/ A
Abmessungen (in mm) x x
DE
*Lightning ist eine Marke der Apple Inc., die in den USA und weiteren
Ländern eingetragen ist.

8
Introduction
Dear customer,
Thank you for choosing the TowerBank®from ratiotec. Please read the
instruction manual carefully in order to ensure the correct, error-free use of
the device. The TowerBank®consists of a charging station, several power
banks with dierent connections and a power supply.
Safety instructions
Failure to follow these safety instructions may result in re, explosion,
electric shock or other hazards, and may cause serious injury and/or
property damage.
The power bank contains lithium-polymer batteries and must not be
opened, as these could leak and cause explosions. The power bank must
not be disassembled and/or shaken. Do not expose the power bank to
rain or water.
Keep the power bank away from re and high temperatures (above
˚C/˚F), and do not use the product near high voltage equipment.
Please note: Keep the product out of the reach of children!
EN

9
EN
Overview of charging station
Overview of power bank
. contact pin
. LED display
. V/ A input
. contact pin
. start button
. charging cable
. micro-USB/
USB-C/Lightning*
connection
. USB output
. LED display
*Lightning is a trademark of Apple Inc., registered in the US and other
countries.
6.

10
Initial start-up
Connect the power adapter (included in delivery) to the charging station
and plug the power cord into a mains socket. Initially the blue LED will
light up. Fully charge the power bank before rst use. To do so, place the
power bank on the charging station so that the power bank’s contact pin
is touching the charging station’s contact pin. When the contact pins are
touching, the power bank’s LEDs will light up.
To charge your smartphone, use original accessories only. Using the
charging cable, connect the power bank to your smartphone and press the
"START" button to start the charging process. Look at the battery gauge on
your smartphone to check if the power bank is charging your smartphone.
Once your smartphone is fully charged, remove the charging cable.
Please note: Do not connect your smartphone to the power bank while the
power bank is on the charging station.
EN

11
EN
Charging status
Status display
While the power bank is charging on the station, its charging status can be
read as follows:
RED: < % charged
VIOLET: >= % charged
BLUE: % charged
While the power bank is in use, you can check its battery status by briefly
pressing the start button (lights switch o automatically after seconds):
RED: < % charged
VIOLET: >= % charged
BLUE: > % charged

12
Technical data
Technical data Power bank
Battery capacity mAh
Battery type Rechargeable lithium polymer battery
USB output V/. A
Charging time to full
capacity
approx. hours (when used with power
banks)
Operating temperature O˚C - ˚C
Dimensions (mm) x x
Number of power banks
per set
(can be expanded to per charging
station)
Smartphone connections x micro-USB, x USB-C, x Lightning*
Technical data Charging station
Input/output V/ A
Dimensions (mm) x x
EN
*Lightning is a trademark of Apple Inc., registered in the US and other
countries.

13
Introduzione
Indicazioni di sicurezza
IT
Gentile cliente,
Grazie per aver scelto TowerBank®di ratiotec. La preghiamo di leggere
attentamente le istruzioni per l’uso per garantire un funzionamento corretto
e senza guasti. TowerBank®è costituito da una postazione di carica, power
bank con diverse connessioni e un alimentatore.
La mancata osservanza di queste istruzioni di sicurezza può provocare
incendi, esplosioni, scosse elettriche o altri pericoli e causare lesioni gravi
e/o danni materiali.
La power bank contiene batterie ai polimeri di litio e non deve essere
aperta, in quanto potrebbero fuoriuscire e causare esplosioni. La power
bank non deve essere smontata e scossa. Non esporre la power banka
pioggia o acqua.
Tenere la power bank lontano dal fuoco e temperature elevate (oltre
°C/°F) e non utilizzare il prodotto vicino ad apparecchiature ad alta
tensione.
Nota: Tenere il dispositivo lontano dalla portata dei bambini!

14
. Spinotto di contatto
. Pulsante di avvio
. Cavo di carica
. Connettore
microUSB/
USB-C/Lightning *
. Uscita USB
. Display LED
* Lightning è un marchio di Apple Inc., registrato negli Stati Uniti e in altri
Paesi.
6.
. Spinotto di contatto
. Display LED
. Ingresso V/
Ainotto di contatto
Panoramica della postazione di ricarica
Panoramica power bank
IT

15
Messa in servizio
Collegare l'adattatore in dotazione alla postazione di carica e inserire il
cavo di alimentazione in una presa di corrente. Inizialmente si accende il
LED verde. Caricare completamente la power bank prima del primo utilizzo
posizionandola sulla postazione di carica in modo che la power bank faccia
contatto con la postazione di carica. Quando viene eettuato il collegamen-
to degli spinotti, i LED della power bank si accendono.
Per caricare lo smartphone, si prega di utilizzare solo accessori originali.
Usando il cavo di ricarica, collegare la power bank allo smartphone e
premere il pulsante "START" per iniziare il processo di ricarica. Osservare
l'indicatore della batteria sullo smartphone per vedere se la power bank
carica lo smartphone.
Una volta che lo smartphone è completamente carico, rimuovere il cavo
di ricarica.
Nota: Non collegare lo smartphone alla power bank mentre si trova nella
postazione di ricarica.
IT

16
Stato di carica
Display stato:
Mentre la power bank si sta caricando sulla postazione, lo stato di ricarica
può essere letto come segue:
ROSSO: caricato < %
VIOLA: caricato >= %
BLU: caricato %
Mentre la power bank è in uso, è possibile leggere lo stato come segue
premendo brevemente il pulsante di avvio (l'illuminazione si spegne
automaticamente dopo secondi):
ROSSO: caricato < %
VIOLA: caricato >= %
BLU: caricato > %
IT

17
Dati tecnici
Dati tecnici Power bank
Capacità della batteria mAh
Tipo di batteria batteria ricaricabile ai polimeri di litio
Uscita USB V/. A
Tempo totale di carica circa ore (quando si lavora con
power bank)
Temperatura di esercizio O˚C - ˚C
Dimensioni (mm) x x
Numero di power bank
per set
(opzionale espandibile a per posta-
zione di carica)
Collegamenti smartphone x microUSB, x USB-C, x Lightning*
Dati tecnici Postazione di carica
Entrata/uscita V/ A
Dimensioni (mm) x x
IT
* Lightning è un marchio di Apple Inc., registrato negli Stati Uniti e in altri
Paesi.

18
ES
Introducción
Indicaciones de seguridad
Estimado cliente:
Muchas gracias por haberse decantado por la TowerBank®de ratiotec. Lea
atentamente este manual de instrucciones, para garantizar un funciona-
miento fluido e impecable. La TowerBank®consta de una estación cargado-
ra, baterías externas con diversos puertos y una fuente de alimentación.
La inobservancia y el incumplimiento de estas indicaciones de seguridad
pueden conllevar incendios, explosiones, descargas eléctricas u otros
peligros y ocasionar lesiones o daños materiales graves.
La batería externa contiene acumuladores con polímeros de litio y no se
debe abrir, pues las pérdidas de ese material pueden provocar explo-
siones. La batería externa no se debe desensamblar ni sacudir. No someta
la batería externa a la lluvia ni al agua.
Mantenga la batería externa alejada del fuego y de altas temperaturas (más
de ˚C/˚F) y no use el producto cerca de aparatos con alta tensión.
Nota: ¡Mantenga el producto alejado de los niños!

19
ES
Vista general de la estación de carga
Vista general de la batería externa
. chaveta de contacto
. indicación LED
. entrada V/ A
. chaveta de contacto
. botón de encendido
. cable de carga
. puerto microUSB-/
USB-C-/Lightning*
. salida USB
. indicación LED
*Lightning es una marca de la Apple Inc., que está registrada en los EE.UU.
y en otros países.
6.

20
ES
Puesta en servicio
Conecte la fuente de alimentación adjunta con la estación de carga e
inserte el enchufe en el tomacorriente. Al principio se enciende el LED azul.
Cargue la batería externa completamente antes del primer uso colocando
la batería en la estación de carga de forma que la chaveta de contacto
de la batería entre en contacto con la chaveta de la estación. Cuando las
chavetas están en contacto los LED de la batería externa brillan.
Para cargar el smartphone use los accesorios originales. Conecte la batería
externa con su smartphone usando el cable de carga original, pulse el
botón de encendido «START» para iniciar la carga. Coteje en la indicación
del nivel de batería del smartphone si la batería está cargando el teléfono.
Tan pronto como el smartphone esté completamente lleno extraiga el cable.
Nota: No conecte el smartphone en la batería cuando esta esté en la
estación de carga.
Other manuals for TowerBank
1
Table of contents
Languages:
Other ratiotec Accessories manuals
Popular Accessories manuals by other brands

Panasonic
Panasonic LM10 instruction manual

Honeywell
Honeywell CTP-20 installation instructions

Mitsubishi Electric
Mitsubishi Electric Melsensor FA-CF26-SR Settings guide

Avalon Instruments
Avalon Instruments M-Uno user manual

Rawlings
Rawlings Pro Line Two Wheel owner's manual

OmniPreSense
OmniPreSense OPS241 Code Update

MKS
MKS HPS 903 Series Operation and maintenance manual

Perlick
Perlick CS1DPSP Installation and operation instructions

Electro-Voice
Electro-Voice 1828C Specifications

Smartwares
Smartwares SH4-90155 instruction manual

White Rodgers
White Rodgers F145-0825 installation instructions

Vivid
Vivid CLV-401A user manual