Ravas SAVAR 6100 User manual

1
OPERATION MANUAL
Software Version 1.17
INDEX page
1. The weighing hand pallet truck
1.1. Taking the system into operation 2
1.2. Use 2
1.3. Maintenance 5
2. Touch panel indicator 6
3. Functions indicator
3.1. General
3.1.1. Switching On / Off 9
3.1.2. Date and time adjust 9
3.1.3. Weighing programs Basic and Count 10
3.2. Basic: weighing and printing
3.2.1. Before weighing: check zero point 10
3.2.2. Gross weighing 10
3.2.3. Net weighing: automatic tare 10
3.2.4. Net weighing: manual tare entry 11
3.2.5 Using Tare memories 11
3.2.6. Code entry and printing (option) 12
3.2.7. Totals displaying and printing (option) 12
3.3. Count: weighing and piece counting
3.3.1. Before weighing: check zero point 12
3.3.2. Gross weighing 12
3.3.3. Net weighing: automatic tare 13
3.3.4. Net weighing: manual tare entry 13
3.3.5. Piece counting without known piece weight 13
3.3.6. Piece counting with known piece weight 14
3.3.7. Piece count with reference scale (option) 14
3.3.8. Code entry and printing (option) 15
3.3.9. Totals displaying and printing (option) 15
We would like to inform you about the fact that this RAVAS product is 100 % recyclable on the basis
that the parts are processed and disposed off in the right manner. More information can be found on
our website www.ravas.com.
Rev.20171018
Printing/typographical errors and model changes reserved

2
1. THE WEIGHING HAND PALLET TRUCK
1.1. TAKING THE SYSTEM INTO OPERATION
The weighing system is activated with thekey (see 3.1.1).
After three to five minutes the electronics and load cells have reached the operational
temperature. Before this, inaccuracies of up to ca. 0.3% may occur.
It is recommended not to lift loads before the zero point correction has been
executed.
1.2. USE
How to disconnect the rechargeable batteries out of the housing:
To recharge or exchange the battery packs please follow instructions underneath.
Open the door of the
battery compartment
Press the lock upwards with
your thumb
Release the lock
completely and take out
the battery pack
How to charge the batteries:
A fully charged battery provides power for approx. 25 hours of uninterrupted
operation.
To avoid damages to the battery it should never be completely discharged. Deep
discharge strongly reduces the life time of the battery. Charging at regular intervals
ensures full operational availability.
Charger: When the battery packs are being charged, the red LED is on. After the
charging time of 8 hours min. has elapsed, the charger is switched off and the
batteries are fully charged. The LED signal turns from red to green.
Important note: Both battery packs should always be charged at the same time!

3
8 hours
1.
2.
Charger
Attention: When the charger is connected to 230 VAC mains supply and no battery
pack is plugged in, the green LED is on. The battery packs are protected against
overcharging by the auto shut-off function of the charger.
When batteries are placed in the charging holder and plug is out of the 230 VAC, the
batteries will be de-charged by the charger. So when you take out the 230 VAC plug,
also take out the batteries.
How to connect the charged batteries into the housing:
Always recharge both
battery packs at the
same time!*
Charging function LEDS:
RED = CHARGING
GREEN = FULL
Please take attention to the
notch when replacing the
full battery packs!
Push the top-side against
the back wall and close the
release again

4
The weight must be lifted freely: without touching the housing of the indicator or other
pallets.
Wrong way of lifting the load
Correct way of lifting the load
The accuracy of the weighing system diminishes with circa 0.1% per degree starting
from a tilted position of 2°. This effect also occurs with pits / potholes in the floor. An
even floor is optimal.
The optimally accurate weighing result is obtained when the centre of gravity of the
load is placed between the forks. With a non-centric loading the forks will tordate and
bend. This may result in a higher inaccuracy.
With legal for trade versions, the level control will switch off the indicator with a non-
centric loading or a tilted position that influences the weighing accuracy.
Non-optimal placement of the
load
Optimal placement of the load
Temperature range: between -10 and +40°C the maximum inaccuracy is 0.1% of the
weighed load. Outside this range inaccuracies up to 0.3% may occur.
Fast temperature changes must be avoided because it can cause condensation in
the electronics. During acclimatisation the weighing system must be switched off.

5
1.3. MAINTENANCE
For the chassis of the mobile weighing system the maintenance guidelines for normal
hand pallet trucks apply. From experience we know that the integrated weighing
systems still functions when the chassis is damaged by overloading.
Main guidelines:
- Because the steering wheels are mounted in front, pulling the hand pallet truck is
preferred above pushing it.
- When the lifting mechanism is not used, it should be kept in the neutral, middle,
position. This prolongs the life span of the sealings.
- The electronics may only be cleansed with a moist cloth. Chemical cleansers and
high-pressure cleansing will cause damage.
- For the whole system goes that only specialists may execute actions involving
welding. This to avoid damage to electronics and load cells.
- The bearings of the wheels (not with polyurethane) and the pivoting points of the
levelling bar of the loading wheels must be cleansed and greased regularly.
- The oil container must be checked every six months.

6
2. TOUCH PANEL INDICATOR
Front indicator
THE ALPHANUMERIC DISPLAY
The indicator has an alphanumeric display, containing 20 segments. The display
shows: weights and help-prompts and it indicates which function is active at any
moment, f.i.:
NET the main display shows the net weight
TAR the main display shows the tare weight
PT manual entered tare weight

7
THE KEYS
DISPLAY
Display shows gross-/net weight and prompts
display shows gross –zero value (+ 0,2 counts)
display shows: load instability
INFO-/WEIGH KEYS
Info
scroll forward, activate Service Mode during start-up, show active
tare value in basic weigh mode
automatic tare function or deleting exciting tare value
set to zero of the Gross weight value
FUNKTION KEYS
F1-F8
F1-F2
F0
F-
F.
F button and an numeral entry button (1 - 8). Press simultaneously
to call the defined function in the user program. (example: F8 will
be entered by pushing the ‘F button and the 8 button
simultaneously)
Changing from scale 1 to scale 2 if 2 scales are connected.
Resolution switching to a 10-fold higher value. The display returns
in the normal resolution after 5 seconds automatically.
Activating alfanumeral entries.
Activating numeral entries.
F6
Changing from basic to count
F7
Turning the indicator off
F8
activates Supervisor mode
Clr
short press: last entered character will be deleted
Long press (> 1 sec) :delete complete entry

8
back to previous program step
enter key - next program step will become active
Total
printing of the total weight or the total counted pieces
NUMERIC KEYS
0-9
Use for numeric entries. ' Yes ' (= 1) confirmation
or denial ' no ' (= 0) and entries of alpha characters via the
multiple key-mapping.
ALFANUMERIC KEYS
Data entry is as with mobile phones –one key has more characters which can be
seen, by pressing the key more then once within in a short period the display will
show the characters.
REMOVE CHARACTERS
An incorrect entry can be removed by quickly pressing the CLR key (removed the last
entered character) or by clicking on the CLR key for 1 sec. (removed the complete
entry).
WARNING
When the weighed load surpasses the pre-set maximum, the help display shows: “----
---------”. In order to prevent damage to the indicator or load cells, the weighing
system must be unloaded immediately.
TILTED POSITION
With the approved version of the weighing system, the help display indicates a tilted
position larger than 2° with the remark: “/”. In this case, the weighing system must be
placed in a horizontal position.

9
3. FUNCTIONS INDICATOR
3.1 GENERAL
3.1.1 SWITCHING INDICATOR ON/OFF
The indicator is switched on by pressing the key. Pressing the F7 key will switch of
the indicator. To save the life span of a charged battery, the indicator will switched off
automatically after 15 minutes of load stability.
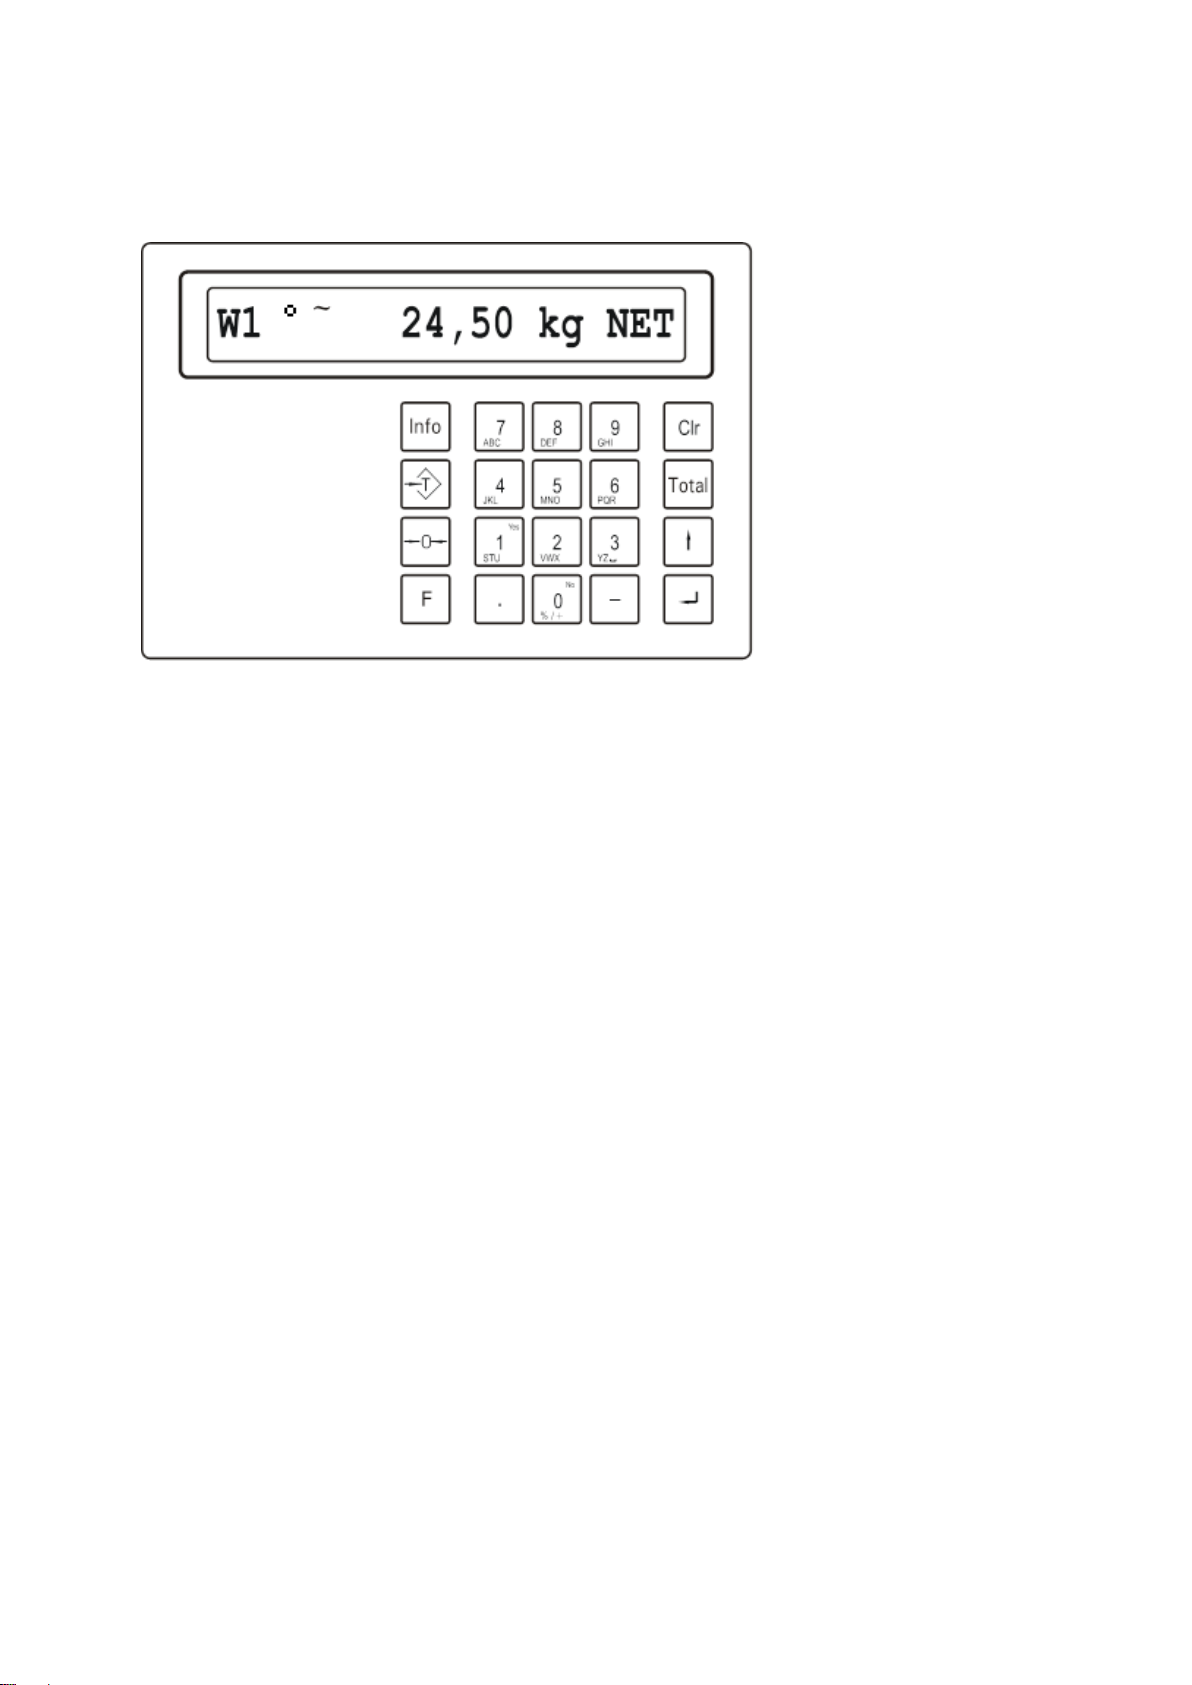
If the battery level is too low, a rectangle will flash on the right of the display to show
that the battery needs to be charged. After 2 minutes the indicator will turn off
automatically.
3.1.2 DATE & TIME ADJUST
After switching on of the indicator the display gives sequentially the following
information: IT3000M..” (initialization takes about 12 sec.) software version number,
date/time and the active programme (BASIC or COUNT). This information can also
be displayed by pressing the key.
Adjusting date & time is done in the supervisor mode. This is done like this:
Press F8 to activate the supervisor mode.
The display gives the text “Supervisor mode” and “Password [2958].
Key in password (a wrong password will give “Invalid Password”. With the key
you can go back to the normal weighing mode.)
On the display appears “Choose: Parameter”.
Confirm with
The display shows the entered date & time.
Change the date with the numeric key path and confirm with
(or confirm the current setting of the date with).
The display shows the entered time.
Change the time with the numeric key path and confirm with
(or confirm the current setting of the time with ).
The display shows “Ticket nr.”.
Scroll through the other items in the supervisor mode by pressing the key
several times.
The display shows “Saving”, the entered values will be stored
On the display appears ‘’Choose: Parameter”.
To return to the weighingprogramme push ↑
The indicator returns returns to the weighing programme.

10
3.1.3 WEIGHING PROGRAMM’S: BASIC AND COUNT
The indicator knows two weighing programmes: BASIC (standard weighing and
registration of data) and COUNT (for weighing and piece counting). You can toggle
between both programmes by pressing the function key F6.
3.2 BASIC: WEIGHING AND REGISTRATION
With the F6 Key –you can switch between the BASIC program and the COUNT
program.
3.2.1 BEFORE WEIGHING: CHECK ZERO POINT
Before each weighing it is necessary to check whether the system is unloaded and
free. The indicator is fitted with an automatic zero correction. This means that small
deviations of the zero point will be corrected automatically. If the indicator does not
determine the zero point automatically, it must be done manually using the 0
key.
3.2.2 GROSS WEIGHING
After lifting a load, the display shows the gross value of the weighed load.
3.2.3 NET WEIGHING: AUTOMATIC TARE
The indicator has an automatic tare function to tare out a (empty) pallet or container
automatically. This way the net added or subtracted weights can be determined.
Lift load.
Press key T.
The display shows 0 kilogram, with at the right the indication NET.
Place or remove the net load.
The display shows the net value of the weighed load. When removing load, this
is a negative value.
With the Info key you can read the actual tare weight.
By pressing the key T again, the indicator returns back to gross weighing.

11
3.2.4 NET WEIGHING: MANUAL TARE ENTRY
A tare weight can be entered at any moment, meaning in either a loaded or unloaded
situation. For a higher accuracy, a tare weight can be entered with a smaller
graduation step, independent of the applied load and the graduation of the indicator.
A tare weight larger than the capacity of the weighing system will not be accepted by
the indicator. On a printout a manual entered tare weight will be printed with the sign
Pt, the net weight with KgC.
The tare weight can be entered in the gross weighing mode with the keys 0-9.
A wrong entry can be corrected with the Clr-key.
Display shows “Tare entry” together with the entered value.
Conform with: .
The tare weight is activated.
if the system is loaded at that moment, the net value appears in the display. The
secondary display shows: "NET".
With the Info key Info you can display the tare weight.
By pushing key T the indicator goes back to gross weighing.
3.2.5 USING TARE MEMORY
It is possible to manually enter a maximum of 9 tare values in the memory.
Entering tare values:
Push on the “Info” key.
The display shows “0.0 kg TAR”.
Push the “” button.
The display shows “Memory 1: 0.0”.
Enter a tare weight for the first memory. Per example 12.5 kg.
The display shows “Memory 1: 12.5”.
Push the “” button.
The display shows “Memory 2: 0.0”.
Enter a tare value in the second memory of press the ↑button to return to
weighing mode.
Using tare memories:
Push the “-”button and subsequently on the number of wanted memory.
The display shows briefly “S1 12.5 kg PT”. , the preset tare value will be
entered and the system automatically returns to weighing-mode.

12
3.2.6 CODE ENTRY AND PRINTING (OPTION)
If the scale is equipped with a printer, you can enter and print a reference code at
each weighing, f.i. an order number or an article number. On the printout gross- /
tare- / net weights, code and datum / time will be printed. The code can have a
maximum of 10 alphanumeric characters.
Pick up the load and if needed key in tare weight.
Press thekey.
The display shows the text “Code Nr.: -”.
Enter the correct code using the alphanumeric keys. The entry of characters is as
it is with a cellular telephone (GSM): several key presses shortly after each other
on the same key give different numbers and letters. At incorrect entry there is the
Clr-key: per character by short pressing and the whole code by long pressing.
Confirm with.
The printer prints the ticket with the data and the indicator goes back to the
normal weighing mode.
3.2.7 DISPLAYING TOTAL WEIGHTS AND PRINTING THEM (OPTION)
All printed net weights will be automatically added together by the indicator to a total
weight. With this one can easily determine the total weight of a shipment containing
of several pallets.
Press the Total key.
The display shows the text “Tot.” With the number of weighings and the total
weight.
To go back to the weighing program without resetting the memory: press
key . Now you can weigh more pallets and add them to the total.
To printout the total weight: press thekey. The net total weight will be printed
and the memory will be reset to zero. The indicator returns to the weighing
program.
To clear the Total without printing: press the CLR key. The total memory will be
erased. The indicator goes back to the weighing program.

13
3.3 COUNT: WEIGHING AND COUNTING
Use Key F6 to switch between weighing program BASIC and program COUNT
3.3.1 BEFORE WEIGHING: CHECK ZERO POINT
As in BASIC: see 3.2.1
3.3.2 GROSS WEIGHING
As in BASIC: see 3.2.2
3.3.3 NET WEIGHING: AUTOMATIC TARE
As in BASIC: see 3.2.3
3.3.4 NET WEIGHING: MANUAL TARE ENTRY
As in BASIC: see 3.2.4
3.3.5 PIECE COUNTING WITHOUT KNOWN PIECE WEIGHT
The indicator has several possibilities to count articles on the scale. By use of the
known piece weight (weight per article); this weight will be used to calculate the total
number of pieces when weighing the complete load. The indicator will show, instead
of weight, the number of articles. If the piece weight is not known, the indicator can
calculate it, after which a counting is executed
Place the load which you want to count on the scale.
Key in the tare weight of the pallet or container (see 3.2.4) or tare out the empty
pallet or container (see 3.2.3): The piece counting is executed in the net mode
only.
Press thekey.
The display shows “10 pieces on the scale”.
Add 10 articles or take 10 off: the scale calculates the piece weight
Through the weight increase or decrease. (If you want to put an other number of
articles on the scale then you press the Clr key and you key in that number.)
Confirm with thekey.
The display shows the message “Piece weight. (g)” and the calculated piece
weight in grams.
Confirm with thekey.
The display gives the message “pieces” and the counted number of articles.

14
3.3.6 PIECE COUNTING WITH KNOWN PIECE WEIGHT
When the piece weight is known (or is measured on a small reference scale), it can
be entered manually after which the indicator will calculate the number of pieces on
the scale.
Place the load which you want to count on the scale.
Enter the tare weight of the pallet or container (see 3.2.4) or tare the empty pallet
or container (see 3.2.3): the calculation will only be executed with the net load.
Confirm with thekey.
The display gives the message “10 piece on scale”.
Press the key: Info.
The display shows: “Piece wght. (g)” and the last used piece weights in grams.
Enter the known piece weight through the numeric keys and confirm with the
key. (when more pallets are using the same piece weight you can use that piece
weight by confirming this with thekey).
The display gives the message “Number” and the number of counted articles.
N.B.: When a big number of containers with the same article have to be counted in a
row, the user can –after determining of the piece weight –use the same piece
weight directly with the next container. Set parameter “ Ser.mode” in Supervisor
mode on 1 (to activate Supervisor mode: see 3.1.2).
3.3.7 PIECE COUNING WITH A REFERENCE SCALE (OPTION)
When the piece weight is extremely small, or the accuracy of the piece weight is of
paramount importance, the system can be equipped with a reference scale (f.i. with a
10 kg capacity and a resolution in grams). The piece weight is determined on the
reference scale and the indicator uses that weight directly to calculate the number of
pieces of the pallet scale.
Place the load which you want to count on the scale.
Enter the tare weight in for a pallet or container (see 3.2.4) or tare out the empty
pallet or container (see 3.2.3): the calculation is executed now with the net weight
only.
Confirm with thekey.
The display gives the message “10 Pieces on scale”.
Press F2 to switchover to the reference scale. The weight, number of pieces and
messages in the display are related to information of the reference scale.
Put 10 articles on the reference scale and press thekey.
The display gives the message “Piece wght. (g)” and the calculated piece
weight in gram’s.

15
Confirm with the key.
Display gives the message “Pieces” and the number of articles of the reference
scale.
With F1 you go back to the main weighing system. The weight, the number and
messages in the display of the main weighing system are activated.
The display gives the message “Number” and the number of counted goods on
the main weighing system. When you take goods out of the pallet of put more
goods in then the counted number of articles will increase and decrease
accordingly.
3.3.8 CODE ENTRY AND PRINTING (OPTION)
When the weighing system is equipped with a printer, it is possible to enter per
weighing/count action an order or an article number. On the printout it shows gross- /
tare- / net weights, piece weight and the number of pieces and the entered codes
with date / time. The maximum number of codes is 10 alphanumeric characters.
Lift the load and execute a count action (see above).
Press key.
Display shows the text “Code Nr.: -”.
Key in the code using the alphanumeric key path. Entry of characters is executed
as with a mobile phone: sequentially pressing the same key in a short time.
Incorrect entries can be corrected using the Clr-key: per character by pressing
shortly and a long press for the complete code
Confirm with.
The printer prints the ticket and returns to the normal program.
3.3.9 PRINTING AND DISPLAYING TOTALS (OPTION)
All printed net weights and counting results will be accumulated automatically by the
indicator into a weight total and a piece total. So with shipments with several pallets
with the same articles it is possible to get the total calculated and registered. (!: the
indicator does not recognize the different articles. All quantities of pieces are added
together).
Press theTotal key.
Display shows the text “Tot.” including the numbers of summations and the
total number of pieces
To get back to the weighing program without deleting the total memory:
press . You can add more pallets to the current total value if needed.
To print the totals: Press. The net total weight will be printed, the total memory
will be reset and the indicator returns to the normal weighing program.
Table of contents
Popular Farm Equipment manuals by other brands

Farmi Forest Corporation
Farmi Forest Corporation CH380HF OPERATION, MAINTENANCE AND SPARE PARTS MANUAL

GTM Professional
GTM Professional ELEPHANTS TRUNK 3 user manual

LELY
LELY Juno Operator's manual

H&S
H&S HD 7+4 Operator's manual / parts book

AGKNX
AGKNX 400 Operation manual

Roxell
Roxell KiXoo in line user guide

LOFTNESS
LOFTNESS GrainLogix XLB10 Owner's manual and parts book

Greenbroz
Greenbroz 215 CannaGin Destemmer user manual

Anderson
Anderson Hybrid-X Product range overview

KISANKRAFT
KISANKRAFT KK-SRT-910D Operation manual

Ziegler
Ziegler PKT 452 Original operating instructions

Rauch
Rauch RFZ 7 instruction manual