Raymar DSP9612 User manual

0049-0117-100 DSP9612 Flash Poll Modem – User Guide 10/12/2011
Rev. F1
DSP9612 Flash Poll
Modem User’s Guide

0049-0117-100 DSP9612 Flash Poll Modem – User Guide 10/12/2011
Rev. F1 Page 1 of 44
Raymar Information Technology, Inc.
7325 Roseville Road
Sacramento, CA 95842
800-695-1951
Fax: 916-783-1952

0049-0117-100 DSP9612 Flash Poll Modem – User Guide 10/12/2011
Rev. F1 Page 2 of 44
The products and programs described in this User’s Guide are licensed products
of Raymar-Telenetics. This User’s Guide contains proprietary information
protected by copyright, and this User’s Guide and all accompanying hardware
and documentation are copyrighted.
Raymar-Telenetics does not warrant that the hardware will work properly in all
environments and applications, and makes no warranty and representation,
either implied or expressed, with respect to the quality, performance,
merchantability, or fitness for a particular purpose.
Information in this User’s Guide is subject to change without notice and does not
represent a commitment on the part of Raymar-Telenetics. Raymar-Telenetics
assumes no responsibility for any inaccuracies that may be contained in this
User’s Guide.
Raymar-Telenetics makes no commitment to update or keep current the
information in this User’s Guide, and reserves the right to make changes to this
User’s Guide and/or product without notice.
No part of this manual may be reproduced or transmitted in any form or by any
means, electronic or mechanical, including photocopying, recording, or
information storage and retrieval systems, for any purpose other than the
purchaser's personal use, without the express written permission of Raymar-
Telenetics.
©Copyright 2011 Raymar Information Technology, Inc.
7325 Roseville Road
Sacramento, California 95842
Tel: 800-695-1951 Direct: +1-916-783-1951
Fax: 916-783-1952
Web site: www.raymarinc.com

0049-0117-100 DSP9612 Flash Poll Modem – User Guide 10/12/2011
Rev. F1 Page 3 of 44
Contents
CHAPTER 1 INTRODUCTION ………………………..5
FEATURES ………………………………………………...6
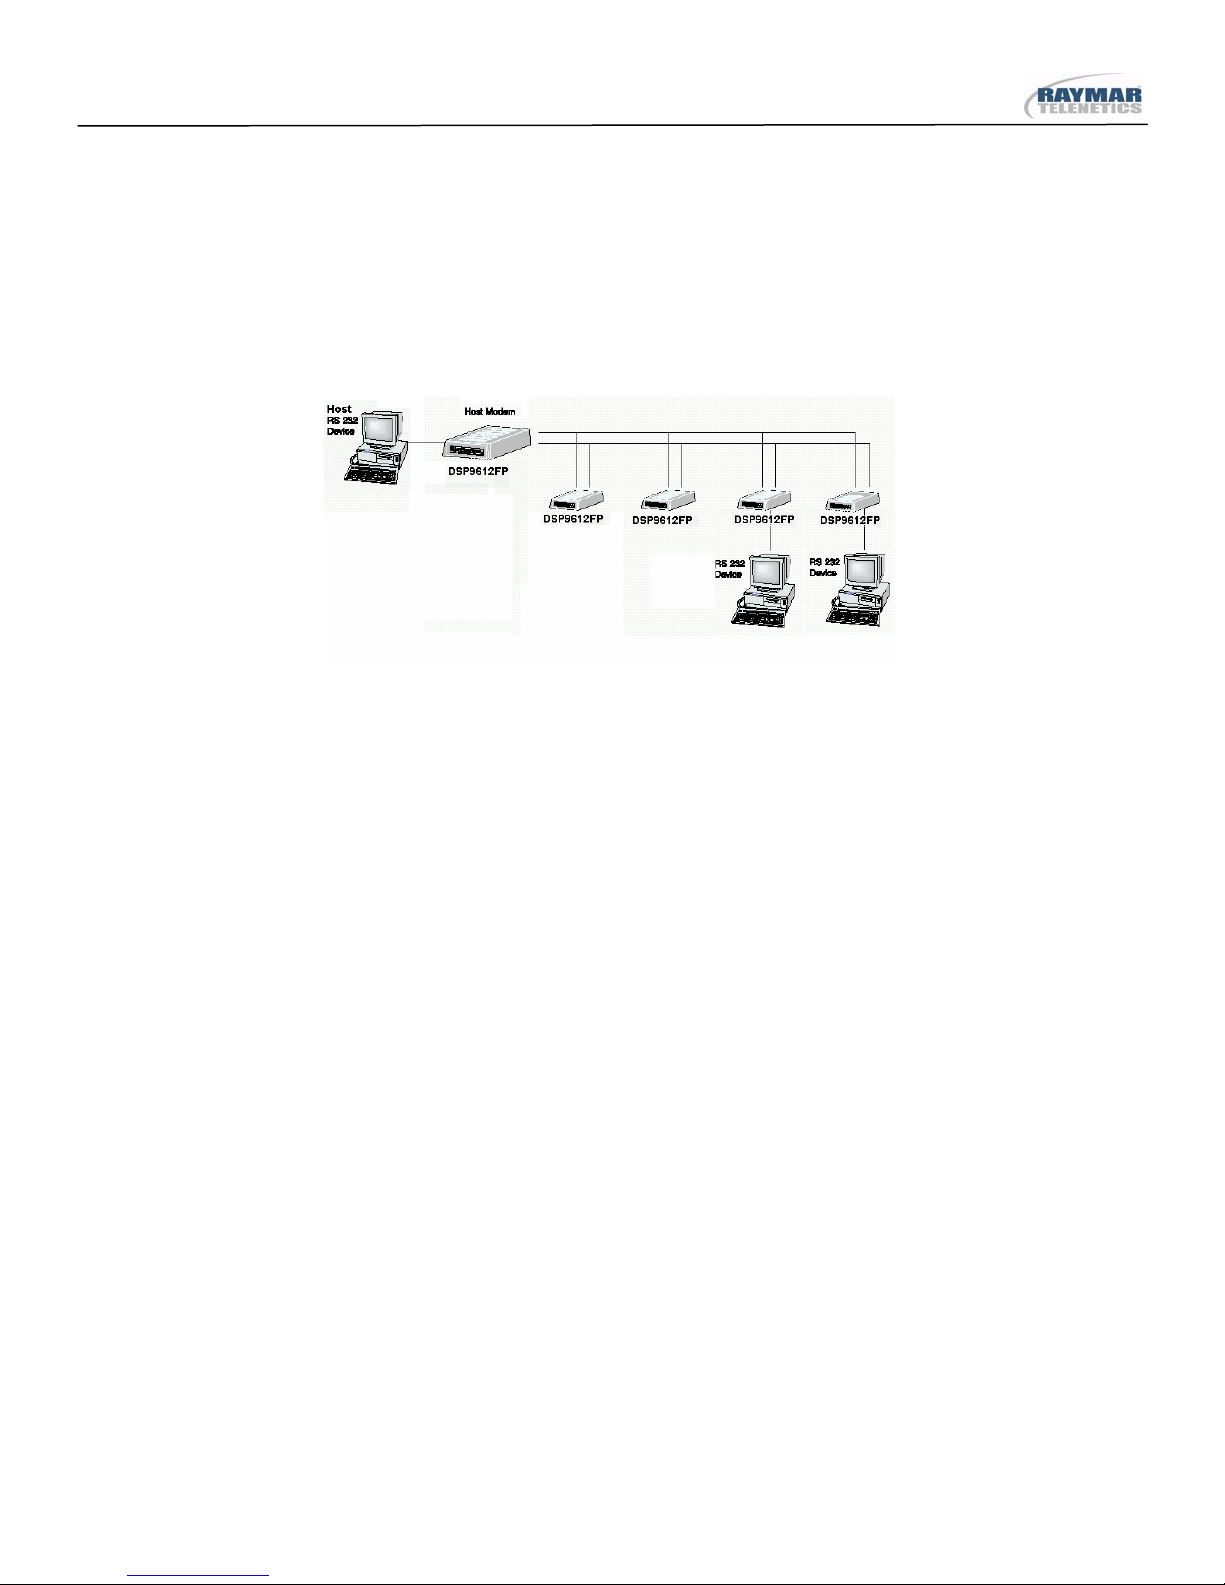
APPLICATIONS …………………………………………….7
CHAPTER 2 INSTALLATION …………………………9
UNPACKING YOUR HARDWARE ………………………….. 9
ADDITIONAL ITEMS YOU NEED ……………………………9
HARDWARE OVERVIEW ………………………………… 10
Back View ……………………………………………...10
Front View………………………………………………11
INSTALLATION SUMMARY ………………………………..12
FINDING A SUITABLE LOCATION …………………………12
CONFIGURING THE MODEM ……………………………...13
SW1 DIP Switch Settings……………………………..14
SW2 DIP Switch Settings……………………………..17
SW3 DIP Switch Settings……………………………..21
CONNECTING TO A TRANSMISSION LINE ………………..26
CONNECTING TO A VOLTAGE SOURCE ………………….27
CONNECTING AN RS-232 DEVICE ………………………28
LEDS ……………………………………………………29
LOOPBACK CONTROL SWITCH …………………………. 30
APPENDIX A TROUBLESHOOTING ………………32
PROBLEM SOLVING ……………………………………...32
APPENDIX B DIP SWITCH SUMMARY ……………33
APPENDIX C SPECIFICATIONS …………………...35
GENERAL SPECIFICATIONS …………………………… 35
MECHANICAL SPECIFICATIONS ……………………….. 36
INTERFACE CONNECTOR PIN ASSIGNMENTS …………. 37
RS-232 (DTE) Interface……………………………….38
ENVIRONMENTAL SPECIFICATIONS………………………38
COMPLIANCES ………………………………………….. 39
APPENDIX D COMPLIANCES ……………………...40
ADAPTING AC TO DC ……….……………………...42
APPENDIX E LIMITED PRODUCT WARRANTY….45
APPENDIX F RMA PROCEDURE…………………..47

0049-0117-100 DSP9612 Flash Poll Modem – User Guide 10/12/2011
Rev. F1 Page 4 of 44
NOTES

0049-0117-100 DSP9612 Flash Poll Modem – User Guide 10/12/2011
Rev. F1 Page 5 of 44
Chapter 1
Introduction
Congratulations for purchasing the finest industrial-grade fast-poll modem
available.
The Telenetics DSP9612 (Flash Poll) modem is a 9600/4800/0-1800 bps
modem designed for 4-wire, full-duplex or 2-wire, half-duplex operation
over a voice-band leased line or private line. The modem is designed
utilizing the latest digital-signal processing (DSP) technology to achieve
high performance. The modem employs Telenetics’ proprietary modulation
and encoding scheme to achieve fast modem training time. The modem is
also backward compatible with Bell 202 and ITU-T V.23 modems.
The DSP9612 modem is ideally suited for multi-point communication
systems that require fast response time, short training time, and low
throughput delay. The DSP9612 is the most technologically advanced
modem on the market.
This User’s Guide describes both the DSP9612FP (AC-powered) modem
and the DSP9612-LV (DC-powered) modem. This manual is intended to
let you get your modem “up and running” as quickly as possible. It
contains all the information you need to configure and install your modem.
It also contains troubleshooting information in the unlikely event you
encounter a problem with your modem.

0049-0117-100 DSP9612 Flash Poll Modem – User Guide 10/12/2011
Rev. F1 Page 6 of 44
Features
The DSP9612 modem is specifically designed for harsh environments
found in utility substations and industrial facilities. Though functionally
similar to commercial modems, the DSP9612 provides the following
unique features that make it well suited for utility and industrial
applications.
Packaged in a rugged, compact enclosure for industrial applications.
Leased-line interface protected with heavy-duty surge protection
hardware (15KV).
Requires no human intervention, making it ideal for unmanned
locations.
Works within an extended temperature range of -40ºC to +85ºC.
Designed with coupling transformers for high-voltage isolation and
common mode noise rejection in industrial and commercial
environments.
Operate over voice-band conditioned or unconditioned leased line and
pilot wires.
Accepts power from a wide range of AC and DC power supplies.
−DSP9612FP: 85 to 265 VAC or 85 to 400 VDC
−DSP9612-LV: 10 to 53 VDC
Standard industrial connectors for data, analog, and power interfaces
allow reliable interconnection to other industrial equipment.
Asynchronous data rates (selectable) of 9600, 4800, and 0-1800 bps.
Easily accessible DIP switches for user configuration and option
selection.
DB25 connector for RS-232/V.24 interface.
Local analog, local digital and remote digital loopback diagnostics

0049-0117-100 DSP9612 Flash Poll Modem – User Guide 10/12/2011
Rev. F1 Page 7 of 44
Applications
The DSP9612 modem is designed for point-to-point and multipoint data
communications. Figure 1-1 shows a typical multipoint configuration.
Figure 1-1. Network of Multipoint Configuration
There are a number of factors that can affect the network’s and modem’s
operation and performance. These include:
Operating speed
2-wire or 4-wire configuration
Transmission line characteristics, noise, and line impairments
Network configuration (point-to-point or multipoint)
Number of nodes on the network

0049-0117-100 DSP9612 Flash Poll Modem – User Guide 10/12/2011
Rev. F1 Page 8 of 44
NOTES

0049-0117-100 DSP9612 Flash Poll Modem – User Guide 10/12/2011
Rev. F1 Page 9 of 44
Chapter 2
Installation
This chapter describes how to install the modem.
Unpacking Your Hardware
Your package should include:
At least one of the following DSP9612 modems:
−Model DSP9612FP for 85 to 265 VAC or 85 to 400VDC
−Model DSP9612-LV for 10 to 53 VDC
A leased-line cable
A shielded DC power cable (model DSP9612-LV modem only)
User’s Guide CD
If your package contents are damaged or missing, please contact your place of
purchase immediately.
Additional Items You Need
To use your modem, you need the following additional items:
Two- or four-wire transmission line or leased line
A DB25-F data cable for your Data Terminal Equipment (DTE) port

0049-0117-100 DSP9612 Flash Poll Modem – User Guide 10/12/2011
Rev. F1 Page 10 of 44
A power supply that provides either:
−85 to 265 Volts AC, 50 to 60 Hz, single phase or 85 - 400
VDC (if you have the model DSP9612FP modem), or
−10 to 53 Volts DC (if you have the model DSP9612-LV
modem)
Hardware Overview
Back View
Figures 2-1 and 2-2 show the back view of the two DSP9612 modem models. Starting
from the left side, these views show:
A 4-wire/2-wire configuration block. See page 26.
A female, 25-pin RS-232 connector, for connecting a standard DTE (RTU). See
page 28.
A POWER ON/OFF switch.
A power connector. See page 27.
Figure 2-1. Back View of Model DSP9612FP Modem

0049-0117-100 DSP9612 Flash Poll Modem – User Guide 10/12/2011
Rev. F1 Page 11 of 44
Figure 2-2 Back View of Model DSP9612-LV Modem
Front View
The Model DSP9612FP and Model DSP9612-LV modems have identical front panels.
Figure 2-3 shows the front view of the modem. Starting from the left side, this view
shows:
A set of nine LEDs.
A loopback test switch.
Figure 2-3 Front View of Modem

0049-0117-100 DSP9612 Flash Poll Modem – User Guide 10/12/2011
Rev. F1 Page 12 of 44
Installation Summary
The modem installation involves the following steps:
1. Finding a suitable location for the modem. See the section below.
2. Configuring the modem.
3. Connecting to a transmission line.
4. Connecting to a voltage source.
5. Connecting a DTE device.
Finding a Suitable Location
The location you select should provide easy access to the back panel
communications interface(s) and front panel power interface. It should
also let you view all the LEDs on the front panel.
Note: Raymar-Telenetics also offers a rack-mount version of this
modem (Model DSP9612RM) as a plug-in module for the
Telenetics/UDS RM16M Central Site Modem Rack.
For more information, contact Raymar-Telenetics Sales Department
at 916-783-1951.

0049-0117-100 DSP9612 Flash Poll Modem – User Guide 10/12/2011
Rev. F1 Page 13 of 44
Configuring the Modem
You configure the modem using the three sets of DIP switches on the
bottom of the modem.
,
IMPORTANT It is important to follow the three steps
described below, in the order shown, to
ensure that you configure your modem
properly using the modem DIP switches:
1. Use DIP switch 3 (SW3) to configure the
modem for your host DTE interface and
network topology. Using SW3, you select
the modem to operate in high-speed fast-
poll or low-speed (FSK) mode.
2. If you set SW3 for FSK mode in step 1,
use DIP switch 2 (SW2) to configure the
modem for either Bell 202T or ITU-T V.23
compatibility. Otherwise, you can use the
modem in fallback mode.
3. Use DIP switch 1 (SW1) to select the
modem’s transmitter output level and
receiver dynamic range. The SW1 settings
apply for both high-speed fast-poll and
low-speed (FSK) modes.

0049-0117-100 DSP9612 Flash Poll Modem – User Guide 10/12/2011
Rev. F1 Page 14 of 44
SW1 DIP Switch Settings
SW1 is an 8-position DIP switch. Table 2-1 shows the modem switch
settings for DIP switch SW1. A description of the SW1 switch settings
follows the table.
Note: SW1 settings apply for both high-speed fast-
poll and low-speed (FSK) modes
Table 2-1. Modem Switch Settings for DIP Switch SW1
Switch SettingsSwitches ON OFF
(Default)
SW1-1 −1-4: Transmit
Level (page 15) (see Table 2-2 on page 15)
SW1-5: Receiver Dynamic
Range
(page 16)
−10 to −43
dBm +3 to −30
dBm
SW1-6: TX Cable Equalizer
(page 16) Enabled Disabled
SW1-7: RX Cable Equalizer
(page 16) Enabled Disabled
SW1-8: Anti-streaming
(page 16) Active Inactive

0049-0117-100 DSP9612 Flash Poll Modem – User Guide 10/12/2011
Rev. F1 Page 15 of 44
SW1-1 through SW1-4 −Transmit Level
Switches SW1-1 through SW1-4 adjust the modem’s transmit level. Table
2-2 shows the transmit levels you can select using these switches.
Table 2-2 Transmit Levels
SW1 through SW4 Switch Settings
Transmit
Level
SW1-1 SW1-2 SW1-3 SW1-4
0 dBm OFF OFF OFF OFF
−1 dBm OFF OFF OFF ON
−2 dBm OFF OFF ON OFF
−3 dBm OFF OFF ON ON
−4 dBm OFF ON OFF OFF
−5 dBm OFF ON OFF ON
−6 dBm OFF ON ON OFF
−7 dBm OFF ON ON ON
−8 dBm ON OFF OFF OFF
−9 dBm ON OFF OFF ON
−10 dBm ON OFF ON OFF
−11 dBm ON OFF ON ON
−12 dBm ON ON OFF OFF
−13 dBm ON ON OFF ON
−14 dBm ON ON ON OFF
+3 dBm ON ON ON ON

0049-0117-100 DSP9612 Flash Poll Modem – User Guide 10/12/2011
Rev. F1 Page 16 of 44
SW1-5 −Receiver Dynamic Range
SW1-5 ON = −10 to −43 dBm
OFF = +3 to −30 dBm
For a low receive signal level, set SW1-5 to ON (−43 dBm ). For short
distances or to select a strong receive signal, set SW1-5 to OFF.
SW1-6 and SW1-7 −Cable Equalizer (Fast-Poll Mode Only)
SW1-6 ON = Enable TX Cable Equalizer
OFF = Disable TX Cable Equalizer
SW1-7 ON = Enable RX Cable Equalizer
OFF = Disable RX Cable Equalizer
To improve or extend the modem’s polling performance, use the fixed
Compromise Cable Equalizer when polling on long metallic circuits. The
cable equalizer is active only when the modem is in fast-poll mode (SW3-1
set to OFF).
SW1-8 −Anti-streaming
SW1-8 ON = Anti-streaming active
OFF = Anti-stream inactive
Typically, anti-streaming is used in multi-point applications to prevent a
malfunctioning slave modem from occupying the line indefinitely. When
anti-streaming is active, the modem can transmit data for a maximum of
27 seconds before the transmitter turns off automatically. The modem
then looks for an ON-to-OFF Request To Send (RTS) transition before
proceeding with normal operation. Anti-streaming can be selected in either
high-speed or low-speed mode.

0049-0117-100 DSP9612 Flash Poll Modem – User Guide 10/12/2011
Rev. F1 Page 17 of 44
SW2 DIP Switch Settings
SW2 is an 8-position DIP switch. Table 2-3 shows the modem switch
settings for DIP switch SW2. A description of the SW2 switch settings
follows the table.
Table 2-3 Modem Switch Settings for DIP Switch SW2
Switch SettingsSwitches ON OFF
(Default)
SW2-1: FSK Mode V.23 Bell 202
SW2-2: Receiver Squelch
(page 18)
(valid for FSK mode, 2-wire
half-duplex operation only)
Turnaround
Squelch
(Bell 202):
8ms
Turnaround
Squelch
(V.23):
150ms
Turnaround
Squelch (Bell
202): 0ms
Turnaround
Squelch
(V.23): 0ms
SW2-3: FSK Soft Carrier
(page 19) Disabled Enabled
SW2-4 and SW2-5: FSK
RTS-CTS Delay (page 19) (see Table 2-4)
SW2-6: FSK CD Delay
(page 20) 23ms 6ms
SW2-7: Remote Loopback
(page 20) Enabled Disabled
SW2-8: Reserved (Test
Only) (page 20) Test Normal

0049-0117-100 DSP9612 Flash Poll Modem – User Guide 10/12/2011
Rev. F1 Page 18 of 44
SW2-1 −FSK Mode
SW2-1 ON = ITU-T V.23 mode
OFF = Bell 202 mode
The modem has two FSK modes:
Bell 202, which supports data rates from 0 to 1800 bps
ITU-T V.23, which supports data rates from 0 to 1200 bps
SW2-1 configures the modem for either of these FSK modes. Setting
SW2-1 to ON selects ITU-T V.23 mode. In this mode, the modem
complies with ITU-T (CCITT) recommendation V.23 with the following
parameters:
Mode 2 modulation only
No backward channel
No provisions for disablement of echo suppressors
DTR (circuit 108) is ignored
Setting SW2-1 OFF selects Bell 202 mode.
SW2-2 ⎯Receiver Squelch (FSK Mode 2-Wire Half-Duplex Only)
SW2-2 ON = 8ms for Bell 202, 150ms for ITU-T V.23
OFF = 0ms
SW2-2 configures the turnaround squelch delay and is valid when the
following are active:
FSK mode (SW3-1 ON)
2-wire half-duplex operation (SW3-7 ON)
Setting this switch to OFF configures the modem to enable its receiver
immediately after the Request To Send (RTS) signal is turned off.

0049-0117-100 DSP9612 Flash Poll Modem – User Guide 10/12/2011
Rev. F1 Page 19 of 44
When this switch is set to OFF and the modem is configured for 2-wire,
half-duplex mode (SW3-7 ON), the modem squelches the receiver after
RTS is turned off to prevent far-end echoes from causing data errors. The
duration that the modem squelches the receiver is either:
8 milliseconds if the modem is configured for Bell 202 mode (SW2-1
OFF)
150 milliseconds if the modem is configured for ITU-T V.23 mode
(SW2-1 ON)
SW2-3 ⎯FSK Soft Carrier (Bell 202 FSK Mode Only)
SW2-3 ON = None
OFF = 8ms
SW2-3 controls the soft carrier and is valid for Bell 202 FSK mode only
(SW2-1 set to OFF). Setting this switch to OFF will configure the modem
to transmit a 900 Hz soft carrier to the remote modem for 8 milliseconds
after RTS is turned off. Setting this switch to ON will prevent the modem
from transmitting a soft carrier after RTS is turned off.
SW2-4 and SW2-5 ⎯RTS-CTS Delay (Bell 202 Mode Only)
Switches SW2-4 and SW2-5 determine the duration of the RTS-CTS delay
in Bell 202 mode. Table 2-4 shows how to set these switches to select the
appropriate setting.
Table 2-4. RTS-CTS Delay Settings in Bell 202 Mode
To Select
a Delay
of…
Set SW2-4
to… And Set SW2-
5 to…
8ms OFF OFF
33ms OFF ON
59ms ON OFF
219ms ON ON
Table of contents
Other Raymar Modem manuals

Raymar
Raymar 326X V.34 Series User manual

Raymar
Raymar DSP9612RM User manual

Raymar
Raymar Myriad MD9612FP User manual

Raymar
Raymar Telenetics MIU14.4L User manual

Raymar
Raymar RMX-2 Operating instructions

Raymar
Raymar 2.4 MIU/PowerPort Series User manual

Raymar
Raymar Myriad MD202T User manual

Raymar
Raymar V.32M/14.4 User manual

Raymar
Raymar Alliance V.34M User manual

Raymar
Raymar Telenetics MIU9.6FPD User manual