Raytheon 138-118 User manual

Raytheon Marine GmbH
High Seas Products
Postfach 1166
D -- 24100 Kiel
Germany
Tel+49--431--3019--0
Fax+49--431--3019--291
Email [email protected]
www.raymarine.com
R
3647.DOC010302 Edition: November 21, 2003
Revision: Feb. 14, 2004
Revision: Feb. 23, 2004
DISTRIBUTION UNIT
Type 138--118
1 Description
2 Installation

Weitergabe sowie Vervielfältigung dieser Unterlage, Verwertung und
Mitteilung ihres Inhaltes nicht gestattet, soweit nicht ausdrücklich
zugestanden. Zuwiderhandlungen verpflichten zu Schadenersatz.
Copying of this document, and giving it to others and the use or
communication of the contents thereof, are forbidden without express
authority. Offenders are liable to the payment of damages.
Toute communication ou reproduction de ce document, toute
exploitation ou communication de son contenu sont interdites, sauf
autorisation expresse. Tout manquement à cette règle est illicite et
expose son auteur au versement de dommages et intérêts.
Sin nuestra expresa autorización, queda terminantemente prohibida la
reproducción total o parcial de este documento, así como su uso
indebido y/o su exhibición o comunicación a terceros. De los infractores
se exigirá el correspondiente resarcimiento de daños y perjuicios.

Distribution Unit
138--118
DISTRIBUTION
UNIT
I3647.DOC010302Edition: November 21, 2003
CONTENTS Page
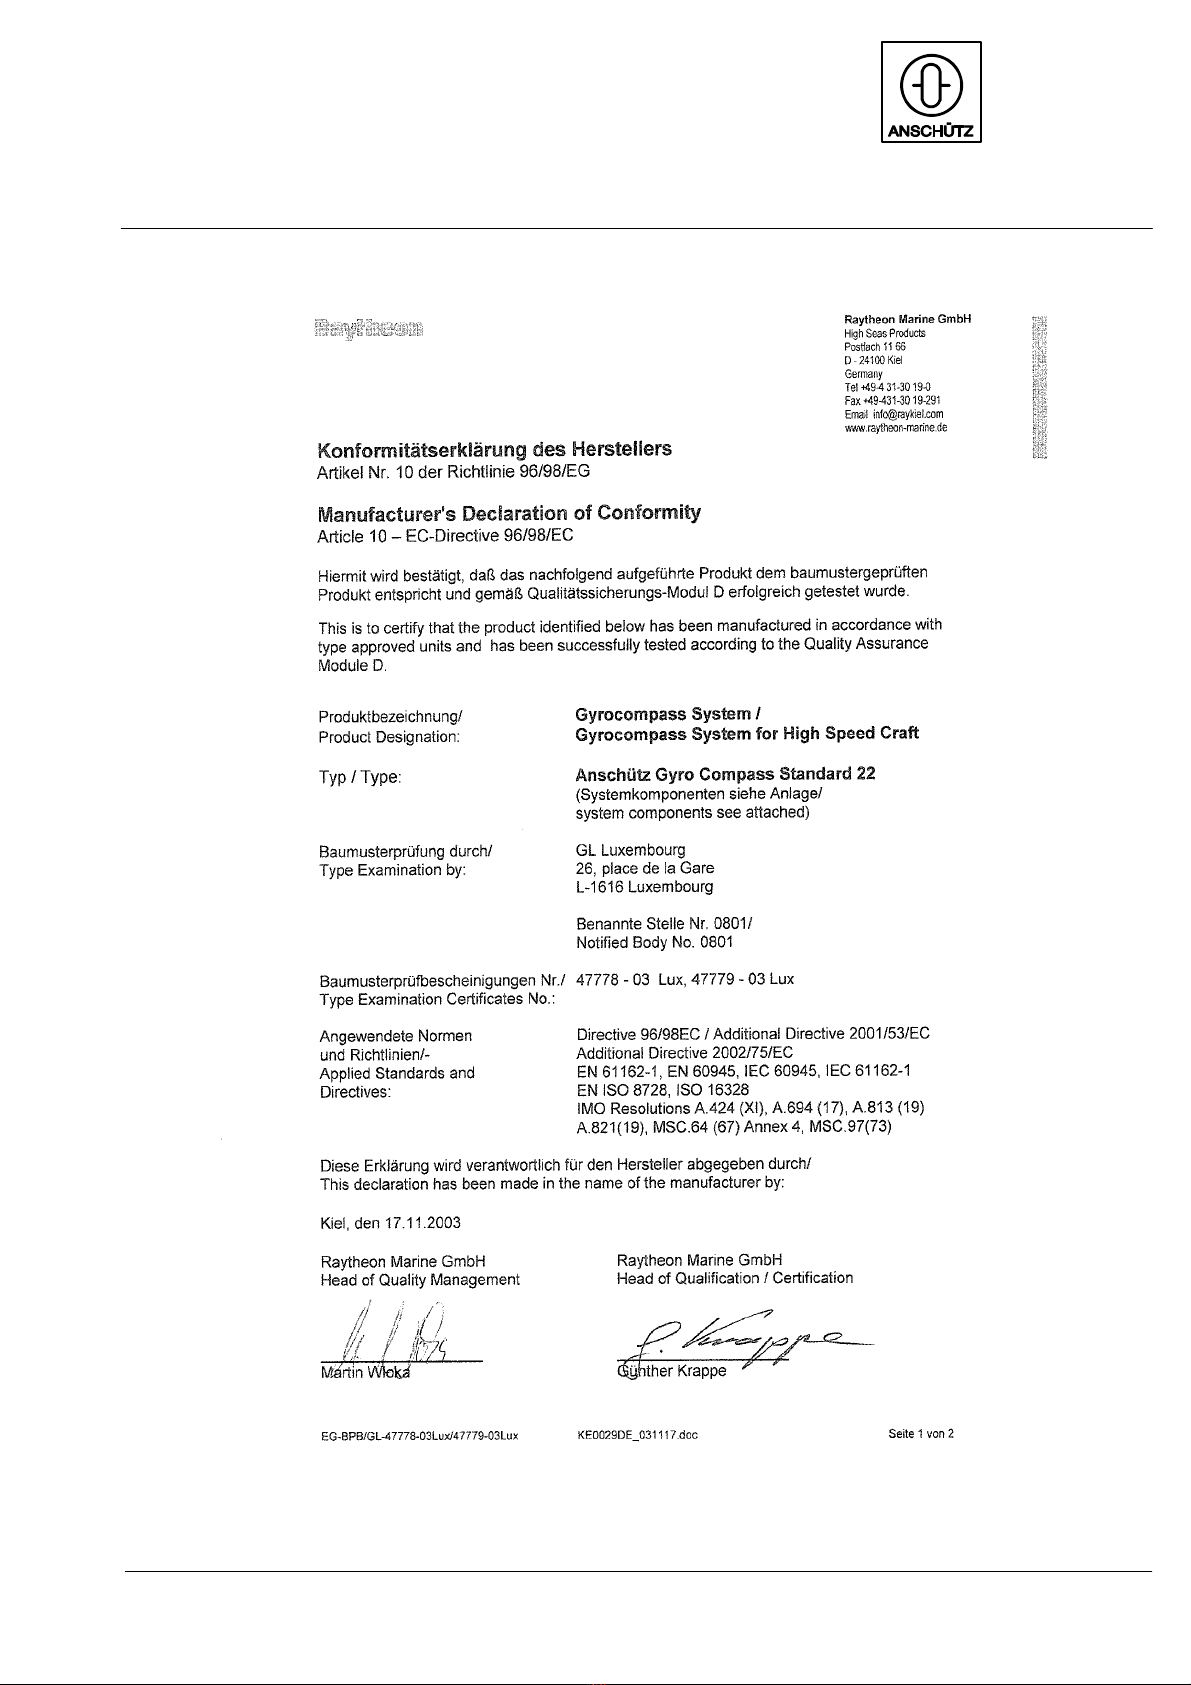
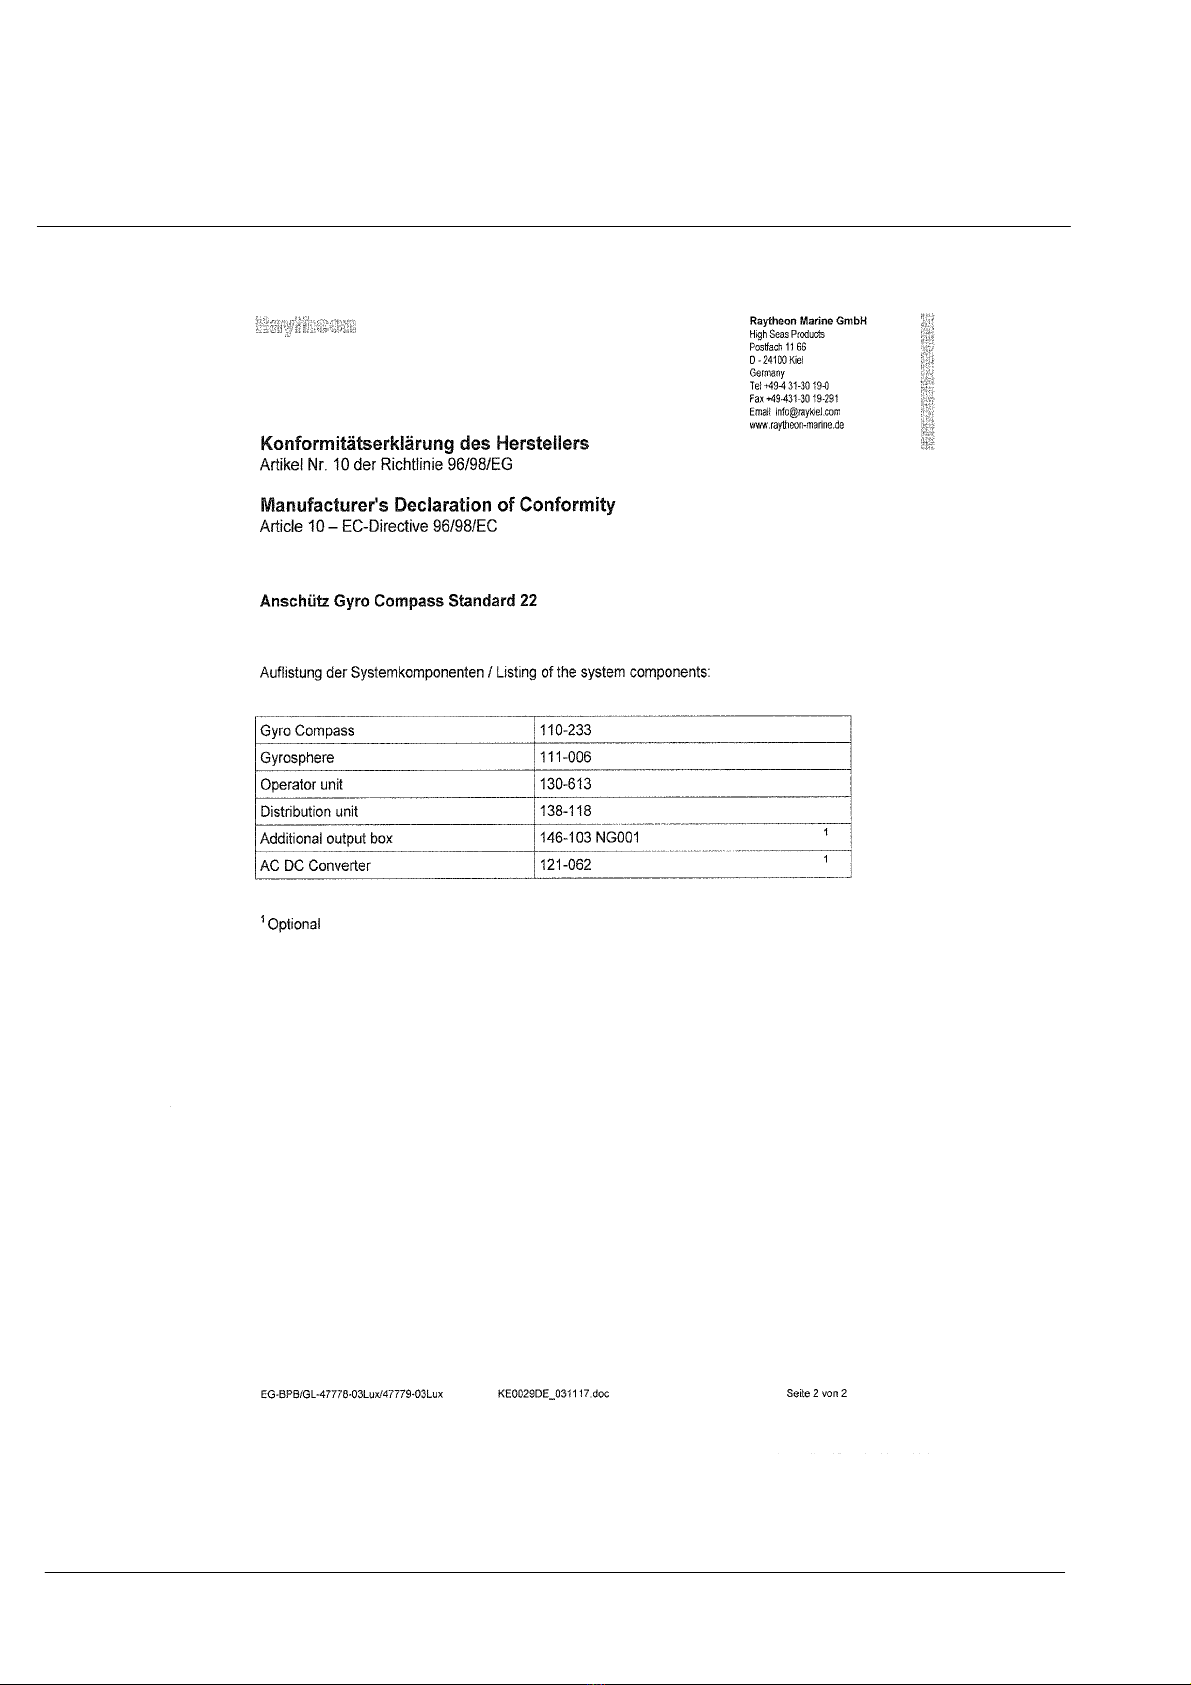
DeclarationofConformity ................................................
1 General 1..............................................................
1.1 CAN--Bus 2.............................................................
1.2 Technical Data 3.........................................................
1.2.1 Mechanical Data 3.......................................................
1.2.2 Electrical Data 3.........................................................
1.2 Information about LED‘s, push buttons and connectors of the integrated PCB‘s 4
2 Installation of the Distribution Unit 10........................................
2.1 General remarks 10.......................................................
2.1.1 General information about establishing an earth connection 12.................
2.2 Installation 13............................................................
2.2.1 Installation of the options 13...............................................
2.3 Connections 15...........................................................
2.3.1 Connection of the options 15...............................................
3 Switching On the Distribution Unit 15........................................
4 Setting of Jumpers and DIP--Switches 16....................................
4.1 Setting of Jumpers 16.....................................................
4.2 Setting of DIP--Switches 17................................................
4.2.1 General information in use of the DIP--Switch and push buttons 17..............
4.2.1.1 Setting of CAN Bus address 18.............................................
4.2.1.2 Adjustment of the 8 output channels 19......................................
4.2.1.3 Adjustment of NMEA Formats 21...........................................
4.2.1.4 Scaling of RoT Output 23..................................................
4.2.1.5 Selection of magnetic compass 24..........................................
4.2.1.6 Displaying heading or speed information 25..................................
5 Switching OFF the Distribution Unit 26.......................................
6 Adjustments 27...........................................................
6.1 Adjustment of magnetic sonde 27...........................................
7 Maintenance and Repair 29................................................
8 Functional description of DIP switch settings (SEC) in the service mode 30.......
Drawings:
Gyro Compass STD 22 Cable and Connection Diagram 110--233 HP009 Sheets 1--3
Distribution Unit Dimensional Drawing 138--118 HP005
Distribution Unit Wiring Diagram 138--118 HP008

Distribution Unit
138--118
II Edition: November 21, 2003
3647.DOC010302

Distribution Unit
138--118
DISTRIBUTION
UNIT
III 3647.DOC010302Edition: November 21, 2003

Distribution Unit
138--118
IV Edition: November 21, 2003
3647.DOC010302

Distribution Unit
138--118
DISTRIBUTION
UNIT
V3647.DOC010302Edition: November 21, 2003
Safety instructions
Caution:
zInstallation, maintenance and repair work must be
carried out only by properly trained and qualified staff
with a good knowledge of national equipment safety
regulations.

Distribution Unit
138--118
VI Edition: November 21, 2003
3647.DOC010302

Distribution Unit
138--118
DISTRIBUTION
UNIT
13647.DOC010302Edition: November 21, 2003
1 General
The Distribution Unit 138--118 consists of an aluminium casting in which 2 printed circuit
board are integrated.
-- I / O -- P C B
-- Interface PCB.
At the bottom of the casting there are 40 cable inlets for connecting repeaters, gyros and
other heading receivers and sensors.
The task of this distribution Unit is:
-- Distribution of heading information to all connected heading receivers.
The selection of the heading source (gyro1...3 or magnet compas) is performed by
the Operation unit.
-- System monitoring by alarm--and status messages.
-- Distribution of corrected heading information to all connected heading receivers.
-- Gateway between DV--Bus and CAN--Bus (future purpose)
-- Power supply of all connected heading receivers and heading sources (sensors).
There are no operating proceures during the normal operation of the distribution unit.
Only the setting to work--procedure needs some settings performed by DIP--Switches at
the CAN Network Modul Interface PCB.
Options are:
“Additional output box” for additional output signals.
“AC/DC--Converter” to generate the supply voltage for the distribution unit.

Distribution Unit
138--118
2
3647.DOC010302 Edition: November 21, 2003
1.1 CAN-Bus
(CAN = Controller Area Network)
259.8
Gyro compass
Gyro compass
GPS compass
Operator unit
Distribution unit
8 x heading
(course bus
or NMEA)
3xstep
1 x rate of turn
1xprinter
Repeater
Repeater
= terminating resistor
The CAN bus is a Multi-Master-Bus allowing the
connection of all devices and systems regardless
of their task and function. This means that any
number of devices can be connected. These de-
vices must be designed for CAN bus technology.
For the CAN bus it is essential that every bus user
is addressable via a unique address. This address
is set within each bus user.
The usable address range is from 01(16) to 3F(16)
(address 00(16) is reserved for development pur-
poses).
Each bus user can send and receive data via the
CAN bus.
The CAN bus must be terminated at both ends via
an ohmic resistor (125 ohms). This terminating
resistor is activated by a jumper on the respective
PCB.
There are 2 redundant bus systems (CAN1 and
CAN2).
Fig.1:Principle of CAN bus technology

Distribution Unit
138--118
DISTRIBUTION
UNIT
33647.DOC010302Edition: November 21, 2003
1.2 Technical Data
1.2.1 Mechanical Data
see Dimensional Drawing “Distribution Unit 138--118.HP005”
Equiment cathegory: Protected from the weather
1.2.2 Electrical Data
Supply Voltage: 15VDC.......40VDC
Max. Current: 15A
(2 Gyros and 8 Repeaters)
Input:
--Spd--Log
-- N M E A G P S
--Log
-- C A N B u s
--DV Bus (future purpose)
-- T M C
Output:
--8 Outputs (adjustable)
Heading seriel (Course bus)
NMEA1
NMEA2
--RoT+/--10V (adjustable)
--Course Printer Interface RS232C
--3 STEP--signal 1/6°/step
Optional with an “Additional Output Box 146--103
Fast NMEA, SIF, STEP

Distribution Unit
138--118
4
3647.DOC010302 Edition: November 21, 2003
1.3 Information about LED‘s, push buttons plugs and connectors of the integrated
PCB‘s
1 2 34567891011121314
15
16
17
181920212223
24
25
26
Fig.2: Interface PCB (138--118.100)

Distribution Unit
138--118
DISTRIBUTION
UNIT
53647.DOC010302Edition: Feb. 14, 2004
No. Designation at the Interface
PCB
Remark
Fig.2/1 Terminal Board L1 of the
Distribution Unit
Connection of supply voltages
for the distribution unit itself and
for connected gyros, operator
unit and heading receivers.
Fig.2/2 LED H1 +5VDC DC/DC--Converter for
CAN--Bus and Course Bus
Fig.2/3 Terminal Board L1 of the
CAN Network Modul Interface
PCB
Supply Voltage for this PCB
Fig.2/4 LED H7 +5VDC Course Bus
Fig.2/5 LED H4 +5VDC DV--Bus (Future pur-
pose)
Fig.2/6 Push Button B21 Reset Processor
Fig.2/7 DIP--Switch B20 Adjustments for the Distribution
Unit
Fig.2/8 Push Button B23 Mode--Selection for DIP--Switch
B20
Fig.2/9 Jumper B2 CAN--Bus/NMEA (Test only)
Fig.2/10 Display
Fig.2/11 Push Button B22 Set--function for DIP--Switch B20
Fig.2/12 DIP Switch B24 DV--Bus setting (Future purpose)
Fig.2/13 Push Button B11 Reset DV--Bus Processor (Fu-
ture purpose)
Fig.2/14 LED H6 Programming
Fig.2/15 Jumper B1 Programming
Fig.2/16 Jumper B4 Bus--Resistor DV--Bus
Fig.2/17 Terminal Board L2 Connection of Signals
Fig.2/18 Plug B6 CAN1--Bus
Fig.2/19 Jumper B31 Bus--Resistor CAN1--Bus
Fig.2/20 Jumper B32 Bus--Resistor CAN2--Bus
Fig.2/21 Plug B7 CAN2--Bus
Fig.2/22 LED H3 +5VDC CAN2--Bus
Fig.2/23 LED H2 +5VDC CAN1--Bus
Fig.2/24 LED H8 Processor clock
Fig.2/25 Fuse E1 10A, T; for Gyro input “Gyro1”
Fig.2/26 Fuse E2 10A, T; for Gyro input “Gyro2”

Distribution Unit
138--118
6
3647.DOC010302 Edition: November 21, 2003
1234567
11
12
13
14
15
16
17
18
19
20
21
22
23
24
25
26
27
28
29
30
31
32
36
37
38
39
40
41
42
43
44
45
46
47
48
49
50
51
52
8
9
10
33
34
35
Fig.3:I/O PCB (138--118.101)

Distribution Unit
138--118
DISTRIBUTION
UNIT
73647.DOC010302Edition: November 21, 2003
No. Designation at the I/O PCB Remark
Fig.3/1 Connector B1 Connection to the CAN Network
Modul Interface PCB
Fig.3/2 LED H30 35VDC Voltage (Step)
Fig.3/3 Push Button B40 Processor Reset
Fig.3/4 LED +5V5 +5VDC for RoT--Conversion
Fig.3/5 LED +5V4 +5VDC galvanically seperated
supply voltage
Fig.3/6 LED +5V6 +5VDC for RS232C Interface
(Printer)
Fig.3/7 LED --15V RoT Supply voltage
Fig.3/8 LED +15V RoT Supply Voltage
Fig.3/9 LED H1 Processor Clock
Fig.3/10 LED H50 Relais ON/OFF Step--Supply
Fig.3/11 Plug B26 Output Channel 4 with 3 LED‘s
blue = NMEA 2
green = NMEA 1
red = Course bus
Fig.3/12 Plug B25 Output Channel 3 with 3 LED‘s
blue = NMEA 2
green = NMEA 1
red = Course bus
Fig.3/13 Plug B24 Output Channel 2 with 3 LED‘s
blue = NMEA 2
green = NMEA 1
red = Course bus
Fig.3/14 Plug B23 Output Channel 1 with 3 LED‘s
blue = NMEA 2
green = NMEA 1
red = Course bus
Fig.3/15 Fuse E4, 1A T Protection for Channel 4
Fig.3/16 Fuse E3, 1A T Protection for Channel 3
Fig.3/17 Fuse E2, 1A T Protection for Channel 2
Fig.3/18 Fuse E1, 1A T Protection for Channel 1
Fig.3/19 Plug B30 Output Channel 8 with 3 LED‘s
blue = NMEA 2
green = NMEA 1
red = Course bus
Fig.3/20 Plug B29 Output Channel 7 with 3 LED‘s
blue = NMEA 2
green = NMEA 1
red = Course bus

Distribution Unit
138--118
8
3647.DOC010302 Edition: November 21, 2003
No. Designation at the I/O PCB Remark
Fig.3/21 Plug B28 Output Channel 6 with 3 LED‘s
blue = NMEA 2
green = NMEA 1
red = Course bus
Fig.3/22 Plug B27 Output Channel 5 with 3 LED‘s
blue = NMEA 2
green = NMEA 1
red = Course bus
Fig.3/23 Fuse E8, 1A T Protection for Channel 8
Fig.3/24 Fuse E7, 1A T Protection for Channel 7
Fig.3/25 Fuse E6, 1A T Protection for Channel 6
Fig.3/26 Fuse E5, 1A T Protection for Channel 5
Fig.3/27 Plug B3 +24VDC supply voltage for
repeaters
Fig.3/28 Plug B5 RoT--Output +/--10VDC
Fig.3/29 Plug B6 Plug for connection Printer
(RS232C Interface)
Fig.3/30 Plug B7 Step--output 1
Fig.3/31 Plug B8 Step--output 2
Fig.3/32 Plug B9 Step--output 3
Fig.3/33 LED H49 Indication Step--Interface 1
Fig.3/34 LED H48 Indication Step--Interface 2
Fig.3/35 LED H47 Indication Step--Interface 3
Fig.3/36 Fuse E9, 0.25A T Protection for Step--output 1
Fig.3/37 Fuse E10, 0.25A T Protection for Step--output 2
Fig.3/38 Fuse E11, 0.25A T Protection for Step--output 3
Fig.3/39 Plug B20 with LED H11 Status--Signal with indication
“GPS COMPASS SELECTED”
Fig.3/40 Plug B17 with LED H8 Status--Signal with indication
“SENSOR DIFF. ALARM”
Fig.3/41 Plug B14 with LED H5 Status--Signal with indication
“SENSORALARM G3/GPS”
Fig.3/42 Plug B11 with LED H2 Status--Signal with indication
“SYSTEMALARM”
Fig.3/43 Plug B21 with LED H12 Status--Signal with indication
“CAN DISTURBED”
Fig.3/44 Plug B18 with LED H9 Status--Signal with indication
“TMC SELECTED”
Fig.3/45 Plug B15 with LED H6 Status--Signal with indication
“SENSORALARM TMC”
Fig.3/46 Plug B12 with LED H3 Status--Signal with indication
“SENSORALARM G1”

Distribution Unit
138--118
DISTRIBUTION
UNIT
93647.DOC010302Edition: November 21, 2003
No. Designation at the I/O PCB Remark
Fig.3/47 Plug B22 with LED H13 Reserve
Fig.3/48 Plug B19 with LED H10 Status--Signal with indication
GYRO SELECTED
Fig.3/49 Plug B16 with LED H7 Status--Signal with indication
MONITORALARM GYRO/TMC
Fig.3/50 Plug B13 with LED H4 Status--Signal with indication
SENSORALARM G2
Fig.3/51 Plug B2 TMC Connector IN/OUT
Fig.3/52 Jumper B41 Testpurpose

Distribution Unit
138--118
10
3647.DOC010302 Edition: November 21, 2003
2 Installation of the Distribution Unit
2.1 General remarks
Caution
When establishing cable connections ensure that the
cables are disconnected from the power supply.
It is essential to ensure that all cables are disconnected
from the power supply, if necessary measure the voltage
beforehand and/or disconnect the relevant distributor.
In order to ensure that the system operates correctly, it is essential that you follow the
procedures described below for establishing cable connections.
-- Strip approx. 180mm of the cable.
Make sure you do not damage the shielding layer.
-- Strip off the shielding to a remainder of approximately 15mm.
approx. 180mm
approx.
15mm
Fig.4 How to strip the connection cable
-- Screw the cable gland out from the distribution box and push the screw
connection components over the cable.
It is absolutely essential that the sequence (as shown in Fig.5) is adhered to.
-- Check the cone and counterpart on the earthing insert for corrosion and
if necessary remove corrosion using an appropriate process (emery board).

Distribution Unit
138--118
DISTRIBUTION
UNIT
11 3647.DOC010302Edition: November 21, 2003
-- Push the counterpart of the earthing insert as far as the end of the cable
shield.
-- Push the earthing insert cone below the shielding against the counterpart.
Observe a shared evenly distribution of the shielding via the cone (see Fig. 3).
Shielding
Seal
+ strain relief
Washer
Cable
Counter nut
Earthing insert
-- cone
-- counterpart
Wall and DIN socket
Fig.5 Making the cable entry
-- Insert the earthing insert, the seal with and the washer into the cable gland, place
the counter nut on top and hand-tighten.
-- Strip the cable cores to a length of approx. 1.5cm, twist slightly and clamp on the
cable end sleeves. Connect the cable strands in the junction box as shown in the
table below. Hand-tighten the terminal screws concerned
-- check the connection is firm by pulling lightly.

Distribution Unit
138--118
12
3647.DOC010302 Edition: November 21, 2003
2.1.1 General information about establishing an earth connection
In order to comply with the stringent EMC requirements, please abide by the information
given below regarding cable connections.
Use the cable types specified.
Earth connections should be connected to the gyro compass and to the junction box.
It is essential to ensure that these connections have a
common reference to the ship’s earth.
Any additional components (options) must also be con-
nected to the common earth!
Fig.6: Establishing an earth connection
All earth connections must be made as shown in Fig.6.
The earthing cable attached to the cable bracket must possess a cross-section of mini-
mum 1.5 mm2.
The cable bracket should be mounted between two toothed discs.
Earth connections must be free of corrosion and well fastened.
Table of contents