Pakedge PowerPak 9 User manual

PowerPak
Power Distribution Unit
User Guide

PowerPak Power Distribution Unit
2
Contents
Introduction..............................................................................................................................4
Overview ...................................................................................................................................5
PowerPak 9...................................................................................................................................................................5
Front panel...............................................................................................................................................................5
Back panel................................................................................................................................................................5
PowerPak 8I .................................................................................................................................................................6
Front panel...............................................................................................................................................................6
Back panel................................................................................................................................................................6
Display ............................................................................................................................................................................7
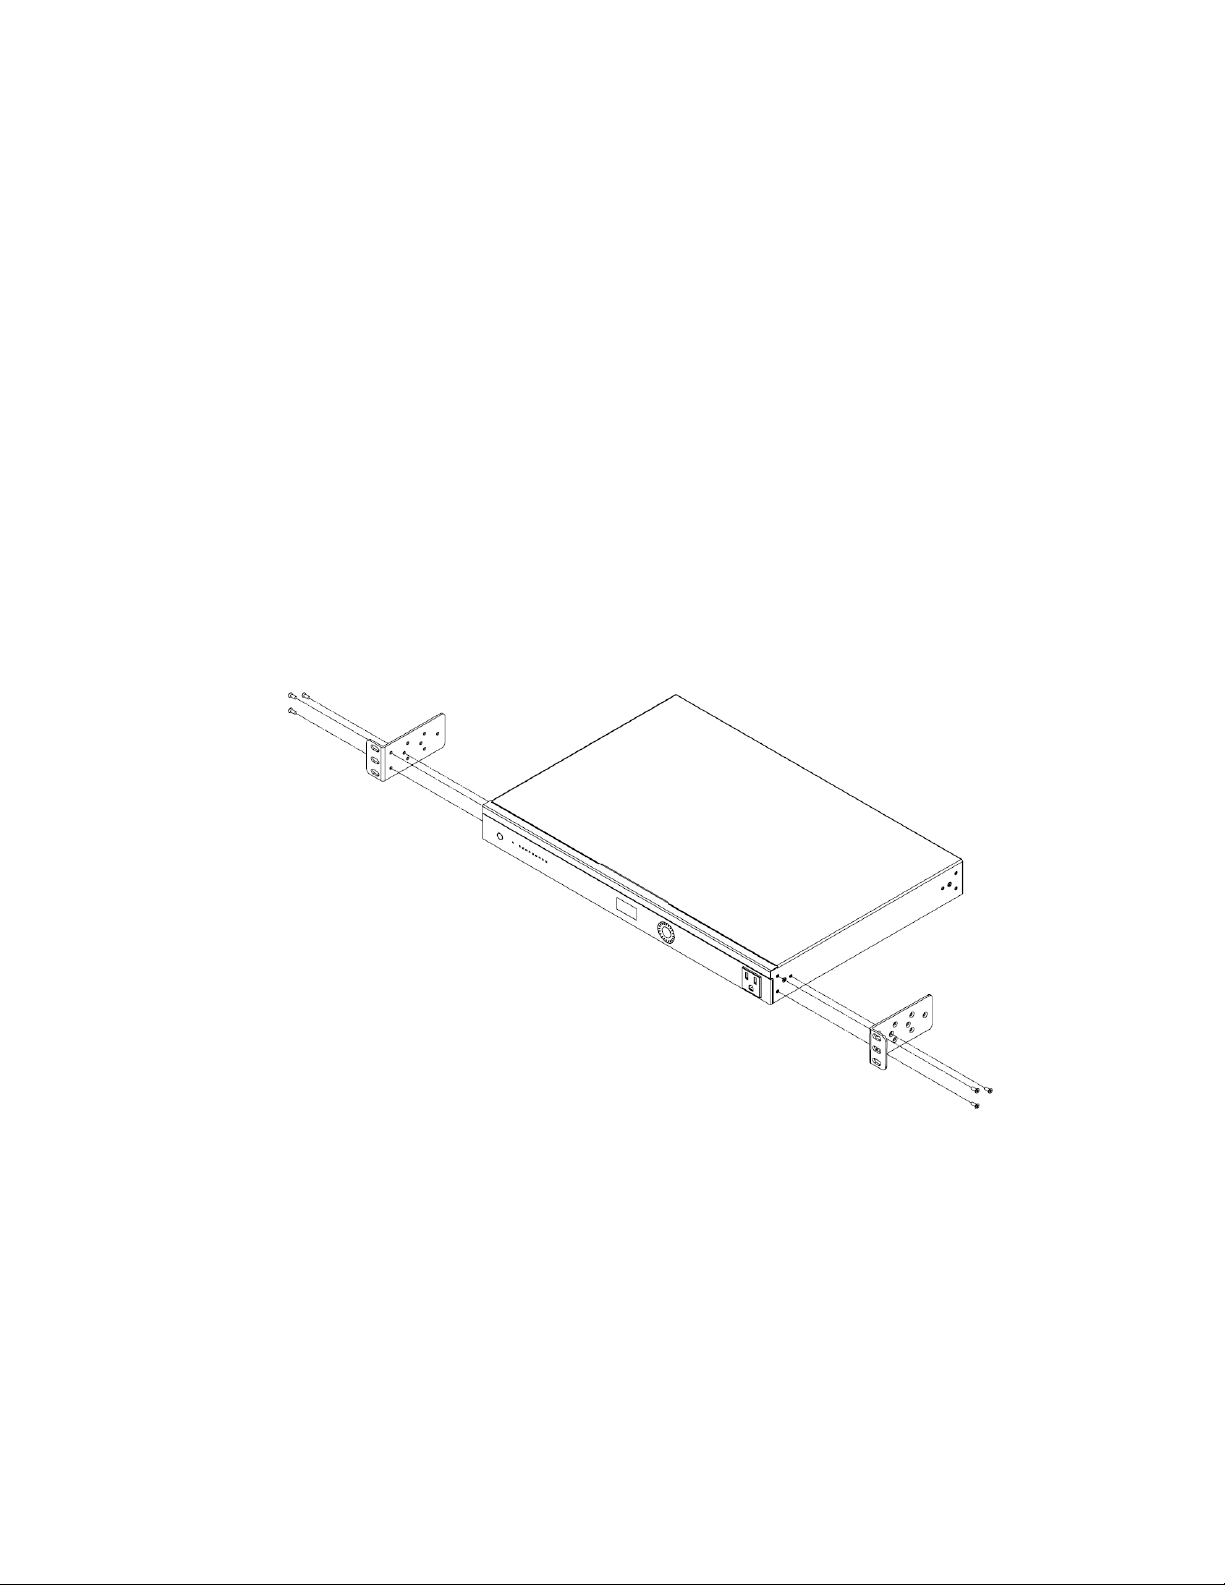
PowerPak Installation ...........................................................................................................8
Warnings...................................................................................................................................................................9
Using the hardware controls..............................................................................................9
PowerPak startup................................................................................................................. 10
Menu options ......................................................................................................................... 13
Status ............................................................................................................................................................................ 13
Dashboard..............................................................................................................................................................14
System Log............................................................................................................................................................14
Network........................................................................................................................................................................ 15
LAN ........................................................................................................................................................................... 15
Outlet ............................................................................................................................................................................ 15
Configuration ........................................................................................................................................................ 16
Auto-Ping ............................................................................................................................................................... 16
Default host settings .......................................................................................................................................................... 16
Scheduling.............................................................................................................................................................. 17
Analysis ................................................................................................................................................................... 17
Table view............................................................................................................................................................................... 17
Graph view ............................................................................................................................................................................. 18
Global alerts........................................................................................................................................................... 18
Outlet alerts........................................................................................................................................................... 19
Alert/Notification settings .............................................................................................................................. 19
System .......................................................................................................................................................................... 19
Username/Password.........................................................................................................................................20
Time zone ..............................................................................................................................................................20

PowerPak Power Distribution Unit
3
Maintenance .........................................................................................................................................................20
Back up the configuration................................................................................................................................................ 20
Restore the configuration ................................................................................................................................................ 21
Manually reboot the PowerPak...................................................................................................................................... 21
Firmware................................................................................................................................................................ 22
Diagnostics ........................................................................................................................................................... 22
Display .................................................................................................................................................................... 23
Add the PowerPak to a BakPak account.....................................................................23
Troubleshooting .................................................................................................................. 26
Specifications ........................................................................................................................27
Package contents.................................................................................................................27

PowerPak Power Distribution Unit
4
Introduction
The Pakedge PowerPak power distribution unit gives you unprecedented convenience and control,
including on/off sequencing to power on and shut down sensitive equipment in a configurable order. The
PDU has full monitoring capabilities including input voltage, frequency, individual outlet current and
temperature (sensor sold separately). The user-defined alerts can trigger actions based on these
measurements, sound an audible buzzer and notify interested parties.
This device has been tested to the specifications of UL1449 for protection against both current and
voltage surges. Remote management of the PDU is easily accomplished with a BakPak Network Patroller
which provides a tunnel to the PDU through the Internet and monitors all your network devices. See “Add
the PowerPak to a BakPak Cloud account” on page 23 for more information on setting up the BakPak
integration.
Key features:
•Configurable power-up and shutdown: Configure the PowerPak to power on/off connected
devices in any order for device-dependent hardware and to protect sensitive equipment against
power flooding.
•Secure network control: The PowerPak is fully IP addressable using the built-in, secure Web
interface.
•Web-based monitoring: Monitor the real-time and historical current and power usage of each
PDU outlet, along with the input voltage and frequency.
•Configurable alerts: Define visual, audible, and email alarms with full logging.
•Surge protection: Provides up to 6kV surge protection to your devices.
•BakPak Lite built in: Manageable by Pakedge’s BakPak and BakPak Lite network management
agents from any location.

PowerPak Power Distribution Unit
5
Overview
PowerPak 9
The PowerPak 9 power distribution unit comes with nine NEMA 5-15 outlets.
•Input: 100-120VAC, 50~60 Hz
•Output: 100-120VAC, 12A, 50~60 Hz, 1440W (total)
Front panel
A. Power switch
B. Surge protection indicator light
C. Power outlet 1~8, F indicator light
D. OLED display
E. Circular selector switch
F. Power outlet F
Back panel
A. Power inlet
B. Circuit breaker
C. Power outlet 1~8
D. Ground lug
E. Console port
F. RJ11 port to connect the temperature sensor
G. SD card slot
H. Ethernet port for a network connection

PowerPak Power Distribution Unit
6
PowerPak 8I
The PowerPak 8I power distribution unit comes with eight IEC C14-type outlets.
•Input: 100-240VAC, 50~60 Hz
•Output: 100-240VAC, 10A, 50~60 Hz, 2400W (total)
Front panel
A. Power switch
B. Surge protection indicator light
C. Power outlet 1~8 indicator light
D. OLED display
E. Circular selector switch
Back panel
A. Power inlet
B. Circuit breaker
C. Power outlet 1~8
D. Ground
E. Console port
F. RJ11 port to connect the temperature sensor
G. SD card slot
H. Ethernet port for Internet connection

PowerPak Power Distribution Unit
7
Display
The front panel of the PDU has an OLED display, which helps you quickly review information and control
outlets while working at the rack without needing to log in to the web interface.
From the home screen, rotate the scroll wheel and press the center button to select from the menu
options:
•Local Reboot:Press and hold the center button for two seconds to power cycle the outlets that
have this feature enabled.
•Measurements:Display the voltage, current, or power consumption for the entire PDU or
individual outlets.
•Outlet Control:Turn the selected outlet on/off.
•Settings:
•Display the IP address, MAC address, or serial number of the PDU.
•Turn off the OLED display or adjust the contrast.
•Dim the LEDs or turn them on/off.
•Display the date and time.
•Messages:When a user-defined alert condition occurs, a message displays showing the type of
alert (options below), and the LED of the outlet will blink (all LEDs will blink for global alerts).
•Voltage
•Current
•Power
•Temperature
Note: If the buzzer feature is enabled, press the center button to turn the buzzer off.

PowerPak Power Distribution Unit
8
PowerPak Installation
Tools required:
•Phillips screwdriver (if using rack-mount brackets).
•Computer with an Ethernet interface and a web browser (an integrated DB-9 port or USB-to-Serial
adapter may be necessary if you would like to use the console interface).
•Ethernet cable.
To install the PowerPak:
1. Open the box and remove the unit.
2. If mounting the PowerPak in a standard 19” AV rack, attach the rack-mounting brackets to the sides. If
not rack-mounting, ensure that the PowerPak is mounted near power and network connections (i.e, a
backbone switch or a firewall/router). The PowerPak must also be connected to a reliable ground
connection.
3. To ensure the unit is properly grounded and remains safe, connect a ground wire (12 gauge minimum)
from the back of the PowerPak’s ground terminal to a reliable ground (such as metal on the rack or a
floor ground lug).
4. Connect power to the device. The power outlet indicator light will light up.
5. Connect an Ethernet cable from your computer to the LAN port on the PowerPak. You are now ready to
configure the PowerPak to an IP address that matches your network.

PowerPak Power Distribution Unit
9
Warnings
Elevated Operating Ambient—If installed in a closed or multi-unit rack assembly, the operating ambient
temperature of the rack environment may be greater than room ambient. Therefore, consideration should
be given to installing the equipment in an environment compatible with the maximum ambient
temperature (Tma) specified by the manufacturer.
Reduced Air Flow—Installation of the equipment in a rack should be such that the amount of air flow
required for safe operation of the equipment is not compromised.
Mechanical Loading—Mounting of the equipment in the rack should be such that a hazardous condition
is not achieved due to uneven mechanical loading.
Circuit Overloading—Consideration should be given to the connection of the equipment to the supply
circuit and the effect that overloading of the circuits might have on overcurrent protection and supply
wiring. Appropriate consideration of equipment nameplate ratings should be used when addressing this
concern.
Reliable Earthing—Reliable earthing of rack-mounted equipment should be maintained. Particular
attention should be given to supply connections other than direct connections to the branch circuit (for
example, via the use of power strips).
Using the hardware controls
Task
Action
Result
Reset to factory defaults
Press and hold power
button for 10 seconds.
Outlet LEDs blink during reset, but outlets
remain enabled. User interface is reset to
defaults.
Enter Sleep mode
Press and hold power
button for two seconds.
Outlets turn off, based on user-defined
power off delay times.
Wake from Sleep mode
Press and release power
button.
Outlets turn on according to user-defined
power-on delay times.
OLED menu options
Rotate scroll wheel and
press center button
Toggles menu options and selects an action.

PowerPak Power Distribution Unit
10
PowerPak startup
To log in to the PowerPak, you must first configure the TCP/IP settings of your computer.
To configure TCP/IP settings:
1. Under Control Panel, double-click Network Connections and double-click the connection of your
Network Interface Card (NIC). The Local Area Connection Properties dialog appears:
2. Select Internet Protocol Version 4 (TCP/IPv4) and click Properties. The Internet Protocol (TCP/IP)
dialog appears where you can configure the TCP/IP settings of your PC.

PowerPak Power Distribution Unit
11
3. Select Use the following IP Address and type the IP address and subnet mask, as in the example
below. Be sure the IP address and subnet mask are on the same subnet as the PowerPak. If the
PowerPak has been connected directly to a network with an active router, then it will be assigned an IP
address from the DHCP server instead of using the default 192.168.1.210 address. Note: Make sure the
PowerPak and your computer are configured on the same subnet.
PowerPak IP address: 192.168.1.210
PC IP address: 192.168.1.10
PC subnet mask: 55.255.255.0
4. To configure the PowerPak through a web browser, type the IP address of the PowerPak (default
192.168.1.210) and press Enter.
Default settings: The IP address will be automatically assigned by a router if a DHCP server is
detected. Otherwise, the default IP address will be automatically set to 192.168.1.210.
To log in:
1. For Username,type pakedge. For Password, type pakedgep, then click Log in.

PowerPak Power Distribution Unit
12
The Quick Setup page opens.
Use this page to quickly set up your PDU’s basic configuration. You can set:
•Username
•Password
•Outlet names
•Whether to register the PDU in the cloud
2. Click Apply to apply your changes to the PDU. The Quick Setup page closes, and you are brought to
the Dashboard. Note: You can return to the Quick Setup page at any time by clicking the Quick Setup
tile in the Dashboard.

PowerPak Power Distribution Unit
13
The PowerPak’s Dashboard (main menu) appears. The Dashboard displays the status of PowerPak and
general information such as IP address, MAC addresses, voltage, and frequency. The outlet section
displays the current, power consumption, power on delay, etc.
Menu options
Status
This section contains system-level menus like LAN and Display settings

PowerPak Power Distribution Unit
14
Dashboard
The Dashboard is the default landing page of the PDU. You can also access this page by hovering over the
Status icon and clicking Dashboard, or by clicking the PowerPak circle in the upper-left corner. This
page displays the MAC and IP addresses, current voltage/frequency/current, outlet status, and
temperature/humidity with the temperature sensor.
Dashboard for an individual outlet:
•The information fields display the outlet name, current, power, peak current measured since the
last reset, and power on/off delay times. A red border will be displayed around the outlet when
it is in an alert condition.
•Power cycle Click to reboot (power off/on) the outlet.
•Reset peak Click to reset the measured peak current to 0.
System Log
Click to view the System Log. The log displays a list of power events that have occurred since last reset.

PowerPak Power Distribution Unit
15
Network
This section contains settings for the PowerPak’s network settings.
LAN
IP network setting configures the IP network setting of your PowerPak (DHCP or static IP). The default
setting is DHCP.
Outlet
This section contains outlet configuration and management menus, including schedules and alerts.

PowerPak Power Distribution Unit
16
Configuration
Configure the name, local reboot, auto ping reboot, power on/off delay for each individual outlet.
•Outlet name: Specify an outlet name. For example, if you connect a 24-Port switch to Outlet1, you
can rename Outlet1 to “24-Port-Switch”.
•Local reboot: Enable/disable local reboot. When enabled, pressing the center button on the front
of the PDU for 2 seconds will reboot this outlet.
•Power on delay: The time, in seconds, that the outlet will wait before powering on in order to
ensure that not all the devices connected to the PowerPak will power on at once.
•Power off delay: The time, in seconds, that the outlet will wait before powering off.
Auto-Ping
Configure the default host settings and the auto-ping and reboot settings for each outlet.
Default host settings
Enter the website/IP address for up to two hosts, then click Test.
Outlets
•Enable (auto-ping and reboot): Enable/Disable auto ping and reboot. If this feature is enabled, the
PowerPak will ping the destination every 1 second. If the ping fails the specified number of
attempts, the outlet will be rebooted.
•Reboot limit: Maximum number of times the outlet will be power cycled within the specified time
period.
•Time Period: Specify the time, in hours, for the Reboot limit above.
•After reboot: Number of minutes to wait after rebooting the outlet before allowing another
reboot.
•Before reboot: Number of minutes to wait before rebooting when a reboot is triggered.

PowerPak Power Distribution Unit
17
•Email notification: Select to automatically send an email whenever the outlet is power cycled as a
result of failed auto-pings.
•Edit: If auto-ping is enabled for the outlet, click Edit to define host settings for the outlet.
Scheduling
Configure the Power on/Power off/Power cycle schedule for each outlet.
•Enable: Select to enable scheduling for the outlet.
•Action: Select the action you want to schedule for this outlet. The options include Power off,
Power on, and Power cycle.
•Days: Select the days to perform this action.
•At: Set the time to perform this action.
•(Add): Click the button to add more schedules. Up to four schedules are allowed per outlet.
Analysis
Analyze the current and power consumption for each outlet.
Table view
•Current: Click to display either current (RMS) or current (peak).
•Power: Displays the power consumption.
•Energy: Select the time duration in the drop-down menu to display the energy sourced by that
outlet.

PowerPak Power Distribution Unit
18
Graph view
•Outlet: Select the outlet (or All) to display data for.
•Time: Select the time range (Now, Day, or Week) to display data for.
•Measurement: Select the measurement unit (Current or Power).
•Apply: After changing any of the above settings, click Apply to recompute the graph.
Global alerts
Configure the alert settings and notification through an audio or email alert.
For each measurement, set the minimum and maximum allowable values. If the measurement
goes beyond these values, an alarm buzzer can be enabled and/or an email can be sent for this
alert. You also have the option to disable all outlets if the alert condition occurs.
•Voltage range (V): Configure the minimum and maximum allowable input voltages.
•Alert type: Select the alert type to use. You can select multiple types.
•Current range (A): Configure the minimum and maximum allowable input currents.
•Power range (W): Configure the minimum and maximum allowable power consumption.
•Temp range (C): Configure the minimum and maximum allowable temperatures. Note: Available
only when a temperature sensor is used.

PowerPak Power Distribution Unit
19
Outlet alerts
You can also set up alerts for each individual outlet, using the same selection of parameters above.
Alert/Notification settings
•Notification method: Select method of alert to use.
•Recipient’s email: Enter the recipient’s email address.
•Email subject: Type the text you want to appear in the message’s Subject: field.
System
This section contains menus to modify your personal account settings and update your firmware.

PowerPak Power Distribution Unit
20
Username/Password
•Username: Enter a username up to 15 characters.
•Current password: Enter the current password.
•New password: Enter the new password.
•Verify password: Enter the new password again.
Time zone
•Time zone:Select the time zone to use for system reporting and logging.
Maintenance
Back up the configuration
•Back up configuration: Click Download to back up the PowerPak’s configuration file to your
computer.
This manual suits for next models
1
Table of contents
Other Pakedge Power Distribution Unit manuals
Popular Power Distribution Unit manuals by other brands

Tripp Lite
Tripp Lite PDU3VSR6H50A Specifications

IBM
IBM System X High Voltage DC PDU Installation and maintenance guide

Emerson
Emerson Network Poewr MPH2 user manual

MGE UPS Systems
MGE UPS Systems Comet EXtreme Series Startup guide

Amphenol
Amphenol T009-5030 Series installation guide

CityEV
CityEV Safevolt 50 User and installation manual