Raz AT600 User manual

RQD013ENr04 Rev.Date:2022-10-25
Mobile Shower
Commode Chairs
Raz-AT600
(Z360)
User and Dealer
Manual
BASIC UDI-DI: 628758RAZDESIGNINC2004V9

RQD013ENr04 Rev. Date: 2022-10-25
2
SAFETY
PRECAUT
I
ONS
Failure to comply may cause injury or
damage!
It is important that the Raz Mobile Shower Commode Chair be properly
assembled and that all adjustments be made carefully. Please ensure that
the user(s), dealer(s) and attendant(s) have read this manual and thoroughly
understood the safe operation of the Raz Shower Chair. Up-to-date manuals
are available online at www.razdesigninc.com. For clarification of any
section of this manual, contact your distributor or the manufacturer.
MANUFACTURER
U.S.A. AND WORLDWIDE
Raz Design Inc.
135 Railside Rd, Toronto, ON, Canada M3A 1B7
1.877720.5678 / 416.751.5678
DISTRIBUTOR
CANADA
Dynamic Health Care Solutions
Mono, Ontario, Canada
519.942.8441 / 866.875.2877
info@dynamichcs.com
CHAIR CLASSIFICATION BASED ON MAXIMUM USER WEIGHT
AT600 275 kg (605 lbs)
SAFETY WARNINGS TO CONSIDER FOR USER PURPOSES
THIS DEVICE IS SUITABLE FOR TYPE A; HIGH USAGE (e.g. INSTITUTIONS) AND SHOULD NEVER
BE USED FOR ANY PURPOSE OTHER THAN ORIGINALLY INTENDED
Forward Stability
The casters on all models are equipped with dual locks. The step-on
lever activates both the roll lock and the swivel lock. It is essential that
all casters on the shower chair be in an outward position before
engaging the locks for optimal forward and lateral stability. If so
equipped, disengage the optional directional caster lock before rotating
the rear caster to the rearward position and applying the caster’s dual-
locks.
USERS MUST NOT lean forward while sitting in the Raz Mobile Shower
Commode Chair as this may cause the chair to tip forward.
USERS MUST NOT wheel down a ramp without an attendant who can
hold onto the chair during the descent.

RQD013ENr04 Rev. Date: 2022-10-25
3
CASTER LOCKS ARE NOT BRAKES! Never use caster locks to
slow down the shower chair when descending inclines as this
could cause the chair to tip in the direction of travel.
Lateral Stability
USERS MUST NOT lean over the edge of a Raz Mobile Shower
Commode Chair as this could cause the chair to tip.
USERS MUST NOT attempt to pick up objects from the floor by leaning
over andreaching –use a reacher or ask for assistance from anattendant.
USERS MUST NOT position the Raz Mobile Shower Commode Chair on
a side slope as this could cause it to tip.
Ramps and Other Inclines
Ramps and other surfaces that are not level (suchas slopes into wheel- in
showers) must be tested with an attendant to ensure that they don’t
compromise the chair’s stability. A qualified healthcare professional
should be consulted to assist with this process.
DO NOT push or pull the Raz-AT600 up or down an incline or ramp
that exceeds a 1:12 grade (5° slope).
DO NOT allowany userto be propelled (pushedor pulled) in a Raz-AT600
in any other manner than by an attendant.
ALWAYS CHECK THAT THE RAZ-AT600 IS STABLE BEFORE IT IS
OCCUPIED BY ANY USER AT ANY TIME.
Immersion
The Raz Mobile Shower Commode Chair is not designed to be
used as a pool chair. Do not immerse the shower chair in whole
or in part, in water or any other liquid. Immersion may result in
damage to the shower chair.
Chlorine Exposure
Suitable for use in wet areas, but not pools and similarly corrosive
environments.
DO NOT store the device near pools because chlorine in
the air will cause the device to rust.

RQD013ENr04 Rev. Date: 2022-10-25
4
Transfers
The most dangerous part of using any shower chair is the transfer. Since
every chair has different stability characteristics, it is essential to carefully
review and test the transfer technique to ensure that the procedureissafe.
Test transfers should beperformedwithan attendant who can prevent the
chair from tipping or moving during the transfer. If you feel that the
transfers cannot be repeatedly performed safely, contact a healthcare
professional who is familiar with transfer techniques and options.
Individuals who have not learned proper transfer skills must seek
assistance during transfers and may require the use of a mechanical lift.
Transferring onto a Raz-AT600
ALWAYS lock all four casters in an outward position (front casters
positioned in the forward position/rear casters positioned to the rear) for
maximum chair stability.
Transfers should never be attempted with the shower chair
positioned on slippery surfaces. It is recommended that transfers be
performed on clean, dry, non-slippery surfaces. Hard surface flooring
such as tile, wood or concrete may not provide sufficient grip to keep
locked casters and/or rear wheels from sliding. A fully-carpeted
surface is optimal. Be aware that area rugs and shower mats can slide on
floors and thereby present a hazardous surface.
DO NOT stand on any part of the frame of the Raz-AT600.
NEVER use the footplates to assist in transfers. This could cause the
chair to tip. The footrests should be swung to the side or removed entirely
during transfers to provide unobstructed access to the shower chair.
Tilt Function
ALWAYS check the tilt function and ensure both locking gas springs and release cable assemblies are
fully operational BEFORE the chair is occupied by the user.
A pelvic strap can act as an additional safeguard for the user. A pelvic support strap may be ordered as
an option with the Raz-AT600.
DO NOT attempt to tilt an occupant if the attendant is physically incapable of safely and smoothly
operating the tilt function.
NEVER leave the user unattended in a Raz-AT600.
The Raz-AT600 is NOT intended for use as a transportation device or a long-term seating system.
IMPORTANT
!
USERS SHOULD NEVER BE LEFT UNATTENDED IN A RAZ MOBILE SHOWER
COMMODE CHAIR.

RQD013ENr04 Rev. Date: 2022-10-25
5
IMPORTANT
!
DO NOT LIFT A RAZ MOBILE SHOWER COMMODE CHAIR AND OCCUPANT BY THE
ARMRESTS OR FOOTRESTS!
IMPORTANT
!
ALWAYS BE SURE THAT THE SEAT IS PROPERLY
INSTALLED AND LATCHED. THE REAR HOOKS MUST
BE FULLY ENGAGED AND THE FRONT BRACKETS
MUST BE LATCHED AND LOCKED AROUND THE
FRONT SEAT SUPPORT TUBES.
BE SURE THAT WHEN THE CHAIR IS DELIVERED TO
THE CLIENT, SEAT INSTALLATION INSTRUCTION IS
GIVEN TO THE CLIENT AND/OR CAREGIVERS.
IMPORTANT !_______________________
THE RAZ-AT600 IS INTENDED FOR FOLLOWING USE:
•AS AN AID FOR SHOWERING/BATING, GOING TO THE TOILET, AND FOR OTHER
ACTIVITIES ASSOCIATED WITH PERSONAL CARE AND PERSONAL HYGEINE;
•TO PROVIDE SUPPORT FOR THE BODY OF THE USER IN A SEATED OR RECLINED
POSITION;
•WITH OR WITHOUT THE ASSISTANCE FROM A CAREGIVER;
•OVER A STANDARD TOILET, OR AS A COMMODE WITH THE COMMODE PAN;
•IN INDOOR ENVIRONMENTS ONLY;
•IN BOTH TYPE A, HIGH USAGE (e.g. INSTITUTIONAL) ENVIRONMENTS AND IN HOME
ENVIRONMENTS
THE RAZ-AT600 DOES NOT PERFORM ANY THERAPEUTIC OR DIAGNOSTIC FUNCTIONS,
AND ARE NOT INTENDED FOR USE FOR ANY THERAPEUTIC OR DIAGNOSTIC PURPOSES.
ALL PRODUCTS WITHIN THE RAZ FAMILY ARE NON-STERILE, REUSABLE, NON-INVASIVE,
AND NON-IMPLANTABLE.
THE RAZ-AP AND RAZ-SP IS INTENDED TO BE USED BY PEOPLE WITH MOBILITY
IMPAIRMENTS, WHO MAY HAVE DIFFICULTY IN STANDING OR KEEPING THEIR BALANCE
WHILE COMPLETING ACTIVITIES SUCH AS SHOWERING, GOING TO THE TOILET, OR
PERSONAL HYGIENE. TYPICAL USERS HAVE LIMITED ENDURANCE AND POSTURAL
CONTROL, AND MAY REQUIRE ASSISTANCE FROM A CAREGIVER FOR ACTIVITIES SUCH
AS SHOWERING, GOING TO THE TOILET, OR PERSONAL HYGIENE. FOR PRODUCTS WITH
RECLINE FUNCTION, USE OF THE RECLINE FUNCTION MAY BE CONTRA-INDICATED
WHERE THE USER IS SENSITIVE TO SHEARING FORCES ON SEATED SURFACES WHEN
OPENING THE SEAT-TO BACK-ANGLE

RQD013ENr04 Rev. Date: 2022-10-25
6
CAUTION !__________
RISK OF BURNING YOUR SKIN
THE PRODUCT COMPONENTS CAN HEAT UP WHEN EXPOSED TO EXTERNAL SOURCES
OF HEAT.
•CONSIDER HEATED UP SURFACES WHEN USING THE SHOWER AND TOILET
CHAIR WHEN IT IS EXPOSED TO HOT WATER
•DO NOT EXPOSE THE PRODUCT TO DIRECT SUNLIGHT BEFORE USE

RQD013ENr04 Rev. Date: 2022-10-25
7
USER & DEALER MANUAL TABLE OF CONTENTS
1.0 GENERAL INFORMATION
1.1 Raz-AT600 Mobile Shower Commode Chair Overview.........................................................8
1.2 Raz-AT600 Mobile Shower Commode Chair Specifications .................................................8
2.0 SET-UP: INTENDED FOR DEALER USE ONLY
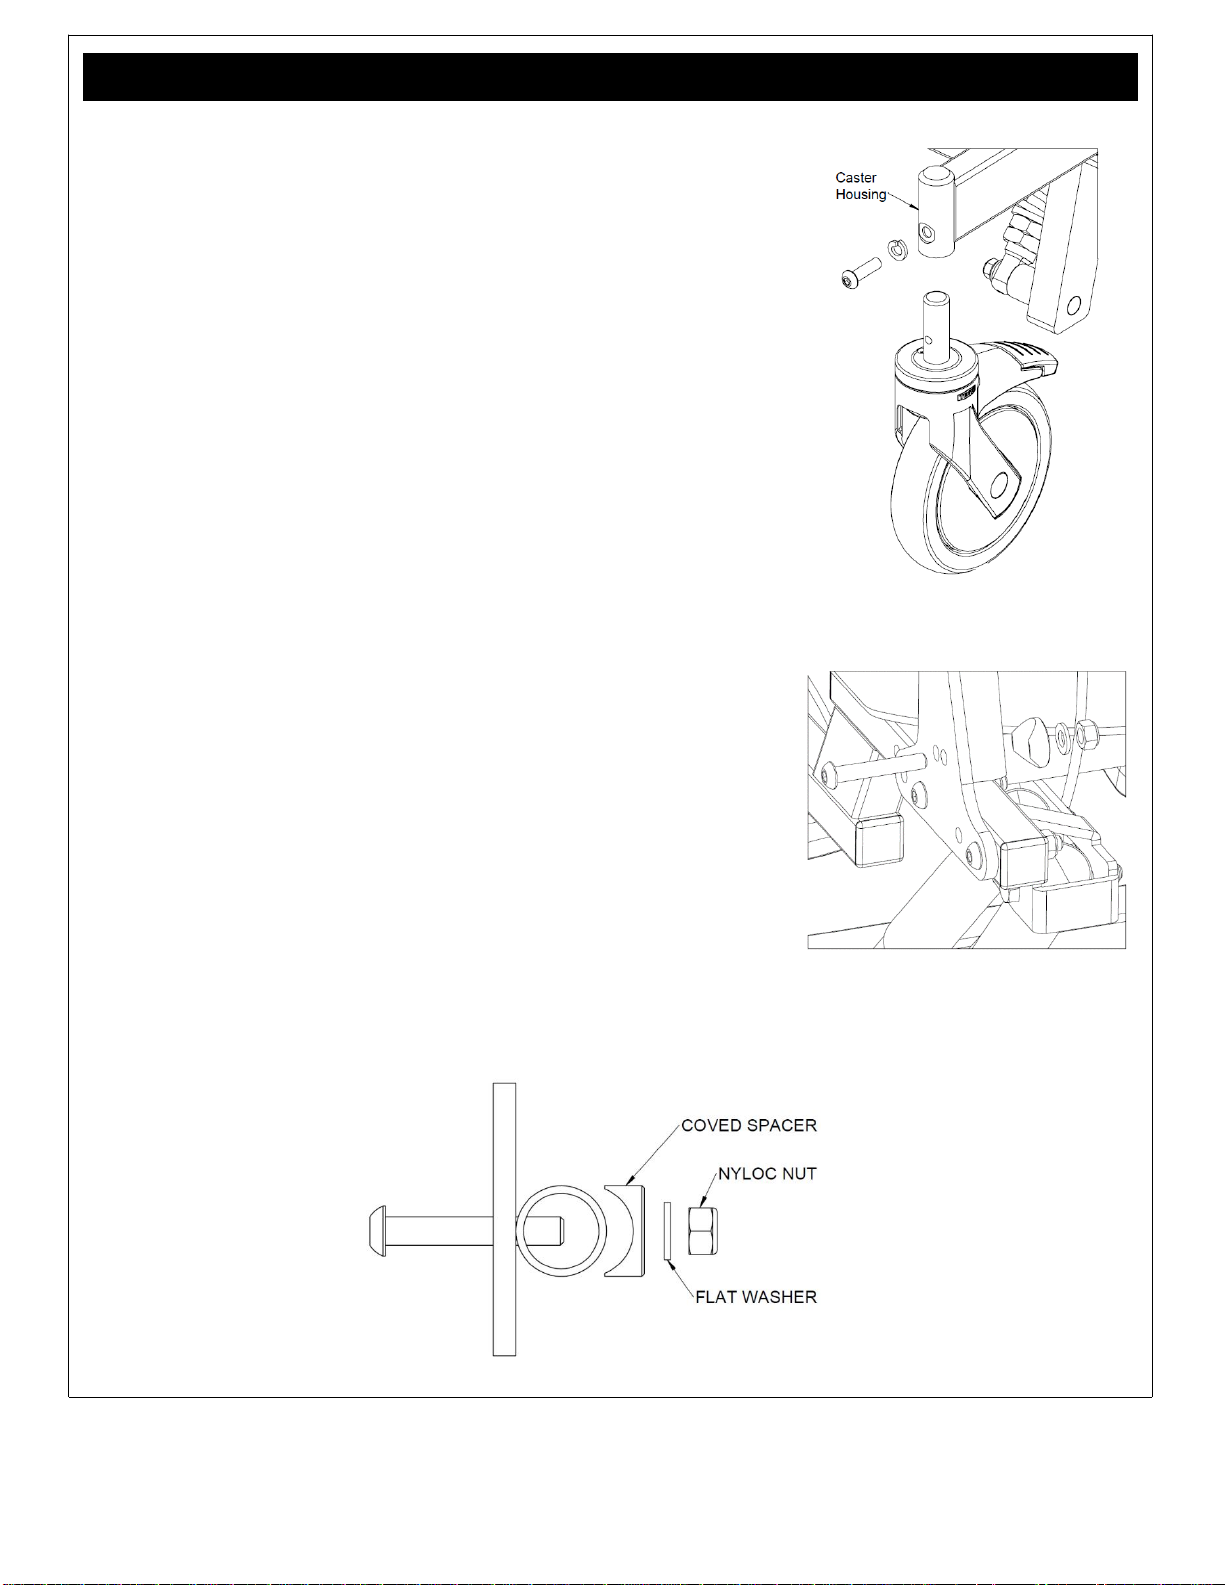
2.1 Caster Installation.................................................................................................................9
2.2 Back Support Installation......................................................................................................9
2.3 Raz Seat Installation...........................................................................................................10
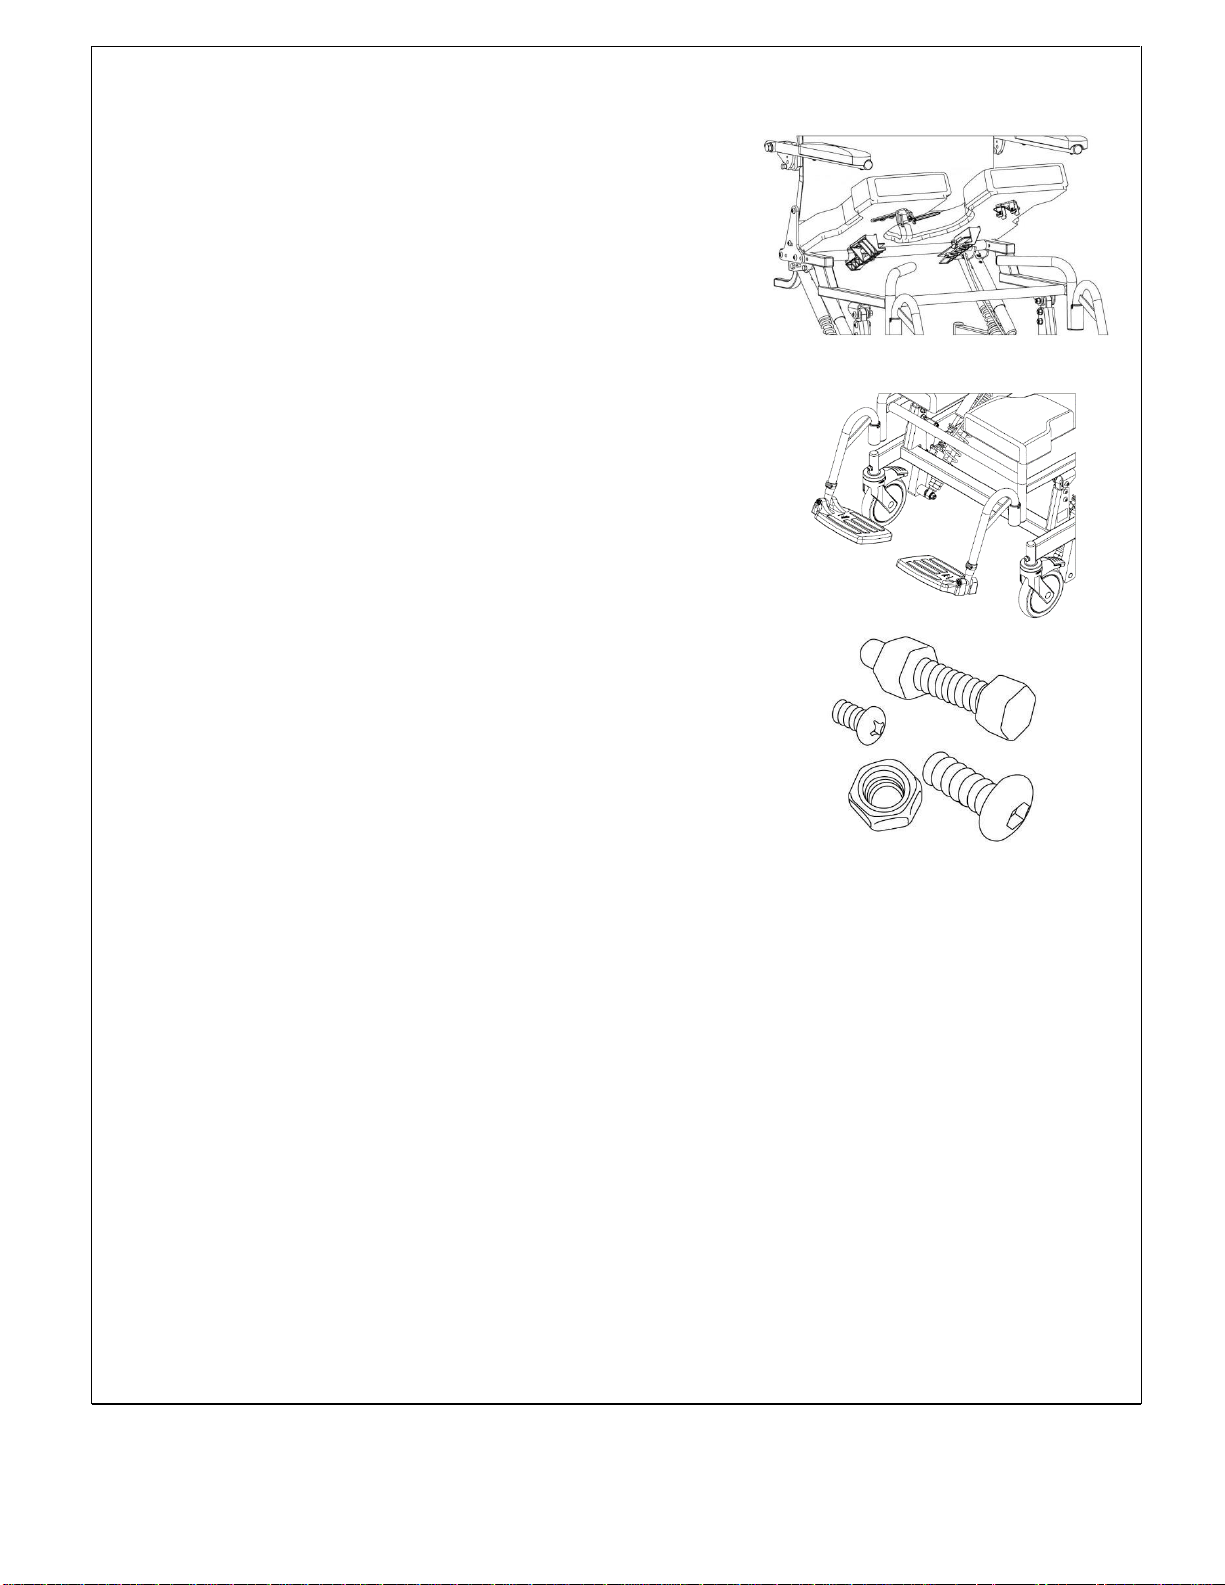
2.4 Adjustable Footrest Installation...........................................................................................10
2.5 Fastener Installation...........................................................................................................10
3.0 ADJUSTMENTS: INTENDED FOR DEALER USE ONLY
3.1 Back Support Adjustment...................................................................................................11
3.1.1 Back Support Angle Adjustment..............................................................................11
3.1.2 Adjustable-Tension Back Upholstery Adjustment....................................................11
3.2 Molded Seat Adjustment.....................................................................................................11
3.2.1 Molded Seat Depth Adjustment...............................................................................11
3.2.2 Molded Seat Height Adjustment..............................................................................12
3.3 Molded Headrest Adjustment..............................................................................................12
3.4 Adjustable Footrest Adjustment..........................................................................................12
3.5 Weight Assisted Spring System (WASS) Adjustment..........................................................13
4.0 USE AND OPERATION
4.1 Tilt Function........................................................................................................................14
4.2 Multi-Position Back Support................................................................................................14
4.3 Adjustable-Tension Back Upholstery..................................................................................15
4.4 Molded Seat.......................................................................................................................15
4.5 Molded Headrest................................................................................................................16
4.6 Adjustable Footrests...........................................................................................................17
4.7 Casters...............................................................................................................................17
4.8 Tilt-Assist Pedal..................................................................................................................17
4.9 Commode Pan....................................................................................................................18
5.0 CLEANING AND MAINTENANCE
5.1 Cleaning After Each Use ....................................................................................................19
5.1.1 Commode Pan........................................................................................................19
5.1.2 Molded Seat............................................................................................................19
5.2 Cleaning As Needed...........................................................................................................19
5.2.1 Adjustable-Tension Back Upholstery.......................................................................19
5.2.2 Frame, Armrests, Adjustable Footrests, and Other Components.............................19
5.3 Suggested Cleaning Products ............................................................................................19
6.0 LIMITED WARRANTY ...................................................................................................................20
7.0 CONTACTS...................................................................................................................................21

RQD013ENr04 Rev. Date: 2022-10-25
8
1.0 GENERAL INFORMATION
1.1 Raz-AT600 Mobile Shower Commode Chair Overview
1.2 Raz-AT600 Mobile Shower Commode Chair Specifications
SPECIFICATIONS
Raz-AT600
WEIGHT CAPACITY
275 kg (605 lbs)
FRAME WIDTH
(seat and back frames)
22” (56 cm)
OVERALL WIDTH
26.5” (67 cm)
OVERALL LENGTH
(with footrests)
39” (99 cm)
SEAT WIDTH (commode seat)
22” (56 cm)
SEAT DEPTH
(front of back post to front of seat)
18” (46 cm)
CLEARANCE HEIGHT
with pan brackets:
without pan brackets:
18”-19” (43-48.5 cm)
18.75”-19.75” (47.5-50 cm)
ARMREST HEIGHT ABOVE SEAT
9.5” (24cm)
SEAT-TO-FLOOR HEIGHT
21.75” and 22.75” (55 cm and 58 cm)
PRODUCT WEIGHT
(with footrests)
84 lbs (38 kg)
FRAME AND HARDWARE MATERIAL
Stainless Steel
(Lifetime warranty against corrosion)
MINIMUM TURNING CIRCLE
45” (114 cm)

RQD013ENr04 Rev. Date: 2022-10-25
9
2.0 SET-UP: INTENDED FOR DEALER USE ONLY
2.1 Caster Installation
TheRaz-AT600 chairs are shipped with casters not installed. Please
follow the instructions below for caster installation.
Tool required: 6mm hex key
1. Insert caster stem into caster housing on the base frame.
2. Align the threaded hole in the caster stem with the hole in the
caster housing.
3. Insert a M8-1.25x30mm long button head screw through the
M8 split lock washer and into the hole on the caster housing.
NOTE: Ensure each M8 screw has medium strength thread locker
solution on its threads before using.
4. Thread the M8 screw through the caster housing and into the
caster stem.
5. Continue to thread the M8 screw until the split lock washer is
completely flat and the M8 screw is tight.
6. Repeat steps 1 to 5 until all four casters are secured in place.
2.2 Back Support Installation
Tools required: 6mm hex key, 13mm wrench
1. Remove the Shower Chair from the shipping carton.
2. Lift the back support to an upright position.
TIP: A Phillips screwdriver can be inserted through one of the plates
and back posts to temporarily hold the back support in an upright
position.
3. Insert an included 45mm long, button head cap screw
through one of the two holes on the backsupport plate, then push
the screw through the back support frame tube.
NOTE: Select the front hole for a 100o back support angle or rear hole
for 95oback support angle.
4. Attach to the other end of the screw with the coved spacer, flat
washer and locknut as shown below.
5. Tighten the assembly.
6. Repeat steps 3 to 5 for other back support plate.
TOP VIEW OF BACK SUPPORT ASSEMBLY

RQD013ENr04 Rev. Date: 2022-10-25
10
2.3 Raz Seat Installation
1. Ensure that the front spring brackets are in the open position.
To open the front brackets, squeeze to unlatch.
2. Slide the rear of the seat over the rear cross tubes as the
front of the seat is lowered onto the frame. Check to make
sure that the rear seat brackets hook below the cross tubes.
3. Continue lowering the front of the seat until the front seat
brackets nestle onto the front seat support tubes.
4. Secure the seat in place by closing the front seat brackets.
To close the seat bracket, squeeze the clip and close
the bracket around the front support tubes.
5. Reverse steps 1 to 4 to remove the seat from the frame.
2.4 Adjustable Footrest Installation
1. Remove wrapped footrests from the inner accessory box.
2. Place the footrest hanger tubes into the receivers, welded at the
front of the chair frame. If thesupport tubesaredirectedforward,
the pins on the tubes will engage with grooves in the receivers
and lock in place.
2.5 Fastener Installation
All fasteners should be installed securely. Locknuts that are removed
for any reason may need to be replaced rather than re-used. Check
performance of nyloc nuts when re-attaching to screw. There should
be significant detectable resistance when tightening. If not, replace
the nyloc nut with a new one. It is advisable to check annually that
all fasteners are secure.

RQD013ENr04 Rev. Date: 2022-10-25
11
3.0 ADJUSTMENTS: INTENDED FOR DEALER USE ONLY
IMPORTANT
!
ADJUSTMENTS SHOULD NEVER BE ATTEMPTED WITH THE USER IN THE CHAIR.
3.1 Back Support Adjustment
3.1.1 Back Support Angle Adjustment
Tools required: 6mm hex key, 13mm wrench
1. Loosen and remove the locknuts and curved washers inside
both vertical back support frame tubes.
2. Remove the middle M8-1.25x45mm screw from the vertical
back support frame tube on both sides.
3. Rotate the back support to one of the two positions on the
back support mounting plates.
NOTE: Select the front hole for a 100o back support angle or rear hole for
95oback support angle.
4. With the back support in place, insert the screws through the
selected holes on the back support plates and push them
through the frame tubes.
5. Fasten the other end of the screws with curved washers and
locknuts.
6. Tighten the assembly with a hex key and wrench.
3.1.2 Adjustable-Tension Back Upholstery Adjustment
In order to adjust the back upholstery, each strap can be tightened or
loosened in the buckles to achieve a wide range of positions.
For example, the second and third straps from the bottom can be
tightened to create more pronounced support in the lumbar area of the
back.
3.2 Molded Seat Adjustment
3.2.1 Molded Seat Depth Adjustment
The seat has approximately 2” of fore/aft adjustment.
Tool required: #2 Phillips screwdriver
1. Release the seat by opening the front seat brackets.
2. Remove the seat by lifting up on the front edge and sliding the
seat forward and away from the chair.
3. Loosen (do not remove) the eight screws attaching the front and
rear seat brackets to the underside of the seat.
4. Returnthe seat to the chair frame, nestling thefront seat brackets
onto the front support tubes.
5. Slide/wiggle the seat to the desired position.
6. Tighten the screws just enough to hold the front seat brackets in
place, making sure the seat is positioned squarely on the frame.
7. With the seat on the chair, slide the rear brackets back until they
make firm contact with the rear cross tube, tighten the screws to
hold the brackets in place.
8. Remove the seat (steps 1 & 2) and tighten all eight screws.
9. Secure the seat to the chair frame by following the seat
installation steps in section 2.3.

RQD013ENr04 Rev. Date: 2022-10-25
12
3.2.2 Molded Seat Height Adjustment
To change the seat-to-floor height on a Raz-AT600, the seat frame
is raised or lowered from the wheel base at the seat posts on both
sides of the chair.
Tools required: 5mm hex key, 6mm hex key, 10mm wrench,
13mm wrench
1. Remove screws from the seat posts, spring support blocks and
gas strut extension tubes.
2. Raise or lower the chair to the height required for the user.
3. Slide the spring support blocks to accommodate the height
change.
4. Adjust the seat to a position level to the ground.
5. Re-attach the screws to their respective positions.
Note: The screw on the gas strut extension tube will need to be
relocated from its previous position in order to achieve a level seat.
IMPORTANT
!
INCREASING THE SEAT HEIGHT AND THE BACK SUPPORT ANGLE WILL DECREASE
REARWARD STABILITY. IT IS ESSENTIAL THAT A STABILITY CHECK BE PERFORMED
AFTER ANY OF THESE ADJUSTMENTS ARE MADE.
3.3 Molded Headrest Adjustment
Tool required: 5/32”hex key
1. Loosen the bottom tri-lobe knob and adjust the vertical “swan
neck” bar.
2. Loosen the top tri-lobe knob and adjust the headrest post
horizontally for a fore/aft change in position.
3. To change the angle of the headrest pad, loosen (do not
remove) the three screws on the back of the Molded Headrest.
Rotate the headrest around the end of the headrest mounting
bar to suit user’s needs and tighten the screws to secure.
4. Ensure that all knobs and screws are tightened securely for the
user’s safety.
3.4 Adjustable Footrest Adjustment
1. Remove a plastic snap-pin from one footrest hanger tube.
2. Adjust the footplate extension tube vertically to achieve the
desired height in the footrest hanger tube.
3. Insert the snap-pin through the footrest hanger tube and the
extension tube. Ensure that the snap-pin is completely through
the tube and that the green plastic clip is snapped securely
around the outside of the hanger tube.
4. Repeat steps 1 to 3 for the other footplate.

RQD013ENr04 Rev. Date: 2022-10-25
13
3.5 Weight Assisted Spring System (WASS) Adjustment
Tool required: 30mm wrench
The engagement of the WASS can be altered by adjusting the hex nuts
along the length of the rod to help facilitate the tilting action for the
attendant depending on user weight.
Move the hex nuts up the rod to further engage the springs. This is
recommended for heavier users as the springs will help support the
user’s weight when tilting. Move the hex nuts down the rod to partially
disengage the springs if the tilting action presents difficulty for the
attendant.

RQD013ENr04 Rev. Date: 2022-10-25
14
4.0 USE AND OPERATION
IMPORTANT
!
ADJUSTMENTS SHOULD NEVER BE ATTEMPTED WITH THE USER IN THE CHAIR.
4.1 Tilt Function
The Raz-AT600 tilts up to 40o to provide comfort and relieve
pressure for the user. Two gas spring struts facilitate this action and
make the tilt smooth for the user and facilitate the tilting function for
the attendant. To tilt the chair, the attendant must squeeze both tilt
triggers and move the chair to the desired angle. To lock the chair
in place, the triggers are simply released. Directly after purchase,
the triggers and springs may seem stiff. This stiffness is normal and
diminishes with use. Using the tilt-assist pedal will help to tilt the seat
frame back. The tilt function must only take place when the casters
are locked.
NOTE: When the chair is mounted at the lowest height setting the
maximum potential tilt angle is 40o. The higher the chair is set, the
fewer degrees the chair can be tilted back.
1.
IMPORTANT
!
DO NOT ATTEMPT TO TILT A RAZ MOBILE SHOWER COMMODE CHAIR IF THE ATTENDANT IS
PHYSICALLY INCAPABLE OF SAFELY AND SMOOTHLY OPERATING THE TILT MECHANISM WITH
A USER OCCUPYING THE CHAIR. ANY ATTENDANT MUST BE FAMILIAR WITH PROPER TILTING
TECHNIQUES PRIOR TO ASSISTING A USER IN THE SHOWER COMMODE. A PELVIC STRAP IS
RECOMMENDED FOR ANY USER AS AN EXTRA SAFETY PRECAUTION.
4.2 Multi-Position Back Support
The Multi-Position Back Support can be set at 95oor 100o.
The armrests can flip up to allow for ease of transfer, and
lock automatically when flipped down. The Multi-Position
Back Support comes in a standard 20” back height.

RQD013ENr04 Rev. Date: 2022-10-25
15
4.3 Adjustable-Tension Back Upholstery
The Multi-Position Back Support comes with an Adjustable-Tension
Back Upholstery that provides trunk support for optimal positioning
and comfort. The upholstery is removable for machine washing.
To install the Adjustable Tension Back Upholstery:
1. Place the fabric against the front of the Back Support canes
making sure that when wrapped around, the clips on the straps
face away from the fabric and the loops point downwards.
2. The first (1) and second (2) straps are positioned above the
crossbar.
3. The third (3), fourth (4) and fifth (5) straps are positioned
between the crossbar and armrest mounting plates.
4. The sixth (6) strap is positioned below the armrest mounting
plates.
5. Adjust all of the straps to meet the user’s needs.
In order to adjust the back upholstery, each strap can be tightened
or loosened in the buckles to achieve a wide range of positions. For
example, the second and third straps from the bottom can be
tightened to create more pronounced support in the lumbar area of
the back.
To remove the Adjustable-Tension Back Upholstery, release the buckles
on the straps.
4.4 Molded Seat
The standard molded seat on Raz-AT600 is designed to help stabilize the pelvis and is contoured
for pressure reduction. The molded seats are made from soft, integral-skin foam and available as a
standard 23” wide, 18” deep seat. Also available as an upgrade in pressure reduction are Visco-Foam
Interface seats. The Visco-Foam seats are available with 5 configurations: bridged front, front open,
rear open, left open, and right open.
All seats feature the unique Ischial Pelvic Alignment System (IPAS) that provides 2” of fore and aft
adjustment, locks in place for transfers and removes easily for cleaning. Optional spacers for
anterior or posterior seat angle are available. All Raz chairs fit over most standard toilet bowls when
the commode pan is not in place.
Bridged Front Rear Left Right
Front Open Open Open Open

RQD013ENr04 Rev. Date: 2022-10-25
16
To install a Raz Seat:
1. Ensure that the front spring brackets are in the open position.
To open the front brackets, squeeze to unlatch.
2. Slide the rear of the seat over the rear cross tubes as the
front of the seat is lowered onto the frame. Check to make
sure that the rear seat brackets hook below the cross tubes.
3. Continue lowering the front of the seat until the front seat
brackets nestle onto the front seat support tubes.
4. Secure the seat in place by closing the front seat brackets.
To close the seat bracket, squeeze the clip and close the
bracket around the front support tubes.
5. Reverse steps 1 to 4 to remove the seat from the frame.
IMPORTANT
!
NEVER ATTEMPT TO CHANGE THE SEAT HEIGHT WITHOUT TH HELP OF A QUALIFIED
DEALER. HIGHER SEAT POSITIONS WILL REDUCE THE CHAIR’S STABILITY AND MAY RESULT
IN TIPPING AND INJURY.
4.5 Molded Headrest
A Molded Headrest is included with all Raz-AT600. The Molded
Headrest is shaped to cradle the head comfortably and is easy to
clean. The Molded Headrest can be adjusted indefinitely forward and
backwards within a 5” range and vertically within a 11½” range.
To adjust the Molded Headrest:
1. Loosen the bottom tri-lobe knob and adjust the vertical “swan
neck” bar.
2. Loosen the top tri-lobe knob and adjust the headrest
horizontally for a fore/aft change in position.
3. To change the angle of the headrest pad, loosen (do notremove)
the three screws on the back of the Molded Headrest.
Rotate the headrest around the end of the headrest mounting
bar to suit the user’s needs and tighten the screws to secure.
4. Ensure that all knobs and screws are tightened securely for
the user’s safety.

RQD013ENr04 Rev. Date: 2022-10-25
17
4.6 Adjustable Footrests
Adjustable Footrests are standard on all Raz Mobile Shower Commode Chairs. For transfers, the
footrests can be flipped up, rotated away or removed entirely. Adjustable Footrests can be extended
for users with longer legs with the optional footrest extension tube, a 2”longer tube that can be ordered
for any Raz Mobile Shower Commode Chairs.
To insert the Adjustable Footrests:
1. Place the footrest hanger tubes into the footrest receivers.
2. If the hanger tubes are aligned forward, the pins on the tubes
will engage with grooves in the receivers and lock in place.
To adjust the length of the Adjustable Footrests:
1. Remove the snap-pin from one footrest hanger tube.
2. Reposition the footplate to a length suitable for the user.
3. Insert the snap-pin through the footrest hanger tube and
through the inner tube.
To rotate the Adjustable Footrests:
1. Lift the footrest hanger tubes to disengage the pins.
2. Rotate the footrests outward or inward.
To remove the Adjustable Footrests, lift the footrests out of the receiving sleeves on the frame.
4.7 Casters
Each Raz Mobile Shower Commode Chair caster is equipped with
a dual-lock feature, which stops the caster from swiveling and rolling
simultaneously. To engage the dual-lock, step on the end of the
caster brake lever until it latches in the “on” position. To deactivate
the dual-lock, step on the raised end of the dual-lock until it latches
in the “off” position.
ALWAYS release the directional lock (ifapplicable)and swivel all four casters to their outward position for
maximum stability before transferring or tilting a user.
4.8 Tilt-Assist Pedal
A Tilt-Assist Pedal is available with the Raz-AT600 to facilitate tilting
the chair for attendants.

RQD013ENr04 Rev. Date: 2022-10-25
18
4.9 Commode Pan
The Raz Commode Pan is designed with an elongated shape that
fits directly under the seat to minimize back splash. A unique splash-
reduction ridge is located at center of the pan. The high gloss surface
facilitates cleaning and rinsing, while the pouring spout and handle
facilitate emptying. Removal of the Commode Pan is achieved by
sliding the pan rearward.
NOTE: When re-inserting the pan, ensure that the pan is guided into
the green plastic brackets and pushed forward until it hits the stops.
IMPORTANT
!
A QUALIFIED RAZ DEALER SHOULD BE CONTACTED TO CHECK ALL FASTENERS, CASTER
AND WHEEL LOCKS, HARDWARE, AND ALL OTHER MOVING COMPONENTS AT LEAST ONCE
PER YEAR
IMPORTANT !
ANY ATTENDANT MUST BE FAMILIAR WITH PROPER TILTING TECHNIQUES PRIOR TO
ASSISTING A USER IN THE SHOWER COMMODE. A PELVIC STRAP IS RECOMMENDED FOR
ANY USER AS AN EXTRA SAFETY PRECAUTION.

RQD013ENr04 Rev. Date: 2022-10-25
19
5.0 CLEANING AND MAINTENANCE
5.1 Cleaning After Each Use
5.1.1 Commode Pan
1. Remove the commode pan and empty contents.
2. Wash the pan with a multi-purpose disinfectant cleaning solution. Use a soft brush if needed.
3. Rinse well before storage or re-use.
NOTE: A soapy hot water wash followed by a disinfectant spray can be substituted for a multi-
purpose disinfectant cleaning solution.
5.1.2 Molded Seat
1. Spray with a multi-purpose disinfectant cleaner and scrub with a soft brush as required.
2. Rinse with a water spray before storage or re-use.
DO NOT IMMERSE the seat in water or cleaning solutions.
3. For a more thorough cleaning, remove the seat from the shower chair to allow better access to the
underside of the seat and around the opening of the seat.
5.2 Cleaning As Needed
5.2.1 Adjustable-Tension Back Upholstery
1. Remove the plastic buckles and tri-glides from the back upholstery straps, paying attention to how
the straps are wound through each component as they are removed.
2. Remove the back upholstery from the back frame and machine wash with a mild detergent in warm
water on a normal or gentle wash cycle. Include other strap accessories such as the H-strap, pelvic
and chest positioning straps.
3. Install the back upholstery and other positioning accessories on the chair and allow to dry.
DO NOT dry the back upholstery in a clothes dryer or damage to the upholstery may occur.
4. Assemble all plastic buckles and tri-glides onto straps.
5. Adjust the straps to the desired tension.
5.2.2 Frame, Armrests, Adjustable Footrests, and Other Components
1. Spray the frame and components with a multi-purpose disinfectant cleaner, scrub with a soft brush
and rinse with water.
2. If necessary, spray the frame and components with a diluted (10 parts water to 1 part solution)
calcium/lime remover (such as CLR), scrub with a soft brush and rinse thoroughly with water. DO
NOT mix a calcium/lime removal solution with any other liquid or toxic fumes may occur.
It is recommended to the user that a qualified Raz dealer check over all fasteners and subassemblies if
there is cause for concern regarding the shower chair’s performance.
Several times each year the shower chair and its components should be wiped down with a diluted
calcium/lime removal solution to reduce deposits, followed by a hot water rinse.
To reduce the risk of mildew buildup, the entire chair should be wiped down with a soft dry cloth after the
final rinse and before storage or use.
5.3 Suggested Cleaning Products
Task
Recommended Products
General Cleaning
Antibacterial Detergent
Tuberculocidal Surface Cleaner
Intermediate Level Disinfectant
Oxiver TB (Virox Technologies Inc.)
SepteFX 7D-11 (Titan Worldwide Inc.)
Calcium and Lime Deterrent
CLR

RQD013ENr04 Rev. Date: 2022-10-25
20
6.0 LIMITED WARRANTY
This warranty is extended only to the original purchaser/user for Raz Mobile Shower Commode Chairs
that have been purchased from a qualified Raz dealer.
This warranty gives you specific legal rights, but you may have additional legal rights depending on your
region and country.
This warranty shall be extended to comply with state/provincial laws and requirements.
With regards to the original purchaser/user only, Raz Design warrants its base and back frame
components to be free of defects in materials and workmanship for a period of two (2) years from the date
of purchase. All other components on the Raz Mobile Shower Commode Chairs are covered for a period
of one (1) year and are subject to normal wear and tear exclusions. If within such warranty period any
such product shall be proven to be defective, the part will be repaired or replaced, at Raz Design’s
discretion. This warranty does not include any labor or shipping charges incurred in replacement, part
installation, or repair of any such product.
For warranty service, please contact the dealer from whom you purchased your Raz Mobile Shower
Commode Chair. In the event that you do not receive satisfactory warranty service, please contact Raz
Design directly using the contact information located in either the beginning or the end of this manual. In
your correspondence please provide your dealer’s name and address, the product type, the date of
purchase, the chair’s serial number (on a grey label located on the chair frame), as well as the nature of
the product issue. Do not return products to the manufacturer without prior authorization.
ULimitations and Exclusions:
The foregoing warranty shall not apply to serial numbered products if the serial number has been removed
or defaced, and to products subjected to negligence or an accident. Improper operation, maintenance, or
storage may void the warranty coverage on the Raz Mobile Shower Commode Chair.
The warranty does not apply to products modified without Raz Design’s express written consent. This
includes, but is not limited to, modification through the use of unauthorized parts or attachments,
products damaged by reason of repairs made to any component by an individual or individuals who are
not employed by a qualified Raz dealer, or to a product damaged by circumstances beyond Raz Design’s
control. Only Raz Design will have the authority to determine whether or not the circumstances are eligible
for warranty coverage. The warranty will not apply to problems arising from normal wear or failure to
adhere to the instructions contained in this manual.
The foregoing warranty is exclusive and in lieu of any other warranties, whether express or implied,
including the implied warranties of merchantability and fitness for a particular purpose. The sole remedy
for violations of any warranty whatsoever will be limited to repair or replacement of the defective product
in compliance to the terms contained in this document.
The application of any implied warranty shall not extend beyond the duration of the express warranty
provided herein. Raz Design will not be liable for any consequential or incidental damages to part or
whole of a Raz Mobile Shower Commode Chair.
This manual suits for next models
1
Table of contents
Other Raz Mobility Aid manuals