RCA DRC8060N User manual

Changing Entertainment. Again.
DVD Recorder
User’s Guide
DRC8060N
Important Disc Information
This Product Can Record on the Following
Disc Types:
DVD+R (2.4x, 4x, 8x, and 16x)
DVD+RW (2.4x and 4x)
This recorder cannot record on DVD-R or DVD-RW
discs. Please make sure to purchase discs with the plus “+”
symbol on the package.

Note:
This device is protected by U.S. patent numbers 5,333,091;
5,692,093; 5,696,866 for Commerical Advance; other
patents pending.
Important Information
WARNING
To reduce the risk of fire or shock hazard, do not expose
this DVD Recorder to rain or moisture.
CAUTION
RISK OF ELECTRIC
SHOCK DO NOT OPEN
This symbol indicates that this product incorporates double
insulation between hazardous mains voltage and user
accessible parts.
This symbol indicates “dangerous
voltage” inside the product that
presents a risk of electric shock or
personal injury.
This symbol indicates
important instructions
accompanying the product.
FCC INFORMATION
This equipment has been tested and found to comply with the limits for a Class B digital device,
pursuant to Part 15 of the FCC rules.These limits are designed to provide reasonable protection
against harmful interference in a residential installation.This equipment generates, uses and can radiate
radio frequency energy and, if not installed and used in accordance with the instructions, may cause
harmful interference to radio communications. However, there is no guarantee that interference
will not occur in a particular installation. If this equipment does cause harmful interference to radio
or television reception, which can be determined by turning the equipment off and on, the user is
encouraged to try to correct the interference by one or more of the following measures.
• Reorient or relocate the receiving antenna.
• Increase the separation between the equipment and receiver.
• Connect this equipment into an outlet on a circuit different from that to which the receiver is
connected.
• Consult the dealer or an experienced radio/TV technician for help.
This class B digital apparatus meets all requirements of the Canadian Interference – Causing Equipment
Regulations.This class B digital apparatus complies with Canadian CES-003.
Cet appareil numérique de la class B est conforme á la norme du NMB-003 du Canada.
Refer to the identification/rating label located on the back panel of your product for its proper
operating voltage.
Product Registration
Please fill out the product registration card and return it immediately. Returning the product registration
card allows us to contact you if needed.
Keep your sales receipt to obtain warranty parts and service and for proof of purchase.Attach it here and
record the serial and model numbers in case you need them.The numbers are located on the back of the
DVD Recorder.
Model No. __________________________ Serial No. __________________________
Purchase Date: ___________________________________________________________
Dealer/Address/Phone: ____________________________________________________
The AC power cord is polarized (one blade is wider than the other) and only fits
into AC outlets one way. If the plug won’t go into the outlet completely, turn the
plug over and try to insert it the other way. If it still won’t fit, contact a qualified
electrician to change the outlet or use a different one. Do not attempt to bypass
this safety feature.
Ventilation:
You must adequately ventilate the product. Make sure there is adequate space around the DVD
Recorder/VCR to provide proper air flow for ventilation.Also, do not block the cooling fan. See diagram.
CAUTION
THIS PRODUCT UTILIZES A LASER. USE OF
CONTROLS OR ADJUSTMENTS OR PERFORMANCE
OF PROCEDURES OTHER THAN THOSE SPECIFIED
HEREIN MAY RESULT IN HAZARDOUS RADIATION
EXPOSURE. DO NOT OPEN COVERS AND DO NOT
REPAIR YOURSELF. REFER SERVICING TO QUALIFIED
PERSONNEL.
CAUTION
FCC Regulations state that unauthorized changes or
modifications to this equipment may void the user’s
authority to operate it.
Note:
This DVD Recorder is designed and manufactured to
respond to the Region Management Information. If the
Region number of a DVD disc does not correspond to the
Region number of this DVD Recorder this DVD Recorder
cannot play the disc.The Region number for this DVD
Recorder is Region No 1.
Note:
This device is protected by U.S. patent numbers 4,631,603
and 4,577,216 and 4,819,098 and other intellectual property
rights.The use of Macrovision’s copy protection technology
in the device must be authorized by Macrovision and is
intended for home and other limited pay-per-view uses only,
unless otherwise authorized in writing by Macrovision.
Reverse engineering or disassembly is prohibited.
The apparatus shall not be exposed to dripping or splashing
and that no objects filled with liquids, such as vases, shall be
placed on the apparatus.
CLASS 1
LASER
PRODUCT

Table of Contents
Chapter 1: Connections and Setup
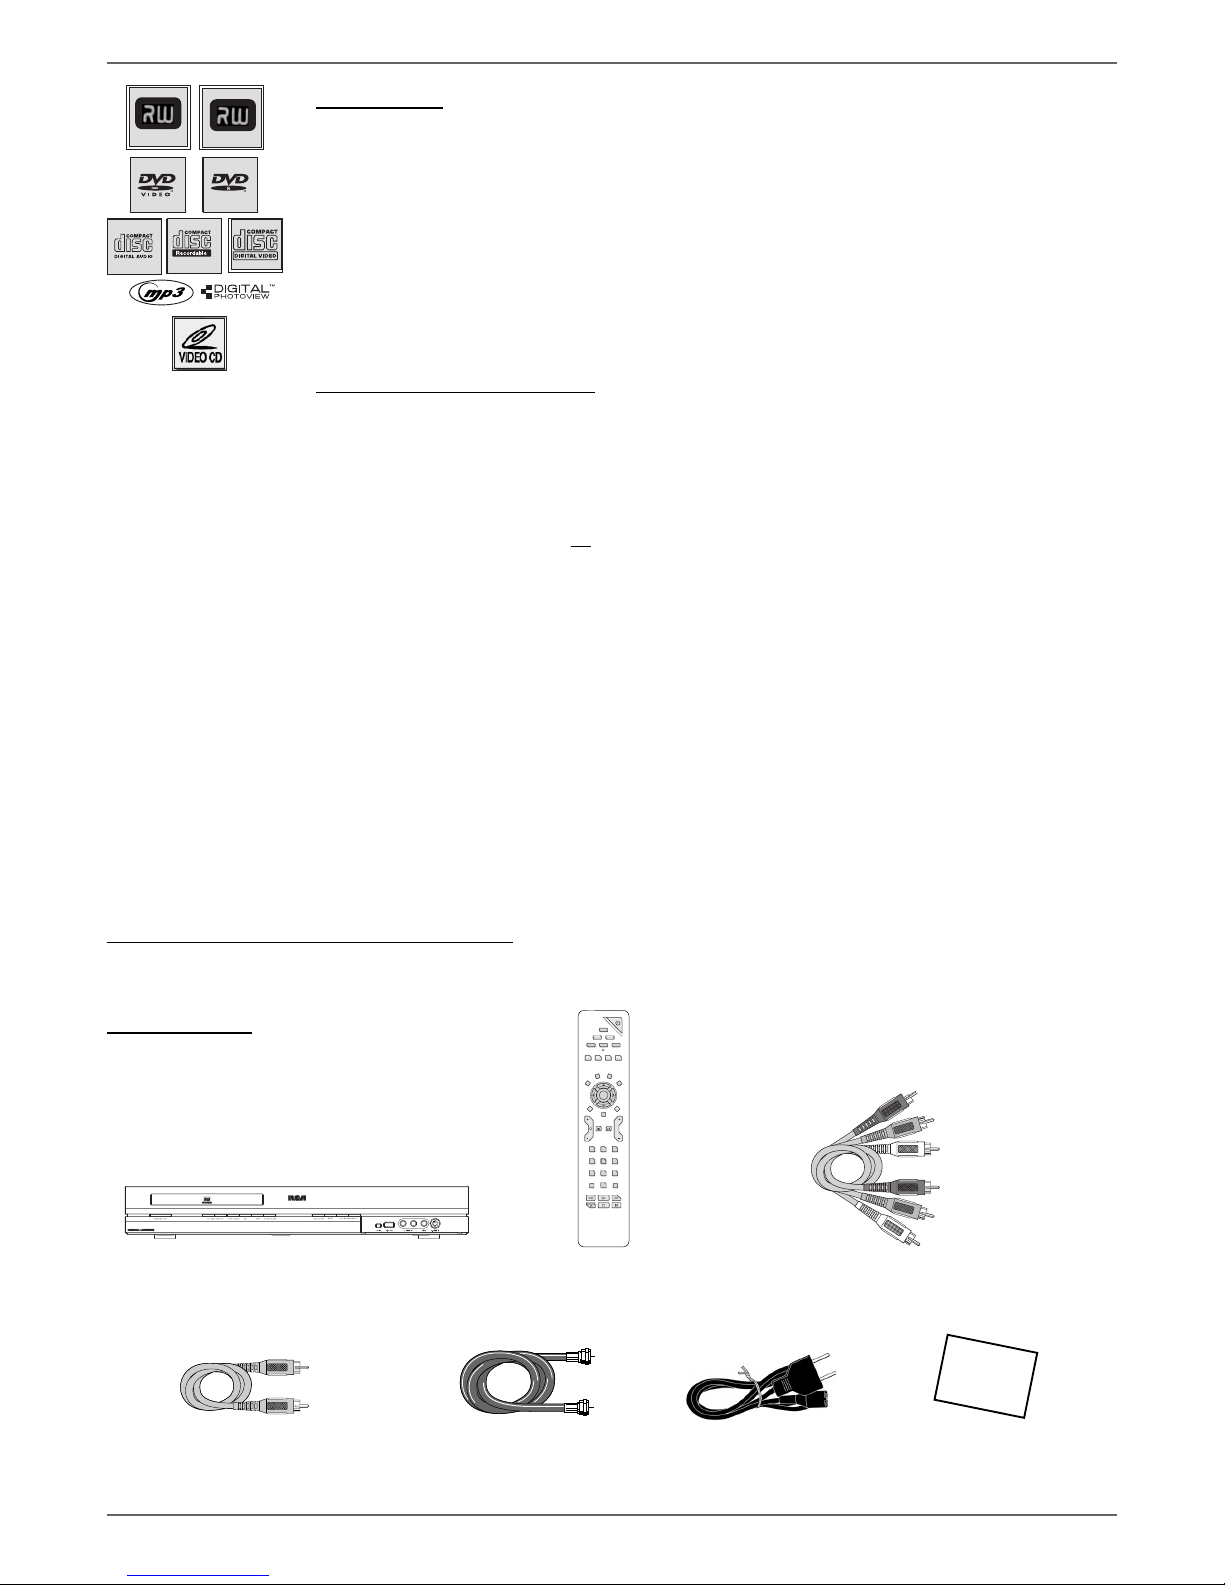
Types of Discs . . . . . . . . . . . . . . . . . . . . . . . . . . . . . . . . . . . . . . . . . . . . . . . . . . . . . . . . . . . .2
Things to Consider BeforeYou Connect . . . . . . . . . . . . . . . . . . . . . . . . . . . . . . . . . . . . . .2
Unpack the Box . . . . . . . . . . . . . . . . . . . . . . . . . . . . . . . . . . . . . . . . . . . . . . . . . . . . . . . . . .2
ChooseYour Connection . . . . . . . . . . . . . . . . . . . . . . . . . . . . . . . . . . . . . . . . . . . . . . . . . . .3
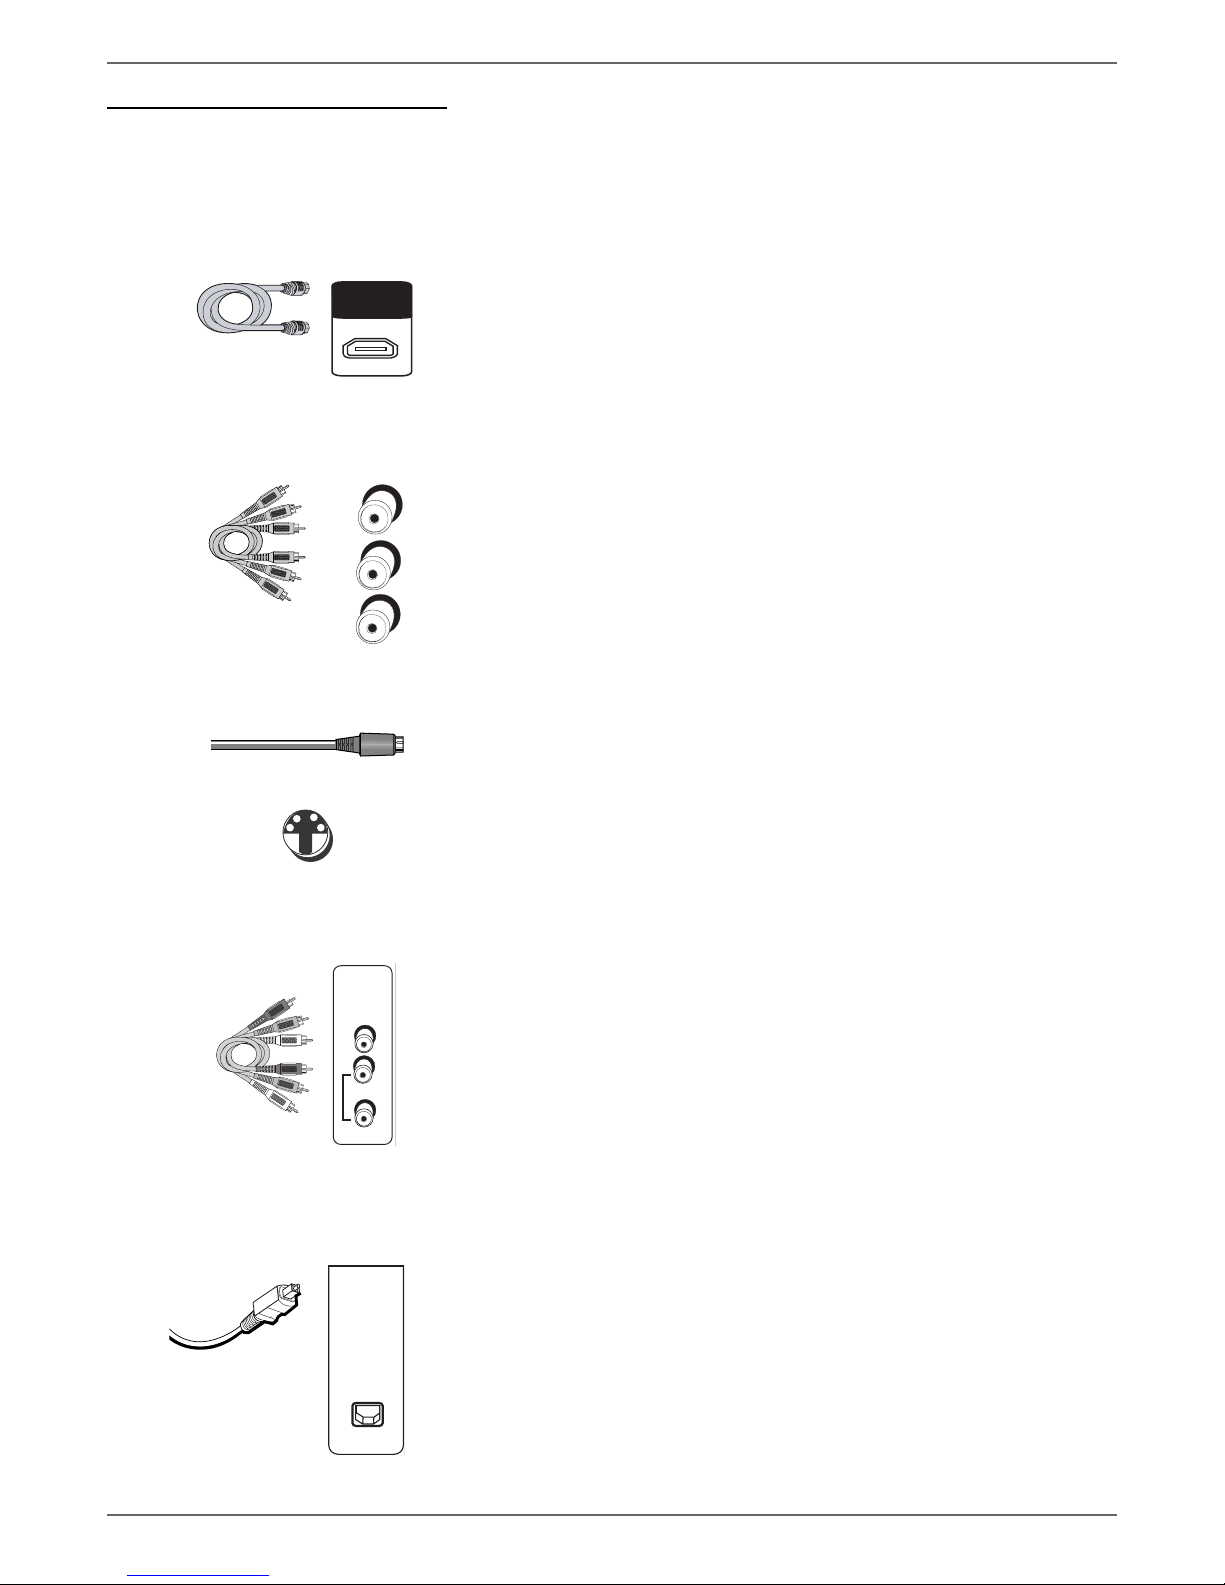
Explanation of Input Jacks and Cables . . . . . . . . . . . . . . . . . . . . . . . . . . . . . . . . . . . . . . . .4
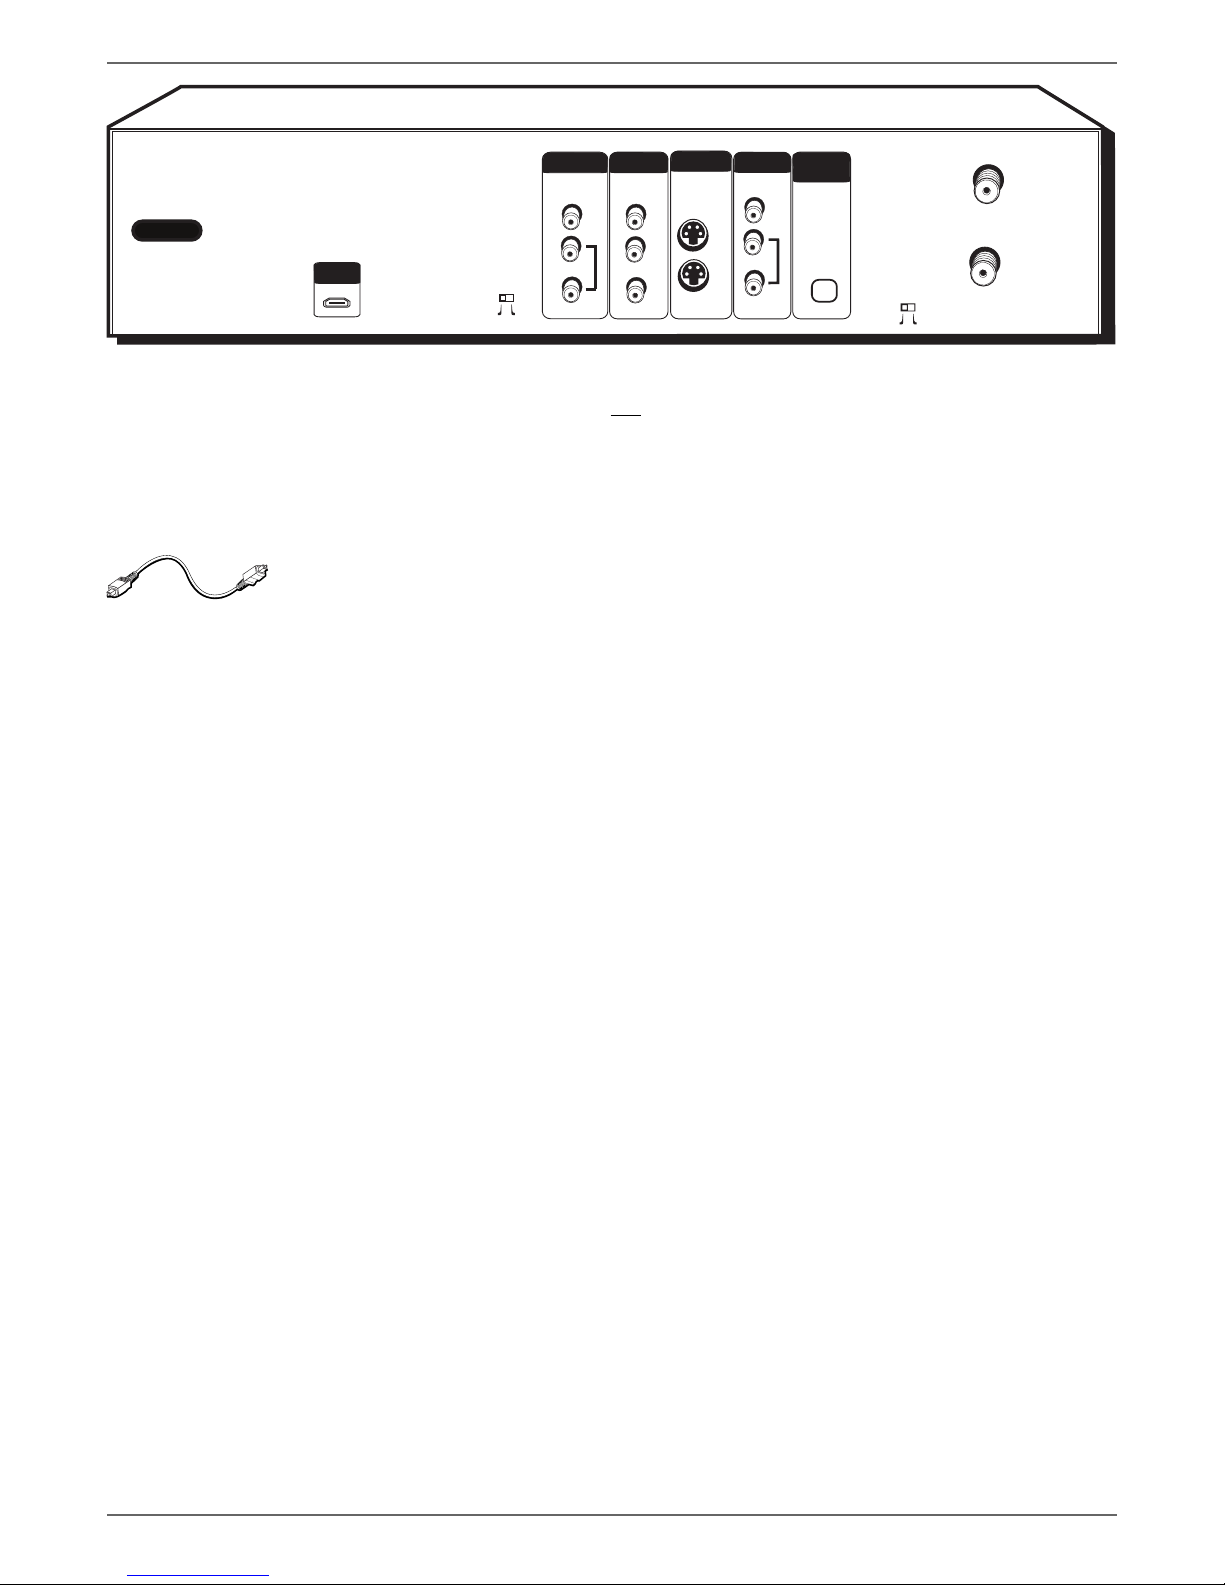
Back of the DVD recorder . . . . . . . . . . . . . . . . . . . . . . . . . . . . . . . . . . . . . . . . . . . . . . . . . .5
Front of the DVD recorder . . . . . . . . . . . . . . . . . . . . . . . . . . . . . . . . . . . . . . . . . . . . . . . . .7
Connection: DVD recorder +TV . . . . . . . . . . . . . . . . . . . . . . . . . . . . . . . . . . . . . . . . . . . . .9
Connection: DVD recorder +TV + Basic Cable Box . . . . . . . . . . . . . . . . . . . . . . . . . . . .11
Connection: DVD recorder +TV + Satellite Receiver . . . . . . . . . . . . . . . . . . . . . . . . . . .13
Connection: DVD recorder +TV + Basic Cable Box + Audio Receiver . . . . . . . . . . . . .15
Install Batteries in the Remote . . . . . . . . . . . . . . . . . . . . . . . . . . . . . . . . . . . . . . . . . . . . .16
Point the Remote in the Right Direction and Put It in DVD Mode. . . . . . . . . . . . .16
Turn on the TV and DVD recorder . . . . . . . . . . . . . . . . . . . . . . . . . . . . . . . . . . . . . . . . . .16
Complete the Interactive Setup . . . . . . . . . . . . . . . . . . . . . . . . . . . . . . . . . . . . . . . . . . . .16
1) Select on-screen menu language. . . . . . . . . . . . . . . . . . . . . . . . . . . . . . . . . . . . . .16
2) Select the Signal that’s connected to the CABLE/ANTENNA INPUT jack . . .17
3) Channel Search. . . . . . . . . . . . . . . . . . . . . . . . . . . . . . . . . . . . . . . . . . . . . . . . . . . .17
4) Channel List . . . . . . . . . . . . . . . . . . . . . . . . . . . . . . . . . . . . . . . . . . . . . . . . . . . . . .17
5) Time Zone. . . . . . . . . . . . . . . . . . . . . . . . . . . . . . . . . . . . . . . . . . . . . . . . . . . . . . . .17
6) Daylight SavingsTime . . . . . . . . . . . . . . . . . . . . . . . . . . . . . . . . . . . . . . . . . . . . . .17
7) Time and Date . . . . . . . . . . . . . . . . . . . . . . . . . . . . . . . . . . . . . . . . . . . . . . . . . . . .18
WatchTV . . . . . . . . . . . . . . . . . . . . . . . . . . . . . . . . . . . . . . . . . . . . . . . . . . . . . . . . . . . . . .18
What to Expect . . . . . . . . . . . . . . . . . . . . . . . . . . . . . . . . . . . . . . . . . . . . . . . . . . . . . . . . .18
How to find yourTV’s Video Input Channel . . . . . . . . . . . . . . . . . . . . . . . . . . . . . . . . . . .19
Next Steps. . . . . . . . . . . . . . . . . . . . . . . . . . . . . . . . . . . . . . . . . . . . . . . . . . . . . . . . . . . . . .19
Chapter 2:The Remote Control
Explanation of Buttons. . . . . . . . . . . . . . . . . . . . . . . . . . . . . . . . . . . . . . . . . . . . . . . . . . . .21
Find out if the remote can operate your TV . . . . . . . . . . . . . . . . . . . . . . . . . . . . . . . . . .22
Programming the remote to operate your TV . . . . . . . . . . . . . . . . . . . . . . . . . . . . . . . .22
Direct Entry . . . . . . . . . . . . . . . . . . . . . . . . . . . . . . . . . . . . . . . . . . . . . . . . . . . . . . . . .22
Automatic Code Search . . . . . . . . . . . . . . . . . . . . . . . . . . . . . . . . . . . . . . . . . . . . . . .22
Programming the Remote to Operate Other Components . . . . . . . . . . . . . . . . . . . . .23
Direct Entry . . . . . . . . . . . . . . . . . . . . . . . . . . . . . . . . . . . . . . . . . . . . . . . . . . . . . . . . .23
Automatic Code Search . . . . . . . . . . . . . . . . . . . . . . . . . . . . . . . . . . . . . . . . . . . . . . .23
Using the Remote’s Features. . . . . . . . . . . . . . . . . . . . . . . . . . . . . . . . . . . . . . . . . . . . . . .23
Very Important: Know the mode . . . . . . . . . . . . . . . . . . . . . . . . . . . . . . . . . . . . . . . .23
Understanding the INPUT button . . . . . . . . . . . . . . . . . . . . . . . . . . . . . . . . . . . . . . .23
Low Battery Indicator . . . . . . . . . . . . . . . . . . . . . . . . . . . . . . . . . . . . . . . . . . . . . . . . .23
Volume Punchthrough Feature . . . . . . . . . . . . . . . . . . . . . . . . . . . . . . . . . . . . . . . . .24
Deleting ALL Volume Punchthrough Commands. . . . . . . . . . . . . . . . . . . . . . . . . . .24
Remote Code List . . . . . . . . . . . . . . . . . . . . . . . . . . . . . . . . . . . . . . . . . . . . . . . . . . . . . . .25
Chapter 3: Recording, Playback & Features
WatchingTV . . . . . . . . . . . . . . . . . . . . . . . . . . . . . . . . . . . . . . . . . . . . . . . . . . . . . . . . . . . .30
The Channel Banner . . . . . . . . . . . . . . . . . . . . . . . . . . . . . . . . . . . . . . . . . . . . . . . . . .30
Recording . . . . . . . . . . . . . . . . . . . . . . . . . . . . . . . . . . . . . . . . . . . . . . . . . . . . . . . . . . . . . .30
Express Recording . . . . . . . . . . . . . . . . . . . . . . . . . . . . . . . . . . . . . . . . . . . . . . . . . . . .30
Watching one channel while you record another channel
(cable with no cable box or off-air antenna only) . . . . . . . . . . . . . . . . . . . . . . . .31
Timer Recordings. . . . . . . . . . . . . . . . . . . . . . . . . . . . . . . . . . . . . . . . . . . . . . . . . . . . . . . .31
Setting up timer recordings to record programs automatically . . . . . . . . . . . . . . .31
Disc Library. . . . . . . . . . . . . . . . . . . . . . . . . . . . . . . . . . . . . . . . . . . . . . . . . . . . . . . . . . . . .32
Finding a title (movie, program, etc) by using the Sort Feature . . . . . . . . . . . . . . .32
Other Sorting Options—Show All Discs . . . . . . . . . . . . . . . . . . . . . . . . . . . . . . . . . .32
Erasing the Disc Library . . . . . . . . . . . . . . . . . . . . . . . . . . . . . . . . . . . . . . . . . . . . . . .32
Turning Off Commercial Advance . . . . . . . . . . . . . . . . . . . . . . . . . . . . . . . . . . . . . . .33
Watching Commercials or Skipping Them Manually . . . . . . . . . . . . . . . . . . . . . . . .33
Playback. . . . . . . . . . . . . . . . . . . . . . . . . . . . . . . . . . . . . . . . . . . . . . . . . . . . . . . . . . . . . . . .34
Disc Information . . . . . . . . . . . . . . . . . . . . . . . . . . . . . . . . . . . . . . . . . . . . . . . . . . . . .34
Editing DVD+R and DVD+RW discs. . . . . . . . . . . . . . . . . . . . . . . . . . . . . . . . . . . . . .35
Copying a digital video camcorder tape to a DVD disc . . . . . . . . . . . . . . . . . . . . . .36
Chapter 4: Playing Discs
Regional Coding . . . . . . . . . . . . . . . . . . . . . . . . . . . . . . . . . . . . . . . . . . . . . . . . . . . . . . . . .38
Types of discs you can play. . . . . . . . . . . . . . . . . . . . . . . . . . . . . . . . . . . . . . . . . . . . . . . . .38
How to Load and Play Discs . . . . . . . . . . . . . . . . . . . . . . . . . . . . . . . . . . . . . . . . . . . . . . .38
Using Different Menus . . . . . . . . . . . . . . . . . . . . . . . . . . . . . . . . . . . . . . . . . . . . . . . . . . . .39
Search Options . . . . . . . . . . . . . . . . . . . . . . . . . . . . . . . . . . . . . . . . . . . . . . . . . . . . . . . . . .39
Playback options . . . . . . . . . . . . . . . . . . . . . . . . . . . . . . . . . . . . . . . . . . . . . . . . . . . . . . . . .39
Using the On-screen Info Display . . . . . . . . . . . . . . . . . . . . . . . . . . . . . . . . . . . . . . . . . . .40
Time Display (DVD,Video CD, and Audio CD) . . . . . . . . . . . . . . . . . . . . . . . . . . . . .41
Selecting a Title on DVDs or aTrack on Audio CDs orVideo CDs . . . . . . . . . . . . .41
Chapter Icon (DVD) . . . . . . . . . . . . . . . . . . . . . . . . . . . . . . . . . . . . . . . . . . . . . . . . . .41
Repeat Icon (DVD,Video CD, and Audio CD) . . . . . . . . . . . . . . . . . . . . . . . . . . . . . .42
Repeating Titles, Chapters, or Tracks . . . . . . . . . . . . . . . . . . . . . . . . . . . . .42
AB Repeat . . . . . . . . . . . . . . . . . . . . . . . . . . . . . . . . . . . . . . . . . . . . . . . . . . . . . . . . . .42
Audio Icon (DVD andVideo CD) . . . . . . . . . . . . . . . . . . . . . . . . . . . . . . . . . . . . . . . .42
Subtitle Icon (DVD). . . . . . . . . . . . . . . . . . . . . . . . . . . . . . . . . . . . . . . . . . . . . . . . . . .42
Camera Angle Icon (DVD) . . . . . . . . . . . . . . . . . . . . . . . . . . . . . . . . . . . . . . . . . . . . .43
Play Mode Icon (Audio CD) . . . . . . . . . . . . . . . . . . . . . . . . . . . . . . . . . . . . . . . . . . . .43
IntroScan Icon (Audio CD). . . . . . . . . . . . . . . . . . . . . . . . . . . . . . . . . . . . . . . . . . . . .43
Playback Control (PBC) Icon (Video CD) . . . . . . . . . . . . . . . . . . . . . . . . . . . . . . . . .43
Playing DiscsYou Recorded (DVD+R and DVD+RW) . . . . . . . . . . . . . . . . . . . . . . . . . . .44
Playing mp3,WMA, or JPEG files . . . . . . . . . . . . . . . . . . . . . . . . . . . . . . . . . . . . . . . . . . .44
Creating an mp3 Disc onYour Computer . . . . . . . . . . . . . . . . . . . . . . . . . . . . . . . . .44
JPEG Index Screen. . . . . . . . . . . . . . . . . . . . . . . . . . . . . . . . . . . . . . . . . . . . . . . . . . . .44
JPEG Info Display . . . . . . . . . . . . . . . . . . . . . . . . . . . . . . . . . . . . . . . . . . . . . . . . . . . . .45
Chapter 5:The Menu System
Overview of the DVD recorder’s Menu System. . . . . . . . . . . . . . . . . . . . . . . . . . . . . . . .47
How to navigate through on-screen menus. . . . . . . . . . . . . . . . . . . . . . . . . . . . . . . .47
The Main Menu . . . . . . . . . . . . . . . . . . . . . . . . . . . . . . . . . . . . . . . . . . . . . . . . . . . . . .47
WatchTV . . . . . . . . . . . . . . . . . . . . . . . . . . . . . . . . . . . . . . . . . . . . . . . . . . . . . . . . . . . . . .48
Disc . . . . . . . . . . . . . . . . . . . . . . . . . . . . . . . . . . . . . . . . . . . . . . . . . . . . . . . . . . . . . . . . . . .48
Disc Library. . . . . . . . . . . . . . . . . . . . . . . . . . . . . . . . . . . . . . . . . . . . . . . . . . . . . . . . . . . . .49
Timers . . . . . . . . . . . . . . . . . . . . . . . . . . . . . . . . . . . . . . . . . . . . . . . . . . . . . . . . . . . . . . . . .49
Setup . . . . . . . . . . . . . . . . . . . . . . . . . . . . . . . . . . . . . . . . . . . . . . . . . . . . . . . . . . . . . . . . . .49
Parental Controls. . . . . . . . . . . . . . . . . . . . . . . . . . . . . . . . . . . . . . . . . . . . . . . . . . . . .49
Recording Options. . . . . . . . . . . . . . . . . . . . . . . . . . . . . . . . . . . . . . . . . . . . . . . . . . . .51
System Options . . . . . . . . . . . . . . . . . . . . . . . . . . . . . . . . . . . . . . . . . . . . . . . . . . . . . .51
DV-CAM. . . . . . . . . . . . . . . . . . . . . . . . . . . . . . . . . . . . . . . . . . . . . . . . . . . . . . . . . . . . . . . .52
Chapter 6:Additional Information
Troubleshooting . . . . . . . . . . . . . . . . . . . . . . . . . . . . . . . . . . . . . . . . . . . . . . . . . . . . . . . . .54
Handling Cautions . . . . . . . . . . . . . . . . . . . . . . . . . . . . . . . . . . . . . . . . . . . . . . . . . . . . . . .57
Maintenance of Cabinet . . . . . . . . . . . . . . . . . . . . . . . . . . . . . . . . . . . . . . . . . . . . . . . . . . .57
Limited Warranty . . . . . . . . . . . . . . . . . . . . . . . . . . . . . . . . . . . . . . . . . . . . . . . . . . . . . . . .58
Accessory Information. . . . . . . . . . . . . . . . . . . . . . . . . . . . . . . . . . . . . . . . . . . . . . . . . . . .59
Copying content from a DVD+R or DVD+RW disc to aVCR videocassette . . . . . . . . .60
Copying content from aVCR videocassette to a DVD+R or DVD+RW disc . . . . . . . . .61

Graphics contained within this publication are for representation only.
2
Chapter 1: Connections and Setup
Types of Discs
DISCSYOU CAN USE FOR RECORDING
DVD+R 2.4x, 4x, or 8x, and 16x ONLY;
DVD+RW 2.4x and 4x ONLY.
IMPORTANT NOTES:
This recorder is not compatible with DVD-R or DVD-RW discs for recording. Please make sure to purchase discs with
the plus “+” symbol on the package. Also, it is NOT possible to record on CD-R or CD-RW discs.
IMPORTANT: It is NOT possible to record content that is copy-protected. This is usually true for most pre-recorded
DVD discs and most pre-recorded VHS tapes.
TYPES OF DISCSYOU CAN PLAY
• DVD discs – DVD movie discs (DVD-ROM); DVD+R; DVD+RW; DVD-RW (must be recorded using video mode or VM); DVD-R
(must be recorded using video mode or VM and must be finalized).
• CDs (Audio CDs, CD-R, CD-RW) – Audio CDs contain musical or sound content only. mp3 discs are CDs (CD-R or CD-RW)
that contain mp3 files.This product also plays CDs that contain JPEG files and Multisession CDs.
• Video CD (VCD) – Like DVD video discs,VCDs contain picture and sound content.The difference is the amount of information
that can be stored on the disc.VCDs typically have lower picture and sound quality than DVD discs.You must use DVD+R or
DVD+RW discs to record on your unit not VCDs.
Things to consider before you connect
Protect components from overheating
• Don’t block ventilation holes on any of the components or the fan on the back of this product.Arrange the components so that air can circulate freely.
• Don’t stack components.
• When you place components in a stand, make sure you allow adequate ventilation.
• If you connect an audio receiver or amplifier, place it on the top shelf.
Position cables properly to avoid audio interference
• Insert each cable firmly into the designated jack.
• If you place components above the TV, route all cables down the side of the back of the TV instead of straight down the middle of the back of the TV.
Connection Pictures
Audio/video cables are usually bundled together. For better visibility, the connection pictures in this book show each cable separately (audio left, audio right, and video).
Graphics contained within this publication are for representation only.
Some discs may not be compatible
due to laser pickup and disc design.
DVD+Rewritable
DVD+R
DVD recorder
GO
BACK
VOL CH
MUTE
TV
ON-OFF
DVD/VCR CABLE
AUX AUDIO
CLEAR MENU
OK
LIVE
RECORD STOP
PLAY
INPUT ANTENNA
PAUSE
FORWARDREVERSE
7
123
456
8
0
9
ADVANCE
AGAIN
INFOTIMER•GUIDE
SAT
ZOOM EDIT OPEN
CLOSE
ANGLE
Remote control and
batteries (part number
261387)
1 set of audio video cables (part number 233086)
S-Video cable (part number 257982) RF Coaxial cable (part
number 221396)
Power cord (part number 218104)
Unpack the Box
Your DVD recorder came with the following items:
DVD+RW
Blank Disc
1 DVD+RW Blank Disc

Graphics contained within this publication are for representation only. 3
Chapter 1: Connections and Setup
Choose Your Connection
There are several ways to connect your DVD recorder. Please use the following chart to determine which connection is best for you.Turn to the appropriate page for
specific instructions.
• Coaxial
• Audio/video
• S-Video
• Component
• HDMI
Components Cables Needed Connection Go to
Satellite Receiver
TVDVD recorder
STOP
CH+/SKIP+
CH-/SKIP-FWD
REVP
LAY/PAUSE
OPEN/CLOSERECORD
INPUT
Cable Box
TV
DVD recorder
STOP
CH+/SKIP+
CH-/SKIP-FWD
REVP
LAY/PAUSE
OPEN/CLOSERECORD
INPUT
DVD recorder
STOP
CH+/SKIP+
CH-/SKIP-FWD
REVPLAY/PAUSE
OPEN/CLOSERECORD
INPUT
TV
TV page 8
• Coaxial
• Audio/video
• S-Video
• Component
TV + cable
box
page 10
• Coaxial
• Audio/video
• S-Video
• Component
TV +
satellite
receiver
page 12
DVD recorder
STOP
CH+/SKIP+
CH-/SKIP-FWD
REVP
LAY/PAUSE
OPEN/CLOSERECORD
INPUT
TV
• Coaxial
• Audio/video
• S-Video
• Digital Audio
• Component
• HDMI
TV + cable
box + audio
receiver
Cable Box
page 14
Audio Receiver
VCR Connection go to pages 60 and 61
If you want to copy content from a DVD to a videotape or
vice versa, go to page 60 and 61 for general information.
Note: You can’t transfer copy protected content.

Graphics contained within this publication are for representation only.
4
Chapter 1: Connections and Setup
Explanation of Input Jacks and Cables
This section describes the jacks and cables you can use to make connections. Some cables are supplied with your product or you can purchase other cables by calling
1-800-338-0376, order online at www.rca.com, or go to your local electronics store).There are several ways to connect your DVD recorder to your TV depending upon the
cables you have and the jacks that are on the back of your TV.
Different jacks and cables provide a different level of performance. It’s important to remember, we’re talking about degrees of picture improvement for comparison. If your
TV has HDMI, Component jacks (Y, Pb, Pr), S-VIDEO, and composite video (often color-coded yellow); HDMI or Component (Y, Pb, Pr), would be considered excellent, S-
Video would be very good, and the composite video jack (yellow) would be considered good.
HDMI™ OUTPUT (High-Definition Multimedia Interface)
Provides an uncompressed digital interface that carries both video and audio data to your TV by way
of an integrated mini-plug cable (HDMI cable not supplied).When connected to a compatible high
definition digital TV, the DVD recorder will convert standard definition signals to higher resolution (high
definition) signals.
Note: If your HDTV set has a DVI input and is HDCP (High Definition Copy Protection) compatible, you can
connect your recorder to the TV using an optional HDMI cable and HDMI/DVI adapter. Remember to connect
the left and right audio cables because the DVI cable carries only the picture signal, not the sound.
Component Video (Y, Pb, Pr) Jacks and Cables
The Y, Pb, Pr jacks provide optimum picture quality because the video is separated into three signals (two signals
are dedicated to the color portion of the image, and the other signal is dedicated to the black and white part of the
image).
To ensure maximum picture quality, use three video-grade cables (not supplied) for the connection.You can purchase
bundled component video cables that are color-coded to match the Y, Pb, Pr jacks (red, green, and blue). Component
Video Input jacks are usually found on high-end TVs, such as HDTVs; multimedia monitors; and some of the “flat”
LCD and Plasma TVs or monitors.
Note: Also, remember to connect the left and right audio cables because the Y, Pb, Pr jacks and cables carry
only the picture signal, not the sound.
S-Video Jacks and Cables
The S-Video (separate video) jack provides better picture quality than a composite video jack (sometimes labeled
VIDEO and color-coded yellow on TVs) because S-Video keeps the color part of the picture separate from the
black and white part of the picture. If your TV has an S-VIDEO jack, connect the DVD recorder to the TV with an
S-Video cable for a better quality picture.
One S-Video cable is supplied with your DVD recorder.
Note: Remember to connect the left and right audio cables because the S-Video cable carries only the picture
signal, not the sound.
Audio/Video Jacks and Cables (RCA-type)
Video
The basic Video jack (usually color-coded yellow) is also referred to as composite video. Composite video doesn’t
keep color information separated (like S-Video), but it’s better than the video quality you get from an RF coaxial
cable (the type used to connect a cable signal or off-air antenna).
Audio
These jacks are used to send the audio from the disc you’re playing in the DVD recorder to the TV.The audio jacks
and cables (supplied) are often color-coded (red for right audio, and white for left audio).You must connect audio
cables to the AUDIO L and R jacks on the DVD recorder and the corresponding Audio Input Jacks on the TV no
matter which Video jack you connect (VIDEO; S-VIDEO;Y, Pb, Pr).
Note: If your TV has only one input for audio (mono), connect it to the left (white) audio jack on the DVD
recorder and don’t connect the right (red) audio part of the cable.
Digital Audio Output
Use a digital optical cable (or SPDIF cable- not supplied) to connect your DVD recorder to a compatible Dolby
Digital or PCM receiver or decoder. Dolby Digital offers theatre-quality sound (six audio channels). If you own a
receiver that uses an optical cable input, you can use an optical cable to connect the DVD recorder to that receiver
for the best sound quality. Go to the Digital Audio Out screen in the System Options menu to select Dolby Digital
or DTS as the output for this jack.
Note: This DVD recorder’s optical digital output jack fully complies with the international standard governing
this type of jack (IEC958), and is designed for connection to a Dolby Digital (AC-3® or PCM) receiver or
decoder. Older equipment, some of which is not fully compliant with IEC958, may not be compatible with the
Dolby Digital bitstream. Such a connection using anything other than a Dolby Digital (AC-3 or PCM) receiver
or decoder could create a high noise level, causing damage to headphones or speakers.
Y
Pb
Pr
S-VIDEO
VIDEO
INPUT
L
R
AUDIO
OPTICAL
DIGITAL
AUDIO OUT
HDMI OUT

Graphics contained within this publication are for representation only. 5
Chapter 1: Connections and Setup
Back of the DVD recorder
The back of your recorder might look a little overwhelming at first.This section explains what goes where and why.There are two sets of jacks on the back of your DVD
recorder—INPUT jacks and OUTPUT jacks.
Each jack is explained individually below, but the basic idea is about sending and receiving information to be played on or through your DVD recorder and displaying that
information on your TV screen.
INPUT The cables connected to the INPUT jacks bring pictures and sound INTO the DVD recorder, such as the cable signal (programming) from the cable company or
satellite programming from a satellite receiver.
OUTPUT The cables connected to the OUTPUT jacks are sending pictures and sound from the DVD recorder OUT TO your TV so you can see it on the screen.The
correct cables must be connected to the DVD recorder’s Output jacks and the corresponding Input Jacks on the TV so you can see the program on the TV.You must also
tune the TV to the correct channel, called a Video Input Channel (for details, go to page 19).
Explanation of Jacks (from left to right)
AC-IN – This is where you attach the power cord.
HDMI OUT Connect an HDMI-compatible TV to this jack for optimum audio/ video quality.
PROG. SCAN switch – If you’ve connected your DVD recorder to a TV that uses progressive scanning to display the image via the Y, Pb, Pr jacks, turn the switch to the
“on” position for progressive scan playback of DVD discs.Typically, only some High Definition Televisions and high-end multimedia monitors use progressive scanning. Leave
the switch in the OFF position for S-VIDEO or regular VIDEO (yellow) connections.
Note: If you turn the PROG SCAN switch on, and your TV isn’t capable of progressive scanning you won’t see a clear picture on the TV screen. Additionally, when
playing DVDs you won’t see any picture—press STOP (the main menu appears) and turn the PROG SCAN switch to the OFF position. Try playing the disc again.
INPUT: These jacks receive audio and video from a compatible component, such as a satellite receiver.Another set of Input Jacks (INPUT 2) are on the front of the DVD
recorder for temporarily connecting components such as a camcorder or a video game unit.
VIDEO: Color coded yellow, the video cable you use with this jack provides better quality than an RF coaxial cable but isn’t as good as S-Video. Connect
corresponding video cable to the output jack of a compatible component, such as a satellite receiver or cable box.
AUDIO L (left): Color coded white, connect corresponding audio cable to the output jack of a compatible component, such as a satellite receiver or cable box.
AUDIO R (right): Color coded red, connect corresponding audio cable to the output jack of a compatible component, such as a satellite receiver or cable box.
COMPONENT VIDEO OUTPUT (Y, Pb, Pr): Some high-end TVs and monitors have ComponentVideo Input jacks.The cables that send the video signal through these
Output Jacks provide the highest resolution because the video signal is divided into 3 separate parts (cables not supplied with DVD recorder).As with VIDEO and S-VIDEO,
COMPONENT VIDEO (Y, Pb, Pr) only carries the picture signal so you need to connect the audio cables so you’ll hear the sound. If your TV has COMPONENT INPUT
jacks, use three video grade cables to connect the DVD recorder to these jacks on the TV to get the best picture quality.
S-VIDEO
IN: If your satellite receiver or cable box has an S-VIDEO output jack, connect the S-Video cable to this jack because it provides better picture quality than standard
video (the yellow jack).
OUT: If your TV has an S-Video jack, connect an S-Video cable to the TV’s S-VIDEO jack and to this S-VIDEO OUT jack on the DVD recorder to achieve better
picture quality than standard video (the yellow jack).
continues on next page…
OPTICAL
ON
OFF
OUTPUT
L
R
PROG.
SCAN
AUDIO
OUT
IN
INPUT
CABLE/ANTENNA
CH4
CH3
AC IN
DIGITAL
AUDIO OUT
INPUT S-VIDEO
VIDEO
OUTPUT
Y
Pb
Pr
COMPONENT VIDEO OUT
L
R
AUDIO
VIDEO
HDMI OUT
HDMI and High-Definition Multimedia Interface are trademarks of registered trademarks of HDMI Licensing LLC.

Graphics contained within this publication are for representation only.
6
Chapter 1: Connections and Setup
OUTPUT: These jacks send the content (audio and video) from your DVD recorder OUT to the TV so you can see it on the TV screen and hear it through the TV’s
speakers.
VIDEO: Color coded yellow, the video cable you use with this jack provides better quality than an RF coaxial cable but isn’t as good as S-Video.
AUDIO L (left): Color coded white, connect corresponding audio cable to TV’s Audio Left Input jack.
AUDIO R (right): Color coded red, connect corresponding audio cable to TV’s Audio Right Input jack.
DIGITAL AUDIO OPTICAL OUT - DVD PLAYBACK ONLY: If you have a Dolby Digital or DTS receiver or decoder
with a Digital Audio Optical Input jack, you can achieve enhanced sound quality during DVD playback by connecting a
digital optical cable (not supplied).
OPTICAL
ON
OFF
OUTPUT
L
R
PROG.
SCAN
AUDIO
OUT
IN
INPUT
CABLE/ANTENNA
CH4
CH3
AC IN
DIGITAL
AUDIO OUT
INPUT S-VIDEO
VIDEO
OUTPUT
Y
Pb
Pr
COMPONENT VIDEO OUT
L
R
AUDIO
VIDEO
HDMI OUT
CH3/Ch4 Switch This switch is also found onVCRs—it corresponds to the TV channel you would use to watch a disc if you only have your TV connected to the DVD
recorder with an RF coaxial cable via the CABLE/ANTENNA OUTPUT jack (if the switch is set to CH3, you would tune the TV to channel 3). However, the connections
illustrated in the User’s Guide show a preferred connection using audio/video cables or an S-Video cable.
CABLE/ANTENNA INPUT: Connect an RF coaxial cable from an off-air antenna, cable box, or cable outlet to this jack.The cable is sending the programming from the
source to the DVD recorder.
CABLE/ANTENNA OUTPUT: Connect an RF coaxial cable (provided) to this jack and to the Cable/Antenna Input jack on your TV. It is important to connect this cable
so that your TV receives programming even when the DVD recorder is turned off.

Graphics contained within this publication are for representation only. 7
Chapter 1: Connections and Setup
Front of the DVD recorder
STANDBY/ON – Turns the DVD recorder on and off.
REV (reverse) – Searches backwards through the disc.
FWD (forward) – Searches forwards through a disc.
PLAY/PAUSE – Starts playback of a disc. Pauses recording or playback.
REC – Records content to a DVD disc (DVD+R or DVD+RW discs only).
STOP – Stops playback and/or recording.
OPEN/CLOSE – Opens and closes the disc tray.
REC QUALITY – Allows you to choose the record quality of the disc.
INPUT – Just like a TV hasVideo Input Channels (page 19), the DVD recorder has one Video Input Channel for each set of INPUT jacks.The Video Input Channel is the
“channel” to which you tune the DVD recorder so you can see the picture and hear the sound that’s coming from the component that is connected to the DVD recorder’s
INPUT jacks. For example, if you connected your camcorder to the Audio andVideo Input jacks on the front of the DVD recorder, you would press the INPUT button until
INPUT 2-Front appears.
CH-/SKIP- (channel down/skip reverse) – Goes to the previous channel in the channel list when you’re watching TV.When playing a disc, goes to the beginning of the
current chapter or track unless you’re within the first minute of a chapter or the first 15 seconds of a track—then, you’ll skip to the beginning of the preceding chapter or
track.
CH+/SKIP+ (channel up/skip forward) – Goes to the next channel in the channel list when you’re watching TV.When playing a disc, goes to the beginning of the next
title, chapter, or track on a disc (in effect,“skipping” the title, chapter, or track).
Front Input Jacks:
DV IN – This jack is provided when you’re connecting a DV camcorder through a IEEE 1394 Firewire connection.
USB – This jack is provided when connecting a USB device, such as a USB flash drive or card reader.
INPUT 2: Audio/Video jacks – These Input jacks are provided for convenience when you’re connecting a temporary component, such as a camcorder.
S-VIDEO IN – If a component you’re connecting, such as a camcorder, has an S-Video Output jack connect it to this jack for picture quality that is better than
regular video (yellow). Remember, you still have to connect audio cables to hear sound.

Graphics contained within this publication are for representation only.
8
Chapter 1: Connections and Setup
In from cable
or antenna
TV
The back of yourTV might look
different than the one pictured here.
To watch one program while you record another:
Tune the TV to its Input 1 channel or Vid 1 channel
Tune the DVD recorder to the channel you want to record, and press RECORD.
Use the buttons on the TV (or the TV’s remote control*) to tune the TV to the channel you want to
watch. For example, change the channel on the TV to channel 8 to watch a program on channel 8.
To play a disc: Tune the TV to its Input 1 channel or Vid 1 channel.
If you need help finding your TV’s various Video Input Channels, go to page 19.
* The remote control packed with your DVD recorder is capable of being programmed to operate many brands and models of TVs and VCRs.
For instructions, go to page 22. If the remote operates your TV, press TV and INPUT to access the Video Input Channel.
Details about the different kinds of cables used to connect your DVD recorder are on page 4.
DVD recorder +TV
OPTICAL
ON
OFF
OUTPUT
L
R
PROG.
SCAN
AUDIO
OUT
IN
INPUT
CABLE/ANTENNA
CH4
CH3
AC IN
DIGITAL
AUDIO OUT
INPUT S-VIDEO
VIDEO
OUTPUT
Y
Pb
Pr
COMPONENT VIDEO OUT
L
R
AUDIO
VIDEO
HDMI OUT
VIDEO L R
INPUT1
INPUT2
S-VIDEO
S-VIDEO
CABLE/ANTENNA
1
3a
3b
3c
4
2
HDMI/DVI INPUT
Use menu for DVI audio.
3e
DVD
Recorder

Graphics contained within this publication are for representation only. 9
Chapter 1: Connections and Setup
Connection: DVD recorder +TV
1. Connect the signal (cable or antenna):
Note: Depending upon how you currently have your TV connected, you’ll have to disconnect the cable from your
TV’s Antenna Input jack (sometimes labeled CABLE/ANTENNA) or your VCR’s Input jack before you connect the
cable as explained below.
Cable service: If you have cable service via a cable that comes out of the wall, connect the end of that cable to the
CABLE/ANTENNA INPUT jack on the DVD recorder.
Note: If you have a cable box, go to page 10 for connection instructions.
Off-air antenna: If you use an off-air antenna to get TV programming, connect the antenna’s RF coaxial cable to the
CABLE/ANTENNA INPUT jack on the DVD recorder.
2. Connect the DVD recorder to theTV
You need to connect cables from the DVD recorder’s OUTPUT jacks to the TV’s INPUT jacks in order to see the
content from the DVD recorder.
Use the RF Coaxial cable that was packed with your DVD recorder, and connect one end to the CABLE/ANTENNA
OUTPUT jack on the DVD recorder. Connect the other end to the Cable/Antenna Input jack on the back of your
TV (sometimes labeled CABLE/ANTENNA). It is important to make this connection so you can watch cable or
antenna programs when the DVD recorder is off.
3. If you want to be able to record one TV program while you watch a different program, you need to connect the
audio/video cables in addition to connecting the RF Coaxial cable described in Step 2.
3a. Connect the audio cables.
A set of audio/video cables was packed with your DVD recorder. Connect the audio cables to
the OUTPUT AUDIO L (left – white) and R (right – red) jacks on the back of your DVD recorder, and to the
corresponding Audio Input jacks on your TV (sometimes labeled AUDIO IN L and R).
3b. Connect the video cable.The cables you use for the video determine the quality of the picture you’ll see on
your TV when you’re playing DVDs. For more information about cables and signal quality, go to page 4. Connect
the video cable (yellow) to the OUTPUTVIDEO jack on the back of your DVD recorder, and to the Video Input
jack on your TV (sometimes labeled VIDEO IN).
3c. S-VIDEO OUT If your TV has an S-Video jack, use the S-Video cable (supplied). Connect one end of the S-
Video cable to the S-VIDEO IN jack on the back of the TV and the other end to the S-VIDEO OUT jack on the
back of the DVD recorder.
3d. COMPONENT OUT
Y, Pb, Pr (not shown) If your TV has Component Input jacks (Y, Pb, Pr), you
can achieve even greater picture quality by connecting the DVD recorder to the TV using these jacks
(COMPONENT VIDEO OUTPUT,Y, Pb, Pr on the DVD recorder). For more explanation, go to page 4.
Component Video cables not supplied with the DVD recorder.
Note: If your TV is capable of progressive scan, connect the DVD recorder to the TV using the COMPONENT
VIDEO OUTPUT jacks (cable not supplied), and slide the PROG SCAN switch to the ON position to see DVD
titles (movies) in progressive scan format. If you need more explanation, go to page 5.
3e. HDMI OUT If your TV has an HDMI Input jack (High-Definition Multimedia Interface), you can achieve
optimum high-definition picture quality as well as digital audio simultaneously. (HDMI cable not supplied).
Important note: Make sure all of the boxes in the Digital Audio Out menu are unchecked for this
connection. Otherwise, the sound may not be sent to the TV properly. For more explanation, go
to page 51.
Notes:
If your HDTV set has a DVI input and is HDCP (High Definition Copy Protection) compatible, you can
connect your recorder to the TV using an optional HDMI cable and HDMI/DVI adapter. Remember to
connect the left and right audio cables because the DVI cable carries only the picture signal, not the
sound.
If you connect your recorder to a high definition TV using the HDMI connection but can’t get a picture,
try pressing the ZOOM button on the remote to toggle the output resolution to 480p, 720p, or 1080i.
4. Attach the AC power cord to the unit.
5. Insert the other end of the AC power cord into an AC outlet (or power strip).
Go to page 16
RF Coaxial cable
If yourTV has an S-Video jack,
connect the S-Video cable
(supplied). S-Video provides
better video quality than
composite video (the yellow jack).
Audio video cables are usually color-
coded red, white, and yellow.
Red
Yellow
White

Graphics contained within this publication are for representation only.
10
Chapter 1: Connections and Setup
The back of yourTV
and/or Cable Box might
look different than the
ones pictured here.
Cable Box
TV
If you connect your components as described, you must access different Video Input Channels on your TV to see programming. If you don’t know how to
access Video Input Channels on your TV, go to page 19 for help.A general explanation, based on the connection shown above, follows:
If you need help finding your TV’s various Video Input Channels, go to page 19.
* The remote control packed with your DVD recorder is capable of being programmed to operate many brands and models of TVs. For instructions, go to page 22. If
the remote operates your TV, press TV and INPUT to access the Video Input Channel.
DVD recorder +TV+ Basic Cable Box
To play a disc: Tune the TV to its Input 1 channel or Vid 1 channel.
Notes about cable boxes:
The connection diagram shown above reflects a basic setup. Since there are many different cable companies and types of cables boxes, your cable box may come
with a different recommended connection diagram. Normally,ANALOG cable boxes are used so that the cable company can scramble the signal for premium
channel programming (like movie channels).The cable box will descramble the signal if you are a premium channel subscriber. In some cases, your cable
company may not scramble the signal for basic channels and the signal could be passed through the cable box so that you could receive the signal with the DVD
recorder.
There are also DIGITAL cable boxes that are relatively new and are used with digital cable service. Even with digital cable service, analog signals are often
carried on the same cable.
Using the connection diagram above, you won’t be able to watch one program while recording another program.This may be possible with a more sophisticated
setup, using an optional signal splitter and A-B switch.We suggest you contact your cable company for help in recommending the best setup for your situation.
OPTICAL
ON
OFF
OUTPUT
L
R
PROG.
SCAN
AUDIO
OUT
IN
INPUT
CABLE/ANTENNA
CH4
CH3
AC IN
DIGITAL
AUDIO OUT
INPUT S-VIDEO
VIDEO
OUTPUT
Y
Pb
Pr
COMPONENT VIDEO OUT
L
R
AUDIO
VIDEO
HDMI OUT
CABLE INCABLE OUT
VIDEO L R
INPUT1
INPUT2
S-VIDEO
S-VIDEO
CABLE/ANTENNA
2d
4
1b
1a
2a
2b
2c
In from cable
DVD Recorder

Graphics contained within this publication are for representation only. 11
Chapter 1: Connections and Setup
RF Coaxial cable
If yourTV has an S-Video jack,
connect the S-Video cable
(supplied). S-Video provides better
video quality than composite
video (the yellow jack).
Audio video cables are usually
color-coded red, white, and yellow.
Red= right audio;White = left
audio;Yellow = video.
Red
Y
ellow
White
Connection: DVD recorder +TV + Basic Cable Box
1. Connect the cable box signal.
Note: Before you connect the DVD recorder, you’ll need to disconnect some of the cables first in order to
reconnect them.
1a. Connect the RF coaxial cable from the cable jack on the wall to the CABLE IN jack on the cable box.
1b. Connect the RF coaxial cable that is connected to the cable box’s Output jack (sometimes labeled CABLE
OUT) to the CABLE/ANTENNA INPUT jack on the back of the DVD recorder.
2. Connect the DVD recorder to theTV
You need to connect cables from the DVD recorder’s OUTPUT jacks to the TV’s INPUT jacks in order to see the
content from the DVD recorder (whether it’s a TV program or a disc you’re playing).
2a. Use the RF coaxial cable that was packed with your DVD recorder, and connect one end to the CABLE/
ANTENNA OUTPUT jack on the DVD recorder. Connect the other end to the Cable/Antenna Input jack on
the back of your TV (sometimes labeled CABLE/ANTENNA). It is important to make this connection so you
can watch cable box programs when the DVD recorder is off.
2b. Connect the audio cables.
A set of audio/video cables was packed with your DVD recorder. Connect the audio cables to the OUTPUT
AUDIO L (left – white) and R (right – red) jacks on the back of your DVD recorder, and to the corresponding
Audio Input jacks on your TV (sometimes labeled AUDIO IN L and R).
2c. Connect the video cable.The cables you use for the video determine the quality of the picture you’ll see on
your TV when you’re playing DVDs. For more information about cables and signal quality, go to page 4.
Connect the video cable (yellow) to the OUTPUTVIDEO jack on the back of your DVD recorder, and to the
Video Input jack on your TV (sometimes labeled VIDEO IN).
2d. S-VIDEO If your TV has an S-VIDEO jack, connect one end of the S-Video cable (supplied) to the S-VIDEO IN
jack on the back of the TV and the other end to the S-VIDEO OUT jack on the back of the DVD recorder.
2e. COMPONENT OUT
Y, Pb, Pr (not shown) If your TV has Component Input Jacks (Y, Pb, Pr), you
can achieve even greater picture quality by connecting the DVD recorder to the TV using these jacks
(COMPONENT VIDEO OUTPUT,Y, Pb, Pr on the DVD recorder). For more explanation, go to page 4.
Component Video cables not supplied with the DVD recorder.
Note: If your TV is capable of progressive scan, connect the DVD recorder to the TV using the COMPONENT
VIDEO OUTPUT jacks (cable not supplied), and slide the PROG SCAN switch to the ON position to see DVD
titles (movies) in progressive scan format. If you need more explanation, go to page 5.
3. Attach the AC power cord to the unit.
4. Insert the other end of the AC power cord into an AC outlet (or power strip).
Go to page 16

Graphics contained within this publication are for representation only.
12
Chapter 1: Connections and Setup
OPTICAL
ON
OFF
OUTPUT
L
R
PROG.
SCAN
AUDIO
OUT
IN
INPUT
CABLE/ANTENNA
CH4
CH3
AC IN
DIGITAL
AUDIO OUT
INPUT S-VIDEO
VIDEO
OUTPUT
Y
Pb
Pr
COMPONENT VIDEO OUT
L
R
AUDIO
VIDEO
HDMI OUT
VIDEO L R
INPUT1
INPUT2
S-VIDEO
S-VIDEO
CABLE/ANTENNA
3c 3b
3d
5
1
SATELLITE IN
LOW SPEED
DATA
OUT TO TVIN FROM ANT
S-VIDEO
VIDEO
AUDIO OUT
R
L
PHONE JACK
2a
2b 2c
3a
The back of your
satellite receiver might
look different than the
one pictured here.
Satellite
Dish and
Antenna
DVD Recorder
TV
The back of yourTV might look
different than the one pictured here.
Details about the different kinds of cables used to connect your DVD recorder are on page 4.
DVD recorder +TV+ Satellite Receiver
To watch TV (satellite
programming) with the DVD
Recorder turned on:
Tune the TV to its Input 1 channel or Vid 1 channel.
Tune the DVD recorder to the INPUT 1 channel (press the INPUT button on the remote).
Tune the satellite receiver to the channel you want to watch.
Tune the TV to its Input 1 channel or Vid 1 channel.
To watch TV (satellite
programming) with the
DVD recorder turned off:
Tune the TV to its CABLE/ANTENNA INPUT channel (usually channel 2, 3, or 4).
Tune the satellite receiver to the channel you want to watch.
To play a disc:
Important
You can’t watch one satellite
program and record another
satellite program at the same
time.

Graphics contained within this publication are for representation only. 13
Chapter 1: Connections and Setup
Connection: DVD recorder +TV + Satellite Receiver
The following instructions enable you to record the programs from your satellite receiver. Because the jack configuration
and labels vary on different satellite receivers and televisions, the steps provided are general guidelines. Consult your
satellite receiver and/or television user’s guides for additional information.
1. Satellite signal: Leave the cable in place that comes from the satellite dish and goes to the satellite receiver.
2. Connect the satellite receiver to the DVD recorder
2a. Connect a coaxial cable to the satellite receiver’s OUT TO TV jack, and to the CABLE/ANTENNA INPUT jack
on the DVD recorder.
2b. Connect audio cables (red and white) to the satellite receiver’s output jacks [sometimes labeled Audio Left
(white) and Audio Right (red)]. Connect the other ends of these cables to the corresponding INPUT AUDIO L
and AUDIO R jacks on the back of the DVD recorder.
2c. Connect the video cable (yellow) to theVideo Output jack on the satellite receiver (sometimes labeledVIDEO)
to the INPUT VIDEO jack on the back of the DVD recorder.
2d. If your satellite receiver has an S-VIDEO OUT jack, connect an S-Video cable to that jack and to the S-VIDEO
IN jack on the DVD recorder for improved picture quality (not shown).
3. Connect the DVD recorder to theTV
You need to connect cables from the DVD recorder’s OUTPUT jacks to the TV’s INPUT jacks in order to see the
content from the DVD recorder (whether it’s a satellite program or a disc you’re playing).
3a. Connect an RF coaxial cable to the DVD recorder’s CABLE/ANTENNA OUTPUT jack and to the TV’s Antenna
Input jack (sometimes labeled CABLE/ANTENNA). It is important to make this connection so you can watch
satellite programs when the DVD recorder is off.
3b. Connect the audio cables.
A set of audio/video cables was packed with your DVD recorder. Connect the audio cables to the OUTPUT
AUDIO L (left – white) and R (right – red) jacks on the back of your DVD recorder, and to the corresponding
Audio Input jacks on your TV (sometimes labeled AUDIO IN L and R).
3c. Connect the video cable.The cables you use for the video determine the quality of the picture you’ll see on
your TV when you’re playing DVDs. For more information about cables and signal quality, go to page 4.
Connect the video cable (yellow) to the OUTPUTVIDEO jack on the back of your DVD recorder, and to the
Video Input jack on your TV (sometimes labeled VIDEO IN).
3d. S-VIDEO If your TV has an S-VIDEO input jack, connect one end of the S-Video cable (supplied) to the S-
VIDEO input jack on the back of the TV and the other end to the S-VIDEO OUT jack on the back of the DVD
recorder.
3e. COMPONENT OUT Y, Pb, Pr (not shown) If your TV has Component Input Jacks (Y, Pb, Pr), you
can achieve even greater picture quality by connecting the DVD recorder to the TV using these jacks
(COMPONENT VIDEO OUTPUT,Y, Pb, Pr on the DVD recorder). For more explanation, go to page 4.
Component Video cables not supplied with the DVD recorder.
Note: If your TV is capable of progressive scan, connect the DVD recorder to the TV using the COMPONENT
VIDEO OUTPUT jacks (cable not supplied), and slide the PROG SCAN switch to the ON position to see DVD
titles (movies) in progressive scan format. If you need more explanation, go to page 5.
4. Attach the AC power cord to the unit. Insert the other end of the AC power cord into an AC outlet (or power
strip).
Go to page 16
Important
You can’t watch one satellite program and record another satellite program at the same time.
This connection scenario illustrates a basic connection—you can achieve better video quality by connecting the
components with S-Video or Component Video options, depending upon the cables you have and the jacks available on
your components. See page 4 for more information about jacks and cables.
RF Coaxial cable
Audio video cables are usually
color-coded red, white, and yellow.
Red= right audio;White = left
audio;Yellow = video.
Red
Yellow
White
If yourTV has an S-Video jack,
connect the S-Video cable
(supplied). S-Video provides better
video quality than composite
video (the yellow jack).

Graphics contained within this publication are for representation only.
14
Chapter 1: Connections and Setup
Manufactured under license from Dolby Laboratories. “Dolby” and the double-D symbol are trademarks of Dolby Laboratories.
DTS is a registered trademark of Digital Home Theater Systems, Inc.
OPTICAL
ON
OFF
OUTPUT
L
R
PROG.
SCAN
AUDIO
OUT
IN
INPUT
CABLE/ANTENNA
CH4
CH3
AC IN
DIGITAL
AUDIO OUT
INPUT S-VIDEO
VIDEO
OUTPUT
Y
Pb
Pr
COMPONENT VIDEO OUT
L
R
AUDIO
VIDEO
HDMI OUT
CABLE INCABLE OUT
VIDEO L R
INPUT1
INPUT2
S-VIDEO
S-VIDEO
CABLE/ANTENNA
2c
4
1b
1a
2a
2b
TV
IN
DVD
IN
IN
VCR 1
OUT
RL
AUDIO
GND
ANTENNA
AM
FM 75Ω
SPEAKERS (6Ω)
CENTER SUBWOOFER (12Ω)
R — FRONT — L
+–+
–
R — REAR — L
OUT TO TV / MONITOR
(ONLYDVD)
S-VIDEO
S-VIDEO
IN
OUT
VIDEO
VCR 1 SAT
IN
Pr
Pb
Y
DIGITAL AUDIO IN
HDMI/DVI INPUT
Use menu for DVI audio.
2e
3a
3b
The back of yourTV
and/or Cable Box might
look different than the
ones pictured here.
DVD
Recorder
Cable Box
TV
If you need help finding your TV’s various Video Input Channels, go to page 19.
* The remote control packed with your DVD recorder is capable of being programmed to operate many brands and models of TVs. For instructions, go to page 22. If
the remote operates your TV, press TV and INPUT to access the Video Input Channel.
DVD recorder +TV + Basic Cable Box + Audio Receiver
Audio
Receiver
To play a disc: Tune the TV to its Input 1 channel or Vid 1 channel.
Notes about cable boxes:
The connection diagram shown above reflects a basic setup. Since there are many different cable companies and types of cables boxes, your
cable box may come with a different recommended connection diagram. Normally,ANALOG cable boxes are used so that the cable company
can scramble the signal for premium channel programming (like movie channels).The cable box will descramble the signal if you are a premium
channel subscriber. In some cases, your cable company may not scramble the signal for basic channels and the signal could be passed through the
cable box so that you could receive the signal with the DVD recorder.
There are also DIGITAL cable boxes that are relatively new and are used with digital cable service. Even with digital cable service, analog signals
are often carried on the same cable.
Using the connection diagram above, you won’t be able to watch one program while recording another program.This may be possible with a
more sophisticated setup, using an optional signal splitter and A-B switch.We suggest you contact your cable company for help in recommending
the best setup for your situation.
If you connect your components as described, you must access different Video Input Channels on your TV to see programming. If you don’t know
how to accessVideo Input Channels on your TV, go to page 19 for help.A general explanation, based on the connection shown above, follows:
In from cable
or antenna
In from cable

Graphics contained within this publication are for representation only. 15
Chapter 1: Connections and Setup
Connection: DVD recorder +TV + Basic Cable Box + Audio Receiver
You’ll need to consult instructions that came with your audio video receiver in order to connect it
properly. The information below provides general guidelines for the DVD recorder’s Audio Output jacks.
Both Dolby* Digital® and DTS® are audio formats used to record 5.1-channel audio signals onto the digital track of
film (while the film is being made). Both of these formats provide up to six separate channels: left, right, center, left rear,
right rear, and common subwoofer.The disc will play 5.1-channel sound only if you’ve connected a DTS or Dolby Digital
receiver or decoder, and if the disc is encoded in the Dolby Digital or DTS format.
Please Read This Before Using the DIGITAL AUDIO Jack!
This unit’s digital audio output jack is designed for a connection to a Dolby Digital or DTS receiver or decoder.
Older digital equipment may not be compatible with the Dolby Digital bitstream. Such a connection can create a
high level of noise that may be harmful to your ears, and could damage headphones or speakers. It is important
to choose the correct Digital Audio Out setting in the System Options menu. For more information, go to page 51.
1. Connect the cable box signal.
Note: Before you connect the DVD recorder, you’ll need to disconnect some of the cables first in order to
reconnect them.
1a. Connect the RF coaxial cable from the cable jack on the wall to the CABLE IN jack on the cable box.
1b. Connect the RF coaxial cable that is connected to the cable box’s Output jack (sometimes labeled CABLE
OUT) to the CABLE/ANTENNA INPUT jack on the back of the DVD recorder.
1c. If your cable box has audio/video output jacks, connect the audio cables to the Audio Output L (left – white)
and R (right – red) jacks on the back of your cable box, and to the corresponding INPUT AUDIO jacks on your
DVD recorder.Then connect the video cable (yellow) to the Video Out jack on the back of your cable box, and
to the INPUT VIDEO jack on your DVD recorder (not shown).
2. Connect the DVD recorder to theTV
You need to connect cables from the DVD recorder’s OUTPUT jacks to the TV’s INPUT jacks in order to see the
content from the DVD recorder (whether it’s a TV program or a disc you’re playing).
2a. Use the RF coaxial cable that was packed with your DVD recorder, and connect one end to the CABLE/
ANTENNA OUTPUT jack on the DVD recorder. Connect the other end to the Cable/Antenna Input jack on
the back of your TV (sometimes labeled CABLE/ANTENNA).
2b. Connect the video cable.The cables you use for the video determine the quality of the picture you’ll see on
your TV when you’re playing DVDs. For more information about cables and signal quality, go to page 4.
Connect the video cable (yellow) to the OUTPUTVIDEO jack on the back of your DVD recorder, and to the
Video Input jack on your TV (sometimes labeled VIDEO IN).
2c. S-VIDEO If your TV has an S-VIDEO jack, connect one end of the S-Video cable (supplied) to the S-VIDEO IN
jack on the back of the TV and the other end to the S-VIDEO OUT jack on the back of the DVD recorder.
2d. COMPONENT OUT
Y, Pb, Pr (not shown) If your TV has Component Input Jacks (Y, Pb, Pr), you
can achieve even greater picture quality by connecting the DVD recorder to the TV using these jacks
(COMPONENT VIDEO OUTPUT,Y, Pb, Pr on the DVD recorder). For more explanation, go to page 4.
Component Video cables not supplied with the DVD recorder.
Note: If your TV is capable of progressive scan, connect the DVD recorder to the TV using the COMPONENT
VIDEO OUTPUT jacks (cable not supplied), and slide the PROG SCAN switch to the ON position to see DVD
titles (movies) in progressive scan format. If you need more explanation, go to page 5.
2e. HDMI OUT If your TV has an HDMI Input jack (High-Definition Multimedia Interface), you can achieve
optimum high-definition picture quality as well as digital audio simultaneously.
Important note: If you want to connect the DVD recorder to your A/V receiver using an optical cable, make
sure to turn off your TV speakers, check to make sure the appropriate box is checked in the Digital Audio
Out menu, and make sure to set your A/V receiver to the corresponding input for the jacks you used for the
connection. For more explanation on the Digital Audio Out menu, go to page 51.
3. Connect the DVD recorder to the Audio/Video Receiver.
3a. A set of audio/video cables was packed with your DVD recorder. Connect the audio cables to the OUTPUT
AUDIO L (left – white) and R (right – red) jacks on the back of your DVD recorder, and to the corresponding
Audio Input jacks on your audio/video receiver (sometimes labeled DVD,AUX, SAT or VCR IN L and R).
The audio input jacks on the audio receiver you use to connect to the DVD recorder will determine which
source or input you need to select on the A/V receiver when you want to watch TV or play a disc.
3b. If you have a Dolby Digital or DTS receiver, connect an optical cable to the DIGITAL AUDIO OUT jack on the
DVD recorder and the Digital Audio Input jack on the receiver.You must also adjust the Digital Audio Out
setting (go to page 51 for information).
Note: Remove the protective cover that’s in the DIGITAL AUDIO OUT OPTICAL jack before connecting the cable.
4. Attach the AC power cord to the unit.
5. Insert the other end of the AC power cord into an AC outlet (or power strip).
Go to page 16
RF Coaxial cable
Audio video cables are usually
color-coded red, white, and yellow.
Red= right audio;White = left
audio;Yellow = video.
Red
Yellow
White
If yourTV has an S-Video jack,
connect the S-Video cable
(supplied). S-Video provides better
video quality than composite
video (the yellow jack).
Notes:
If your HDTV set has a DVI input
and is HDCP (High Definition Copy
Protection) compatible, you can
connect your recorder to the TV using
an optional HDMI cable and HDMI/DVI
adapter. Remember to connect the
left and right audio cables because
the DVI cable carries only the picture
signal, not the sound.
If you connect your recorder to a
high definition TV using the HDMI
connection but can’t get a picture,
try pressing the ZOOM button on
the remote to toggle the output
resolution to 480p, 720p, or 1080i.

Graphics contained within this publication are for representation only.
16
Chapter 1: Connections and Setup
Install Batteries in the Remote
1. Remove the battery compartment cover on the back of the remote.
2. Insert new batteries. Match the polarities (+ and –) on the batteries with the diagram inside the remote’s battery compartment.
3. Put the battery compartment cover back on the remote.
Important Battery Information
• If you’re not going to use the remote for a month or more, be sure to remove the batteries because they can leak and cause damage.
• Dispose of batteries in the proper manner, according to federal, state, and local regulations.
• Any battery may leak electrolyte if mixed with a different battery type, if inserted incorrectly, if all batteries are not replaced at the same time, if
disposed of in fire, or if an attempt is made to charge a battery not intended to be recharged.
• Discard leaky batteries immediately. Leaking batteries can cause skin burns or other personal injury.
Point the Remote in the Right Direction and Put It in DVD Mode
When you want the remote to operate the DVD recorder, point the remote at the DVD recorder, not the TV.The remote has to be pointed in the correct direction and
toward the correct component in order for the remote control’s signal to communicate with the sensor on the component. Make sure there is a clear path between the
remote control and the component you want to operate, so the signal isn’t blocked.
Make sure the remote is in DVD mode—press the DVD/VCR button.
Turn on the TV and DVD recorder
1. Turn on the DVD recorder—press the DVD/VCR button on the remote.
2. Turn on the TV and tune it to the correctVideo Input Channel—if you have an RCA, GE, or Proscan TV, press the TV button on the remote (if the TV doesn’t turn on,
press the ON•OFF button) and then press the INPUT button on the remote until you get to the Video Input Channel that matches how the DVD recorder is connected
to the TV. If you used coaxial cable to connect to your TV, tune your TV to channel 3 or 4.
You’ll know you are on the rightVideo Input Channel when you see the DVD recorder menu for the language selection (see below).
If you have another brand of TV, turn on the TV and tune the TV to the correct Video Input Channel (if you don’t know how to access theVideo Input Channel on your
TV, go to page 19 for help).
Note: You can program your remote to operate most brands of remote controllable TVs. Instructions are on page 22.
Complete the Interactive Setup
The next few pages step you through the series of screens that will appear the first time you turn on
your DVD recorder.
Use the remote control to follow the on-screen instructions.The arrow buttons move the on-screen
highlight in the corresponding directions on the screen (up, down, left, right).
Press the OK button to select a highlighted item.
Notes:
You can access the setup screens from the main menu. If you move, get a different program
provider for TV shows, or change your connections, you’ll need to complete the Interactive Setup
again.
If you don’t see the Language selection screen (below) the first time you turn on the DVD
recorder, make sure you’ve tuned your TV to the Video Input Channel that corresponds to the
way you’ve connected the TV to the DVD recorder. If you need help, go to page 19.
1) Select on-screen menu language
Make sure the remote is in DVD mode (press the DVD/VCR button). If you want the on-screen
menus to appear in English, press the OK button on the remote control. If you prefer another
language, press the arrow down button until that language is highlighted. Press OK to select the
language. Next, the connection screen appears.
Note: If you don’t see the Language selection screen the first time you turn on the DVD recorder,
make sure you’ve tuned your TV to the Video Input Channel that corresponds to the way you’ve
connected the TV to the DVD recorder. If you need help, go to page 19.
GO
BACK
VOL CH
MUTE
TV
ON-OFF
DVD/VCR CABLE
AUX AUDIO
CLEAR MENU
OK
LIVE
ADVANCE
AGAIN
INFOTIMERïGUIDE
SAT
ZOOM EDIT OPEN
CLOSE
ANGLE
Up arrow button
Left arrow
button
Down arrow
button
OK button
Right arrow
button
English
Francais
Espanol
Use the arrow buttons on the remote to move through
on-screen menus and highlight different options. Press the
OK button to select a menu item that is highlighted.

Graphics contained within this publication are for representation only. 17
Chapter 1: Connections and Setup
2) Select the Signal that’s connected to the CABLE/ANTENNA
INPUT jack
Completing this information lets the DVD recorder know what program signals are being sent to
it. Choose the type of signal that is connected to the CABLE/ANTENNA INPUT jack. Press the
right arrow button to access the choices:
Notes: If you’ve connected a cable box or satellite receiver to the CABLE/ANTENNA INPUT jack,
turn on the cable box or satellite receiver before completing this step.
If you’ve connected a satellite receiver to the CABLE/ANTENNA INPUT jack, choose Antenna
Only for this step.
Cable-Antenna (cable service)
Antenna Only (no cable service, just off-air antenna)
Note: If the DVD recorder doesn’t start searching for channels after you’ve selected
the type of signal connected to the CABLE/ANTENNA INPUT jack, press the down arrow
button to highlight Done and press OK.
3) Channel Search
The DVD recorder automatically scans the signal coming through the cable connected to the
CABLE/ANTENNA INPUT jack and prepares the channel list.The channel list determines what
channels appear when you press the CH+ and CH- buttons.
A progress indicator appears on the TV screen.When the Channel Search reaches 100%, press
OK (the Channel List appears). If the Channel List doesn’t appear, check the CABLE/ANTENNA
INPUT jack to make sure the cable is connected properly.
Note: If you are using only a cable box or satellite receiver, there will be few, if any, channels in
the channel list.
Antenna-Cable Antenna-Cable
Done
Searching channels.
35% complete
2 channels found
Select your local time zone:
Eastern
Central
Mountain
Should the clock be
automatically adjusted for
daylight savings time?
Yes No
4) Channel List
The Channel List contains the channels you tune to when you press the CH+ and CH- (channel
up and channel down) buttons on the remote control. From the Channel List screen, you can
delete channels you rarely watch.You’ll still be able to tune to the “deleted” channels directly by
using the number buttons on the remote control, but the DVD recorder won’t tune to a channel
you delete when you press the CH+/CH- buttons on the remote control.
Use the arrow buttons to scroll through the channels.A checkmark in the box next to the
channel means it has been stored in the channel list. Highlight the channel and press OK to check
or uncheck the box.You can also label channels by pressing the INFO button.
To skip editing the channel list, press STOP.
5) Time Zone
Use the down arrow button to highlight your time zone, and press OK (the Daylight Savings Time
screen appears).
6) Daylight Savings Time
If you live an area that recognizes Daylight Savings Time, press OK (the DVD recorder’s internal
clock will automatically advance the time by 1 hour in the spring and set the clock back by 1 hour
in the fall).
If you live in an area that doesn’t use Daylight Savings Time, press the right arrow button to
highlight No, and press OK.

Graphics contained within this publication are for representation only.
18
Chapter 1: Connections and Setup
7) Time and Date
Your DVD recorder has an automatic clock, but it may take awhile for the DVD recorder to find
the correct channel for the clock.Therefore, you might want to set up the clock manually here.
Use the number buttons on the remote to enter Year, Date, and Time.To change the AM/PM setting
when you’re entering the Time, press the right arrow button.
Notes:
If this screen doesn’t appear, you can set the time later from the main menu—with the remote
in DVD mode, press MENU, select Setup, select Installation, select Clock Setup and follow the on-
screen instructions.
The DVD recorder is equipped with a clock that automatically keeps the time accurate. If you
have any problem with the time being accurate, simply turn off the AutoClock option (page 52).
Access the main menu, choose System Options, and then AutoClock. Follow the instructions to
disable it, and set the time manually using the Clock Setup menu option that you access via the
Setup/Installation menu.
Watch TV
When the set-up procedure is complete, the main menu appears with the Watch TV menu highlighted.
To watch TV, just press the OK button on the remote.
What to Expect
Turn on the DVD recorder to Watch TV
In order to use the features of the DVD recorder, you’ll have to get used to turning on your DVD recorder to watch TV.
You also need to tune the TV to the Video Input Channel—instead of changing channels with the TV’s channel up and channel down buttons, you change channels via the
DVD recorder’s channel up and down buttons (or number buttons).The TV stays on theVideo Input Channel that corresponds to the Input Jacks on the TV you used to
connect the TV to the DVD recorder. If you need help finding the TV’sVideo Input Channel, go to page 19.
The Main Menu Appears
The main menu appears whenever you turn on the DVD recorder.To watch TV, press the OK button when the Watch TV menu is highlighted.When you change channels, the
channel banner appears to give you programming information that is available (for more information, go to page 30).
Changing Channels
You might notice a slight delay when you’re changing channels because the signal goes to the DVD recorder and is then sent out to the TV.
Discs for Recording
Recording to DVD discs is new to many people.There are several different formats of DVD discs. For your DVD recorder, only DVD+R 2.4x, 4x, 8x, or 16x and DVD+RW
2.4x and 4x type discs can be used for recording.A DVD+RW disc is “rewritable” which means you can use the disc over and over again (similar to how you useVCR tapes
to record).Additionally, DVD+RW discs have many “digital features” for editing the disc’s content. DVD+R discs can only be used one time—you can’t record over existing
programs and you must get used to “finalizing the disc” in order for other DVD players to be able to play DVD+R discs.Throughout this User’s Guide, you’ll notice that
some features and menu options are only available for a specific type of disc.
Make sure you use discs from a reputable manufacturer. Many problems encountered when recording (or playing) discs are related to the wide
variation in disc quality due to the large number of brands and manufacturers. If you encounter problems with one brand of disc, please try another
brand.
Year 2005
Date 04/29 Fri 29-April
Time 01:47 PM
Auto Clock
Done
Watch TV
Disc
Disc Library
Timers
Setup
Live - Ch 2
No Disc
1 Library Disc(s)
10:49 am Thu 17-Mar 2004
To watch channels, or video inputs, press OK
Table of contents
Other RCA DVD Recorder manuals

RCA
RCA DRC8000N - Progressive-Scan DVD... User manual

RCA
RCA DRC8060 User manual

RCA
RCA GUIDEplus+ DRC8000N User manual

RCA
RCA DRC8335 - DVD Recorder & VCR Combo User manual

RCA
RCA DRC8052NB User manual

RCA
RCA DRC8000N - Progressive-Scan DVD... User manual

RCA
RCA DRC8320N User manual

RCA
RCA DRC8040N User manual

RCA
RCA DRC8030N User manual

RCA
RCA DRC8335 - DVD Recorder & VCR Combo User manual