RCA RB32H1-EU User manual

User Manual
RCA RB32H1-EU

2
Introduction
Installation ...............................................3
Safety ........................................................ 3
Warning/Caution ......................................... 4
Main unit descrription................................. 7
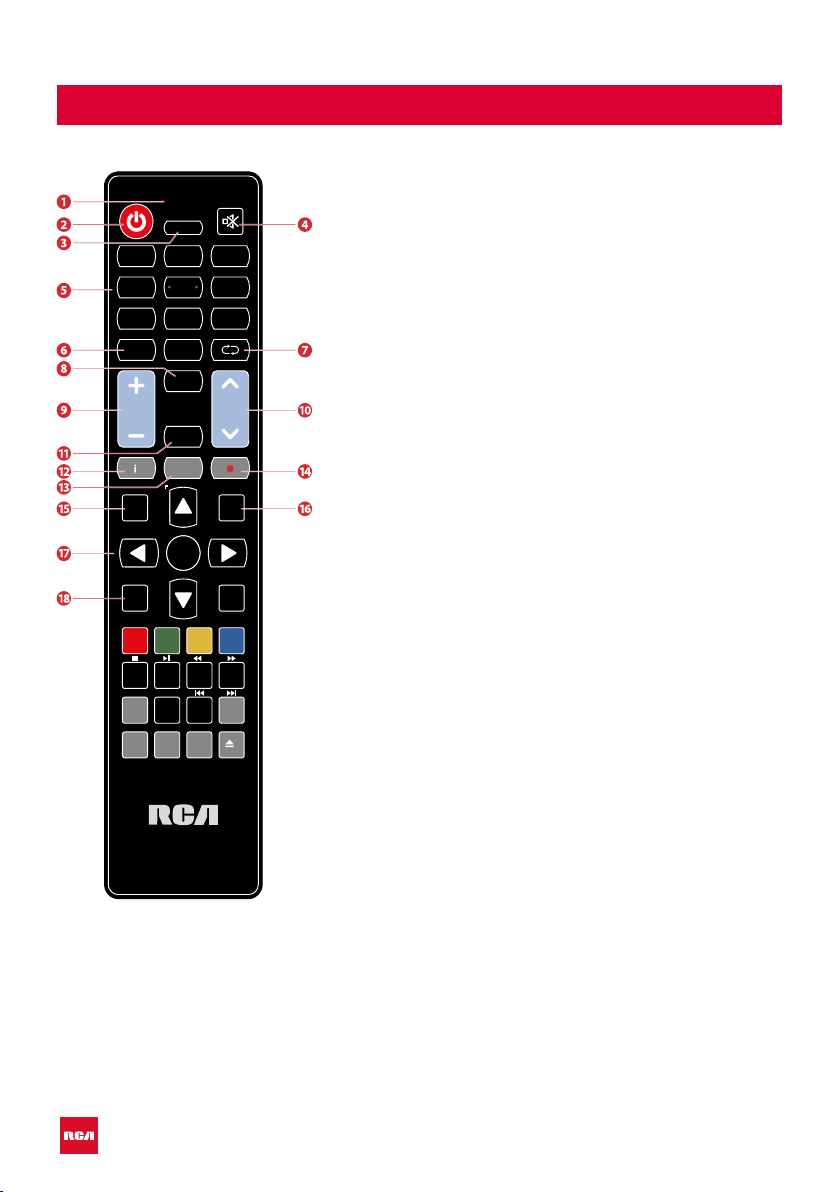
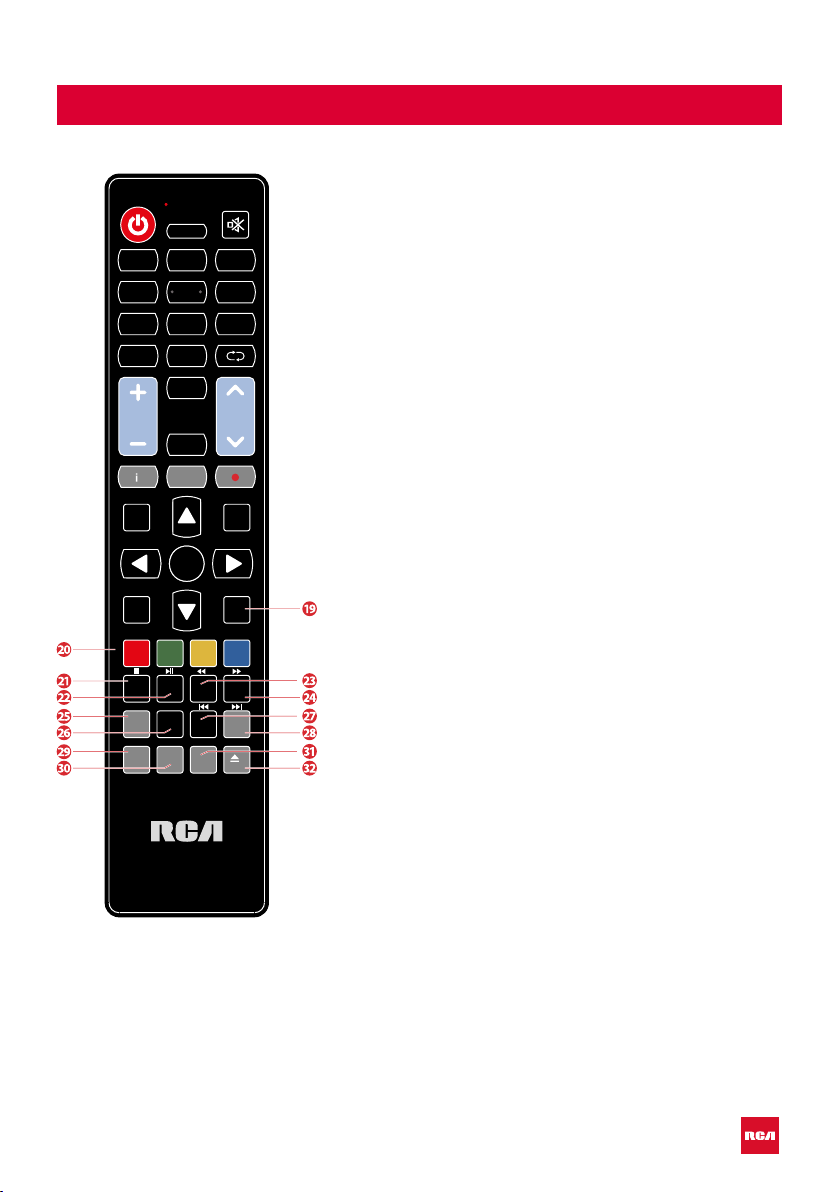
Remote control ........................................... 8
OSD basic adjustments ........................... 10
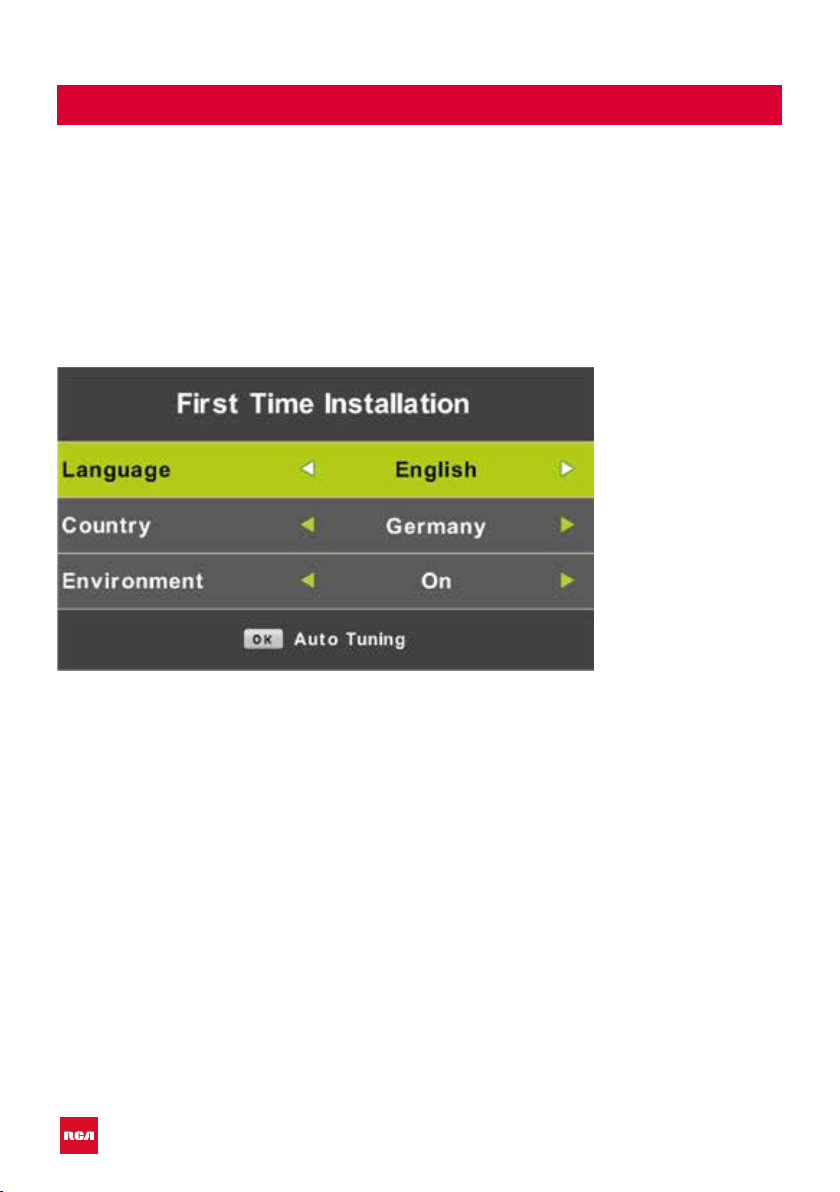
Installation Guide ................................ 10
Channels ............................................... 11
Auto tuning ......................................... 11
Analog Manual Tuning ..................... 12
Digital Manual Tuning........................ 13
Channel edit......................................... 13
Delete channels .................................. 13
Skip channels....................................... 13
Move channels .................................... 13
Schedule list ........................................ 14
Signal information ............................. 14
CI card information ............................ 14
Picture settings .......................................... 15
Sound settings .......................................... 16
Time settings .............................................. 17
Lock settings .............................................. 18
Set-up .......................................................... 19
Screen settings (PC-modus) .................. 20
DTV features .............................................. 21
Favorite list ........................................... 21
Program information ......................... 21
DTV features .............................................. 22
Audio languages................................. 22
Subtitle languages ............................. 22
Electronic Program Guide (EPG) .......... 23
Personal Video Recorder (PVR) ............. 25
USB ............................................................... 25
Specications ............................................. 26
Troubleshooting ........................................ 27
Useful Information and Licences........... 29
Index

3
Introduction
Thank you very much for purchasing your LED TV. It serves as a normal colour
TV and a PC monitor. To enjoy your set fully from the very beginning, read this
manual carefully and keep it handy for future reference.
INSTALLATION
1. Locate the TV in the room where direct light does not strike the screen. Total darkness
or a reection on the picture screen can cause eyestrain. Soft and indirect lighting is
recommended for comfortable viewing.
2. Allow enough space between the TV and the wall to permit ventilation.
3. Avoid excessively warm locations to prevent possible damage to the TV or premature
component failure.
4. This TV can be connected to AC 100-240V~ 50/60Hz.
5. Do not install the TV in a location near heat sources such as radiators, air ducts, direct
sunlight, or in closed compartments and closed areas. Do not cover the ventilation
openings when using the TV.
6. The indicator light will last for about 30 seconds after the power has been tumed off.
Wait until the indicator light goes out before repowering the TV.
SAFETY
1. DO NOT expose the television to extremely high temperatures (below 5 ° C and
above 35 ° C) or extreme humidity (less than 10% and more than 75%).
2. DO NOT expose the television to direct sunlight.
3. Prevent the television from coming into contact with liquids.
4. Make sure that no objects get into the television and do not place vases of water on
the television.
5. Unplug the power cord and remove the antenna cable during a lightning storm
(especially during lightning).
6. Do not walk on the cable and ensure that the cable is fully unrolled.
7. Do not overload outlets or extension cords, as this may result in the risk of re or
electric shock.
8. Use a soft, dry cloth (without volatile substances) to clean the television.
9. Do not attempt to repair the television yourself if it is defective. Contact us by sending

4
Warning
CAUTION: TO AVOID THE RISK OF ELECTRIC SHOCK. DO NOT
REMOVE COVER (OR BACK).
NO USER- SERVICEABLE PARTS INSIDE.
REFER SERVICING TO QUALIFIED SERVICE PERSONNEL.
This symbol is intended to alert the user to avoid the risk
of electric shock, do not disassemble this equipment by anyone
except a qualied service personnel.
This symbol is intended to alert the user to the presence of
important operating and maintenance instructions in
the literature accompanying the equipment.
CAUTION
RISK OF ELECTRIC SHOCK
DO NOT OPEN

5
Caution
Caution
High voltages are used in the operation of this
product.
Do not open the product’s casing. Refer
servicing to qualied service personnel.
Caution
To prevent re or electrical shock hazard, do
not expose the main unit to moisture. Do not
place objects lled with liquids, such as vases,
on the TV.
Caution
Do not drop or push objects into the television
cabinet slots or openings. Never spill any kind
of liquid on the television receiver.
Caution
Avoid exposing the main unit to direct sunlight
and other sources of heat. Do not stand the
television receiver directly on other products
which give off heat: e. g. video cassette
players and audio ampliers. Do not block the
ventilation holes in the back cover. Ventilation
is essential to prevent failure of electrical
components. Do not squash power supply
cord under the main unit or other heavy
objects.
-
-
-
-

6
Caution
Caution
Never stand on, lean on or suddenly push the
product or its stand. You should pay special
attention to children.
Caution
Do not place the main unit on an unstable
cart stand, shelf or table. Serious injury to an
individual, and damage to the television, may
result if it should fall.
Caution
When the product is not used for an extended
period of time, it is advisable to disconnect the
AC power cord from the AC outlet.
Caution
The LED panel used in this product is made of
glass and is therefore breakable. This product
must not be dropped or banged. If the LED
Panel breaks be careful ofbeing injured by
broken glass.

7
tekst
Control Panel Button Function
TV Connections
Optional Conguration as below:
Connect the USB to the USB jack on the set.
Main unit description
1. VGA
2. PC audio
3. Scart
4. DVB-S2
5. RF antenne
6. HDMI-1
7. HDMI-2
8. HDMI-3
9. Coaxial
10. Mini AV & AUDIO
11. Mini YPBPR
12. CI-slot
13. USB
14. Earphone
12
1 2
3
4 5 6 7 8
9
10 11 13 14
VOL+ : Volume up.
VOL- : Volume down
CH+: TV channel up.
CH- : TV channel down.
MENU : Press to select the main menu.
SOURCE : Select the input signal.
POWER : Switch on when in standby mode or to enter the standby mode.
NOTE
• It is only 500 mA MAX of DC current output when you connect
with USB jack.
• To ensure the mobile HD works well, you should use other
power supply for the mobile HD and don’t use the USB jack in
the same time.
• It supports mobile HD by connecting with USB jack (must be
more than 2 Gb). The partitions of the mobile HD can’t be
more than 4 partitions. The max partition is 2 Tb. It supports
FAT/FAT32 les. The max FAT le is 4Gb and the max FAT32
le is 2Tb.

8
tekstRemote Control
1Indicator light.
The red indicator light ashes red to show that the remote is
working and sending a signal.
2Switch the TV between on and standby mode.
3Watch the screen in various formats: Auto/4:3/16:9/Zoom/
Subtitels/Smart-zoom.
4Mute and restore your TV sound.
50-9 numbers.
Press to select a programme.
Select numbered items in a menu (DVD mode).
6List. Display the channel list (ATV/DTV mode).
7Return. Return to the previous viewing channel (ATV/DTV
mode) or return to menu (DVD-modus).
Repeat. Select between different repeat modes (DVD
mode).
8Display subtitles which are broadcast with the programme
(DTV mode).
Display subtitles on the DVD (DVD mode).
9Adjust the volume (+ higher, - lower).
10 Select a channel (up/down).
11 Audio
Turn on/off the Audio Description (AD) function (DTV mode).
Select different Audio Mode on DVD mode.
Select sterio/dual sound reception (ATV mode)
12 Display the present channel information such as current
time and channel name (ATV/DTV mode).
Display the present disc information (DVD mode)
13 Displays the EPG (Electronic Programme Guide) (DTV
mode).
14 No function.
15 Displays the OSD menu (On Screen Display).
16 Select among the different input signal sources: DTV / ATV /
AV / SCART / YPbPr / HDMI1 / HDMI2 / HDMI3 / PC / USB.
17 Allows you to navigate trough the OSD menus and adjust
the system settings to your preference.
OK conrm the selection in the OSD menus.
18 Return to the previous menu in the OSD menus.
2
13
4 6
5
78 9
0
OK
MENU
INPUT
BACK
PROG
INDEX HOLD SIZE
REVEAL
FAV
MENU ANGLE
TITLE SLOW ZOOM
TEXT
CANCEL
TV.RD
MIX
S.PAGE
STEP GOTO A-B
EXIT
DVD SETUP
GUIDE
ASPECT
LIST
S
AUDIO
REPEAT
VOL CH

9
tekstRemote Control
2
13
4 6
5
78 9
0
OK
MENU
INPUT
BACK
PROG
INDEX HOLD SIZE
REVEAL
FAV
MENU ANGLE
TITLE SLOW ZOOM
TEXT
CANCEL
TV.RD
MIX
S.PAGE
STEP GOTO A-B
EXIT
DVD SETUP
GUIDE
ASPECT
LIST
S
AUDIO
REPEAT
VOL CH
19 • Exit the OSD menu.
• Display and exit the DVD setup menu (DVD mode).
20 • Access the Teletext items (ATV/DTV mode).
• Access menu options.
PROG (RED)
• Display th channel menu (ATV/DTV mode).
• Access menu options.
• Programme the DVD (DVD mode).
STEP (GREEN)
• Play the playback forward frame by frame (DVD mode).
GO TO (YELLOW)
• Skip to a specic location on a DVD (DVD mode).
A-B (BLUE)
• Repeat a segment between A and B (DVD mode).
21 • To select the page number of the index in teletext
(TV Teletex mode).
• Stop the playback or recording (USB/DTV/DVD mode).
22 • Freeze a multi-page passage on screen in Teletekst
(TV teletekst mode).
• To start the timeshift playback (DTV mode).
• To start playback or pause (DTV/USB/DVD mode).
23 • To show hidden information if existing (TV teletext mode).
• Reverse playback rapidly (USB/DVD mode).
24 • To enlarge the picture on the TV in teletext
(TV teletex mode).
• Advance playback rapidly (USB/DVD mode).
25 • Display the favourite channel list (ATV/DTV mode).
• Display the DVD menu (DVD mode)
26 • A short cut to switch input source tot TV/Digital radio
channels.
• Select different angles for the video (DVD mode).
27 • TV and TXT pictures are mixed together
(TV teletext mode).
• To skip to the beginning of the previous chapter/track/
photo (USB/DVD mode).
28 • To open a subpage if existing in teletext
(TV teletext mode).
• Skip to the beginning of the next chapter/track/photo
(USB/DVD mode).
29 Display the DVD title content (DVD mode).
30 Play video slowly (DVD mode).
31 • Turn on and off the teletext function (TV mode).
• Zoom in on the displayed frame (DVD mode)
32 • Eject the disc (DVD mode)
• Cancel

10
tekst
Installation Guide
If this is the rst time you are turning on the TV and there are no programs in the
TV memory, the installation Guide menu will appear on the screen.
1. Press the /buttons to select the language.
2. Press the /buttons to select the local country
3. Press the /buttons to select energy mode.
Note:
Searching for platform will take a long time, please be patient and don’t turn
off the TV.
OSD basic adjustment

11
tekstOSD basic adjustment
Channels
Press
OK EXIT
MENU to display the main menu. Press to select ‘CHANNEL’ in the
main menu.
Auto Tuning
Press and select ‘Auto Scan’.
Press to select the country and press to select ‘Tune Type’ and ‘Digital
Type’.
Press OK
EXIT MENU
to start scanning. Press
OK EXIT
MENU to skip or
OK
EXIT
MENU
to stop scanning.
Turn on “Sorting by LCN” to put the channels in logical order.

12
Note:
Searching for platform will take a long time, please be patient and don’t turn off
the TV.
Analog Manual Tuning
Press to select ‘Manual scan’ and
press to ‘ATV Manual Tuning’.
Press
OK EXIT
MENU to return to the previous
menu. Press
OK
EXIT
MENU
to exit the menu.
OSD basic adjustment

13
DTV Manual Tuning (digital)
Press to select ‘Digital Manual
scan’ and press to start.
Press
OK EXIT
MENU to return to the previous
menu. Press
OK
EXIT
MENU
to exit the menu.
Channel Edit
Press to select ‘Programme
Edit’ and press OK
EXIT MENU
to select.
Delete channels
Press to select the channel and
press the red button to delete the
channel.
Skip channels
Press to select the channel and
press the blue button to skip the
channel. Press the blue button again
to cancel the setting.
Move channels
Press to select the channel and
press the yellow button to move the
channel. Press the yellow button again
to conrm.
OSD basic adjustment

14
tekstOSD basic adjustment
Schedule List
Press to select ‘Schedule List’ and press OK
EXIT MENU
to enter the submenu.
Signal information (only use in DTV)
Press to select ‘Signal information’.
Press
OK EXIT
MENU to return to the previous
menu. Press
OK
EXIT
MENU
to exit the menu.
CI card Information
Press to select ‘CI info’. Press OK
EXIT MENU
to check CI card information.

15
tekstPicture
You can select the type of image that best suits your personal preference.
Press
OK EXIT
MENU to enter the OSD menu. Than press to select the ‘PICTURE’
menu. Press to select ‘Picture Mode’. Press OK
EXIT MENU
to select.
You can change various image options here.
Item Adjustable Standard Description
Picture
settings
• Contrast
• Brightness
• Colour
• Scharpness
• Tint
• Colour Temp
• Noise Reduction
• HDMI Mode
Default Set the various standard
image settings
You select the item you want to change with the buttons.
Use the buttons to set the desired setting. Then press OK
EXIT MENU
to conrm.

16
tekstSound
You can select the type of sound that best suits your personal preference.
Press
OK EXIT
MENU to enter the OSD menu. Than press to select the ‘SOUND’ menu.
Press OK
EXIT MENU
to select.
You can change various sound options here.
Item Adjustable Standard Description
Sound
settings
• Sound Mode
• Treble
• Bass
• Coaxial Mode
• AD switch
Default Set the various default
sound settings
You select the item you want to change with the buttons.
Use the buttons to set the desired setting. Then press OK
EXIT MENU
to conrm.

17
tekstTime
You can select different time settings that best suits your personal preference.
Press
OK EXIT
MENU to enter the OSD menu. Than press to select the ‘TIME’ menu.
Press OK
EXIT MENU
to select.
You can change various time options here.
Item Adjustable Standard Omschrving
Time settings
• Time Zone
• Sleeptimer
• Auto Standby
• OSD Timer
Default Set the various default time
settings
You select the item you want to change with the buttons.
Use the buttons to set the desired setting. Then press OK
EXIT MENU
to conrm.

18
tekstLock
You can select different lock settings that best suits your personal preference.
Press
OK EXIT
MENU to enter the OSD menu. Than press to select the ‘LOCK’ menu.
Press OK
EXIT MENU
to select.
You can change various lock options here.
Item Adjustable Standard Omschrving
Lock
settings
• System Lock
• Set Password
• Channel Locks
• Parental Guidance
• Key Lock
• Hotel Mode
Default Set the different security
settings
You select the item you want to change with the buttons.
Use the buttons to set the desired setting. Then press OK
EXIT MENU
to conrm.
The default password is 0000.
NOTE:
The administrator password is 8899.

19
tekstSet Up
You can select different set up settings that best suits your personal preference.
Press
OK EXIT
MENU to enter the OSD menu. Than press to select the ‘SET UP’ menu.
Press OK
EXIT MENU
to select.
Adjustable Setting up
Language to select the OSD language
TT Language to select the TT language
Audio Language audio volume
Subtitle Language to select the subtitle language (only in DTV)
Hearing Impaired on or off for the hearing impaired
Aspect Ratio image size Auto, 4:3,16:9, Zoom1, Zoom2
Blue Screen turn on or off
First Time Installation Press OK
EXIT MENU
to conrm
Reset Press OK
EXIT MENU
, than . Select ‘Yes’ to restore all setting
to default setting.
Software Update Press OK
EXIT MENU
to update software using USB
Environment Choise from Home Mode or Shop Mode
HDMI CEC Connect another device via HDMI
Use the buttons to select the item that you want to change. Use the
buttons to set the desired setting. Then press OK
EXIT MENU
to conrm.

20
tekstScreen (PC modus)
You can select screen settings in PC mode that best suit your personal preference.
Press
OK EXIT
MENU to enter the OSD menu. Than press to select the ‘SCREEN’ menu.
Press OK
EXIT MENU
to select.
You can set various screen settings here.
Item Adjustable Standard Description
Screen
settings
• Auto Adjust
• H-Offset
• V-Offset
• Size
• Phase
• Position Reset
Default
Set the different ones
standard screen settings in
PC mode
Use the buttons to select the item that you want to change. Use the
buttons to set the desired setting. Then press OK
EXIT MENU
to conrm.
Table of contents
Other RCA LCD TV manuals

RCA
RCA LED55G55R120Q User manual

RCA
RCA J12H770 User manual

RCA
RCA l26wd26d - LCD HDTV w/ DVD Player User manual

RCA
RCA l46wd250 - LCD Scenium Flat HDTV Quick start guide

RCA
RCA RLC3257A User manual

RCA
RCA R40F1FHD-EU User manual

RCA
RCA J22H760 User manual

RCA
RCA HDTV Television User manual

RCA
RCA 46LA55R120Q User manual

RCA
RCA J22DE220 User manual