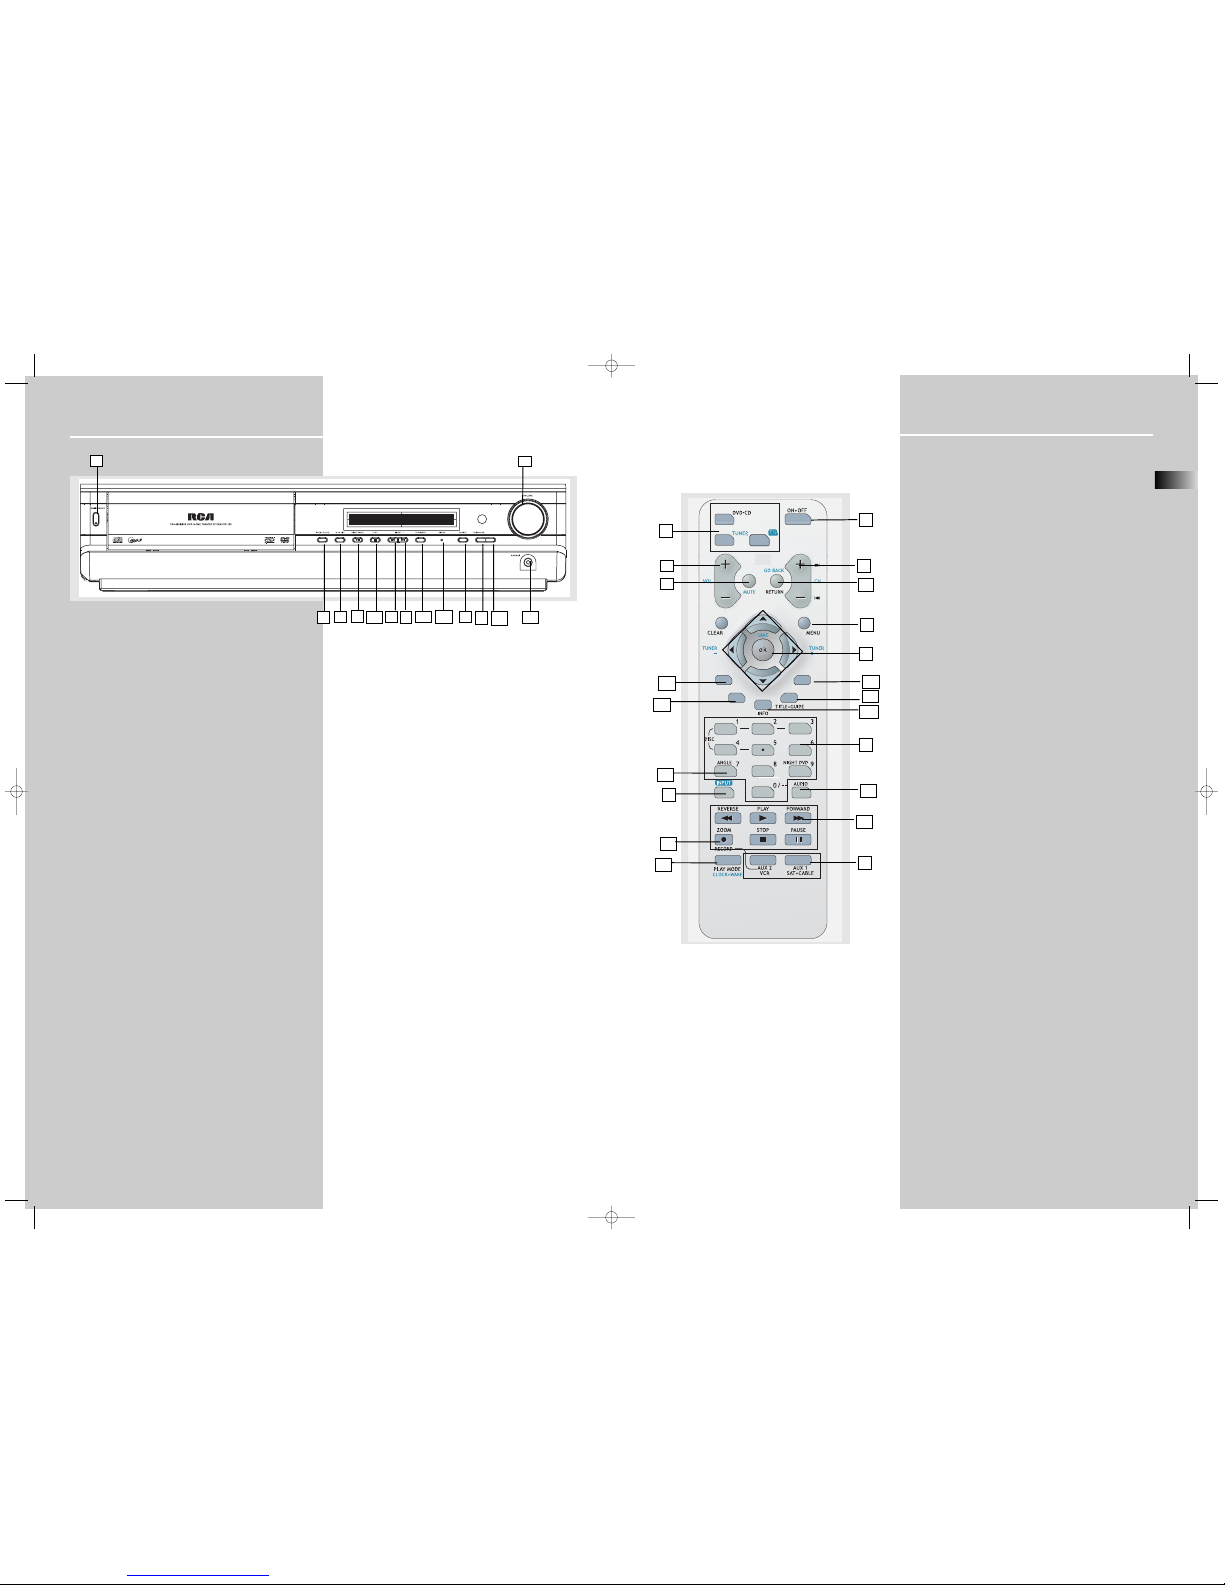
RCA RTD255 User manual

FCC Information
This device complies with Part 15 of the FCC Rules.
Operation is subject to the following two
conditions: (1) This device may not cause harmful
interference, and (2) this device must accept any
interference received, including interference that
may cause undesired operation.
This equipment has been tested and found to
comply with the limits for a Class B digital device,
pursuant to Part 15 of the FCC Rules. These limits
are designed to provide reasonable protection
against harmful interference in a residential
installation. This equipment generates, uses and
radiates radio frequency energy and, if not installed
and used in accordance with the instruction, may
cause harmful interference to radio communica-
tions. However, there is no guarantee that interfer-
ence will not occur in a particular installation.
In accordance with FCC requirements, changes or
modifications not expressly approved by Thomson
Inc. could void the user’s authority to operate this
product.
This device generates and uses radio frequency (RF)
energy, and if not installed and used properly, this
equipment may cause interference to radio and
television reception.
If this equipment does cause interference to radio
or television reception (which you can determine by
unplugging the unit), try to correct the interference
by one or more of the following measures:
• Re-orient the receiving antenna (that is, the
antenna for the radio or television that is
"receiving" the interference).
• Move the unit away from the equipment that is
receiving interference.
• Plug the unit into a different wall outlet so that
the unit and the equipment receiving interference
are on different branch circuits.
If these measures do not eliminate the interference,
please consult your dealer or an experienced
radio/television technician for additional
suggestions.
Also, the Federal Communications Commission has
prepared a helpful booklet, "How To Identify and
Resolve Radio TV Interference Problems." This
booklet is available from the U.S. Government
Printing Office, Washington, DC 20402. Please speci-
fy stock number 004-000-00345-4 when ordering
copies.
This product complies with DHHS Rules 21 CFR
Subchapter J. Applicable at the date of
manufacture.
For Your Safety
The AC power plug is polarized (one blade is wider
than the other) and only fits into AC power outlets
one way. If the plug won’t go into the outlet com-
pletely, turn the plug over and try to insert it the
other way. If it still won’t fit, contact a qualified
electrician to change the outlet, or use a different
one. Do not attempt to bypass this safety feature.
For Your Records
In the event that service should
be required, you may need
both the model number and
the serial number. In the space
below, record the date and
place of purchase, and the seri-
al number:
Model No.
Remote Control No. RCR311AC1
Date of Purchase
Place of Purchase
Serial No.
Service Information
This product should be serviced only by those spe-
cially trained in appropriate servicing techniques.
For instructions on how to obtain service, refer to
the warranty included in this Guide.
Product
Dolby Digital 5DVD Audio video receiver
Brand: RCA
Model: RTD255
Electrical current consumption
120V
60Hz
140 Watts
IMPORTER
Comercializadora Thomson de México, S.A. de C.V.
Álvaro Obregón No. 151. Piso 13.
Col. Roma. Delegación Cuauhtémoc
C.P. 06700. México, D.F.
Telefono: 52-55-11-020360
RFC: CTM-980723-KS5
WARNING:TO PREVENT FIRE OR ELECTRICAL
SHOCK HAZARD, DO NOT EXPOSETHIS PRODUCT
TO RAIN OR MOISTURE.
SEE MARKING ON BOTTOM / BACK OF PRODUCT
CAUTION
RISK OF ELECTRIC SHOCK
DO NOT OPEN
THE EXCLAMATION
POINT WITHIN THE
TRIANGLE IS A
WARNING SIGN
ALERTING YOU OF
IMPORTANT
INSTRUCTIONS
ACCOMPANYING
THE PRODUCT.
THE LIGHTNING
FLASH AND ARROW-
HEAD WITHIN THE
TRIANGLE IS A
WARNING SIGN
ALERTING YOU OF
"DANGEROUS
VOLTAGE" INSIDE
THE PRODUCT.
CAUTION: TO REDUCE THE
RISK OF ELECTRIC SHOCK,
DO NOT REMOVE COVER
(OR BACK). NO USER-
SERVICEABLE PARTS IN-
SIDE. REFER SERVICING
TO QUALIFIED SERVICE
PERSONNEL.
RECORD
This Class B digital apparatus complies with Canadian
ICES-003.
Cet appareil numérique de la class B est conforme à la
norme du NMB-003 du Canada
RTD255-EN receiver 5/17/04 9:16 AM Page 1

SUBWOOFER
RTD255
EXPORTER
Thomson Inc.
P. O . Box 1976
Indianapolis, IN 46206 - 1976
© 2004 Thomson Inc.
Trademark(s) ® Registered
Marca(s) Registrada(s)
Marque(s) Deposée
www.rca.com
Printed in China / Impreso en China
5586807B
IMPORTADOR
Comercializadora Thomson de México,
S.A. de C.V.
Álvaro Obregón No. 151. Piso 13.
Col. Roma. Delegación Cuauhtémoc
C.P. 06700. México, D.F.
Telefono: 52-55-11-020360
RFC: CTM-980723-KS5
It is important to read this instruction book prior to using your new product for the first time.
Es importante leer este manual antes de usar por vez primera su euipo.
user
manual
RTD255-EN receiver 5/17/04 9:16 AM Page 2

1
FCC Information
MusicMatch Software
Getting Started
Unpacking the DVD Receiver . . . . . . . . .2
Unpacking the Speakers . . . . . . . . . . . . .2
Inserting Batteries into Remote Control .3
Set Up and Maintenance of the
Receiver . . . . . . . . . . . . . . . . . . . . . . . . . .3
Protect your Components from
Overheating . . . . . . . . . . . . . . . . . . . . . . .3
Disc Information . . . . . . . . . . . . . . . . . . .3
Connecting to Audio-Visual
Components . . . . . . . . . . . . . . . . . . . . . .4
Connecting Antennas . . . . . . . . . . . . . . .5
Connecting the Speakers . . . . . . . . . . . . .6
Connecting the Subwoofer . . . . . . . . . . .6
Positioning your Speaker . . . . . . . . . . . . .7
Front Speaker Placement . . . . . . . . . . . . .7
Preferred Surround Placement . . . . . . . .8
Advanced Surround Setting . . . . . . . . . .8
Test Tone / Channel Balance . . . . . . . . . .9
Using Headphones . . . . . . . . . . . . . . . . . .9
Factory Setting . . . . . . . . . . . . . . . . . . . . .9
Operating your Receiver
Receiver Controls . . . . . . . . . . . . . . . . . .10
Remote Control . . . . . . . . . . . . . . . . . . .11
Display . . . . . . . . . . . . . . . . . . . . . . . . . .12
Switching On/Off . . . . . . . . . . . . . . . . . .13
Selection of Audio/Video Source . . . . . .13
Connection of Audio/Video Source . . . .14
Advanced Sound Control
Sound Enhancement Systems . . . . . . . .15
Fine Setting of Components . . . . . . . . .16
Fine Setting of the Speakers . . . . . . . . .17
Speaker icons . . . . . . . . . . . . . . . . . . . . .17
DVD Player
Basic Playback Features . . . . . . . . . . . . .19
Quick Search . . . . . . . . . . . . . . . . . . . . .19
Time Search . . . . . . . . . . . . . . . . . . . . . .19
Freeze Frame and Frame Advance . . . .19
Slow Motion Playback (DVD only) . . . . .20
Progressive Scan . . . . . . . . . . . . . . . . . . .20
On-Screen Banner Display . . . . . . . . . . .20
Setup Menu . . . . . . . . . . . . . . . . . . . . . .25
CD / mp3 Player
mp3 Recommendations . . . . . . . . . . . . .30
Loading and Playing an Audio CD . . . .30
On-Screen Banner Display for CD
Playback . . . . . . . . . . . . . . . . . . . . . . . . .32
On-Screen Display for mp3 playback
. . . . . . . . . . . . . . . . . . . . . . . . . . . . .35-36
JPEG CD
On-Screen Display for JPEG CD . . . . . . .37
Radio
Operating the Radio . . . . . . . . . . . . .38-39
Troubleshooting Tips . . . . . . . .40-41
Care and Maintenance . . . . . . . . .42
Limited Warranty
EN
Table of Content
MusicMatch™ Software
RCA is among the first Consumer Electronics companies to have adopted the MP3 format, starting with the release of its mp3 player,
Lyra, into the market. (www.rca.com and www.lyrazone.com). RCA is proud of its initial success and has developed the competencies to
enlarge its offering to other products like Discman and this System. RCA thanks you for your purchase of this System which aims at giving
you tremendous pleasure while listening to your favorite music. In addition to this great System, RCA is proud to offer you the Music
Match CD-ROM, which will assist you in managing your mp3 music library!
The MusicMatch Jukebox
This music management software, to be installed on your PC, allows you to compress music files recorded from you audio CDs into mp3
format and stores them on your PC.
• It makes the search and download of Internet music easier,
• It allows for the management of compressed music and the creation of your own playlist,
• The Jukebox is a true audio player installed on your PC,
• It gives access to thousands of net radios available on the web today.
You can download music files encoded in mp3 from several Internet sites like www.mp3.com.
Playing mp3
• Use .mp3 as the extension when converting audio files into mp3 for saving onto CD-R(W) or CD-ROM, e.g. Rocky08.mp3. Do not use
any other extension e.g. .doc, .pdf.
• Do not use the .mp3 extension for other text or non-audio data files as this may result in serious malfunction and harmful noise inter-
ference.
RTD255-EN receiver 5/17/04 9:16 AM Page 4

Getting Started
Inserting Batteries into Remote Control
Insert two “AAA” batteries according to the + and - signs
on the battery compartment. To use the remote control,
point it directly at your receiver.
Set up and Maintenance of the Receiver
IMPORTANT NOTE
• Provide spaces for sufficient ventilation as indicated
below. If the space is insufficient, the unit may overheat
resulting in malfunction and shorter life time.
• Do not connect to the AC power cords until all connec-
tions are completed.
• Do not use your set immediately after transferring it from
a cold place to a warm place: there is risk of condensation.
• Do not expose your set to water and excessively high
temperatures.
• After having disconnected your set, clean the case with a
soft cloth, or with a slightly damp leather chamois. Never
use strong solvents.
Disc handling precaution:
• Do not touch the recorded surface.
• Do not use record cleaning sprays, solvent or anti-static
liquid.
• If the disc is dirty, clean it with a damp cloth and wipe
from the center out. Wipe in straight line and not in circu-
lar motion.
• Do not attach stickers, label on the disc.
• Store the disc in its case after playing.
Protect your Components from
Overheating
• Do not block ventilation holes in any component.
Arrange the components so that air can circulate freely.
• Do not stack components directly on top of each other.
• Allow adequate ventilation when placing your compo-
nents in a stand.
• Place the receiver near the top shelf of the stand so
heated air rising from it will not affect other components.
Disc Information
EN
3
Getting Started
Unpacking the DVD Receiver
You should receive the following items:
2
SUBWOOFER
SUBWOOFER
+ -
+ -
One DVD receiver unit
One pair of “AAA”
batteries
One Pig-Tail
antenna wire
One external AM loop
antenna
one video cable (single wire)
with yellow connectors
EQ. LEVEL
SURROUND SUBWOOFER
AUX 2
VCR AUX 1
SAT.CABLE
• one instruction book;
• one safety leaflet;
• one Quick Connection Guide
One RCA Remote
Control (RCR311AC1)
Unpacking The Speakers
• one set of speakers including 1 set of left and right front
speakers, 1 centre speaker, 1 subwoofer and 1 set of left
and right rear speakers.
FRONT SPEAKERS CENTER SPEAKER
SUBWOOFER
REAR SPEAKERS
(SURROUND SOUND)
10cm/4”
5cm/2”
10cm/4”
10cm/4”
10cm/4”
1 X green/grey stripped wire for center speaker
1 X red/grey stripped wire for front right speaker
1 X white/grey stripped wire for front left speaker
1 X purple/grey stripped wire for subwoofer
1 X blue/grey stripped wire for rear left speaker
1 X gray/grey stripped wire for rear right speaker
Front
Rear
About CDR, CDRW, Audio mp3,
Compact Disk Audio (CDA), DVD
Video
This model is compatible to play CDR,
CDRW, Audio mp3, Compact Disk Audio
(CDA), Video Compact Disk (VCD) and JPEG pictures.
While your disc player is compatible with the largest num-
ber of discs possible, it cannot be guaranteed that you will
be able to play discs which might not be compatible with
audio CD, VCD and SVCD standards.
Notes on CDR/RW disc
This unit is compatible with CD-RW/ CD-R
discs for playback.
• Do not affix any type of labels to either
side (recordable or labeled side) of a CD-
R/RW disc as this may result in the unit malfunctioning.
• Do not load an unrecorded CD-R/RW disc into the unit.
This may take a longer time to read the disc.
• Playback capability for CD-RW discs may vary due to
variations in the quality of the CD-RW disc and the
recorder used to create the disc.
Playback capability of CD-R, DVD-R and rewritable
discs, compatibility with this player depends on the
recorder, the burning software and the disc used
Attention:
This unit is incompatible with the following
disc formats:
DVD-ROM, DVD-RW, DVD+RW, DVD RAM,
DVD-R, CDV, SACD, DVD Audio (High resolution tracks).
Data part of CD Extra, disc with non standard shape (e.g.
heart), disc with region code different from the one spec-
ified on the back of the unit.
RTD255-EN receiver 5/17/04 9:16 AM Page 6

Getting Started
EN
5
Getting Started
Connecting to Audio-Visual Components
4
TV
TO AUDIO OUT (TV)
SAT
TO AUDIO OUT (VCR)
TO AUDIO OUT (SAT)
VCR
S-video
S-video provides a better connection for the video portion of the
signal than composite video (yellow color terminal). When
connecting S-video cable, a Composite video cable (yellow RCA
connector) must also be used.
Analog input
If you have no VCR, TV or SAT, you can connect any other
compatible components like TAPE player to your DVD receiver via
the VCR/SAT input.
VIDEO IN (TV)
S-VIDEO IN (TV)
COMPONENT IN (TV)
Component video output
Component video terminal provides the best connection for video. By separating the color information (Pb/Pr) and the
luminance signal (Y), the image is improved comparing with S-video or composite video connection (result may vary on
different TV / monitor). If your TV is equipped with these terminals (e.g. Y/Pb/Pr, Y/Cb/Cr, Y/B-Y/R-Y), use an
appropriate video cable (75 Ohm) and connect to the system. Make sure to match the terminal color.
Progressive Scan
- It is necessary to use component video connection to enjoy progressive scan.
- Connect to a TV that has 480P input terminal or compatible with copy guard system, else the image will not be
displayed properly.
- If progressive scan is ON, there will be no video signal output at s-video and composite video monitor output. (Please
refer to page 20 for details of activating progressive scan function)
(If available)
L
R
AUDIO IN COMPONENT
VIDEO OUT
Cr
Cb
Y
S-VIDEO
MONITOR
OUT
SAT VCR TV
Connecting the Antennas
The AM and FM antennas connect to the AM and FM ter-
minals on the system’s back panel.
They must be hooked up in order to have clear reception.
AM Loop Antenna and FM Indoor Antenna
1. Uncoil the AM antenna wire.
2. Press down the antenna tab to open the terminal.
Note:
Make sure the white wire of the AM loop antenna is insert-
ed into the left terminal.
L
R
3ΩFR FLSR SLCENSUB 6Ω
SPEAKERS
AC ~ 120V
60Hz
FM75ΩGND AM LOOP
SUBWOOFER
PREOUT
AUDIO IN COMPONENT
VIDEO OUT
Cr
Cb
Y
S-VIDEO
MONITOR
OUT
SAT VCR TV
AM LOOP
FM 75Ω
White
GND
Tip:
• For FM reception, extend antenna to its
full length and arrange the antenna at dif-
ferent parts of the room until the recep-
tion is optimized.
• For AM reception, rotate the antenna horizontally to
get better reception.
RTD255-EN receiver 5/17/04 9:16 AM Page 8

Getting Started
Positioning your speaker
1 Left, Right (Front Speakers)
They carry primarily music and sound effects.
2 Center
In surround mode, the center speaker carries much of the
dialogue as well as music and effects. It should be set
between the left and right speakers.
3 Surround (Rear Speakers)
Their overall sound balance should be as close as possible
to the front speakers. Proper placement is vital to establish
an evenly distributed sound field.
Subwoofer
A subwoofer is designed to reproduce powerful low bass
effects (explosions, the rumble of spaceships, etc.) which
dramatically heightens involvement with the action on the
screen.
Magnetic shielding
Speakers placed less than two feet from the TV set must be
magnetically shielded in order to prevent picture distor-
tion. Front and center speakers provided with this unit are
magnetically shielded to protect your TV set.
It is not recommended to place the rear speakers and sub-
woofer near the TV set.
Front Speaker Placement
Even if you can't duplicate this ideal home theater setup
exactly, the following suggestions for speaker placement
will help you to get better results.
Alignment
Align the center speaker evenly with (A), or slightly behind
(B), the left and right speakers, but not ahead of them.
Advanced Setting
Angle
Placing the left and right speakers to form a 45-degree
angle with your favorite viewing position will duplicate the
soundtrack mixer's perspective.
Height
The mid- and high-frequency drivers of the three front
speakers should be as close as possible to the same height.
This often requires placing the center speaker directly atop
(A) or beneath (B) the TV set.
EN
7
Getting Started
Connecting the Speakers
Speakers
There are 6 speakers equipped with the unit (2 front, 1 cen-
ter, 2 rear, 1 subwoofer). In order to enjoy good surround
effects all six speakers need to be connected to the receiver
For better sound quality, center speaker, rear speakers and
subwoofer should also be connected. Adding center and
rear speakers will enhance surround effects. Adding a
subwoofer will increase bass response.
If you want to enjoy the full sound range, use the sub-
woofer with the speakers to maintain adequate bass signal.
Speaker cords
1 for each speaker, is
needed for connection. Twist
the stripped ends of the
speaker cord about 2/3 inch
(15 mm). Press down the tab
to open the terminal and
insert the wire. Release tab to
lock wire in the terminal.
To ease speaker connections, the speaker cords and the ter-
minals are color-coded. (please refer to the diagram)
Connect the speaker wire to the back of L, R front speakers
and to the corresponding color terminals on the rear of the
receiver. Do the same for center speaker, rear speakers and
the subwoofer.
Speaker Polarity
When connecting the speakers, make sure the polarities
(“+” speaker wire to “+” on the receiver) of speaker wires
and terminals are matched. If the cords are reversed, the
sound will be distorted and lack of bass (“out of phase”
effect).
Do not ground the output line, it will cause damage to the
speaker.
6
3Ω6Ω
1
1
2
3
3
A
B
Courtesy Dolby Laboratories
RTD255-EN receiver 5/17/04 9:16 AM Page 10

Getting Started
Preferred surround placement
Location
If possible, place surround speakers to either side of the lis-
tening area, not behind it.
Height
If space permits, install surround speakers 2-3 feet above
viewers. This helps to minimize localization effects.
Aiming
Aiming surround speakers straight across the room, not
down at viewers, helps create a more open, spacious sur-
round sound field.
Advanced Setting
Alternative Surround Placement
Rear wall
If rear wall mounting is the only choice, aim the speakers at
each other (A), towards the front (B) or even towards the
sidewalls (C, D). Experiment with placement until surround
sounds seem to envelop you, rather than coming from
behind you.
No adjacent walls
Surround speakers can go on stands facing each other to
approximate the preferred sidewall mounting (A), or to the
sides or rear of the viewing area aimed upwards. In the lat-
ter case, they can go right on the floor, or preferably, a few
feet off the floor such as on end tables (B).
8
Getting Started
EN
9
Test Tone / Channel balance
Channel balance
Your receiver is equipped with a test signal generator for
balancing the channels. As the signal "travels" from chan-
nel to channel, adjust the level controls until each channel
plays at the same loudness level.
Please refer to “Fine setting your speaker” section for more
details.
Level adjustment & surround channel level
expectation
Even though you adjust the surround channel to be as loud
as the others on the test signal, you'll find that on actual
program material the surround channel is usually much
lower than the front. Don't be tempted to re-adjust the
surround level; program producers use surround mostly for
subtle atmosphereics and ambience, and only rarely for
special effects. A good surround mix doesn't call attention
to itself; if it did, it would soon become distracting.
Using Headphones
To listen privately through your
audio system, use the PHONES jack
on the receiver. However, make sure
you turn down the volume before
you put on the headphones.
Increase the volume to the desired
level after headphones are in place.
Once headphones are connected, “HEADPHONE DOWNMIX
2 CHANNEL” will scroll on display. This feature automatical-
ly converts multi-channel outputs to 2 channel stereo for
your listening pleasure.
Hearing Comfort & Well-Being
• Do not play your headset at a high volume. Hearing
experts advise against continuous extended play.
• If you experience a ringing in your ears, reduce volume
or discontinue use.
Factory Setting
The unit is preset to the following setting when you first
turn on the power.
Function = TUNER
Volume setting = 25
Bass & Treble = 0 dB
Channel level = 0 dB
Subwoofer = STRONG
Restore to default settings
You can always restore all settings back to its original state.
When the receiver is in VCR mode, press the following
sequence on the main unit to restore all settings back to
default :
STOP SKIP FORWARD SKIP BACKWARD
Dolby Digital
Manufactured under license
from Dolby Laboratories.
“Dolby”, “Pro Logic” and
the double-D symbol are
trademarks of Dolby
Laboratories. Copyright 1992-1997 Dolby Laboratories,
Inc. All Rights Reserved.
Courtesy Dolby Laboratories
Manufactured under license from
Digital Theater Systems, Inc. US Pat. No.
5,451,942, 5,956,674, 5,974,380,
5,978,762 and other world-wide patents
issued and pending. "DTS" and "DTS Digital Surround"
are registered trademarks of Digital Theater Systems,
Inc. Copyright 1996, 2000 Digital Theater Systems, Inc.
All Rights Reserved.
4
5
6
Note:
All preset radio stations and surround
sound setting will be lost after the facto-
ry setting is restored..
RTD255-EN receiver 5/17/04 9:16 AM Page 12

Operating Your Receiver
SUBWOOFER
Receiver Controls
1. ON / STANDBY
• To turn the unit on / off. When the system is powered on, the
unit will go to STANDBY mode (red light will be on), then press
the ON/STANDBY button to turn the unit on in the last mode
used.
2. Source Button
• To select input source. For example, DVD/CD, VCR, etc.
3. SURROUND
• Press to select the surround sound setting or Digital Sound
Processor (DSP) mode you want.
4. PRESET - / SKIP REVERSE
• To move back to the beginning/previous preset memory
location in tuner mode.
• To skip to the beginning/previous track in CD mode and the
beginning/previous chapter in DVD mode (only during
playback).
5. PRESET + / SKIP FORWARD
• To go to the next preset memory location in tuner mode.
• To skip to the next track in CD mode and the next chapter in
DVD mode (only during playback).
6. OPEN / CLOSE
• Press to open / close the CD compartment door. (You may
replace all non-playing discs during playback.)
7. DISC SKIP
• Press to skip to the next disc in the tray.
8. VOLUME
Turn the knob to adjust volume level.
9. PLAY/PAUSE
To play and pause DVD/CD playback.
10. STOP
To stop DVD/CD playback.
11. PLAYMODE
• Press to toggle between different playmode in DVD/CD
mode.
• In CD mode: refer to CD / mp3 player section.
• In DVD mode: refer to DVD player section.
12. P.SCAN
• When progressive scan is turned on, the green light will be
on.
13. SUBWOOFER
• Press to toggle among different subwoofer mode.
14. PHONES
Plug your headphones (not supplied) into it for your private
enjoyment. Speakers will be off when phones are inserted.
1
62
41413
12
911
75
10
10 3
Operating Your Receiver
EN
Remote Control
Please be sure you have inserted the batteries into the remote
control (see relevant section on page 3.) You can test it by
pressing any button.
1. ON•OFF
• To turn on of off the receiver.
2. Source Buttons
• To turn on and select various audio/video sources.
3. CH+, CH- (Channel Buttons)
• To select programmed stations in TUNER mode.
• To skip to the next or previous chapter, track or image in DVD, CD, mp3 and
JPEG mode.
4. VOL+, VOL- (Volume Buttons)
• To adjust the volume.
5. MUTE
• To mute / unmute all audio outputs.
6. SUBWOOFER
• Selects among subwoofer output level (SOFT SUBWOOFER, BALANCED SUB-
WOOFER, STRONG SUBWOOFER, POWERFUL SUBWOOFER).
7. Adjustment Buttons
• In all mode except DVD/SAT/VCR, press OK will enter function setting mode, for
DVD/SAT/VCR mode, press and hold OK is needed.
• Press OK for dimmer mode (not available in DVD mode) and sleep function.
• When the display shows the setup you want to change (dimmer, sleep, etc),
press the LEFT and RIGHT buttons to choose, and press UP and DOWN buttons
to make changes, then press OK to finalize your choice.
8. Number Buttons
• In Tuner mode, to select a preset station.
• In DVD/CD mode, enable pull down menu by INFO, then press OK to select
field to be adjusted. Press the Number buttons to direct input the settings (e.g.
CD track)
• In DVD/CD mode, when there is no OSD info displayed, press Button 1 to 5to
select disc; when there is OSD showing, press the Number buttons to adjust set-
tings (e.g. CD track)
• In DVD/CD mode, press Button 9 to select night mode. (DVD only)
9. MENU
• In Tuner mode:
- Press TUNER to select band.
- Press to store desired frequency in memory. The flashing icon “PROG” will
appear in display. Input your desired channel number while the word is still flash-
ing and the frequency will be stored.
• In DVD mode, press for menu setup for DVD title.
10. Operation Buttons
• Press TUNER on the remote to enter Tuner mode. In Tuner mode, you can press
TUNER to select band, and press LEFT and RIGHT to tune down or up the radio
frequency.
11. RETURN
• Press to go back to previous menu or exit setup menu completely.
12. AUDIO
• Press to select the audio channel you like. (e.g. LEFT / RIGHT)
• In Tuner mode, press this button to switch from ST to MONO mode and vice-
versa.
• In DVD mode, press to select different audio channel (if available).
13. ANGLE (DVD only)
• Press to select different screen display angles.
14. ZOOM (DVD / JPEG only)
• Press to select the zoom ratio.
15. INFO
• Press to display playback information.
16.TITLE•GUIDE
• Press to go to the title menu at DVD mode.
17. SURROUND
• Press to change the surround sound settings.
18. PLAYMODE
• Press to toggle between different playmodes. (Repeat chapter, etc.)
19. EQ. LEVEL
• Press to toggle between different preset equalizer mode (only available in
stereo mode).
• Press once to enter speaker level, use LEFT/RIGHT to select channel, and use
UP/DOWN to adjust level setting.
EQ. LEVEL
SURROUND SUBWOOFER
1
4
2
3
10
14
13
12
7
8
9
11
6
11
17
5
6
16
15
18
8
2
19
RTD255-EN receiver 5/17/04 9:16 AM Page 14

Operating Your Receiver
EN
13
Operating Your Receiver
DVD / VCD / CD / mp3
• Unit in DVD, VCD, CD or mp3 mode.
DIGITAL
• Audio output is in Dolby Digital mode. (For DVD only)
PROLOGIC II
• Audio output is in Dolby PL II Movie, Dolby PL II Music
or Dolby Prologic Emulation mode.
DTS
• Audio output is in DTS mode. (For DVD input only)
RDM
• Random playback mode activated.
• Currently in playback mode.
• Currently in pause mode.
• Parental lock is on and a password is required to view
DVD above a specific rating level.
TTL
• Title number for DVD playback.
TRK
• Track number being played.
CHAP
• Chapter number for DVD playback.
PROG.
• Program mode is activated.
TUNED
• Tuner station detected.
ST
• Tuner stereo signal detected.
REPEAT / REPEAT TRACK / REPEAT CHAP /
REPEAT A.B. / REPEAT FOLDER (mp3 only)
• CD, mp3 and DVD in repeat mode.
KHz / MHz
• Tuner frequency unit.
• Speaker Icons.
SLEEP
• Sleep mode is activated.
• Display disc information
• Larger number refers to the current disc being played.
Switching on /off
• To switch on the receiver, press ON/STANDBY on the
receiver once to wake up from standby mode. Press one of
the source buttons or ON/OFF on the remote control to
turn on the receiver.
• When the receiver is on, press ON/OFF on the remote or
ON/STANDBY on the receiver to return to the standby
mode.
Selection of Audio/Video source
When one of the audio/video source is selected, the audio
and video input corresponding to the name will be
activated.
The receiver acts as a switching device between all the
sources that are plugged into it.
Example 1:
If you connect a VCR player to the VCR input on the
receiver and press SOURCE until “VCR” shows on the dis-
play. You will be able to have the signal from the VCR.
SUBWOOFER
AUX 2
VCR AUX 1
SAT.CABLE
12
Display
C
3
12345
DISC
SUBWOOFER
Note:
Your receiver has a 2-week back up memo-
ry to avoid losing settings such as preset
radio stations in case of power outage.
SUBWOOFER
RTD255-EN receiver 5/17/04 9:16 AM Page 16

Operating your Receiver
EN
15
Connection of Audio/Video source
You can connect up to 3 audio/video sources to this
amplifier:
Source button Corresponding connector
(remote control) (receiver back panel)
- DVD/CD built-in
- TUNER built-in
- SAT SAT IN
- VCR VCR IN
- TV TV IN
When a source is selected, the source name is shown on the
display.
Example: Press the VCR button to select VCR as the source
to the amplifier.
14
DIGITAL
PRO.LOGIC
INTRORANDOM
LCR
LS
LFE
RS
D
VD
V
CD
CD
M
P3
Advanced Sound Control
Sound Enhancement Systems
This receiver is equipped with several built-in sound
enhancement systems.
Dolby Pro Logic II
The Pro Logic II mode uses the built-in circuit to steer the
Left, Center, Right and Surround left and right channel
audio signals and uses all five speakers to play both stereo
and Dolby Pro Logic program source, such as TV and VCR.
Dolby Pro Logic II includes Dolby Pro Logic II Movie, Dolby
Pro Logic II Music and Dolby Pro Logic Emulation.
You can use this mode to suit any stereo program source
(such as VCR / SAT / TV) to enjoy multi-channel sound expe-
rience).
Dolby 3 Stereo
The 3 Stereo mode will redirect the Surround signals to the
front left and right speakers when only the front and
center speakers are used.
Dolby Digital
The Dolby Digital mode lets you enjoy full digital
surround from software processed in the Dolby Digital for-
mat. Dolby Digital provides better sound quality and a
more powerful presence than conventional Dolby
Surround.
This unit is equipped with Dolby Digital 5.1-channel so
that you can enjoy enhanced full digital surround sound.
Different from Dolby Pro Logic in that only four channels (
Front Left, Front Right, Centre and Rear ) are used, the new
system provides stereo separation of the rear speakers
(Rear-Right, Rear-Left ). Adding the to the 5 channels the
subwoofer channel for bass sounds (counted as 0.1 channel)
results in 5.1 channels (or 6 Channels) that bring you the
most sophisticated Dolby Digital sound enjoyment.
Digital Theater Systems (DTS))
DTS is a digital surround system which delivers six channels
of master-quality, 20-bit audio. It offers five full-range
channels plus a special low frequency effect (LFE) channel
for subwoofer, resulting in what is commonly known as 5.1
channels. It can be applied with existing 5.1 speaker config-
urations.
DTS is available in DVD and CD mode.
Front Left Speaker Front Right Speaker
Subwoofer
Center Speaker
Rear Right Speaker
Rear Left Speaker
Front Left Speaker Front Right Speaker
Center Speaker
Listening
Zone
Listening
Zone
Front Left Speaker Front Right Speaker
Subwoofer
Center Speaker
Rear Right Speaker
Rear Left Speaker
Listening
Zone
Note:
1. Your receiver has a built in tuner. Just
connect the appropriate antenna to the
back of the receiver and you will be able
to listen to radio stations. (See details in
Tuner section)
2. The receiver is also equipped with DVD/CD player. Press
the SOURCE button on the main unit or DVD/CD button on
the remote to activate the feature.
3. Other sources (Tapes,etc) can be connected to this unit
provided that the connections are compatible.
4. Refer to the "Connecting To Audio-Visual Components"
section for details on connection.
RTD255-EN receiver 5/17/04 9:16 AM Page 18

EN
17
16
Advanced Sound Control
Stereo
The Stereo mode uses the two main channel outputs from
the front speakers and subwoofer channel.
Fine Setting of the Components
The receiver can be directly turned on by pressing the
SOURCE buttons on the remote (like DVD/CD, SAT), which
also selects the best surround sound mode. The default sur-
round modes for different components are as below.
If you decide to change the surround mode, you can press
SURROUND repeatedly to toggle among the different sur-
round mode choices and select the one you want.
For Digital Signal (Dolby Digital)
Dolby Digital 3 Stereo Stereo
For DTS Signal
DTS Stereo
For STEREO Signal
Stereo Dolby PL II Movie Dolby PL II Music Dolby
PL Emulation 3 Stereo Arena JazzClub
Theater Stadium Disco
Default Settings
The receiver will keep the last selection in memory as long
as it doesn’t enter standby mode.
DEFAULT INPUT (as seen on display)
Analog (SAT)
Analog (VCR)
Analog (TV)
Built-in Tuner
Built-in
SOURCE
SAT
VCR
TV
TUNER
DVD/CD
Advanced Sound Control
Fine Setting of the Speakers
All the basic settings have already been presetted for the
speakers included in the box.
However, to make the surround sound more effective and
suit the acoustic conditions in your listening room, you may
need to delay the signal coming from some of the speak-
ers. Channel delay compensates for center or surround
speakers that are closer to the listening position than the
front speakers.
You may setup the speakers channel by channel: first, press
the MENU button while in stop mode to enter the setup
menu, then choose SOUND for speaker setup.
To change the speaker setting
In the SPEAKERS menu, press UP/DOWN to select a speaker.
When the speaker picture is selected, you may press
UP/DOWN to change the speaker setting (YES / NONE).
To change the speaker distance
In the DISTANCE menu, press UP/DOWN to select a speaker.
When the speaker distance column is selected, you may
press UP/DOWN to adjust the distance from the front, rear
and center speakers individually.
To test the speaker setting and change the speaker
level
In the TEST menu, a short noise will come from each speak-
er respectively, press UP/DOWN to configure the currently
playing speaker, then press OK to activate.
Advanced Setting
Factory Default Setting
The receiver speaker distance default settings are the
following:
Front speakers (L/R) 15 ft
Center speaker (Cch) 15 ft
Rear speaker (SUR) 10 ft
IMPORTANT NOTE
• Always use the subwoofer for optimum sound
quality.
0 dB
Front Left Gain Control
Note:
SAT, TV and VCR are just generic names.
You can connect other compatible
audio/video components to these inputs
like TAPE, MINI DISC, CD-RW player,
etc.
RTD255-EN receiver 5/17/04 9:16 AM Page 20

18
Advance Sound Control
Speaker Icons
The receiver shows the speakers’ settings on the display
with the following icons:
Displaying Program Formats
When a digital source starts playing, the receiver automati-
cally switches to proper surround mode and provides set-
ting information via the speaker icons located on the right-
hand side of the display. (See diagram)
It is important to note, however, that not all Dolby Digital
sources are encoded with the full complement of five chan-
nels plus LFE*. Speaker icons show how many and which
speaker you have enabled (See “Fine Setting of the
Speakers”) and the letters inside the speaker icons show
which channel is present in the source information. For
example, the diagram shown means you have all five
speakers and subwoofer enabled and the digital sources
you played have five channels plus LFE complemented.
(Dolby Digital 5.1 Channels)
* LFE stands for Low Frequency Effect. The indication “LFE”
appears if the digital source contains LFE information. In
this case, the bass signal will be delivered to the subwoofer,
offering more dynamic deep bass sound effects. If the letter
is flashing, the signal is either too weak or just gone.
Front Speakers
Center Speaker
Rear Speakers
Subwoofer Present
LFE
C
C
RTD255-EN receiver 5/17/04 9:16 AM Page 22

DVD Player
EN
19
Basic Playback Features
1. To select the DVD/CD input source, press SOURCE on the
main unit until "DVD/CD" appears on the display. You may
also directly press DVD/CD on the remote.
2. Press OPEN/CLOSE to
open the tray and load a
disc, with the label facing
up. Press OPEN/CLOSE again
to close the tray.
3. Press PLAY/PAUSE on the main unit or press PAUSE on
the remote to pause playing during playback. Press again
to resume normal playback.
• Press SKIP REVERSE to go back to the previous chapter
or SKIP FORWARD to move to the next chapter.
• Press STOP once to stop playback and go into resume
mode.
Quick search
1. While playing a disc, press REVERSE on the remote con-
trol to scan backward through the disc. Press FORWARD on
the remote to scan forward.
Press repeatedly to change the searching speed to 1,2 or 3
times for VCD and 1,2,3 or 4 for DVD.
2. Press PLAY at any time to resume normal playback.
Time search
1. Press INFO on the remote, info bar will appear.
2. Press OK on the remote when time is highlighted.
3. Use the number buttons to input the time you want to
skip to.
4. Press OK on the remote to confirm.
Freeze frame, frame advance
1. Press PAUSE on the remote control to freeze the picture
during playback.
2. Press PAUSE on the remote control continously to
advance frame by frame.
3. Press PLAY to resume normal playback.
SUBWOOFER
DIGITAL
PRO.LOGIC
INTRORANDOM
LCR
LS
LFE
RS
DVD
VCD
CD
MP3
PLAY
00:00:00
RTD255-EN DVD 3/12/04 10:55 AM Page 1

DVD Player
EN
21
DVD Player
20
Selecting a title
1. Refer to the previous page “General use” to open the
title menu. Then press OK.
2. Enter a title number using the number keys on the
remote control. You can also use UP/DOWN to change the
title number.
Selecting a chapter
1. Refer to the previous page “General use” to open the
chapter menu.
2. Enter a chapter number using the number keys on the
remote control. You can also use UP/DOWN to change the
chapter number.
Selecting an audio language
1. Refer to the previous page “General use” to open the
audio menu, or press AUDIO on the remote control to
select the audio channel.
2. Press UP/DOWN to select the audio channel you want,
then press OK to confirm.
Selecting a subtitle language
1. Refer to the previous page “General use” to open the
subtitle menu.
2. Press UP/DOWN to select the subtitle you want, then
press OK to confirm.
Note:
To exit the OSD banner, press the INFO key.
Slow motion playback
1. Press PLAY/PAUSE on the main unit or PAUSE on the
remote control to freeze the picture during playback.
2. To advance picture in slow motion. Press FORWARD on
the remote control for forward slow motion and REVERSE
(DVD only) for backward slow motion
Press repeatedly to change speed to 1/16 times, 1/8 times,
1/4 times and 1/2 times.
3. Press PLAY/PAUSE on the main unit or PLAY on the
remote control to resume normal playback.
Progressive scan
1. Make sure the component output is connected to a TV
which accepts progressive scan signal. To enable progres-
sive scan, press and hold SUBWOOFER for 3 seconds in
STOP mode.
2. Press SUBWOOFER again to toggle progressive scan
function between ON and OFF. The green light will be on if
the progressive scan function is active.
On-screen banner display
You can access the on-screen banner display during play-
back to select many playback features. Each feature is illus-
trated with an icon. However, each feature shown in the
banner is available only if the disc was created with that
particular feature.
An invalid icon appears on the screen when you
select an icon that does not function. Also, the icon
is “greyed out” to tell you so.
General use
1. Press INFO on the remote control during playback to
show the on-screen info banner.
2. Use the LEFT or RIGHT arrows on the remote control to
move the cursor on the banner, the selected feature icon
will be highlighted.
3. Press OK to open the menu corresponding to the select-
ed feature.
SUBWOOFER
SURROUND
EQ. LEVEL
SUBWOOFER
SURROUND
SUBWOOFER
SURROUND
SUBWOOFER
SURROUND
SUBWOOFER
PLAY
00:00:00
Note:
The progressive Scan function can only
be activated in STOP mode.
Note:
Some discs have one title only.
Note:
This feature only works if the disc was cre-
ated with multiple audio tracks.
Note:
The chapter feature will not work if the
disc is not formatted with separate chap-
ters.
Note:
This feature only works if the disc was cre-
ated with subtitles.
Title Audio
Subtitles
Camera angles
Chapter
Playmode
Time
indicator
Bookmark
SUBWOOFER
SURROUND
SUBWOOFER
SURROUND
SUBWOOFER
SURROUND
SUBWOOFER
SURROUND
RTD255-EN DVD 3/12/04 10:55 AM Page 2

DVD Player
EN
23
DVD Player
22
Selecting an camera angle
1. Refer to page 20 “General use” to open the camera
angle menu, or press ANGLE on the remote.
2. Press UP/DOWN to select the angle you want, then press
OK to confirm.
Selecting an zoom ratio
1.Press ZOOM on the remote to select the zoom ratio.
Using bookmarks
The bookmark feature allows you to mark a point on the
disc for quick access. You can store up to 6bookmarks.
Adding bookmarks
1. Refer to Page 20 “General use” to open the bookmark
menu.
2. Use the arrows on the remote to move the cursor, then
press OK to add a bookmark when reaching a scene of
interest.
3. To add another bookmark, move the cursor to the right
with the arrow button. Then press OK to add a bookmark
when reaching a scene of interest.
4. Press INFO to exit menu.
Recalling bookmarks
1. Refer to page 20 “General use” to open the bookmark
menu.
2. Use the arrows on the remote to move the cursor to the
bookmarked scene you want to recall.
3. Press OK to recall the bookmarked scene.
4. Press INFO to exit menu.
Clearing bookmarks
The bookmarks are cleared each time a disc is removed
from the player or when the power is turned off complete-
ly.
If all bookmarks are in use, you can still mark new scenes
but the previous bookmarks will be erased starting from
the earliest one.
Or you can manually remove bookmark by the following
steps:
1. Refer to page 20 “General use” to open the bookmark
menu.
2. Use the arrows on the remote to move the cursor to the
bookmarked scene you want to delete.
3. Use the arrows on the remote to move the cursor to the
trash icon.
4. Press OK to delete the bookmarked scene.
Play mode
1. Refer to page 20 “General use” to open the playmode
menu.
2. Press UP/DOWN to select among :
Standard > Chapter Repeat > Title Repeat > Repeat
AB > Standard
3. Press OK to confirm the setting.
Program playback
Edit program
1. Refer to the previous page ("General use") to open the
play mode menu to access the program mode.
Note:
Program edit can only be activated during Stop / Resume
mode.
2. The box under “Title” will be highlighted automatically.
Use the arrows on the remote to select title and chapter.
3. Press OK to add selected track and chapter(s) onto
playlist.
4. Use the arrow buttons to highlight “Done” and then
press OK.
5. Follow the instruction on screen to start program play-
back.
SUBWOOFER
SURROUND
SUBWOOFER
SURROUND
Title 1
Title 2
1:T:- C:-
2:T:- C:-
3:T:- C:-
4:T:- C:-
5:T:- C:-
6:T:- C:-
7:T:- C:-
8:T:- C:-
9:T:- C:-
10:T:- C:-
Done
Title 3
Title 4
Title 5
Title 6
AUX 2
VCR
AUX 1
SAT - CABLE
SUBWOOFER
SURROUND
SUBWOOFER
SURROUND
SUBWOOFER
SURROUND
SUBWOOFER
SURROUND
Note:
This feature only works if the disc was
created with multiple angles.
Note:
You can select at maximum 24 items by
repeating steps 2 - 3.
Note:
Random playback is not available in DVD
mode.
SUBWOOFER
SURROUND
SUBWOOFER
SURROUND
SUBWOOFER
SURROUND
SUBWOOFER
SURROUND
SUBWOOFER
SURROUND
RTD255-EN DVD 3/12/04 10:55 AM Page 4

DVD Player
EN
25
DVD Player
24
Insert items to the playlist
1. Select the program menu from the OSD banner to dis-
play the program edit playlist.
2. Use LEFT/RIGHT to select Title or Chapter, then
UP/DOWN to select the number.
3. Press OK on the remote to add new item to the playlist.
4. Use the arrow buttons to highlight “Done” and then
press OK.
Delete items on the playlist
1. Select the program menu from the OSD banner to dis-
play the program edit playlist.
2. Press CLEAR on the remote the delete the last item on
the playlist.
3. Repeat steps 2 to delete additional items.
Cancel program
Program will be cancelled when;
1. the disc tray is opened;
2. power is turned off.
Title 1
Title 2
1:T:- C:-
2:T:- C:-
3:T:- C:-
4:T:- C:-
5:T:- C:-
6:T:- C:-
7:T:- C:-
8:T:- C:-
9:T:- C:-
10:T:- C:-
Done
Title 3
Title 4
Title 5
Title 6
Set up menu
General use
1. Press MENU in STOP and RESUME mode to display the
set up menu on screen. The menu shows the current set-
tings.
2. Use the arrow buttons to highlight an option and press
OK to open the selected menu.
3. Press the LEFT arrow to go back to the previous menu
or press CLEAR to exit the setup menu completely.
Audio language
This step will define the default audio language. Choosing
an audio language from the on-screen banner display will
only overwrite this setting temporarily.
1. Open the audio language menu.
2. Use UP/DOWN to select a language and then press OK.
SUBWOOFER
SURROUND
Play
Play Mode
Parental Control
Display
Sound
Langauges
Player Menus
Disc Menus
Audio
Subtitles
English
English
English
English
SUBWOOFER
SURROUND
SUBWOOFER
SURROUND
SUBWOOFER
SURROUND
Player Menus
Disc Menus
Audio
Subtitles
French
German
Italian
Spanish
Swedish
English
SUBWOOFER
SURROUND
SUBWOOFER
SURROUND
Note:
Pressing MENU during disc playback will
display the disc menu, not the player setup
menu.
Note:
If the selected language is not available on
a disc, that disc's own default language will
be used instead.
SUBWOOFER
SURROUND
SUBWOOFER
SURROUND
SUBWOOFER
SURROUND
RTD255-EN DVD 3/12/04 10:55 AM Page 6

DVD Player
EN
27
DVD Player
26
Subtitle language
This step will define the default subtitle language.
Choosing a subtitle language from the on-screen banner
display will only overwrite this setting temporarily.
1. Open the subtitle language menu.
2. Press UP/DOWN to select a language and then press OK.
Menu language
This step will define the language of menus and other
short messages shown on screen.
1. Open the menu language menu.
2. Use UP/DOWN to select the language and then press OK
to return to the main menu.
Player Menus
Disc Menus
Audio
Subtitles
French
German
Italian
Spanish
Swedish
English
Rating (Parental control)
This setting prevents the playback of DVDs that may not be
suitable for all audiences, by using the rating level that may
be encoded on the disc. If the rating level of the disc is
higher than the preset level (to be set in this step), the play-
back will be prohibited unless the password (see next step)
is entered.
1. Open the rating menu.
2. Use UP/DOWN to highlight the rating which require a
password to start disc playback. Press OK to return to the
main menu. Ratings highlighted in blue require a password.
The rating feature works in accordance with the rating
encoded in the DVD disc software. Keep in mind that not
all movies and discs are rated. In addition to the five stan-
dard (MPAA) rating symbols of “G” (level 2), “PG” (Parental
Guidance, level 4), “PG13” (Parental Guidance and 13 years
old, level 4), “R” (Restricted, level 6) and ”NC17” (from 17
years old, level 7), the player includes a total of 8 rating
steps, corresponding to the existing disc rating steps. These
additional steps allow for a better control the of program
playback for all audiences.
Level 8: All DVDs can be played (Factory preset).
Level 7 to 2: DVDs for general audiences/ children can be
played.
Level 1: DVDs for children can be played, DVDs for adults/
general audiences are prohibited.
Password
Set password
To disable the viewing of rated DVDs, a four-digit password
must be selected.
1. Open the “Lock” menu.
2. Select “Lock On” and press OK.
3. Use the number buttons to enter the password and then
press OK.
4. Repeat step 3 to confirm the password.
8
7NC-17
6R
5
4PG-13
3PG
2
1G
Password Required
Free Access
Enter New Password
-
OK
Lock
Password
Ratings Limits
Unrated Titles
Enter New Password
-
OK
Player Menus
Disc Menus
Audio
Subtitles
Francais
Espanoi
Deutsch
Italiano
English
SUBWOOFER
SURROUND
SUBWOOFER
SURROUND
SUBWOOFER
SURROUND
SUBWOOFER
SURROUND
SUBWOOFER
SURROUND
SUBWOOFER
SURROUND
Note:
If you set the “Unrated Titles” to “pass-
word required”, it will overrule the set-
ting in the “Rating Limits”. You may need
to enter password whenever you want to play a DVD.
RTD255-EN DVD 3/12/04 10:55 AM Page 8

DVD Player
EN
29
DVD Player
28
Change the password
In order to change the password in parental lock menu, the
current password must first be entered.
1. Open the password menu.
2. Use the number buttons to enter the password and then
press OK.
3. Use UP / DOWN to select “Password” and then press OK.
4. Use the number buttons to enter a new password and
then press OK.
5. Repeat the above step to confirm the password and
return to the password menu. Use the LEFT arrow to
return to the main menu.
Clear password
1. Refer to “General use” to open the parental lock menu.
2. Use the number buttons to enter the password and then
press OK.
3. Select “Lock Off” and press OK.
SUBWOOFER
SURROUND
Lock
Password
Ratings Limits
Unrated Titles
Enter New Password
-
OK
TV aspect
This step selects the TV aspect, wide-screen (16:9) or
conventional (4:3).
1. Open the TV Image menu.
2. Use UP/DOWN to select TV aspect and then press OK to
select.
If you have a wide-screen (16:9) TV, choose “16:9
Widescreen”.
- For 16:9 movie you will get
(Do not select 16:9 widescreen setting
if you are using a 4:3 TV set, or the
image may look distorted with some
DVD disc.)
- For a 4:3 movie you will get
If you have a conventional (4:3) TV,
- if you select 4:3 letterbox for a 16:9
movie, you will get
- if you select 4:3 Pan Scan for a 16:9
movie, you will get (the left and
right edges are hidden)
- for a 4:3 movie, for both selections,
you will get
TV Image
Front Display
Black Level
4X3 Letterbox
4X3 Letterbox
4X3 Letterbox
SUBWOOFER
SURROUND
Note:
When an incorrect password is entered, a
new password menu appears so that you can
enter and confirm the password again.
• A lock icon shows on unit display when password is
required to view rated discs.
Important:
Keep the password in a safe place or remember it reliably
as access to rated discs or rating / password menus
requires the correct password.
RTD255-EN DVD 3/12/04 10:56 AM Page 10

5. Press SKIP REVERSE on the main unit or CH- on the
remote to return to the previous track. Press SKIP FOR-
WARD on the main unit or CH + on the remote to go to
the next track.
6. Press STOP on the main unit or STOP on the remote con-
trol to end playback.
Quick scan
1. Press FORWARD or REVERSE on the remote to scan
through a track quickly during playback. To change speed
to 1, 2 or 3 times, press repeatedly during scan. Quick scan
does not work with mp3 music.
2. Press PLAY on the main unit or the remote to resume
normal playback.
CD / mp3 Player
EN
31
CD / mp3 Player
30
AUX 2
VCR
AUX 1
SAT - CABLE
Press SOURCE on the main unit or DVD/CD on the remote
to select the DVD/CD input source.
Loading and playing an audio CD
1. Press OPEN/CLOSE on the front panel to open the disc
tray. Place the disc on the disc tray with the label side
facing up. Press OPEN/CLOSE again to close disc tray.
2. Press DISCSKIP or 1-5 on the remote control to select
another disc. The disc will be read to detect whether an
audio CD or mp3 CD has been inserted.
3. Press PLAY/PAUSE to start the playback.
4. Press PLAY/PAUSE on the main unit or PAUSE on the
remote control to pause playback. Press PLAY/PAUSE again
on the main unit or PLAY on the remote to resume normal
playback.
SUBWOOFER
mp3 recommendations
• Use .mp3 as the extension when converting
audio files into mp3 for saving onto CD-R(W) or
CD-ROM, e.g. Rocky08.mp3. Do not use any other
extension e.g. .doc, .pdf.
• Do not use the .mp3 extension for other text or
non-audio data files as this may result in serious
malfunction and harmful noise interference.
• Most commonly available CD creation software
can make files compatible for the system but do
not forget to finalize your disc after creation. This
set cannot read DirectCD recordings.
•In order to get audio CD quality, you need to
record your MP3 CD at 128 kbps. You can record
up to 256 kbps. Beyond 256 kbps, the unit might
not read the CD.
• Do not combine CD Audio and MP3 tracks onto
a CD-R(W) or CD-ROM. The player will only
playback CD audio tracks from mixed CD formats.
Note:
• If over 400 items (songs/folders) are on
the disc, only the first 400 songs can be
played.
• Resume function does not operate in mp3 mode.
Note:
If the CD is a mp3 CD, reading may take up
to 2 minutes.
Note:
Be sure to remove all the discs from the
disc compartment before moving or trans-
porting the unit!
Note:
When playback is interrupted, the location
at which it stopped will be memorized.
Playback will resume at the position it was
last stopped. Resume playback does not work with mp3
music.
RTD255-EN CD_MP3 3/12/04 10:56 AM Page 2

CD / mp3 Player
EN
33
CD / mp3 Player
32
Bookmarks (Audio CDs Only)
The bookmark feature allows you to mark a point on the
disc for quick access. 6 bookmarks can be selected.
Adding Bookmarks (Audio CDs Only)
1. Refer to “General use” on page 32 to open the
bookmark menu.
2. Use the arrow keys to highlight the “Bookmark” option,
then press OK to enter bookmark menu.
3. Use the arrow keys to select a bookmark location, then
press OK to add bookmark when you reaching a point of
interest.
4. To add another bookmark, move the cursor to the right
and then press OK when reaching another point of inter-
est.
5. Press CLEAR to exit menu.
Recalling bookmarks
1. Refer to “General use” on page 32 to open the
bookmark menu.
2. Use the arrow keys to highlight the “Bookmark” option,
then press OK to enter bookmark menu.
3. Use the arrow keys to select a bookmark location, then
press OK to recall the bookmarked point.
4. Press CLEAR to exit menu.
Clearing bookmarks
1. Refer to “General use” on page 32 to open the
bookmark menu.
2. Use the arrow keys to highlight the “Bookmark” option,
then press OK to enter bookmark menu.
3. Use the arrow keys to select a bookmark location, when
you see a trach icon, select it and press OK will erase this
bookmark.
The bookmarks are cleared each time a disc is removed
from the player or when the power is turned off
completely.
If all 6 bookmarks are in use, you can still mark new points
but the previous bookmarks will be erased.
Time display (Audio CDs Only)
1. Refer to “General use” on page 32 to open the time
display menu.
2. Press the arrow keys to move the cursor to the time dis-
play box, then you can press UP to switch among "Track
Elapsed", "Track Remain", “Disc Elapsed” and “Disc
Remain” time during playback. The selected mode is dis-
played on the banner.
SUBWOOFER
SURROUND
SUBWOOFER
SURROUND
On- screen banner display for CD playback
General use
1. Press INFO on the remote control to hide and show
the on- screen banner. (Only audio CD banner)
2. Use LEFT / RIGHT to move the cursor on the banner. The
selected feature icon will be highlighted.
3. Press UP / DOWN to change setting of the selected fea-
ture.
Selecting a track
1. Refer to “General use” to open the track menu.
2. Enter a track number. Start any single-digit track num-
ber by a 0 (e.g. 9 = 09).
Playmode selection for CD
There are several options for this feature.
1. Standard – normal CD playback
2. Program – plays the programmed tracks (usable in stop
mode only)
3. Random All Disc – randomly plays all audio CD in the
tray repeatedly. (works only if at least one of the discs is an
audio CD.)
4. Repeat All Disc– plays all audio CD in the tray repeat-
edly. (works only when at least one of the discs is audio
CD.)
5. Random – randomly plays all the tracks of that disc.
6. Repeat Track – plays one track over repeatedly.
7. Repeat Disc – repeatedly plays the selected or currently
playing disc.
8. Repeat A-B – repeatedly plays the selected time frame.
Program
Program edit - can be activated in STOP mode only.
Program play - can be activated in STOP mode only.
00:03:20
PLAY
T:4
Track
Bookmark
Playmodes
Time indicator
SUBWOOFER
SURROUND
SUBWOOFER
SURROUND
EQ. LEVEL
SUBWOOFER
SURROUND
Note:
You must be in playback mode for track
selection.
SUBWOOFER
SURROUND
SUBWOOFER
SURROUND
RTD255-EN CD_MP3 3/12/04 10:56 AM Page 4
Table of contents
Other RCA Receiver manuals

RCA
RCA DCD302RA User manual

RCA
RCA RP-6150 User manual

RCA
RCA DRD505RB User manual

RCA
RCA RTD210 User manual

RCA
RCA RT2500 - Dolby Digital Home Theater System Assembly instructions

RCA
RCA RT2280 User manual

RCA
RCA RW2110 User manual

RCA
RCA RW2100 User manual

RCA
RCA DRD302RA User manual

RCA
RCA RTD101 User manual