RCA 25202 User manual

Two-Line Speakerphone
with Call Waiting Caller ID
User’s Guide
Please read this manual before
operating this product for the
first time.
Model 25202

2
NOTICE: This product meets the applicable Industry Canada technical specifications.
Operation is subject to the following two conditions: (1) This device may not cause
interference, and (2) This device must accept any interference, including interference that may
cause undesired operation of the device.
The equipment must be installed using an acceptable method of connection. The customer
should be aware that compliance with the above conditions may not prevent degradation of
service in some situations.
Repairs to certified equipment should be made by an authorized Canadian maintenance facility
designated by the supplier. Any repairs or alterations made by the user to this equipment, or
equipment malfunctions, may give the telecommunications company cause to request the user
to disconnect the equipment.
Users should ensure for their own protection that the electrical ground connections of
the power utility, telephone lines and internal metallic water pipe systems, if present, are
connected together. This precaution may be particularly important in rural areas.
CAUTION: Users should not attempt to make such connections themselves, but should contact
the appropriate electric inspection authority, or electrician, as appropriate.
NOTES: This equipment may not be used on coin service provided by the telephone company.
Interference Information
This equipment generates and uses radio frequency energy which may interfere with residential
radio and television reception if not properly installed and used in accordance with instructions
contained in this manual. Reasonable protection against such interference is ensured, although
there is no guarantee this will not occur in a given installation. If interference is suspected and
verified by switching this equipment on and off, the user is encouraged to try to correct the
interference by one or more of the following measures: Reorient the radio/television receiver’s
antenna, relocate the equipment with respect to the receiver, plug the equipment and receiver
into separate circuit outlets. The user may also wish to consult a qualified radio/television
technician for additional suggestions. This equipment has been fully tested and complies with
all limits for Class B computing devices pursuant to part 15 FCC Rules and Regulations.
REN NUMBER IS LOCATED ON THE CABINET BOTTOM
Hearing Aid Compatibility (HAC)
This telephone system meets FCC/Industry Canada standards for Hearing Aid Compatibility.
Licensing
Licensed under US Patent 6,427,009.
Important Information

3
Important InformatIon .....................2
Interference InformatIon...............................2
IntroductIon ....................................5
connectIons and setup.....................6
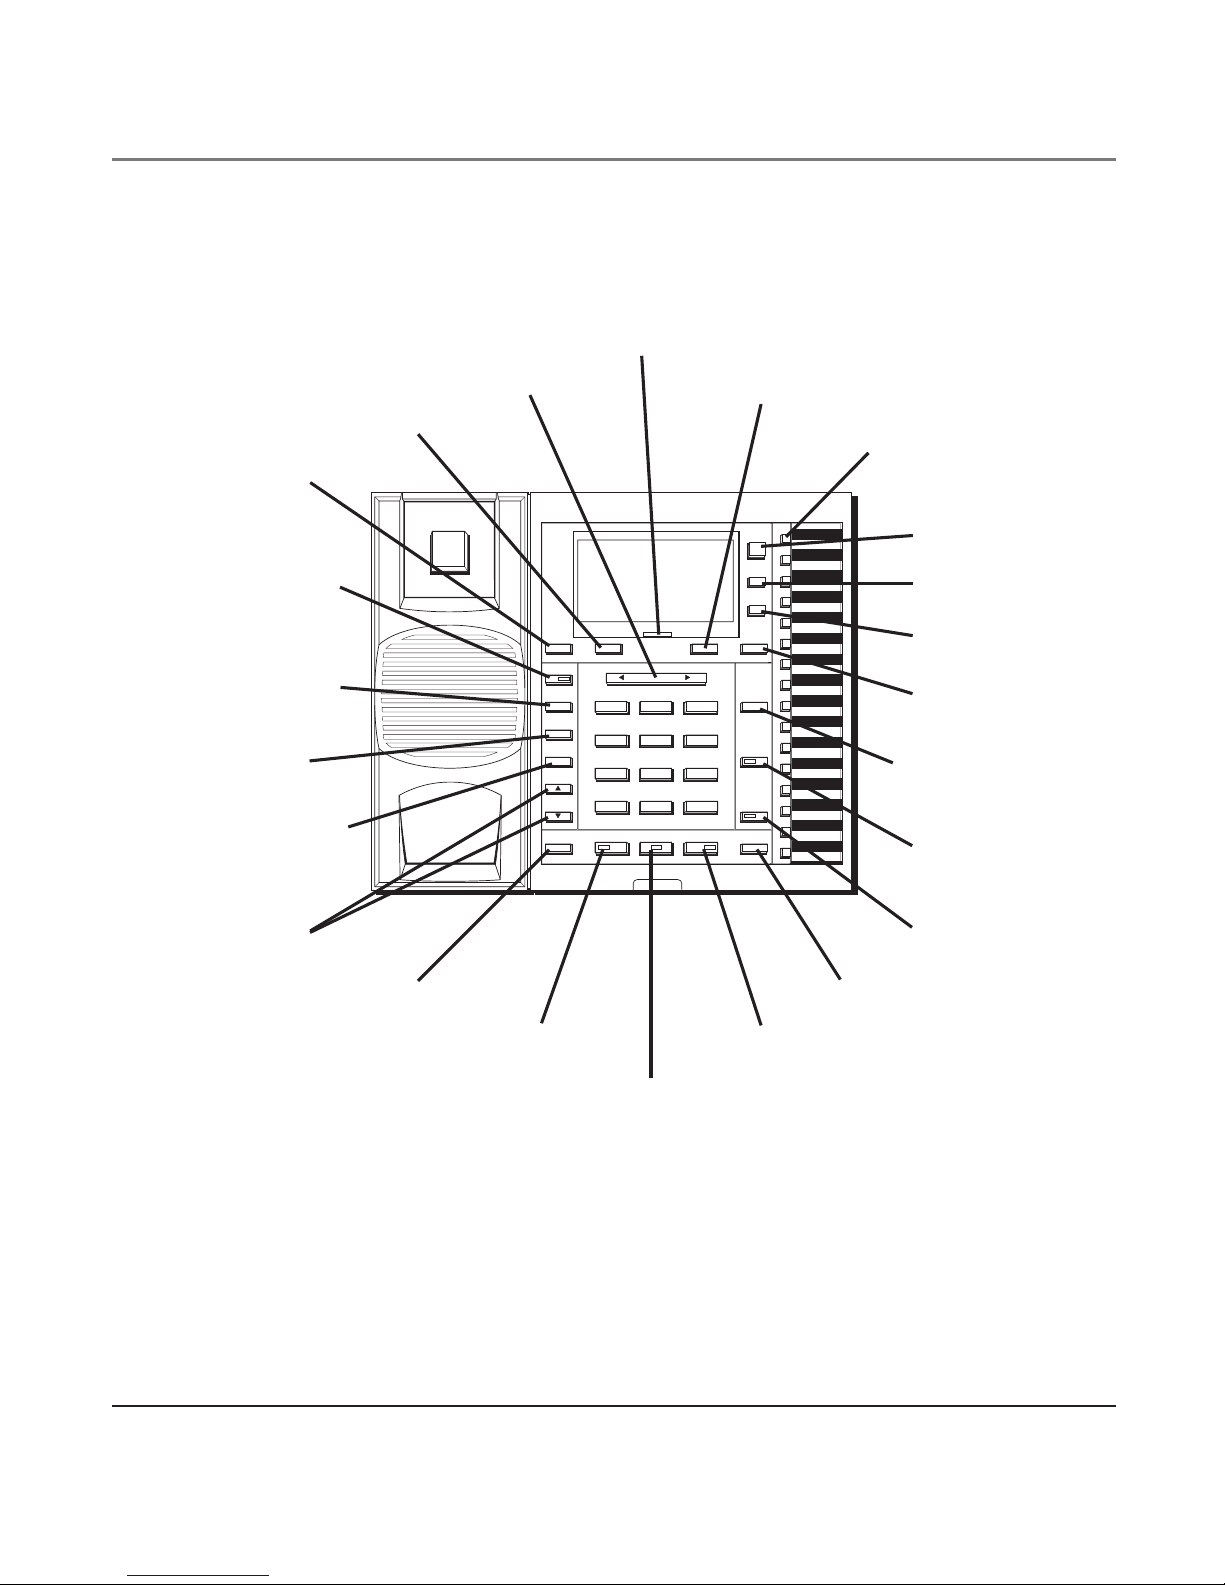
Base Layout..................................................6
Parts CheCklist................................................. 7
telePhone JaCk requirements .......................... 7
InstaLLatIon ..................................................7
imPortant installation information ................ 7
InstaLLIng the phone .....................................8
data port ..................................................10
programmIng the teLephone ........................11
DisPlay language.............................................11
manually setting the Date anD time .............11
flash time.......................................................12
hour format ..................................................12
Call alert tone..............................................13
loCal area CoDe.............................................13
regional area CoDes .....................................14
VoiCe mail aCCess CoDes...............................15
restoring the Defaults...................................15
teLephone operatIon ......................16
teLephone operatIon ...................................16
making Calls with the hanDset....................16
making Calls with the sPeakerPhone ...........16
making Calls with the oPtional heaDset.....16
reCeiVing Calls with the hanDset .................17
reCeiVing Calls with the sPeakerPhone.........17
reCeiVing Calls with the oPtional
heaDset.......................................................17
switChing Between the sPeakerPhone,
hanDset, anD heaDset ...............................17
Pre-Dialing telePhone numBers ...................18
Call timer.......................................................18
mute................................................................18
holD ................................................................19
Placing acall on Hold.................................... 19
Releasing acall fRom Hold............................. 19
flash ...............................................................19
reDial .............................................................19
Volume ............................................................19
RingeR Volume................................................... 20
sPeakeRPHone, Handset, and Headset
Volume ............................................................... 20
ConferenCe......................................................20
Donot DisturB ..............................................20
VoiCe messaging.............................................21
caLLer Id ......................................22
caLLer Id (cId) .........................................22
summary sCreen.............................................22
Table of Contents

4
reCeiVing anD storing CiD reCorDs .............22
reViewing CiD reCorDs .................................23
saVing CiD reCorDs to memory/Phone DireC-
tory memory..............................................23
Deleting aCiD reCorD ..................................23
Deleting all CiD reCorDs .............................23
Dialing BaCk ...................................................23
ifYou PRogRammed YouR local aRea
code in tHe setuP menu ................................... 23
ifYou did not PRogRam YouR local
aRea code in tHe setuP menu.......................... 24
Call waiting Caller iD .................................24
memory ........................................25
dIrect access memory & dIrectory
memory...................................................25
storing aname anD numBer in memory .....25
Table of Contents
reViewing storeD names & numBers ...........25
Changing astoreD name or numBer...........26
storing the last numBer DialeD ...................26
storing aPause..............................................26
Dialing astoreD numBer...............................27
Chain Dialing..................................................27
Deleting all DireCtory memory....................28
other InformatIon .........................29
dIspLay messages .......................................29
trouBLeshootIng guIde ................................29
generaL product care ................................31
ren numBer..............................................31
teLephone network InformatIon ..................31
servIce .......................................................32
accessory order form...................35
SEE MARKING ON BOTTOM / BACK OF PRODUCT
RISKOFELECTRICSHOCK
DONOTOPEN
WARNING: TO
PREVENT FIRE OR
ELECTRICAL SHOCK
HAZARD, DO NOT
EXPOSETHIS
PRODUCT TO RAIN
OR MOISTURE.
THE LIGHTNING
FLASH AND ARROW
HEAD WITHIN THE
TRIANGLE IS A
WARNING SIGN
ALERTING YOU OF
“DANGEROUS
VOLTAGE” INSIDE
THE PRODUCT.
CAUTION: TO REDUCE THE
RISK OF ELECTRIC SHOCK, DO
NOT REMOVE COVER (OR
BACK). NO USER
SERVICEABLE PARTS INSIDE.
REFER SERVICING TO
QUALIFIED SERVICE
PERSONNEL.
THE EXCLAMATION
POINT WITHIN THE
TRIANGLE IS A
WARNING SIGN
ALERTING YOU OF
IMPORTANT
INSTRUCTIONS
ACCOMPANYING
THE PRODUCT.
CAUTION:

5
Introduction
CAUTION: When using telephone equipment, there are basic safety instructions that should
always be followed. Refer to the IMPORTANT SAFETY INSTRUCTIONS provided with this product
and save them for future reference.
Your Caller ID phone stores and displays specific information, provided by your local
telephone company, to subscribers of Caller ID or similar caller identification services.
Your Caller ID phone enables you to:
• Identify callers before you answer the phone.
• View the time and date of each incoming call.
• Record up to 99 Caller ID messages sequentially.
• Know who called while you were away.
To get the most from your new phone, we suggest that you take a few minutes right now
to read through this user’s guide.
IMPORTANT: In order to use this unit, you must subscribe to either the standard Name/Number Caller
ID Service or Caller ID with Call Waiting Service. To know who is calling while you are on the phone, you
must subscribe to Caller ID with Call Waiting Service.

6
Base Layout
DELETE EXIT SELECT/SAVE DIAL
STORE
MENU
DIRECTORY
NEW CALL
CONFER
LINE 2
LINE 1
VOICE MAIL 1
VOICE MAIL 2
DND
PAUSE
REDIAL
VOLUME
FLASH HANDSET SPEAKER MUTE HOLD
16
1
2
3
4
5
6
7
8
9
10
11
12
13
14
15
INTERCOM/MEMORY LOG
MEM.
MEM.
MEM.
MEM.
MEM.
MEM.
MEM.
MEM.
MEM.
MEM.
MEM.
MEM.
MEM.
MEM.
MEM.
MEM.
INT.
INT.
INT.
INT.
INT.
INT.
INT.
INT.
INT.
INT.
INT.
INT.
INT.
INT.
INT.
INT.
REVIEW
PQRS
7
TUV
8
WXYZ
9
GHI
4
JKL
5
MNO
6
1
ABC
2
DEF
3
TONE
*
OPER
0#
MEMORY buttons
DIRECTORY button
MENU button
STORE button
DIAL button
CONFERENCE button
LINE 2 button
LINE 1 button
HOLD button
MUTE button
SPEAKER button
HEADSET button
FLASH button
VOLUME button
PAUSE/REDIAL button
DND (Do not
disturb button)
VOICE MAIL 2 button
VOICE MAIL 1 button
DELETE button
EXIT button
REVIEW button
NEW CALL indicator
SELECT/SAVE button
Connections and Setup

7
Handset cord Line cords AC power adaptor
Modular telephone
line jack
Wall plate
Base Handset
Parts Checklist
Make sure your package includes the following items:
Telephone Jack Requirements
To use this phone, you will need one RJ14C (CA14A)
or two RJ11C (CA11A) type modular phone jacks,
which might look like the one pictured here,
installed in your home/office.
Installation
Important Installation Information
• Never install telephone wiring during a lightning
storm.
• Never touch uninsulated telephone wires or
terminals, unless the telephone line has been
disconnected at the network interface.
• Use caution when installing or modifying
telephone lines.
• Never install telephone jacks in wet locations
unless the jack is specifically designed for wet
locations.
DELETE EXIT SELECT/SAVE DIAL
STORE
MENU
DIRECTORY
NEWCALL
CONFER
LINE2
LINE1
VOICEMAIL 1
VOICEMAIL 2
DND
PAUSE
REDIAL
VOLUME
FLASH HANDSET SPEAKER MUTE HOLD
16
1
2
3
4
5
6
7
8
9
10
11
12
13
14
15
INTERCOM/MEMORYLOG
MEM.
MEM.
MEM.
MEM.
MEM.
MEM.
MEM.
MEM.
MEM.
MEM.
MEM.
MEM.
MEM.
MEM.
MEM.
MEM.
INT.
INT.
INT.
INT.
INT.
INT.
INT.
INT.
INT.
INT.
INT.
INT.
INT.
INT.
INT.
INT.
REVIEW
PQRS
7
TUV
8
WXYZ
9
GHI
4
JKL
5
MNO
6
1
ABC
2
DEF
3
TONE
*
OPER
0
#
Connections and Setup

8
Installing the Phone
1. Choose an area near an electrical outlet and
telephone wall jack. Your phone should be placed
on a level surface, such as a table top or desk.
2. Install 3 AA-size alkaline batteries (not included)
for back up power in the event of a power
failure.
• Use a screwdriver to loosen and lift up the
battery compartment door located on the
bottom of the phone.
• Insert the batteries as shown on the diagram
inside the battery compartment.
• Snap the battery compartment door back into
place and tighten the screw.
NOTE: If the low battery icon appears in the display,
you need to replace the batteries. It is important that
you replace them as soon as possible to maintain unit
operation when electrical power is off. As a precaution,
you may want to write down any stored information you
do not want erased.
IMPORTANT: If you are not going to use the telephone for
more than 30 days, remove the batteries because they can
leak and damage the unit.
3. Connect the AC power adaptor to an electrical
outlet and the DC connector to the back of the
base.
CAUTION: Use only the 5-2495 power adaptor that
is compatible with this unit. Using other power
adaptors may damage the unit.
4. Connect the telephone line cords:
Connections and Setup

9
If you have two telephone lines installed on a single jack, plug one end
of the straight telephone line cord into the jack marked LINE 1+2 on
the back of the base. Plug the other end into the 2-line wall jack.
If you have two separate telephone line jacks, plug one telephone line
cord into the jack marked LINE 1+2 and another cord into the jack
marked LINE 2. Plug the other end of each line cord into separate wall
jacks.
3
4
5
6
NOTE: To use two line, you must have two telephone lines with unique telephone
numbers. If you only have one telephone line, this phone will still operate, but
only as a single line telephone.
5. Connect the handset cord:
Plug one end of the coiled handset cord into the side of the base and
the other end into the jack on the handset, and place the handset in
the cradle.
6. Check for a dial tone. Lift the handset and listen for a dial tone. If
you hear a dial tone, the phone is properly installed.
Connections and Setup

10
Data Port
This phone has a DATA PORT jack to connect an auxiliary phone device,
such as a fax machine, computer modem, answering machine, or even
a cordless phone.
The DATA PORT switch on the back of the phone controls the DATA
PORT jack so you can choose line 1 or line 2.
Use the DATA PORT jack to hook up your fax machine, for example, and
then set the DATA PORT switch to 2 in order to receive faxes on the
phone number for line 2.
If you are talking to someone on line 2 and want them to fax
something to you, change the DATA PORT switch to 1 and give him the
phone number for line 1. Your fax machine can now receive calls on
line 1.
IMPORTANT: Be sure to switch the fax machine back to the normal line when you
are done because outside callers who do not know that you have multiple lines
will not be able to reach your fax machine if they dial the normal fax line.
Connections and Setup

11
Programming the Telephone
Display Language
You may set the display language to English, French, or Spanish. The default is English.
1. Press the MENU button. LANGUAGE is displayed
2. Press SELECT.
3. Use the REVIEW 3or 4button to select the language.
4. When finished, press SELECT to save. To start over, press EXIT to return to the
LANGUAGE menu and repeat step 2.
Manually Setting the Date and Time
NOTE: If you do not manually set the time and date, it is automatically set when you receive your first
Caller ID call. The unit resets the hour and minute each time a call is received.
1. Press the MENU button.
2. Use the REVIEW 3or 4button to scroll to TIME & DATE.
3. Press SELECT.
4. Use the REVIEW 3or 4button to scroll to the desired hour.
5. Press SELECT to save. The cursor moves to the minute field.
6. Use the REVIEW 3or 4button to select the minute.
7. Press SELECT to save. The cursor moves to the month field.
8. Use the REVIEW 3or 4button to select the month.
9. Press SELECT to save. The cursor moves to the date field.
10. Use the REVIEW 3or 4button to select the date.
11. Press SELECT to save. To start over, press EXIT to return to the TIME & DATE menu.
Connections and Setup

12
Flash Time
Depending on the services you have with the phone company, you may need to adjust the
flash timing. It can be set from 100ms or 600ms. The default is 600ms.
1. Press the MENU button.
2. Use the REVIEW 3or 4to scroll to PHONE OPTIONS.
3. Press SELECT.
4. Use the REVIEW 3or 4to scroll to FLASH TIME.
5. Press SELECT.
6. Use the REVIEW 3or 4to scroll to the desired setting.
7. Press SELECT to save. To start over, press EXIT to return to the FLASH TIME menu.
Hour Format
You can set the clock for either 12-hour or 24-hour (military) format. The default is 12
hour.
1. Press the MENU button.
2. Use the REVIEW 3or 4to scroll to PHONE OPTIONS.
3. Press SELECT.
4. Use the REVIEW 3or 4to scroll to HOUR FORMAT.
5. Press SELECT. To start over, press EXIT to return to the PHONE OPTIONS menu.
6. Use the REVIEW 3or 4to scroll between 12 HOUR and 24 HOUR.
7. Press SELECT to save. To start over, press EXIT to return to the HOUR FORMAT menu.
Connections and Setup

13
Call Alert Tone
When the call alert tone is turned ON, you hear a call alert tone when you are on the
phone and you receive a call on the other line. If you prefer to have incoming calls not
interrupt or disturb your ongoing conversation, set the Call Alert Tone to OFF. The default
is ON.
1. Press the MENU button.
2. Use the REVIEW 3or 4button to scroll to PHONE OPTIONS.
3. Press SELECT button.
4. Use the REVIEW 3or 4button to scroll to CALL ALERT.
5. Press SELECT button.
6. Use the REVIEW 3or 4button to scroll to ON or OFF.
7. Press SELECT to save. To start over, press EXIT to return to the CALL ALERT menu.
Local Area Code
1. Press the MENU button.
2. Use the REVIEW 3or 4button to scroll to AREA CODE.
3. Press SELECT. ENTER DIGIT is displayed.
4. Use the touch-tone pad to enter your area code.
NOTE: If you make a mistake, press DELETE to clear all three digits and re-enter the area code.
5. When finished, press SELECT to save. To start over, press EXIT to return to the AREA
CODE menu and repeat step 3.
Connections and Setup

14
Regional Area Codes
Depending on your area, you may need to set regional area codes. These are needed in
order for the phone to determine the number format to display when a valid CID signal is
received. Calls received that match any of the regional area codes display as 10 digits. If
the number is not displayed correctly, the phone may not be able to dial back the number.
You can store up to 6 regional area codes.
You may need to use this feature if you have:
• Multiple area codes
• Overlapping area codes
• Areas that require 10-digit dialing.
1. Press the MENU button.
2. Use the REVIEW 3or 4button to scroll to REGION CODE.
3. Press SELECT.
4. Use the REVIEW 3or 4to scroll to desired code #.
5. Press SELECT.
6. Use the touch-tone pad to enter the code. Press DELETE to clear and re-enter all three
digits.
7. When finished, press SELECT to save and return to CODE # x.
Connections and Setup

15
Voice Mail Access Codes
You can program a voice mail access code for each telephone line for quick access to your
voice mail.
1. Press the MENU button.
2. Use the REVIEW 3or 4button to scroll to VM CODE.
3. Press SELECT.
4. Use the REVIEW 3or 4button to scroll between L1 VM CODE and L2 VM CODE.
5. Press SELECT.
6. Use the touch-tone pad to enter your voice mail access phone number.
• Use the REVIEW 3or 4button to move the cursor in the display.
• Use the DELETE button to erase a mistake and re-enter the correct digit.
7. Press SELECT to save. To start over, press EXIT to return to Lx VM CODE menu.
Restoring the Defaults
This feature allows you to reset all the menu settings to the original default settings.
1. Press the MENU button.
2. Use the REVIEW 3or 4to scroll to RESTORE SET.
3. Press SELECT.
4. Use the REVIEW 3or 4to scroll to YES.
5. Press SELECT to save. To start over, press EXIT to return to the RESTORE SET menu.
Connections and Setup

16
Telephone Operation
Making Calls with the Handset
1. Pick up the handset and the phone automatically selects an open line.
2. Wait for a dial tone.
3. Dial a phone number.
4. Hang up the handset when finished.
Making Calls with the Speakerphone
1. Press the SPEAKER button and the phone automatically selects an open line.
2. Wait for a dial tone.
3. Dial a phone number.
4. Press SPEAKER when finished.
Making Calls with the Optional Headset
1. Connect a headset to the HEADSET jack on the side of the base.
2. Adjust the headset to rest comfortably on top of your head and over your ear.
3. Move the microphone to approximately 2 to 3 inches from your mouth.
4. Press the HEADSET button, and the phone automatically selects an open line.
5. Wait for a dial tone.
6. Dial a phone number.
7. Press HEADSET when finished.
NOTE: To converse using the headset, the handset must be placed in the cradle.
Telephone Operation

17
Receiving Calls with the Handset
When the phone rings, the corresponding line’s indicator flashes rapidly.
1. Pick up the handset (your phone automatically selects the ringing line).
2. When you are finished, hang up the handset.
Receiving Calls with the Speakerphone
When the phone rings, the corresponding line’s indicator flashes rapidly.
1. Press the SPEAKER button. The speakerphone turns on and automatically selects a line.
2. When you are finished, press SPEAKER.
Receiving Calls with the Optional Headset
When the phone rings, the corresponding line’s indicator flashes rapidly.
1. Press the HEADSET button, and the phone automatically selects the line using
the headset.
2. When you are finished, press HEADSET.
NOTE: Whether you are making or receiving a call, the caller is disconnected if you press another line
without putting the call on hold first.
NOTE: To converse using the headset, the handset must be placed in the cradle.
Switching Between the Speakerphone, Handset, and Headset
To switch to the speakerphone, press SPEAKER. The speakerphone indicator turns on.
To switch to the handset, pick up the handset. The speakerphone or headset turns off.
To switch to the headset, press HEADSET. The headset indicator turns on. Place the
handset in the cradle.
Telephone Operation

18
Pre-Dialing Telephone Numbers
Pre-dialing lets you to enter , check , and edit a telephone number before engaging the
line. There are several ways to pre-dial a telephone number:
• Manually enter the telephone number, or
• Press one of the 16 memory location buttons, or
• Press DIRECTORY, followed by the REVIEW 3or 4button to search the phone book
memory.
• Press the REVIEW 3or 4buttons to scroll the CID memory, or
• Press the REDIAL button.
Then -
1. Press the DIAL button. The phone automatically selects a line and turns on the
speakerphone.
2. Dial the number showing in the display.
Call Timer
During a phone conversation, a built-in call timer displays the length of the call in
minutes and seconds. When the call is finished, total time shows in the display for about
10 seconds. A call is timed even while it is on hold.
Mute
To have a private, off-line conversation, use the MUTE feature. The party on the telephone
line cannot hear you. A conversation can be muted during speakerphone, handset, or
headset use.
1. Press MUTE. The mute indicator turns on.
2. Press MUTE to cancel and return to your phone conversation
NOTE: Switching from speakerphone to handset or headset cancels mute.
Telephone Operation

19
Hold
Placing a Call on Hold
1. Press HOLD. The indicator for the line on hold flashes green.
2. Hang up or press another line button.
Releasing a Call from Hold
Press the line button for the call on hold. The phone automatically goes into
speakerphone mode.
NOTE: If you want to change modes, lift the handset to switch to the handset, or press the HEADSET
button to use the headset.
Flash
Use the FLASH button to activate custom calling services such as Call Waiting, which is
available through your local telephone company.
Redial
To quickly redial the last number you dialed (up to 32 digits):
1. Pick up the handset, or press SPEAKER or HEADSET.
2. The line is selected automatically.
3. Wait for a dial tone.
4. Press REDIAL.
Volume
The ringer, speaker, and handset/headset volumes can be set independently. Your
telephone is preset but may be set to individual taste. To return to the default settings,
press both the VOLUME 5or 6buttons simultaneously.
Telephone Operation

20
Ringer Volume
While the handset is on the cradle tap the VOLUME 5or 6button to increase or
decrease the ringer loudness. The phone generates a sample ring at the selected setting.
Speakerphone, Handset, and Headset Volume
While using the phone press the VOLUME 5or 6buttons to set the volume to a
comfortable level The phone stores the setting when you release the button.
Conference
This feature lets you connect two calls to make a conference call.
To connect with two calls:
1. Press any line button. If you already have someone on the line, skip to step 2.
2. Press HOLD.
3. Press the another line button to answer or make a second call
4. When the second call connects, press CONFER.
To disconnect one line, press the line button for the party you want to continue talking
with and the other party is automatically disconnected.
To disconnect both lines, hang up the handset or press SPEAKER if you are using the
speakerphone or press HEADSET if you are using the headset.
To keep both parties on-line but talk to one party:
1. Press the HOLD button to place both lines on hold.
2. To talk with one caller, press the corresponding line button. The other line remains on
hold.
3. To resume the conference call with both lines, press CONFER.
Do Not Disturb
This feature disables an incoming call ring, within the time duration you selected. You can
program the do not disturb duration.
1. While the handset is on the cradle, press DND button. The DND indicator flashes.
Telephone Operation
Other manuals for 25202
2
Table of contents
Languages:
Other RCA Telephone manuals