Doro 720 User manual

720

10
9
68
7
2
4
311
1
5
1 Redial/Pause button
2 Mute/Erase button
3 Scroll UP
4 Phone book/Back button
5 *and Key Lock button
6 Recall and Off/On button
7 Microphone
8 Intercom calls
9 Talk button
10 Scroll DOWN/Caller ID button
11 Menu/OK button
English

1 Πλήκτροεπανάκλησης/παύσης
2 Πλήκτροσίγασης/διαγραφής
3 ΚύλισηΕΠΑΝΩ
4 Πλήκτροτηλεφωνικούκαταλόγου/
επιστροφής
5 πλήκτρο*καικλείδωμαπλήκτρων
6 Πλήκτροανάκλησηςκαι
απενεργοποίησης/ενεργοποίησης
7 Μικρόφωνο
8 Κλήσειςενδοεπικοινωνίας
9 Πλήκτροομιλίας
10 ΠλήκτροκύλισηςΚΑΤΩ/αναγνώρισης
κλήσεων
11 ΠλήκτροΜενού/ΟΚ
Ελληνικά
1 Újrahívás/Szünet gomb
2 Némítás/Törlés gomb
3 Felfelé görgetés
4 Telefonkönyv/Vissza gomb
5 *ésBillentyűzárgomb
6 Visszahívás és Ki-be gomb
7 Mikrofon
8 Belsőhívások
9 Hívás gomb
10 Lefelé görgetés/Hívóazonosító gomb
11 Menü/OK gomb
Magyarul
1 Botão de remarcação / pausa
2 Botão Mute (silenciar) / apagar
3 Deslocar para cima
4 Botão de lista telefónica / voltar
5 *e botão de bloqueio do teclado
6 Botão de repetição de chamada e de
ligar/desligar
7 Microfone
8 Chamadas intercom (internas)
9 Botão de activação de linha
10 Botão de deslocar para baixo / ID de
chamada
11 Botão Menu / OK
Português
1 TlačítkoVytočitznovu/Pauza
2 TlačítkoZtlumit/Smazat
3 Posunutí NAHORU
4 TlačítkoTelefonníseznam/Zpět
5 *atlačítkoZámekklávesnice
6 TlačítkoFlashaVypnout/Zapnout
7 Mikrofon
8 Interní hovory
9 TlačítkoHovor
10 PosunutíDOLŮ/TlačítkoIdentikace
volajícího
11 TlačítkoMenu/OK
Česky
1 TlačidloZnovuvytočiť/Pauza
2 TlačidloVymazania/Stlmenia
3 Posúvanie HORE
4 TlačidloTel.zoznam/Späť
5 *atlačidloBlokovanieklávesnice
6 TlačidloVolaniespäťaVypínanie/Zapínanie
7 Mikrofón
8 Volania pomocou Intercomu
9 Tlačidlohovoru
10 PosúvanieDOLE/TlačidloIDvolajúceho
11 TlačidloMenu/OK
Slovenčina
1 Tekrararama/Beklemesüresituşu
2 Sessiz/Silmetuşu
3 YUKARIilerlemetuşu
4 Telefonrehberi/Gerituşu
5 *vetuşkilidituşu
6 Flaşvekapatma/açmatuşu
7 Mikrofon
8 Dahili aramalar
9 Cevaplamatuşu
10 YUKARIilerleme/Arayankimliğituşu
11 Menü/OKtuşu
Türkçe

1
English
Connection
1. Connect the mains adapter and the line cord to the wall sockets.
2. Insert the batteries (AAA 1.2V 600 mAh NiMH) into the handset ensuring correct
battery polarity is observed.
3. Chargethehandsetwiththekeypadfacingoutwards(24hoursthersttime).
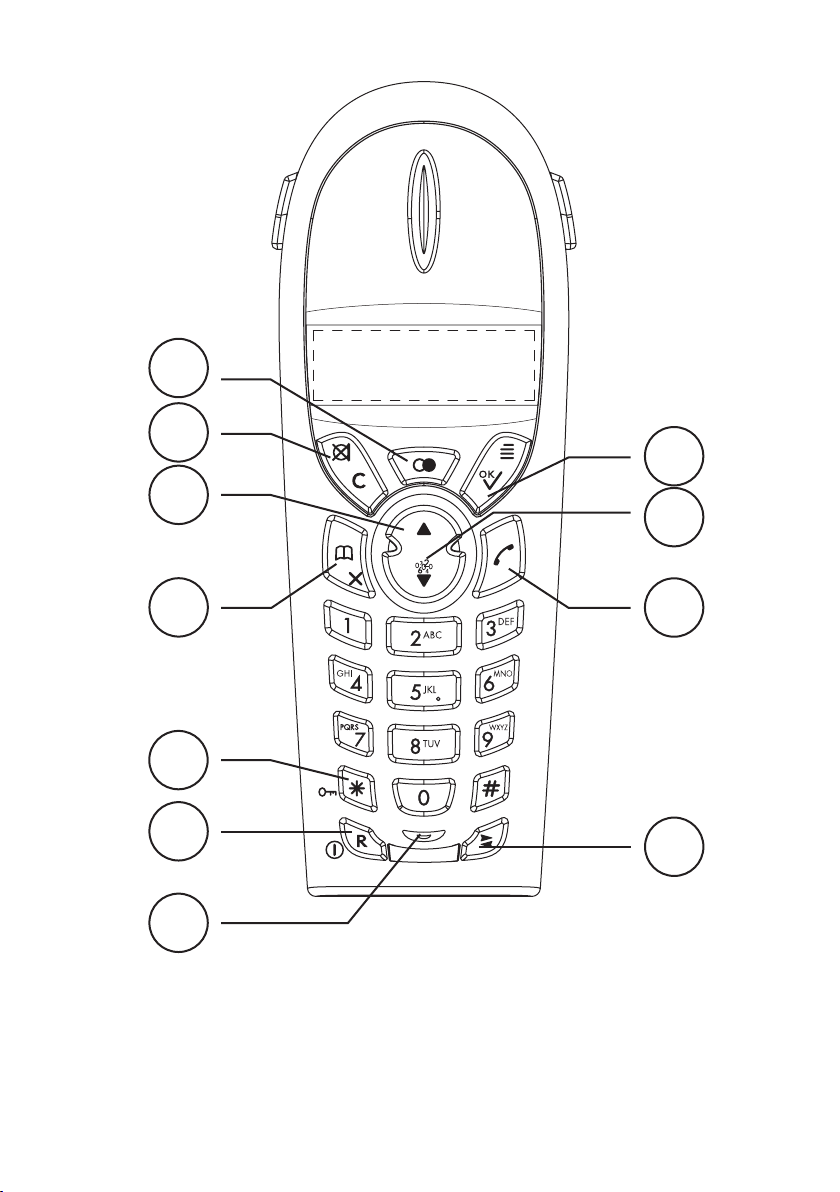
Set language and time
4. Press w. Scroll to HANDSET using {/}. Press 0.
5. Scroll to LANGUAGE. Press 0.
6. Scroll to the required language. Press 0toconrm.
7. Scroll to CLOCK SET. Press 0.
8. Enter the time (HH:MM – 24hr format) using the handset keypad. Press 0.
9. The unit will return to standby mode after a while, alternatively repeatedly press C.
Please note!
Only use with the supplied power adaptor/s.
Under power failure conditions the telephone will not work. Please ensure that a separate telephone not
dependant on local power is available for emergency use.
Do not place the base unit close to other electrical equipment or where it will be exposed to direct sunlight or
other major heat sources! This will minimise the risk of interference.
It is normal that the equipment become warm during charging and will not damage the equipment.
Use original batteries only. The guarantee does not cover any damage caused by use of incorrect batteries.
Range
Speciedrangesrequireunobstructedtransmissionbetweenthehandsetandbaseunit.In
such ideal conditions the telephones range can be up to 300 metres. In densly populated
areas, houses, apartments etc the range will be reduced. Try to get the best range by
relocating the base unit, the ideal location is a high and unobstructed place. If the handset
is carried to far from the base unit during a call the sound quality will decrease and the call
will be terminated.
Batteries
As with all batteries the performance may degrade over time, should you notice that the
talk and standby times are reduced considerably or there are signs of leakage, the batteries
should be replaced.The base unit has an automatic charging mechanism that prevents the
batteries from being overcharged or damaged by prolonged charging.
Fully-charged batteries (8 hours) will last for approx. 200 hours in standby or approx. 10
hours’ call time. These operation times apply at normal room temperature.
Full battery capacity will be achieved once the batteries have been charged 4-5 times.
The indicator will only show full when capacity is >95%.

2
English
Making a call
1. Enter the required telephone number. Mistakes can be erased by pressing C.
2. Press qto dial the telephone number. Press qagain to terminate the call.
Receiving a call
1. Wait for the handset to ring.
2. Press qto answer the call. Press qagain to terminate the call.
Please note!
If the telephone cannot connect to a line, a warning tone will be heard. The problem may be due to the batteries
running low, the handset being too far from the base unit or all of the transmission channels being engaged.
Turning handset on/off
To switch the handset Off (blank display) or On press and hold 1.
Volume control
The volume may be adjusted during a call using {/}.
Redial function
Press rand {/}to view the last 10 numbers dialled. Press q.
Mute button
The microphone can be turned off/on during a call using z.
Key lock
Press and hold Nuntil Nis displayed. To deactivate key lock press any button
(PRESS * will be displayed), press *buttontoconrm.
Paging
Press 5on the base unit to activate the paging signal. The signal will stop automatically
or when qon the handset or 5on the base unit are pressed.

3
English
Phone book
The phone book can store 50 names and telephone numbers. If you subscribe to the Caller
ID service various ringer melodies can be selected for each name /number, the name of
the caller will also be displayed when you receive a call.
Letters
Each number key is allocated certain letters, these do not follow the standard for all
languageswithsomecountry-speciccharactersunavailable.
The Phonebook is also arranged according to the order of the buttons.
To insert a space press 1, to erase press C.
Storing names/numbers in the phone book
1. Press 0. PHONEBOOK will be displayed. Press 0.
2. ADD ENTRY will be displayed. Press 0.
3. Enter a name by pressing/repeatedly pressing the number buttons. Press 0.
4. Enter the telephone number including area code. Press 0.
5. Select a ringer melody using {/}. Press 0.
6. The handset will return to standby mode, alternatively repeatedly press C.
Dialling from the Phone book
1. Press b.
2. Scroll ({/}) through the phone book. To quick search press the number button that
correspondstotherstletter.
3. Press qto dial the displayed number.
Changing phone numbers/names
1. Press 0. PHONE BOOK will be displayed. Press 0.
2. Scroll ({/}) to MODIFY ENTRY. Press 0.
3. Scroll through the entries. Press 0.
4. Correct the name using Cand the keypad. Press 0.
5. Correct the number using Cand the keypad. Press 0.
6. Select a ringer melody using {/}. Press 0.
7. The handset will return to standby mode, alternatively repeatedly press C.
Deleting a Phone book entry
1. Press 0. PHONE BOOK will be displayed.
2. Press 0.
3. Scroll ({/}) to DELETE ENTRY. Press 0.
4. Scroll through the entries. Press 0.
5. Press 0.
6. The unit will return to standby mode after a while, alternatively repeatedly press C.

4
English
New calls (Caller ID memory*)
Caller ID allows you to see who is calling or the last 40 new calls received.
NewcallsareindicatedinstandbymodebyaashingTin the display.
Please note!
In order for numbers to be shown, you must subscribe to the Caller ID service provided by your network
operator and a current subscription in place. Contact your network operator for more information.
Retrieving and dialling incoming numbers
You will hear a loud beep at the end and the beginning of the list.
1. Press }. Scroll ({/}) through the displayed names/numbers.
2. Press qto dial the displayed number, alternatively repeatedly press X.
Caller ID messages
UNAVAILABLE
/INT NATIONAL An International or PBX call (no information received).
WITHHELD Blocked or withheld number possibly from a PBX.
Deleting numbers
1. Press }. Scroll ({/}) through the displayed names/numbers.
2. To delete press C, or press and hold Cto delete all.
3. Press 0.
Storing numbers in the Phone book
1. Press }. Scroll ({/}) through the displayed names/numbers. Press 0.
2. Press 0. ADD ? will be displayed. Press 0.
3. Enter a name by pressing/repeatedly pressing the number buttons. Press 0.
Handset menu
1. Press w. Scroll to HANDSET using {/}. Press 0.
2. Select a function below using {/}. Press 0.
INT RING VOL, EXT RING VOL, INT MELODY, EXT MELODY, BEEPS,
LANGUAGE, CLOCK SET, ALARM SET, AUTO ANSWER, NAME,
KEYLOCK ?.
3. Modify the selected option using {/}. Press 0.
ALARM SET: Select alarm clock to setting ON and enter the alarm time (HH:MM) or
select alarm clock to OFF. To silence the alarm press X.

5
English
Registering additional handsets
Every new additional handset must be registered to use the current base unit, when
registered the handset is allocated a handset number between 1-5.
See also the Expanded System chapter for more information.
1. Press and hold 5on the base unit until you hear two beeps.
2. Press wand scroll ({/}) to REGISTER. Press 0.
3. Scroll to REG BASE. Press 0.
4. Select a base unit (1-4) using the handset keypad.
5. Enter the base unit PIN code (0000 by default) when prompted. Press 0.
Important!
Alarm while sounding can be silenced by pressing any keypad button.
Clock and Alarm programming is in 24 hour format.
Name will only be displayed upon terminating a call.
Base menu
1. Press w.
2. Scroll to SETUP using {/}. Press 0.
3. Select a function below using {/}. Press 0.
BASE VOLUME, BASE MELODY, DEL HANDSET, PIN CODE, DIAL
MODE, RECALL, DEFAULT.
4. Modify the selected option using {/}.
5. Press 0toconrm.
Important!
Resetting to factory defaults certain functions will be lost requiring reprogramming ie: Clock, Phone book,
Redial memories etc.
PIN code is 0000 when supplied.
Dial mode default setting is TONE DIAL.
Recall default timing is RECALL 1.

6
English
Expanded system (+1...)
DECT (Digital Enhanced Cordless Telephone) is a digital method of transmission for
cordless telephones. You can:
- Register up to 5 handsets to one single base unit.
This model is also GAP (Generic Access Prole) compatible, which means that the handset and the base unit
can both be used with most other GAP-compatible units irrespective of manufacturer. However, the GAP
protocol does not guarantee all functions will work.
Intercom
1. Press 4.
2. Enter the handset number of the handset that you wish to call, 1-5.
Should an external call be received while an intercom call is in progress, a tone will be heard. Press qto
terminate the call and answer the incoming call.
Transferring/Conference calls between handsets
1. While an external call is connected.
2. Press 4. Enter the handset number of the handset that you wish to call, 1-5.
3. To transfer the call press q, alternatively press #to connect all three parties in a
conference call.
Note:
If you decide not to transfer the call press 4, alternatively wait until the person you intercomed to hang up.
To terminate a conference call press 4twice on either handset, the other handset can then continue the
conversation with the external caller.

7
English
Declaration of conformity
Doro hereby declares that the Doro 720 products conform to the essential requirements
and other relevant regulations contained in the Directive 1999/5/EC(R&TTE), 2002/95/
EC(ROHS). A copy of the manufacturer’s declaration is available at www.doro.com/dofc
Specic Absorption Rate (SAR)
This equipment meets current international safety requirements for exposure to radio
waves. This telephone measures 0.06 W/kg (measured over 10g cloth).
The limit value set by the WHO is 2W/kg (measured over 10g human tissue).
Guarantee
This product is guaranteed for a period of 12 months from the date of purchase. Proof of
purchase is required for any service or support required during the guarantee period.
This guarantee shall not apply to a fault caused by an accident or a similar incident or
damage, liquid ingress, negligence, abnormal usage, not reasonably maintained or any
other circumstances on the purchaser’s part. Furthermore, this guarantee shall not apply
toafaultcausedbyathunderstormoranyothervoltageuctuations.Asamatterof
precaution, we recommend disconnecting the telephone during a thunderstorm.

1
Português
Ligação
1. Ligue o adaptador de corrente e o cabo telefónico às respectivas tomadas na parede.
2. Introduzaaspilhas(AAA1,2V600mAhNiMH)notelefone,certicando-sedeque
respeita as polaridades indicadas.
3. Carregue o telefone com o teclado voltado para fora (24 horas se for a primeira utilização).
Seleccionar o idioma e acertar a hora
4. Prima w. Desloque a selecção até TERMINAL utilizando {/}. Prima 0.
5. Desloque a selecção até LINGUA. Prima 0.
6. Desloque a selecção até ao idioma desejado. Prima 0paraconrmar.
7. Desloque a selecção até ACERT RELOG. Prima 0.
8. Introduza a hora (HH:MM – formato de 24 horas) utilizando as teclas do telefone.
Prima 0.
9. Esta unidade volta ao modo de espera após um curto período de tempo.
Alternativamente, prima C.
Nota!
Utilize apenas o(s) transformador(es) de alimentação eléctrica fornecido(s).
O telefone não funcionará durante os períodos de quebra de fornecimento de energia eléctrica. Certique-se de
que existe uma telefone alternativo que não dependa do fornecimento de energia eléctrica para o poder utilizar
em situações de emergência. Não coloque a unidade base perto de outros equipamentos eléctricos nem em locais
onde que exposta à luz solar directa ou a qualquer outra fonte forte de calor. Isto minimizará o risco de
interferências. É normal que o equipamento aqueça durante o carregamento e isso não o danica. Utilize apenas
pilhas originais. A garantia não cobre qualquer dano provocado pela utilização de pilhas desadequadas.
Alcance da cobertura
Osalcancesespecicadosreferem-sealocaisondeatransmissãoentreotelefoneea
unidade base não encontra obstáculos. Nestas condições ideais, os telefones conseguem
um alcance de até 300 metros. Em áreas densamente povoadas, casas, apartamentos, etc.,
o alcance é inferior. Tente obter a melhor cobertura através do posicionamento da unidade
base.Oslocaisideaissãoosquecammaisaltosenãoobstruídos.Seotelefoneforlevado
para demasiado longe da unidade base durante uma chamada, a qualidade do som diminui
e pode até acontecer que a chamada seja terminada.
Pilhas
Tal como acontece com todas as pilhas, o desempenho destas também pode degradar-se
com o passar do tempo. Se notar que os tempos que o telefone aguenta em conversação
ou em espera estão bastante diminuídos, ou se houver sinais de derrame, deve substituir
as pilhas. A unidade base possui um sistema de carregamento automático que evita que as
pilhassobreaqueçamousedaniquemdevidoacarregamentosprolongados.
Pilhas completamente carregadas (8 horas de carregamento) proporcionam
aproximadamente 200 horas em modo de espera ou 10 horas de conversação. Estes
temposdefuncionamentovericam-seemcondiçõesdetemperaturaambientenormal
para interiores. A capacidade total das pilhas só será alcançada depois de estas terem sido
carregadas 4 ou 5 vezes. O indicador apenas indica carregamento total quando a carga é
superior a 95%.

2
Português
Efectuar uma chamada
1. Introduza o número de telefone pretendido. Pode apagar os enganos premindo C.
2. Prima qpara marcar o número de telefone. Prima qnovamente para terminar a
chamada.
Receber uma chamada
1. Aguarde até que o telefone toque.
2. Prima qpara atender a chamada. Prima qnovamente para terminar a chamada.
Nota!
Será ouvido um som de aviso se o telefone não conseguir obter linha. O problema pode dever-se a pilhas com
pouca carga, bem como ao facto de o telefone estar demasiado distante da unidade base ou ao facto de todos os
canais de transmissão estarem ocupados.
Ligar/desligar o telefone
Para desligar o telefone (visor em branco) ou para o ligar, prima e mantenha a pressão em 1.
Controlo do volume do som
O volume pode ser ajustado durante uma chamada utilizando {/}.
Função de remarcação
Prima re {/}para ver os últimos 10 números marcados. Prima q.
Botão Mute (silenciar)
O microfone pode ser desligado/ligado durante uma chamada, utilizando z.
Bloqueio do teclado.
Prima Ne mantenha a pressão até que apareça Nno visor. Para desactivar o bloqueio
do teclado, prima qualquer botão (aparece PRIMA * no visor) e, em seguida, prima o
botão *paraconrmar.
Chamar o telefone - Paging
Prima 5na unidade base para activar o sinal de chamamento do telefone. O sinal parará
automaticamente quando for premido qno telefone ou 5na unidade base.

3
Português
Lista telefónica
A lista telefónica pode guardar 50 nomes e números de telefone. Se subscrever o serviço de
identicaçãodechamadas,podeseleccionarmelodiasdetoqueespecícasparacadanome/
número e o nome da pessoa que lhe está a ligar aparece no visor quando receber chamadas.
Letras
Cada botão numérico tem atribuídas algumas letras. Estas letras não formam o padrão para
todososidiomas,peloquepoderãofaltaralgunscaracteresespecícosdealgunspaíses.
A lista telefónica também é ordenada de acordo com a ordem dos botões.
Prima 1 para inserir um espaço e prima Cpara apagar.
Guardar nomes/números na lista telefónica
1. Prima 0. Aparece LISTA TELEF no visor. Prima 0.
2. Aparece ADIC NOME no visor. Prima 0.
3. Introduza um nome premindo repetidamente os botões numéricos. Prima 0.
4. Introduza o número de telefone, incluindo o indicativo de zona. Prima 0.
5. Seleccione uma melodia de toque utilizando {/}. Prima 0.
6. O telefone voltará ao modo de espera. Alternativamente, prima Crepetidamente.
Marcar através da lista telefónica
1. Prima b.
2. Desloque a selecção pelas entradas utilizando {/}. Para procurar mais rapidamente,
prima o botão numérico que corresponde à primeira letra.
3. Prima qpara o telefone marcar o número.
Alterar nomes/números de telefone
1. Prima 0. Aparece LISTA TELEF no visor. Prima 0.
2. Desloque a selecção com {/}até MODIF NOME. Prima 0.
3. Desloque a selecção pelas entradas. Prima 0.
4. Corrija o nome utilizando Ce o teclado. Prima 0.
5. Corrija o número utilizando Ce o teclado. Prima 0.
6. Seleccione uma melodia de toque utilizando {/}. Prima 0.
7. O telefone voltará ao modo de espera. Alternativamente, prima Crepetidamente.
Apagar uma entrada da lista telefónica
1. Prima 0. Aparece LISTA TELEF no visor.
2. Prima 0.
3. Desloque a selecção com {/}até APAGAR NOME. Prima 0.
4. Desloque a selecção pelas entradas. Prima 0.
5. Prima 0.
6. A unidade volta ao modo de espera após um curto período de tempo.
Alternativamente, prima C.

4
Português
Novas chamadas (memória* de identicação de chamadas)
Aidenticaçãodechamadaspermite-lhevernovisoronomedapessoaquelheestáa
telefonar e também os números das últimas 40 chamadas recebidas. As novas chamadas são
indicadas com um Tintermitente no visor quando o telefone está em modo de espera.
Nota!
Para que sejam apresentados os números, é necessário que subscreva o serviço de identicação de chamadas
do seu operador de rede e que essa subscrição esteja activa. Contacte o seu operador de rede para obter mais
informação.
Recuperar números recebidos e fazer chamadas para eles
Otelefoneemiteumsinalsonorobemaudívelquandosechegaaonalouaoiníciodalista.
1. Prima }. Desloque a selecção pelos nomes/números apresentados, utilizando {/}.
2. Prima qpara marcar o número seleccionado. Alternativamente, prima X
repetidamente.
Mensagensdeidenticaçãodechamada
NÃO DISPONIV
/NACIONAL INT Chamada internacional ou originária de uma central telefónica PBX
(nenhuma informação recebida).
PENDENTE Número bloqueado ou oculto, possivelmente originário de um PBX.
Apagar números
1. Prima }. Desloque a selecção pelos nomes/números apresentados, utilizando {/}.
2. Prima Cpara apagar ou prima e mantenha a pressão em Cpara apagar tudo.
3. Prima 0.
Guardar números na lista telefónica
1. Prima }. Desloque a selecção pelos nomes/números apresentados, utilizando {/}.
Prima 0.
2. Prima 0. Aparece ADICIONAR? no visor. Prima 0.
3. Introduza um nome premindo repetidamente os botões numéricos. Prima 0.
Menu Terminal
1. Prima w. Desloque a selecção até TERMINAL utilizando {/}. Prima 0.
2. Seleccione uma função utilizando {/}. Prima 0.
VOL TOQUE IN, VOL TOQUE EX, MELODIA INT, MELODIA EXT,
TOQUES, LINGUA, ACERT RELOG, ACERT ALARM, ATEND.AUTO,
NOME, TEC.BLOQ ?.
3. Modiqueaopçãoseleccionadautilizando{/}. Prima 0.
ACERT ALARM: Activar o relógio despertador (ON) e introduzir a hora do despertar
(HH:MM), ou desactivar o relógio despertador (OFF). Prima Xpara silenciar o
despertador.

5
Português
Registar telefones adicionais
Todos os telefones adicionais têm de ser registados na unidade base para poderem ser
utilizados. Cada telefone recebe um número de 1 a 5 quando é registado.
Consulte também o capítulo “Sistema expandido” para obter mais informação.
1. Prima e mantenha a pressão em 5na unidade base até ouvir dois bips.
2. Prima we desloque a selecção até REGISTO com {/}. Prima 0.
3. Desloque a selecção até BASE REGIST. Prima 0.
4. Seleccione uma unidade base (1-4) utilizando o teclado do telefone.
5. IntroduzaocódigoPINdaunidadebase(0000porpredenição)quandoestelhefor
pedido. Prima 0.
Importante!
Quando o alarme estiver a tocar, pode ser silenciado premindo qualquer botão.
A programação do relógio e do alarme é feita no formato de 24 horas.
O nome só será apresentado após terminar a chamada.
Menu Base
1. Prima w.
2. Desloque a selecção até CONFIG utilizando {/}. Prima 0.
3. Seleccione uma das seguintes funções utilizando {/}. Prima 0.
VOLUME BASE, MELODIA BASE, APAGAR TERM, COD. ACESSO,
MODO MARC, CHAMAR NOVO, DE FABRICA.
4. Modiqueaopçãoseleccionadautilizando{/}.
5. Prima 0paraconrmar.
Importante!
A reposição das predenições de fábrica faz com que se percam algumas funções, sendo necessário reprogramá-
las. Por exemplo: relógio, lista telefónica, memórias de marcações, etc.
O código PIN é 0000 quando o telefone é fornecido.
O modo de marcação predenido é TONS.
A repetição de chamada predenida é CHAMAR NOVO1.

6
Português
Sistema expandido (+1...)
O sistema DECT (Digital Enhanced Cordless Telephone) é um método digital para
transmissãoentretelefonessemos.Pode:
- registar até 5 telefones em cada unidade base.
Este modelo também é compatível com a norma GAP (Generic Access Prole – perl de acesso genérico), o
que signica que o telefone e a unidade base podem ser utilizados em conjunto com a maior parte das unidades
compatíveis com a norma GAP, independentemente de quem for o fabricante. No entanto, o protocolo GAP
não garante que todas as funções funcionem.
Intercom – chamas internas
1. Prima 4.
2. Introduza o número atribuído ao telefone para o qual deseja fazer uma chamada (1-5).
Será ouvido um sinal sempre que for recebida uma chamada externa e estiver em curso uma chamada
intercom. Prima qpara terminar a chamada interna e atender a chamada externa.
Transferir chamadas/conferência entre telefones
1. Quando estiver estabelecida uma chamada externa.
2. Prima 4. Introduza o número atribuído ao telefone que deseja chamar (1-5).
3. Prima qpara transferir a chamada ou prima #paraquetodasastrêspartesquem
em conferência.
Nota:
Se decidir não transferir a chamada, prima 4. Alternativamente, aguarde até que a pessoa para quem fez a
chamada interna desligue o telefone.
Prima 4 duas vezes em qualquer telefone para terminar a conferência. O outro telefone pode continuar a
conversação na chamada externa.

7
Português
Declaração de conformidade
A Doro declara neste documento que o produto Doro 720 está em conformidade com
os requisitos essenciais e com outros regulamentos relevantes contidos nas Directivas
1999/5/CE (R&TTE) e 2002/95/CE (ROHS). Está disponível uma cópia da declaração do
fabricante em www.doro.com/dofc
Taxa de absorção especíca (SAR - Specic Absorption Rate)
Este equipamento satisfaz os requisitos internacionais de segurança actuais relativamente à
exposição a ondas de rádio. Neste telefone mediu-se o valor de 0,06 W/kg (medição sobre
tecido de 10g).
OlimitedenidopelaOMSéde2W/kg(mediçãosobretecidode10g).
Garantia
Este produto tem garantia por um período de 12 meses a partir da data de compra. A
prova de compra é necessária para qualquer serviço ou assistência que seja necessário
prestar durante o período de garantia.
Esta garantia não se aplicará a anomalias provocadas por acidente ou incidente semelhante,
nem a danos, entrada de líquidos, negligência, utilização anormal, falta de manutenção
razoável ou outras circunstâncias cuja responsabilidade seja atribuível ao comprador. Esta
garantia também não se aplicará a anomalias provocadas por tempestades com relâmpagos
ououtrasutuaçõesnofornecimentodecorrenteeléctrica.Comomedidadeprecaução,
recomendamos que o telefone seja desligado durante as tempestades com relâmpagos.

1
Magyarul
Csatlakoztatás
1. Csatlakoztassaahálózatitápegységetésatelefonzsinórtamegfelelőfalialjzathoz.
2. Helyezze be az akkumulátorokat (AAA 1,2 V-os, 600 mAh kapacitású NiMH) a
kézibeszélőbe,ügyelveahelyespolaritásra.
3. Töltseakézibeszélőtelőrefordítottbillentyűzettel(elsőalkalommal24óránát).
Anyelvésazidőbeállítása
4. Nyomja meg a wgombot. Lépjen a KÉZI BESZÉLŐ pontra a {/}gombokkal.
Nyomja meg az 0gombot.
5. Lépjen a NYELV pontra. Nyomja meg az 0gombot.
6. Lépjen a kívánt nyelvre. Nyomja meg az 0gombotamegerősítéshez.
7. Lépjen az ÓRA BEÁLLÍTÁS pontra. Nyomja meg az 0gombot.
8. Adjamegazidőt(ÓÓ:PP,24órásformátumban)akézibeszélőbillentyűzetén.
Nyomja meg az 0gombot.
9. Akészülékkisvártatvavisszatérkészenlétiüzemmódba,illetveaCgomb többszöri
megnyomásával kézzel is visszakapcsolható.
Fig yelem!
Csak a mellékelt hálózati tápegység(eke)t használja.
Áramszünet esetén a telefon nem működik. Gondoskodjon róla, hogy vészhelyzet esetére mindig rendelkezésre
álljon egy olyan telefon, amelyet nem szükséges a villamos hálózatra kapcsolni.
Ne helyezze a bázisegységet más elektromos készülék közelébe, illetve olyan helyre, ahol az közvetlen
napsugárzás vagy más hőforrások hatásának lehet kitéve. Ezzel minimalizálható az interferencia veszélye.
Töltés közben a készülék felmelegszik; ez normális jelenség, nem tesz kárt a készülékben. Csak eredeti
akkumulátorokat használjon. A jótállás nem terjed ki a nem megfelelő akkumulátor használata okozta károkra.
Hatótávolság
Amegadotthatótávolságakkorérvényes,haakézibeszélőésabázisegységközöttiátvitelt
semmisemakadályozza.Ilyenideáliskörülményekközöttakézibeszélő300méteres
körzetbenhasználható.Sűrűnlakottterületen,házban,lakásbanstb.ahatótávolság
kisebb. A bázisegység áthelyezésével próbálja meg megtalálni a legjobb hatótávolságot; a
bázistalegjobbolyan,magasanfekvőhelyretelepíteni,amelykörülnincsenekakadályok.
Haakézibeszélőahívássorántúlságosanmesszekerülabázisegységtől,rosszabblesza
hangminőség,svégülmegszakadahívás.
Elemek
Ezekteljesítménye,mintmindenakkumulátoré,idővelgyengülhet.Hajelentősencsökken
abeszéd-vagyakészenlétiidő,vagyhaszivárgástészlel,akkorcseréljenakkumulátort.
Azalapegységautomatikustöltőmechanizmussalrendelkezik,amelymegakadályozzaaz
akkumulátoroktúltöltésétvagyameghosszabbítotttöltésbőlfakadómegsérülését.
Ateljesfeltöltés(8óra)körülbelül200óráskészenlétiidőtésmintegy10órásbeszélgetési
időtbiztosít.Ezekazüzemelésiidőkszobahőmérsékletenérvényesek.
Az akkumulátorok csak 4-5 feltöltés után érik el teljes kapacitásukat.
Atöltöttségjelzőcsakakkorjelezteljeskapacitást,haatöltöttség>95%.

2
Magyarul
Hívás kezdeményezése
1. Írja be a kívánt telefonszámot. A hibás számjegyeket a Cgomb megnyomásával törölheti.
2. Nyomja meg a qgombot a telefonszám tárcsázásához. A hívás befejezéséhez
ugyancsak a qgombot nyomja meg.
Hívás fogadása
1. Várjon,amígcsengeninemkezdakézibeszélő.
2. A hívás fogadásához nyomja meg a qgombot. A hívás befejezéséhez ugyancsak a
qgombot nyomja meg.
Fig yelem!
Ha a készülék nem tud csatlakozni a vonalra, ezt gyelmeztető hang jelzi. A problémát a következők
okozhatják: alacsony telepfeszültség, a kézibeszélő túl messze van az alapegységtől vagy az összes átviteli
csatorna foglalt.
A kézibeszélő be-ki kapcsolása
Akézibeszélőkikapcsolásához(üreskijelző)vagybekapcsolásáhoztartsanyomvaa1
gombot.
Hangerő-szabályozás
Hívás közben a {/}gombokkalmódosíthatóahangerő.
Újrahívás funkció
A rés a {/}gombokkalválaszthata10legutóbbhívottszámközül.Nyomjamega
qgombot.
Némítás gomb
Telefonálás közben a zgombbal ki-be kapcsolható a mikrofon.
Billentyűzár
Tartsa nyomva a Ngombot,mígakijelzőnmegnemjelenikaNjelzés.Abillentyűzár
kikapcsolásához nyomjon meg egy gombot (NYOMJON *-t jelenik meg), majd
megerősítésképpennyomjamega*gombot.
Személyhívó funkció
A személyhívó jel aktiválásához nyomja meg a bázisegység 5gombját. A jelzés a
kézibeszélőqgombjával vagy a bázisegység 5gombjával kapcsolható ki, illetve egy
időutánautomatikusanleáll.

3
Magyarul
Telefonkönyv
Atelefonkönyvben50névéstelefonszámtárolható.Haelőzetahívóazonosító
szolgáltatásra,azegyesnevekhez/számokhozkülönbözőcsengődallamrendelhető,és
bejövőhíváseseténmegjelenikahívófélneve.
Betűk
Mindenszámgombhozmeghatározottbetűktartoznak,ígybizonyosspeciáliskarakterek
azonbannemelérhetők.
Atelefonkönyvbejegyzéseineksorrendjeugyancsakabetűrendetköveti.
Szóköz beszúrásához az 1, törléshez a Cgombot nyomja meg.
Nevek és számok mentése a telefonkönyvbe
1. Nyomja meg az 0gombot. Megjelenik a TELEFONKÖNYV felirat. Nyomja meg az
0gombot.
2. Megjelenik az ÚJ BEJEGYZÉSmenüpont.Nyomjamegaz0gombot.
3. Írja be a nevet a számgombok (többszöri) megnyomásával. Nyomja meg az 0gombot.
4. Írjabeatelefonszámot,körzetszámmalegyütt.Nyomjamegaz0gombot.
5. Válasszakiakívántcsengődallamota{/}gombokkal. Nyomja meg az 0gombot.
6. Akézibeszélővisszatérkészenlétiüzemmódba,illetveaCgomb többszöri
megnyomásával kézzel is visszakapcsolható.
Tárcsázásatelefonkönyvből
1. Nyomja meg a bgombot.
2. Lépjen ({/}) a telefonkönyv kívánt bejegyzésére. Gyorskereséshez nyomja meg a
névelsőbetűjénekmegfelelőgombot.
3. A megjelenített szám tárcsázásához nyomja meg a qgombot.
Telefonszámok és nevek módosítása
1. Nyomja meg az 0gombot. Megjelenik a TELEFONKÖNYV felirat. Nyomja meg az
0gombot.
2. Lépjen ({/}) a BEJEGY MÓDOS elemre. Nyomja meg az 0gombot.
3. Lépjen a kívánt bejegyzésre. Nyomja meg az 0gombot.
4. Javítsa ki a nevet a Cgombbal és a számgombokkal. Nyomja meg az 0gombot.
5. Javítsa ki a számot a Cgombbal és a számgombokkal. Nyomja meg az 0gombot.
6. Válasszakiakívántcsengődallamota{/}gombokkal. Nyomja meg az 0gombot.
7. Akézibeszélővisszatérkészenlétiüzemmódba,illetveaCgomb többszöri
megnyomásával kézzel is visszakapcsolható.
Telefonkönyv-bejegyzés törlése
1. Nyomja meg az 0gombot. Megjelenik a TELEFONKÖNYV felirat.
2. Nyomja meg az 0gombot.
3. Lépjen ({/}) a BEJEGY TÖRÖL elemre. Nyomja meg az 0gombot.
4. Lépjen a kívánt bejegyzésre. Nyomja meg az 0gombot.
5. Nyomja meg az 0gombot.
6. Akészülékkisvártatvavisszatérkészenlétiüzemmódba,illetveaCgomb többszöri
megnyomásával kézzel is visszakapcsolható.
Other manuals for 720
2
Table of contents
Languages:
Other Doro Telephone manuals

Doro
Doro MemoryPlus 319ph User manual

Doro
Doro PAYPHONE ZIRCON User manual

Doro
Doro NEOBIO 10 User manual

Doro
Doro Congress 100 User manual

Doro
Doro AUB 3 User manual

Doro
Doro MemoryPlus 319ph User manual

Doro
Doro PhoneEasy 311cs User manual

Doro
Doro Arc 6 User manual

Doro
Doro 501 User manual

Doro
Doro congress 205 User manual