RCA F19627YX1L User manual

Tel mm
ion
User's G ide
Changing Entertainment. _=n.

WARNING
To reduce the risk of fire or
electric shock, do not expose
this TV to rain or moisture.
To reduce the risk of electric shock, do not remove
cover (or back). No user serviceable parts inside.
Refer servicing to qualified service personnel.
_This symbol indicates
"dangerous voltage" inside
the product that presents a
risk of electric shock or
_This symbol indicates
important instructions
accompanying the product.
personal injury.
Caution: To prevent electric shock, match wide blade of
plug to wide slot, fully insert.
Attention: Pour eviter les chocs 61ectriques, introduire
la lame la plus large de la fiche dans la borne
correspondante de la prise et pousser jusq0 au fond.
Refer to the identification/rating label located on the back panel of your
product for its proper operating voltage.
FCCRegulations state that unauthorized changes or modifications to this
equipment may void the user's authority to operate it.
If fixed (non-moving) images are left on the screen for long periods,
they may be permanently imprinted on the picture tube. Such
images include network Iogos, phone numbers, and video games.
This damage is not covered by your warranty. Extended viewing of
channels displaying these images should be avoided.
Cable TV Installer: This reminder is provided to call your attention to
Article 820-40 of the National Electrical Code (Section 54 of the Canadian
Electrical Code, Part 1) which provides guidelines for proper grounding and,
in particular, specifies that the cable ground shall be connected to the
grounding system of the building as close to the point of cable entry as
practical.
Product Registration
Please fill out the product registration card and return it immediately. Returning the card allows usto contact
you if needed.
Keep your sales receipt to obtain warranty parts and service and for proof of purchase. Attach it here and record
the serial and model numbers in case you need them. The numbers are located on the back of the television.
Model No.
Serial No.
Purchase Date:
Dealer/Address/Phone:
G-LINK, VCR Plus+, C3,PlusCode, GUIDE Plus+, and GUIDE Plus+ Gold are trademarks of Gemstar Development
Corporation.
The GUIDE Plus+ Gold system is manufactured under license from Index Systems Inc.
Thomson Consumer Electronics and Gemstar are not in any way liable for the accuracy of the program information
provided by the GUIDE Plus+ System. In no event shall Thomson Consumer Electronics or Gemstar be liable for any
amount representing loss of profits, loss of business, or indirect, special, or consequential damages in connection
with the provision or use of any information equipment, or services relating to the GUIDE Plus+ System.

Jn r@ducti@n
Key Features Overview
Your TV is equipped with fl.atures that will add to your TV viewing experience. The lk_lk)wing
infbrmation sumnmrizes a llew of these teatures. Chapter 3 provides more inlnrmation about tile
rest of the TV's fl.atures and how to use them.
On-screen Program Guide
Description: The GUIDE Plus+ system is an on-screen interactive list of
programs and inlnrmation that is built into your TV. You can scroll through tile
guide to see what's on and tune direc/ly to that program from tile guide. You
can also browse programs by category with tile sort l)ature.
When you access tile Nc,w._ fl'ature, MSNBC will appear in your video window
if it's available through your TV.
One-Touch VCR Recording is another benefit of tile GUIDE Plus+ system. YOu
don't have to remenlber to program your VCR or use tile menus in your VCR
to set up a recording.
Requirements:
• Remove tile Demn I in lrom tile G-LINK jack,
• Complete the on-screen interactive setup. You'll lind detailed instructions
in Chapter 1.
• One-'lbuch VCR Recording: You must connect tile G-LINK cable to tile TV
and place one nt the wands in fl'ont nt the remote sensor on tile VCR.
• If you have a cable Ix)x, connect tile G-LINK cable to tile TX_and place
one of the wands in frnnt ol tile remote sensor on the cable box.
V-Chip: Parental Controls
Description: You can block programs and innvies by content, age-based
ratings, and/or movie ratings.
Requirements:
• Set up the t_m_t_l Co_trot.s in(_nu in tile TV's main m_,nu (Chapter 3
has details).
• The broadcasters must use tile rating system when they send tile program
to your TV in order lk_ryour TV to block tile program.
Auto Tuning
Description: Alk)ws you to set up the TV to autnnlatically tune to a specific
7
channel when you press a certain component (\ CR, DVD Player, etc.) button
on the remote.
Requirements: Set up Azdo Tzcni_zg in tile TV's menu system. (Chapter 3
has details).
1

Jn_r@ducti@n
(This page intentionally left blank)
2

ble @f C@nten s
Introduction
Key Features Overview .................................................................................................... 1
On-screen Program Guide ......................................................................................... 1
V-Chip: Parental Controls ........................................................................................... 1
Auto Tuning ................................................................................................................ 1
Chapter 1: Connections & Setup
Things to Consider Before You Connect ......................................................................... 6
Protect Against Power Surges ................................................................................... 6
Protect Components from Overheating ................................................................... 6
Position Cables Properly to Avoid Audio Interference ............................................ 6
Important Stand and Base Safety information ........................................................ 6
Use Indirect Light ....................................................................................................... 6
Connection Pictures ................................................................................................... 6
Demo Pin .................................................................................................................... 6
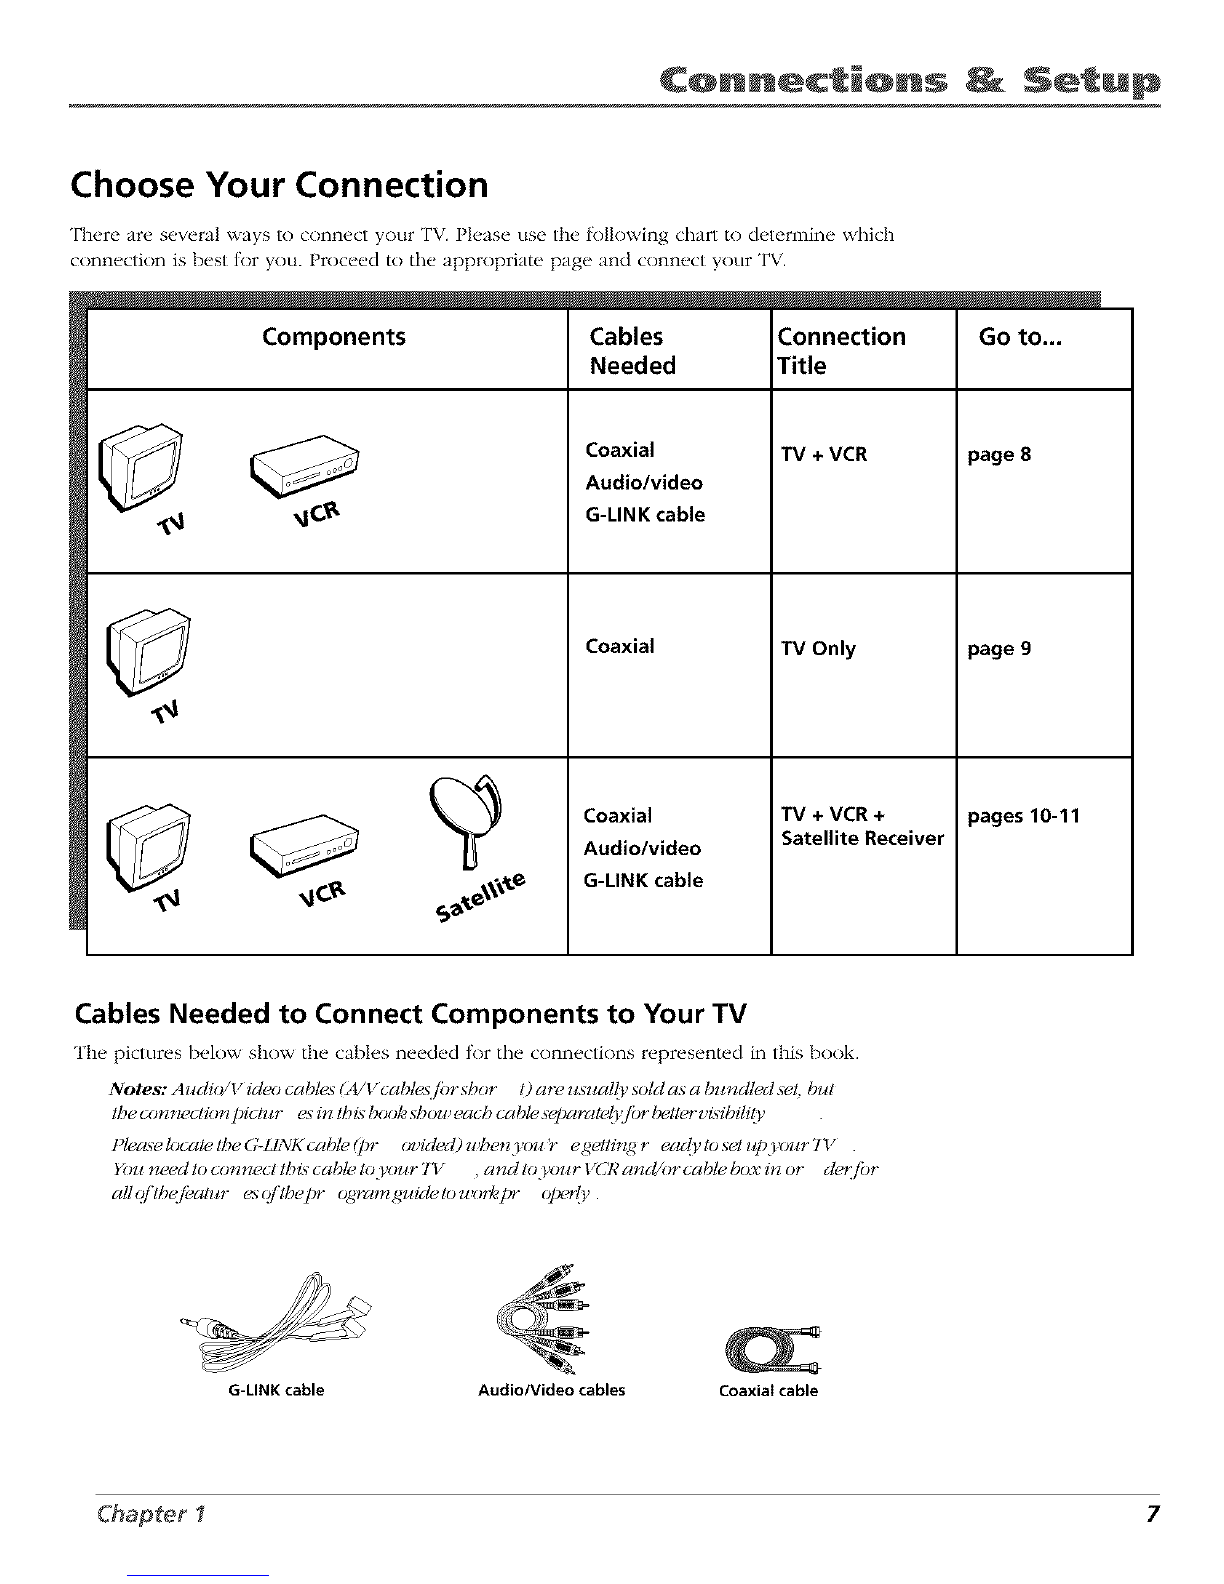
Choose Your Connection .................................................................................................. 7
Connection: TV + VCR....................................................................................................... 8
Connection: TV Only ......................................................................................................... 9
Connection: TV + VCR + Satellite Receiver ................................................................... 11
Jacks on the Back of Your TV ......................................................................................... 12
The Front of Your TV ...................................................................................................... 13
Why You Should Connect This G-UNK Cable ............................................................... 14
How to Find the Remote Sensor ............................................................................. 14
Placing the G-LINK Wands ....................................................................................... 14
Complete the Interactive Setup ..................................................................................... 16
Set the Menu Language .......................................................................................... 16
Complete Auto Channel Search .............................................................................. 16
The GUIDE Plus+ System Setup ................................................................................ 17
What to Expect ............................................................................................................... 22
Next Steps ....................................................................................................................... 22
Chapter 2: Using the Remote Control
The Buttons on the Remote Control ............................................................................. 24
Using the WHO.INPUT Button ................................................................................ 25
Programming the Remote to Operate Other Components ......................................... 26
Find Out If You Need to Program the Remote ....................................................... 26
How to Program the Remote .................................................................................. 26
Now to Use the Remote After You've Programmed It ................................................ 27
Chapter 3: Using the TV's Features
About the GUIDE Plus+ System ..................................................................................... 30
Downloading Data ................................................................................................... 30
Getting In & Out of the GUIDE Plus+ System ......................................................... 31
The GUIDE Plus+ System Menus .............................................................................. 31
Grid Guide ................................................................................................................ 31
Sort ............................................................................................................................ 33
News .......................................................................................................................... 34
3

ble @f C@nten s
Schedule .................................................................................................................... 34
Messages ................................................................................................................... 35
Channels ................................................................................................................... 36
Setup ......................................................................................................................... 36
How to Get More Information About an Advertisement or a Program ............... 37
GUIDE Plus+ Menu Items ............................................................................................... 37
Channel Banner .............................................................................................................. 38
Why You Should Use the Auto Tuning Feature ............................................................ 38
How to Set Up the Auto Tuning Feature ................................................................ 38
Parental Controls and V-Chip ......................................................................................... 40
How V-Chip Works ................................................................................................... 40
V-Chip TV Rating Limit ............................................................................................. 41
Blocking Specific Content Themes .......................................................................... 43
Viewing Specific Content Themes ........................................................................... 44
V-Chip Movie Rating Limit ....................................................................................... 45
V-Chip Unrated Program Block ............................................................................... 46
Channel Block ........................................................................................................... 46
Front Panel Block ..................................................................................................... 46
Lock/Unlock Parental Controls ................................................................................ 46
Chapter 4: Using the TV's Menu System
How to Use Your TV's Menu System ............................................................................. 48
Audio Menu .................................................................................................................... 48
Picture Quality Menu ..................................................................................................... 49
Screen Menu ................................................................................................................... 50
Using Closed Captioning ................................................................................................ 50
Channel Menu ................................................................................................................. 51
Time Menu ...................................................................................................................... 52
Chapter 5: Other Information
Troubleshooting .............................................................................................................. 54
Care and Cleaning .......................................................................................................... 57
RCATV Limited Warranty .............................................................................................. 57
Index ................................................................................................................................ 61
4

1
Connections &Setup
Chapter Overview:
• Things to Consider Before You Connect
•Choose Your Connection
•Connections
•Jacks on the Back of Your TV
•The Front of Your TV
•Why You Should Connect This G-LINK Cable
• Plug in theTV
• Put Batteries in the Remote
•How to Use the Remote Control to Complete the
Interactive Setup
•Turn on the TV
• Complete the Interactive Setup
Changing Entertainment. Again.
5

C@nnecti@ns Setup
Things to Consider Before You Connect
Protect Against Power Surges
• Connect all components betore you plug any of their power cords into the wall outlet.
• Turn off the TV and/or component betk)re you connect or disconnect any cables.
• Make sure all antennas and cables are properly grounded. Reti, r to the Important
Sali, guards sheet packed with your TV.
Protect Components from Overheating
• Don't block ventilation holes on any ot the components. Arrange the components so that
air can circulate ficeely.
• Don't stack components.
• When you place components in a stand, make sure you allow adequate ventilation.
• If you connect an audio receiver or amplifier, place it on the top shelf so the heated air
from it won't flow around other components.
Position Cables Properly to Avoid Audio Interference
• Insert each cable firmly into the designated jack.
• If you place components above the TV, route all cables down the side of the back ot the
TV instead of straight down the middle of the back of the TV.
• If your antenna uses 300-ohm twin lead cables, do not coil the cables. Also, keep the twin
lead cables away from audio/video cables.
Important Stand and Base Safety Information
Choos_, the location tor your TV carefully. Place the TV on a stand or bas_, that is ot adequate
size and strength to prevent the TV ficom being accidentally tipped over, pushed ofl, or pulled
• 7
off. This could cause personal injury and/or damage the T\. Reler to the Important Sail, guards
sheet packed with your TV.
Use Indirect Light
Don't place the TV where sunlight or room lighting will be directed toward the screen. Use soft
or indirect lighting.
Connection Pictures
Audio/video cables are usually bundled together. For better visibility,/he connection pictures in
this book show each cable separately (audio letS, audio right, and video).
Demo Pin
You must remove the Demo Pin ficom the G-LINK jack on the back ot
7
your T_, in order |k)r your TV to operate properly and to connect the
G-LINK cable.
6Chapter1

C@nnecti@ns Setup
Choose Your Connection
There are several ways to connect your TV. Please use the lk)llowing chart to determine which
connection is best tor you. Proceed to the appropriate page and connect your TV.
Components Cables
Needed
Coaxial
Audio/video
G-LINK cable
Coaxial
Coaxial
Audio/video
G-LINK cable
Connection
Title
TV+ VCR
"IV Only
TV +VCR+
Satellite Receiver
page 8
page 9
pages10-11
Cables Needed to Connect Components to Your TV
The pictures below show the cables needed tor the connections represented in this book.
Notes: Aucli(2/V iclcx) cables (A/Vcabtesf!)r sbor 1)are z#;ualli, soM as a buncltedset, but
tbecon_ectio_U)ictur esintbisbooksbou_eacbcablesel)aratdj'jbrl_U*,rvidbiti 9,
t)lec_elocatetbeG-LINKcabte(t)r ovided)u_etzyoJ#r egetdn_,gr ea@tosetupyoJ_rTY .
You need to ccmnect lbi_ cable Io,_ur 7"v_ , and Io,_)ur VCR a_M/or cable box in or cl_jbr
all(//'lbefi_a/_¢r esq/'/bepr o_ramguicletou_(,¢_t_" olx_rty.
G-LINK cable Audio/Video cables Coaxiaicable
Chapter I7

C@nnecti@ns Setup
TV(backpanel)
VIDEO
R L
AIIOIO
RL
__CABLE/
OuIINFROM_ANT CH3
From Cable
or ARteRga
Connection: TV + VCR
1. Connect your TV to your VCR
2.
.
A. Connect a coaxial cable to the CABLE/ANTENNA jack on your TV and to the Output Jack on
your VCR (sometimes labeled OLT TO TV).
B. Connect the audio/video cables. Connect audio cables (white and red) to the AtDIO IN jacks
on the back of the TV (R and L) and to the Audio Output Jacks on the VCR (sometimes labeled
OLT R L).
C. Connect the video cable (yellow) to the VIDEO IN jack on the back ot the TV and to the Video
Output Jack on the VCR.
Connect cable or antenna to your VCR
Connect the coaxial cable froln your cable outld, cable box, or antenna to the Input Jack on your
VCR (sometimes labeled IN FP,OM ANTENNA or IN FROM ANT).
Connect the G-LINK cable to the TV
A. If you haven't already done so, remove tile Demo Pin tkom tile G-LINK jack,
B. Connect the G-LINK cable to the G-LINK jack on the TV. Next step, place one of the wands of
the G-LINK cable to work with your VCR (instructions are on p. 14).
Go to page 14
8Chapter1

C@nnecti@ns Setup
TV(backpanel)
VIDEO RAUDIO L
FromCable,
CableBox,
orAntenna
Connection: TV Only
1. Connect the TV to your cable or antenna
Connect tile coaxial cable f_comyour cable or antunna to the CABLE/ANTENNA jack on the back
of your TV.
Go to page 15
2. If you're connecting a cable box, connect the G-LINK cable
A. If you haven't already don(. so, remow, the Demo Pin from the. G-LINK jack.
B. Connect the G-LINK cable to the G-LINK jack on the TV. Next step, place the wands of the
G-LINK cable to the cable box (instructions are on p. 14).
Go to page 14
Chapter I9

C@nnecti@ns _ Setup
SATELLITERECEIVER FromCableorAntenna
OUT
VIDEO R L
IN FROM ANT
OUT TOTV SATELLITE
IN
CH3
CH4[_
VCR Satellite
Signal
VIDEO
OUTTO TV
TV (back panel)
VIDEO RL
I_ _ _1'_
G-LI_K
10 Chapter I

C@nnecti@ns Setup
Connection: TV + VCR + Satellite Receiver
1. Connect your Satellite Receiver to your 'IV
A. Connect the audio/video cables. Connect the audio cables (white and red) to the AUDIO
IN jacks on the back of the TV (t{ and L) and to the Audio Output Jacks on the Satellite
Receiver.
B. Connect the video cable (yellow) to the VIDEO IN jack on the back of the TV and to the
Video Output Jack on the satellite receiver.
2. Connect coaxial cables to the Satellite Receiver
A. Connect the coaxial cable t_cnm your cable outlet, cable box, or antenna to the Input Jack
on your satellite receiver (sometimes labeled IN FROM ANT).
B. Connect the coaxial cable t_cnm your satellite dish antenna to the Input Jack on your
satellite receiver (sometimes labeled SATELLITE IN).
3. Connect the Satellite Receiver to the VCR and to the TV
A. Connect a coaxial cabh, to the Output Jack (sometimes labeled OUT TO TV) on tile
satellite receiver and to the Input Jack on the VCR (sometimes labeled IN FROM ANT),
B. Connect a coaxial cable to/he Output Jack on the VCR (sometimes labeled OUT TO TV)
and to the CABLE/ANTENNA jack on the TV.
4. Connect G-LINK cable
A. If you haven't done so, remove the Demo Pin tknm the G-LINK jack,
B. Connect the G-LINK cable to the G-LINK jack on the TV. Next step, place one of the
wands of the G-LINK cable to work with your VCR (instructions are on p. 14).
Go to page 14
Chapter I11

C@nnecti@ns _ Setup
Jacks on the Back of Your TV
If you are connecting many components, please consult the manual that came with each
component K)r connection instructions. The picture of your TV's back panel describes tile jacks
on the back of your TV and what types of components that you can connect to these jacks.
When connecting, make sure you connect Output jacks to Input jacks, Video to Video, Right
Audio to Right Audio, etc.
TV
backpanel)
Audio and Video Input Jacks:
AUDIO R and Land VIDEO
Conn(,ct any of th(, tollowing conlpon(,nts:
• r)VD Player * Satellite Receiver
• Laserdisc Player * VCR
• Internet Access Device
"1_)watch the content t_om tile component that's
connected to the VIDEO Input Jack, press the
WHO * INPtT button on the remote (the TV switche_
to the correct channel). /
AUDIO
VIDEO R L
G-LINK
G-LINK Jack
Connect tile end of the
G-LINK cable (provided) to this
jack. The G-LINK cable enables
the TV's Guide Plus+ system to
interact wilh the cable box and/
or the VCR. A picture of tile
G-LINK cable is on page 7.
_CABLE/
ANTENNA
l
CABLE/ANTENNA Jack
Connect tile coaxial cable from
tile VCR's Output jack to this
jack. If you're not connecting a
VCR, connect a coaxial cable
that carries the signal from tile
antenna, cable, or cable box to
the CABLE/ANTENNA jack.
12 Chapter1

C@nnecti@ns Setup
The Front of Your TV
Front Panel
It yOU can't lind your remote control you can use the buttons on your TV to
operate many nt the TVs fl_atures.
MENU Brings up the TV MAIN MENU. When in the menu system, it selects
highlighted items. Also returns you to the previous menu. Press and hnM MEN{
tnr two seconds to access the GUIDE Plus+ system.
CH v Scans down through the current channel list. When you're using tile TV's
menu system, it acts like the arrow down button on the remote cnntrol.
CH A Scans up through the channel list. When you're using tile TV's menu
system, it acts like the arrow up button on the remote control
VOL-- Decreases the volume. When you're using tile TV's menu system it acts
like tile left:arrow button on the remote control.
VOL + Increases tile w)lume. When you're using the TV's menu system, it acts
like the right arrow button on the remote control.
POWER Turns the TV on and off.
IVIDEO L/MONO R I
(Not available on model F19627)
Front Panel Jacks (Not available on model F19627)
You can ac'c_,ss the component you connected by pressing the WHO* INPUT
button on your remote until FRNT appears on tile screen.
7
VIDEO (in) Allows you to connect a component such as a \ CP,, camcorder or
Internet access device.
L/MONO (left audio) and R (right audio) Receives audio signals t_com
another component such as a VCR, camcorder or Internet access device.
Chapter I13

C@nnecti@ns Setup
Why You Should Connect This G-LINK Cable
The G-LINK cable enables the GUIDE Plus+ system (the on-screen interactive program guide) to
wnrl,: with your VCR and/or cable box,
Cable Box- If your TV is connected to a cable box you nltlSt connect the G-LINK cable to
receive TV program listings tk)r your area and to tune directly to a channel when the program
guide is on your TV screen.
VCR-- If your TV is connected to a VCR and you don't connect the G-LINK cable, nne-tnuch VCR
recording won't work. The other l_,atures nlthe guide will work properly.
G_LINK wands
How to Find the Remote Sensor
YOUhave lo place the G-LINK wands in front of the remote sensor on the VCR and/or cable box.
Some cable boxes and VCRs have the remote sensor labeled on the unit. If the remote sensor
isn't labeled on your VCR and/or cable box, you need to use the remote cnntrnl that came with
the VCR and/or cable box to locate the sensor.
1. Turn off the VCR and/or cable bnx.
2. Hold the remote control (not the one that came with your TV, but the one that came with
the cable box and/or VCt{ to which you're attaching the G-LINK cable) so that it is touching
the front of the component.
3. Slowly move the remote control across the trnnt nt the component (VCR or cable box) while
you press the power button on and off, YOu nmst press and release the power button each
time you move the remote (holding down the button won't work).
/i.
II II ,__
g-g-2
When the component turns on, you've located the remote sensor.
If you don't have both a
cable box and a VCR
connected to your TV,
just coil the cable of the
extra G-LINK wand with
a twist tie and leave it
behind the TV
Placing the G-LINK Wands
Place the G-LINK wands in f_ont of the remote s_,nsnr on your VCR and/or cable box
approximately one inch away []cointhe remote sensor (see instructions below).
TV (bagk panel)
@
_Connect_ to G-tlftK jack
y_,__ __°nthe back of the TV, v_¢ I_
14 Chapter1

C@nnecti@ns _ Setup
Plug in the TV
Plug the end of the power cord into the wall outlet. Match the wide blade of the
plug with the wide slot in the outlet. Insert the plug completely into
the outlet.
Put Batteries in the Remote
1. Remove the battery compartment cover on the remote.
2. Insert new batteries. Match the polarities (+ and -) on the baueries with the
diagram on the remote.
3. Put the ba/tery compartment cover back on the remote.
q_C>
Use the arrow buttons and the OK
button to move through the menu
system.
How to Use the Remote Control to
Complete the Interactive Setup
The technical term is 'Navigation" - how yOklinove through the on-screen
menus. The theory is the same throughout the menu screens: highlight your
choice and select it.
To highlight a inenkl item, press the arrow buttons tin the remote to highlight
one tit'/he items listed on the screen, tse tile tip or down arrow button to nlove
up or down. tse the right or left arrow button to move right or left.
To select the item that you've highlighted, press OK.
Note: Highh_@ted mean._ that tbe menu item stancl._ ou(f!" om
otbcn_me*_u items on tbe ti._t(appea_s clarla, r ,b_7_@tcn_, or a
clflOr _n_tcoto<).
Turn on the TV
Press the TV bul/on on the remote control or the POWER button on the TV (the
first screen of the Interactive Setup appears). The menu screens "time nut" after
a period of time if you don't make a selection. The tips in this section tell you
how to access the Setup menu screens manually.
)• • 7
Note: t t_._t_i_lgthe 7I bzdton not on(y tz_r n._on the 7Y , butpuls the
t_-vnoteinto 717mode. "7_v_mod(, "_leans that the bzltlons (m the r _nnote
contr ot opwate the TY' .sjilltclion._.
Chapter I15

C@nnecti@ns Setup
Complete the Interactive Setup
The menu system in your TV allows the TV's teatures to work properly. In this
Tip book, we call it tile "interactive setup" because tile TV asks you questions, you
Toaccessthe setup menus manually, answer, and tile TV makes tile appropriate adjustments. The first time you turn
pressMENUand chooseSetup. on your TV, tile setup screens appear automatically.
Set the Menu Language
The first part nt tile SETUP asks you to select your preferred hmguage tbr the
menu system.
1. Highlight your preterred hmguage t_r the menu system.
2. Press OK to select that language.
Complete Auto Channel Search
The next part of the SETG_ asks you if you want the TV to search for all
channels viewable through your antenna or cable TV system. This is sometimes
called "auto programming."
1. Press OK to tell the TV to begin searching lbr channels. A progress report
app(,ars on the screen,
2. When the screen on the TV tells you the search is complete, press OK (tile
first G{IDE Plus+ system setup screen appears).
Note: [fTou sEipAuto Cha_*_zet&_ar ch now, you can access it latcn"
)# # ) _#
tbr( z_ghthe C,San**elm_ nu. 5ke Chctpter4.fi_rmor e cletait._.
16 Chapter1

C@nnecti@ns Setup
The GUIDE Plus+ System Setup
The G(IDE Plus+ system is an on-screen interactive progrmn guide that lists
Tip what shows are on TV in your area, In order to receive program listings, you
If you move to anew zip or postal
code, or if any of your information
changes, you need to access the
setup screens from the TV's main
menu-- press MENU, choose GUIDE
Plus+ Menu, and choose GUIDE
Plus+ Setup.
need to complete the lnllnwing steps.
The G-LINK cable nmst be connected to the Imck of your TV, and tile wands
must be placed in tront nt the remote sensor nt the cable box and/or VCR in
order tnr the GUIDE Plus+ system to work (go back to p. 14 tk)r details).
1. You shouM see a screen displaying the teatures nt the Guide Plus+ system.
Press OK to continue.
2. The next screen asks you to locate setup materials and hardware. Once you
have done this, press OK to continue.
Step 1: Identifying Your TV's Location
1. It your country is highlighted, press OK on the remote control.
If your country isn't highlighted, press tile up or down arrow button on tile
remote control to highlight your country and press OK.
2. [se tile nunlber buEons on your remote tn emer your zip cnde.
Press OK when you're finished.
Note: fflyonrpostat code c(mtcli__st_4tem,pr ess the J_pand cloun ar mw
f)ntton._on)_mrr c_notetoc_#erl_41c_%andpr _stbeHgbtar r(m !o1#lon
togotot/genexlspace.'lbelgfiar _:Jlt(,wtlonmozz,s3_z_totloelg ft.
Chapter I17

C@nnecti@ns Setup
Step 2: Configuring for Cable
The next series of screens asks you about your cable setup. To supply your TV
with the correct TV program listings, the GUIDE Plus+ system needs to know if
your TV is connected to cable.
1. If your TV is connected to cable, highlight Yes and press OK.
If your TV isn't connected to cable, highlight No and press OK (Slt_P 3:
Co*_/l_gz_Hn_,_jbra VCR appears).
2_ If you have a cable box connected to this TV, highlight Yes and press OK on
your remote control.
Note: 2be next series (?]kcr eens isz_,r y impor tar# becaJ_sehSeGg/ll)tz"
Ph*s+.systemmils(find the cot _z_clcable t_Jxi*_/br mation i_ or derlo
*eceiz_,the cor 1eel TVpr _4_ramltvlings.
If you don't have a cable box connected to this TV, highlight No and
press OK ($77J °3: Cotd_uHngjbr a VCR appears).
Tip
If you're not sure which channel is the
cable box's output channel, consult
the book that came with your cable
box or contact your cable company,
3_ Highlight the channel lo which you have to tune your TV in order to see
cable programming, and press OK (a screen appears reminding you to
connect your G-LINK cable to your TV and cable bnx).
Notes: Cbar_net ().:_/._tbe most common.
Choose Video I/A !:X!_/)_n_rcable box is connected to.}_)ur 7Y witb az_clio/
video cables instead o/'a coaxial cabte. Go Iopage 7fi_rtgctz¢r esq/'lbese
cables.
18 Chapter1
This manual suits for next models
6
Table of contents
Other RCA TV manuals