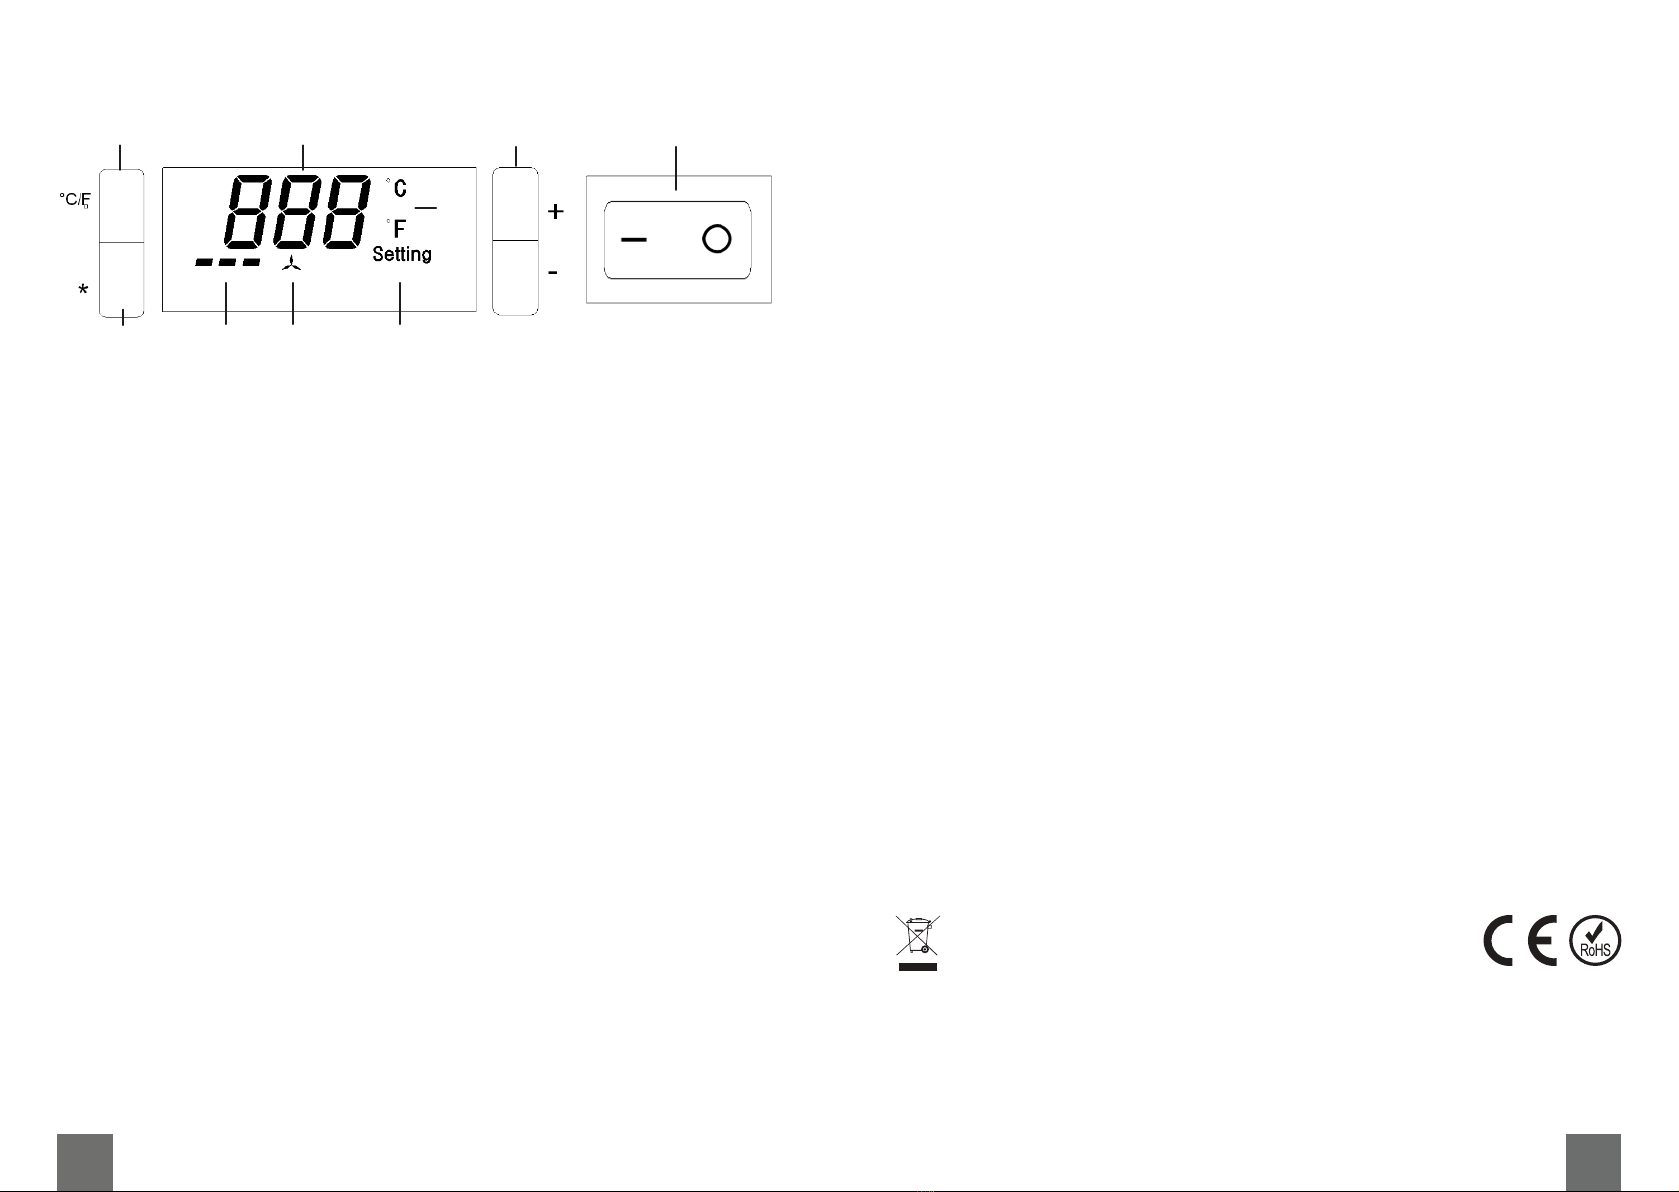
Rebel TOOLS LUT0085 User manual

TOOLS
HOT AIR
REWORK STATION
USER
MANUAL
DE PLEN RO
model: LUT0085

2 3DE DE
SICHERHEITSHINWEISE
Bitte lesen Sie diese Bedienungsanleitung so gfältig vo de Benutzung und bewah en
diese auf zum späte en Nachschlagen.
1. Bevo Sie das Ge ät an die St omve so gung anschließen, stellen Sie siche , dass
die auf dem Ge ät angegebene Spannung mit de Spannung de Steckdose
übe einstimmt.
2. T ennen Sie das Ge ät IMMER von de St omve so gung, wenn es nicht in Geb auch
ist.
3. Das Ge ät ist nicht fü Kinde bestimmt. Bewah en Sie das Ge ät auße halb de
Reichweite von Kinde n auf.
4. Wenn Sie das Netzkabel des Ge äts t ennen, g eifen und ziehen Sie am Stecke ,
nicht am Kabel.
5. Netzkabel da f nu in eine auto isie ten Se vicestelle e setzt we den.
6. Ve suchen Sie nicht das Ge ät selbst zu epa ie en. Bei Beschädigung, wenden
Sie sich an eine auto isie te Se vicestelle fü Übe p üfung /Repa atu .
7. T ennen Sie imme das Ge ät vo dem Reinigen vom St omnetz.
8. Halten Sie das Ge ät und dessen Kabel fe n von Hitze, Wasse , Feuchtigkeit,
scha fen Kanten und ande e Fakto en, die das Ge ät ode das Kabel beschädigt
können.
9. Be üh en Sie keine heißen Metallteile des Ge ätes.
10. Ve wenden Sie dieses Ge ät nicht in de Nähe von b ennba en / explosiven
Mate ialien.
11. Lassen Sie dieses Ge ät nicht unbeaufsichtigt wäh end des Bet iebs.
12. Ve wenden Sie dieses Ge ät nicht fü ande e Zwecke als in diese Bedienungsanleitung
angegeben sind.
13. Das Ge ät da f nicht sta ken E schütte ungen ausgesetzt we den.
14. Ve wenden Sie nu O iginal-Zubehö und We kzeuge.
15. Ve wenden Sie dieses Ge ät nicht, wenn es beschädigt ist ode de Bet ieb ist
nicht no mal.
16. De He stelle dieses P odukts ist nicht ve antwo tlich fü die du ch unsachgemäße
Handhabung und Ve wendung des Ge äts ve u sachten Schäden.
17. Wa nung: Dieses We kzeug muss bei Nichtgeb auch auf den Stände gestellt
we den.
18. Wenn das Ge ät nicht ve wendet wi d, sollte es an einem t ockenen O t auße halb
de Reichweite von Kinde n auewah t we den.
19. Bei Beschädigung des Netzkabels wenden Sie sich zum Austausch ode zu
Wa tung des Kabels an einen auto isie ten Se vicepunkt.
20.Das Ge ät wi d automatisch ausgeschaltet, wenn das Ge ät eine bestimmte
Tempe atu übe sch eitet. Sobald die Tempe atu auf ein Siche heitsniveau
gefallen ist, wi d die St omve so gung automatisch eingeschaltet.
21. Das Ge ät kann nu in gut belüfteten Räumen ve wendet we den.
22.Ve wenden Sie das Ge ät nicht zum E hitzen von Flüssigkeiten ode Kunststo.
23.Das Ge ät ist nu fü den Innenbe eich bestimmt.

4 5DE DE
TECHNISCHE DATEN
DISPLAY
3
42 5 6
89
7
1
1. Taste Tempe atu einheit auswählen
2. Taste Luftst om
3. Zeigt die eingestellte Tempe atu an; d ücken Sie die Tasten +/- zum einstellen.
4. Luftst omgeschwindigkeit.
5. Luftst omsymbol. D ücken Sie die Taste * - das Symbol e scheint am Display, Sie
können nun mit den Tasten +/- die Luftst omgeschwindigkeit einstellen. Nach
Beendigung, ve schwindet das Symbol.
6. Zeigt an dass die Tempe atu eingestellt wi d. Nach Beendigung, ve schwindet
das Symbol.
7. Tempe atu einheiten. G ad Celsius ist vo eingestellt. D ücken Sie die Taste °C/F
zum wechseln.
8. Einstellungstasten
9. Ein/Aus Schalte
DÜSEN
Im Set sind d ei Düsen mit den Du chmesse n 5, 8 und 12 mm enthalten.
Schieben Sie die entsp echende Düse auf das Heizelement.
Um es zu entfe nen, ziehen Sie es vom Heizelement ab.
ALLGEMEINE HINWEISE
• Stellen Sie vo dem Anb ingen de Düse siche , dass das Ge ät ausgeschaltet
und von de St omve so gung get ennt ist.
• VORSICHT. D e Luft st extrem he ß und kann schmerzhafte Verbrennungen
verursachen. Berühren S e n emals das He zelement oder d e Düse und
lassen d e erh tzte Luft n cht auf Ihre Haut blasen.
• Wenn Sie wäh end des Bet iebs eine Pause einlegen möchten, stellen Sie das
Ge ät auf den Stände .
• Stellen Sie nach Geb auch siche , dass das Ge ät abgekühlt ist.
• ÜBERHITZUNGSSCHUTZ. De St om wi d automatisch ausgeschaltet, wenn
das Ge ät eine bestimmte Tempe atu übe sch eitet. Sobald die Tempe atu auf
ein Siche es Niveau gefallen ist, schaltet sich de St om automatisch ein.
REINIGUNG UND LAGERUNG
• WARNUNG. Das Ge ät muss bei Nichtgeb auch auf seinen Stände gestellt we den.
• Stellen Sie das Ge ät nach Geb auch auf den Stände und lassen es vo de Lage ung
abkühlen.
• Lage n Sie das Ge ät an einem t ockenen O t auße halb de Reichweite von Kinde n.
Leistung: 300 W
St omve so gung: 220-240 V~; 50 Hz
Max. Luftst om: 22 l/min
Heißlufttempe atu : 200°C-500°C
Tempe atu einstellung: digital
LCD-Tempe atu anzeige
Gewicht: 399 g
Netzkabellänge: 110 cm
Im Set: 3 Düsen (5, 8, 12 mm), Stände
ERFAHREN SIE MEHR
Fü weite e info mationen zu diesem ge ät finden sie unte : www. ebelelect o.com.
Lesen sie die bedienungsanleitung so gfältig du ch, bevo sie das ge ät ve wenden.
Besuchen sie www. ebelelect o.com website fü weite e p odukte und zubehö .
Deutsch
Korrekte Entsorgung d eses Produkts
(Elektromüll)
Es ist ve boten, Ge äteabfälle, die mit dem Symbol eine du chgest ichenen Mülltonne gekennzeichnet
sind, zusammen mit ande en Abfällen zu entso gen. Dieses Ge ät unte liegt de Sammlung und dem
Recycling. Die da in enthaltenen Schadstoe können Umweltbelastungen ve u sachen und eine Gefah fü
die menschliche Gesundheit da stellen.
He gestellt in China fü Lechpol Elect onics Leszek Sp.k., ul. Ga wolińska 1, 08-400 Miętne.

6 7EN EN
SAFETY INSTRUCTIONS
Please ead this ope ation inst uction ca efully befo e use, and keep it fo futu e efe ence.
1. Befo e connecting the device to powe supply socket, make su e the voltage
indicated on the device co esponds to the voltage in the powe supply socket.
2. ALWAYS disconnect the p oduct fo m the powe mains when it is not in use.
3. When you disconnect the powe co d of the device, g asp and pull the plug, not
the co d/cable.
4. The device is not intended fo use by child en. Keep the device out of the each
of child en.
5. Fixed powe cable may only be eplaced in an autho ized se vice point.
6. Do not attempt to epai this device you self. In case of damage, contact autho ized
se vice point fo check-up o epai .
7. Always disconnect the p oduct fo m the powe mains befo e cleaning.
8. Keep the device and its co d/cable away f om heat, wate , moistu e, sha p edges
and any othe facto which may damage the appliance o its co d.
9. Do not touch hot pa ts of the device.
10. Do not use this device nea flammable/explosive mate ials.
11. Do not leave this device unattended while ope ating.
12. Do not use the p oduct fo pu poses die ent f om displayed in this ope ating manual.
13. Do not expose this device to st ong shock.
14. Use only o iginal accesso ies and tools.
15. Do not use this device if it has been damaged o its ope ation is abno mal.
16. P oduce of this p oduct is not esponsible fo damages caused by inapp op iate
handling and using of the device.
17. Wa ning: this tool must be placed on its stand when not in use.
18. When not in use, the device should be sto ed in a d y location beyond the each of
child en.
19. Incaseofpowe co ddamage, etu n to anautho ized se vice point fo co d eplacement
o se vice.
20.Powe will automatically be o when the unit exceeds a ce tain tempe atu e. Once
the tempe atu e has d opped to a safety level, powe will automatically tu n on.
21. The device can be used only in well ventilated places.
22.Do not use the device to heat liquids o plastic.
23.The device is intended fo indoo use only.
DISPLAY
3
42 5 6
89
7
1
NOZZLES
The e a e th ee nozzles included in the set with the diamete s of 5, 8 and 12 mm.
Push the app op iate nozzle on the heating element.
To emove it, pull it o the heating element.
GENERAL TIPS
• Befo e attaching the nozzle make su e the device is switched o and disconnected
f om powe supply.
• CAUTION. The a r s extremely hot and can cause pa nful burns. Never touch the
heat ng element or the nozzle or allow the heated a r to blow aga nst your sk n.
• If you want to take a b eak du ing ope ation, put the device on the stand.
• Afte use make su e to cool the device.
• OVERHEATING PROTECTION. Powe will automatically be o when the unit
exceeds a ce tain tempe atu e. Once the tempe atu e has d opped to a safety
level, powe will automatically tu n on.
1. Tempe atu e unit switch button
2. Ai flow button
3. Shows set tempe atu e; p ess the +/- buttons to adjust.
4. Ai flow speed.
5. Ai flow symbol. P ess the * button- the symbol appea s on the display, now you
can use the +/- buttons to adjust the ai flow speed. Afte it is done, the symbol
will disappea .
6. It indicates that tempe atu e is being adjusted. Afte it is done, it will disappea .
7. Tempe atu e units. The deg ee Celsius is set as default. P ess the °C/F button to
switch.
8. Adjustment buttons
9. On/o switch

LEARN MORE
Fo mo e info mation on this device visit: www. ebelelect o.com.
Read owne ’s manual ca efully befo e using you device.
Visit www. ebelelect o.com website fo mo e p oducts and accesso ies.
Engl sh
Correct D sposal of Th s Product
(Waste Electr cal & Electron c Equ pment
It is fo bidden to place equipment waste ma ked with the symbol of a c ossed-out t ash bin togethe with
othe waste. This equipment is subject to collection and ecycling. The ha mful substances it contains can
cause envi onmental pollution and pose a th eat to human health.
Made in China fo Lechpol Elect onics Leszek Sp.k., ul. Ga wolińska 1, 08-400 Miętne.
8 9EN EN
CLEANING AND STORAGE
• WARNING. The device must be placed on its stand when not in use.
• Place the device on its stand afte use and allow it to cool down befo e sto age.
• Sto e the device in a d y location, out of the each of child en
SPECIFICATION
Powe : 300 W
Powe supply: 220-240 V~; 50 Hz
Max ai flow: 22 l/min
Hot ai tempe atu e: 200°C-500°C
Tempe atu e adjustment: digital
LCD tempe atu e display
Weight: 399 g
Powe co d length: 110 cm
In set: 3 nozzles (5, 8, 12 mm), stand
8 9PL PL
KWESTIE BEZPIECZEŃSTWA
P zed użyciem należy dokładnie zapoznać się z t eścią inst ukcji obsługi, o az
zachować ją w celu późniejszego wyko zystania.
1. P zed podłączeniem u ządzenia, należy sp awdzić zgodność napięcia p ądu
gniazda sieciowego i u ządzenia.
2. Należy zawsze odłączyć u ządzenie od ź ódła zasilania, jeśli nie jest używane.
3. Odłączając u ządzenie od ź ódła zasilania, należy chwycić i pociągnąć za wtyczkę,
nigdy za kabel/sznu .
4. U ządzenie nie może być używane p zez dzieci. U ządzenie należy p zechowywać
w miejscu niedostępnym dla dzieci.
5. P zewód zasilający nieodłączalny może być wymieniany wyłącznie w auto yzowanym
punkcie se wisowym.
6. Zab ania się własno ęcznej nap awy sp zętu. W wypadku uszkodzenia, należy oddać
u ządzenie do auto yzowanego punktu se wisowego w celu sp awdzenia/nap awy.
7. Należy zawsze odłączyć u ządzenie od ź ódła zasilania p zed czyszczeniem.
8. U ządzenie i kabel zasilający należy p zechowywać z dala od ź ódeł ciepła, wody,
wilgoci, ost ych k awędzi o az innych czynników, któ e mogłyby spowodować
uszkodzenie tego u ządzenia lub kabla.
9. Nie należy dotykać ozg zanych elementów.
10. U ządzenia nie należy używać w pobliżu mate iałów łatwopalnych/wybuchowych.
11. Nie należy pozostawiać p acującego u ządzenia bez nadzo u.
12. Nie należy używać u ządzenia w innym celu niż opisanym w poniższej inst ukcji.
13. U ządzenie należy ch onić p zed silnymi wst ząsami.
14. Należy używać wyłącznie o yginalnych akceso iów i na zędzi.
15. Nie należy używać p oduktu, jeśli zostało uszkodzone lub nie działa pop awnie.
16. P oducent nie ponosi odpowiedzialności za uszkodzenia powstałe wskutek
niep awidłowego użycia p oduktu.
17. Uwaga: Gdy u ządzenie nie jest używane, musi być umieszczone w uchwycie.
18. Gdy u ządzenie nie jest używane, powinno być p zechowywane w miejscu suchym
i niedostępnym dla dzieci.
19. W p zypadku uszkodzenia kabla zasilającego, należy zw ócić go do auto yzowanego
punktu se wisowego w celu wymiany lub nap awy.
20.Zasilanie jest automatycznie odłączane, jeżeli tempe atu a p zek oczy ustaloną
wa tość. Kiedy tempe atu a spadnie do bezpiecznego poziomu, zasilanie jest
automatycznie włączane.
21. U ządzenie może być używane wyłącznie w dob ze wentylowanych pomieszczeniach.
22.Nie należy używać u ządzenia do podg zewania płynów lub podg zewania plastiku.
23.U ządzenie p zeznaczone jest do użytku wewnęt znego..

10 11PL PL
WYŚWIETLACZ
3
42 5 6
89
7
1
1. P zycisk zmiany jednostki tempe atu y
2. P zycisk nawiewu
3. Ustawiona tempe atu a; należy użyć p zycisków +/-, aby dostosować.
4. P ędkość nawiewu.
5. Symbol nawiewu. Należy nacisnąć p zycisk * - symbol pojawi się na wyświetlaczu,
te az można ustawić p ędkość nawiewu za pomocą p zycisków +/-. Gdy p ędkość
zostanie ustawiona, symbol zniknie.
6. Napis pojawia się podczas ustawiania tempe atu y. Gdy tempe atu a zostanie
ustawiona, napis zniknie.
7. Jednostka tempe atu y. Stopnie Celsjusza są ustawione jako domyślna jednostka
tempe atu y. Należy nacisnąć p zycisk °C/F, aby zmienić jednostkę.
8. P zyciski egulacji
9. Włącznik
10. Wyświetlacz LCD
DYSZE
W zestawie znajdują się t zy dysze o ś ednicach 5, 8 i 12 mm.
Należy nasunąć odpowiednią dyszę na kolbę.
Aby ją zdjąć, należy mocno ją pociągnąć i zsunąć z kolby.
UWAGI
• P zed zamocowaniem dyszy należy upewnić się, że u ządzenie jest wyłączone
i odłączone od zasilania.
• UWAGA. Pow etrze wydmuch wane z lutown cy jest gorące może powodować
oparzen a. N gdy n e należy dotykać kolby lub dyszy an k erować strum en a
gorącego pow etrza na żadną część c ała.
• Podczas p ze wy w p acy, należy zawsze odkładać u ządzenie na podstawkę.
• Po zakończeniu ko zystania z u ządzenia należy pozwolić mu całkowicie ostygnąć.
• OCHRONA PRZED PRZEGRZANIEM. Zasilanie zostanie automatycznie odłączone,
gdy u ządzenie osiągnie zbyt wysoką tempe atu ę. Kiedy tempe atu a spadnie do
bezpiecznego poziomu, zasilanie zostanie automatycznie p zyw ócone.
WIĘCEJ
Więcej info macji na temat tego u ządzenia dostępne są na st onie: www. ebelelect o.com.
P zed użyciem należy dokładnie zapoznać się z t eścią inst ukcji obsługi.
Odwiedź st onę www. ebelelect o.com, aby poznać więcej p oduktów i akceso iów.
Poland
Praw dłowe usuwan e produktu
(zużyty sprzęt elektryczny elektron czny)
Oznaczenie p zek eślonego kosza umieszczone na p odukcie lub w odnoszących się do niego tekstach
wskazuje, że po upływie ok esu użytkowania nie należy usuwać go z innymi odpadami pochodzącymi z
gospoda stw domowych. Aby uniknąć szkodliwego wpływu na ś odowisko natu alne i zd owie ludzi
wskutek niekont olowanego usuwania odpadów, p osimy o oddzielenie p oduktu od innego typu
odpadów o az odpowiedzialny ecykling w celu p omowania ponownego użycia zasobów mate ialnych,
jako stałej p aktyki. W celu uzyskania info macji na temat miejsca i sposobu bezpiecznego dla
ś odowiska ecyklingu tego p oduktu użytkownicy w gospoda stwach domowych powinni skontaktować
się z punktem sp zedaży detalicznej, w któ ym dokonali zakupu p oduktu, lub z o ganem władz
lokalnych. Użytkownicy w fi mach powinni skontaktować się ze swoim dostawcą i sp awdzić wa unki
umowy zakupu. P oduktu nie należy usuwać azem z innymi odpadami komunalnymi. Taki sp zęt podlega
selektywnej zbió ce i ecyklingowi. Zawa te w nim szkodliwe substancje mogą powodować
zanieczyszczenie ś odowiska i stanowić zag ożenie dla życia i zd owia ludzi.
Wyp odukowano w CHRL dla Lechpol Elect onics Leszek Sp.k., ul. Ga wolińska 1, 08-400 Miętne.
SPECYFIKACJA
CZYSZCZENIE I PRZECHOWYWANIE
• OSTRZEŻENIE. U ządzenie musi być odłożone na podstawkę, gdy nie jest używane.
• Po zakończeniu p acy, należy odłożyć u ządzenie na podstawkę i pozwolić mu
całkowicie ostygnąć.
• Należy p zechowywać u ządzenie w miejscu suchym, z dala od dzieci.
Moc: 300 W
Zasilanie: 220-240 V~; 50 Hz
Maks. P zepływ powiet za: 22 l/min
Zak es egulacji tempe atu y: 200°C-500°C
Regulacja tempe atu y: cyf owa
Wyświetlacz tempe atu y LCD
Waga: 399 g
Długość p zewodu: 110 cm
W zestawie: 3 dysze (5, 8, 12 mm), podstawka

12 13RO RO
INSTRUCTIUNI PRIVIND SIGURANTA
Va ugam sa cititi cu atentie manualul inainte de a utiliza apa atul si past ati manualul
pent u consulta i ulte ioa e.
1. Înainte de a conecta apa atul la p iză, asigu ați-vă de tensiunea indicată pe
apa at co espunde cu tensiunea de la p iză.
2. Deconectați întotdeauna p odusul de la su sa de alimenta e dacă nu este utilizat.
3. Dispozitivul nu este p oiectat pent u a fi utilizat de căt e copii. Țineți p odusul depa te
de copii.
4. Cablul de alimenta e poate fi înlocuit doa la un se vice auto izat.
5. Nu înce cați să epa ați p odusul. În caz de dete io a e, contactați un se vice
auto izat pent u ve ifica e sau epa ații.
6. Deconectați întotdeauna p odusul de la su sa de alimenta e înainte de cu ăța e.
7. Țineți p odusul și cablul de alimenta e depa te de căldu ă, apă, umezeală, ma gini
ascuțite și o ice alt facto ca e poate dete io a p odusul sau cablul acestuia.
8. Nu atingeți elementele calde ale dispozitivului.
9. Nu utilizați acest dispozitiv în ap opie ea mate ialelo inflamabile/explozibile.
10. Înainte de a înce ca să ascundeți dispozitivul sau să înlocuiți vâ ful de lipit, asigu ați-
vă că dispozitivul s-a ăcit.
11. Nu lăsați dispozitivul nesup avegheat în timp ce funcționează.
12. Nu utilizați p odusul în alte scopu i decât cele afișate în acest manual de utiliza e.
13. Nu expuneți acest dispozitiv la șocu i pute nice.
14. Utilizați doa acceso ii și unelte o iginale.
15. Nu utilizați acest dispozitiv dacă este dete io at sau dacă nu funcționează no mal.
16. P oducăto ul nu este esponsabil pent u daunele cauzate de manipula ea și
utiliza ea neco espunzătoa e a apa atului.
17. Atenție: Acest inst ument t ebuie pus pe supo tul lui atunci când nu este utilizat.
18. Când nu utiliați apa atul, acesta t ebuie depozitat înt -un loc uscat, depa te de a ajunge
copiii la el.
19. În cazul dete io ă ii cablului de alimenta e, contactați un se vie auto izat pent u
înlocui ea cablului.
20.Alimenta ea se va op i automat când unitatea depășește o anumită tempe atu ă.
Odată ce tempe atu a a scăzut la un nivel de sigu anță, alimenta ea va po ni automat.
21. Dispozitivul poate fi utilizat doa în spații bine ventilate.
22.Nu utilizați dispozitivul pent u a încălzi lichide sau plastic.
23.Apa atul este p oiectat pent u a fi utilizat doa în inte io .
3
42 5 6
89
7
1
AFIȘAJ
1. Buton de comuta e a unității de tempe atu ă
2. Buton flux de ae
3. Afișează tempe atu a setată; apăsați butoanele +/- pent u a egla.
4. Viteză flux de ae
5. Simbolul fluxului de ae . Apăsați butonul * - simbolul apa e pe afișaj, acum puteți
utiliza butoanele +/- pent u a egla viteza fluxului de ae . După ce este gata,
simbolul va dispă ea.
6. Indică faptul că tempe atu a este eglată. După ce este gata, va dispă ea.
7. Unități de tempe atu ă. G adele Celsius sunt setate implicit. Apăsați butonul
°C/F pent u a comuta.
8. Butoane de egla e
9. Comutato ON/OFF
DUZE
În set sunt incluse t ei duze cu diamet e de 5, 8 și 12 mm.
Împingeți duza co espunzătoa e pe elementul de încălzi e.
Pent u a o scoate, ve ificați ca apa atul să nu fie cald și apoi t ageți duza de pe
elementul de încălzi e.
SFATURI GENERALE
• Înainte de a atașa duza, asigu ați-vă că dispozitivul este op it și deconectat de
la su sa de alimenta e.
• ATENȚIE. Aerul este extrem de fierb nte ș poate provoca arsur dureroase. Nu
at ngeț n c odată elementul de încălz re sau duza ș nu lăsaț aerul încălz t să
sufle pe p ele.
• Dacă do iți să faceți o pauză în timpul funcționă ii, puneți dispozitivul pe supo t.
• După utiliza e, asigu ați-vă că dispozitivul s-a ăcit.
• PROTECȚIE LA SUPRAÎNCĂLZIRE. Alimenta ea se va op i automat când
unitatea depăseste o anumită tempe atu ă. Odată ce temepe atu a a scăzut la
un nivel de sigu anță, alimenta ea se va po ni automat.

14 15RO RO
AFLĂ MAI MULTE
Pent u mai multe info mații desp e acest dispozitiv vizitati: www. ebelelect o.com.
Citiți manualul de utiliza e cu atenție înainte de a utiliza dispozitivul.
Vizitati site-ul web www. ebelelect o.com pent u mai multe p oduse si acceso ii.
Roman a
Rec clarea corecta a acestu produs
(rez duur proven nd d n aparatura electr ca s electron ca)
Esteinte zisă depozita eadeșeu ilo deechipamentema cate cusimbolul unuicoș degunoi ba at împ eunăcualte
deșeu i. Acest echipament este supus colectă ii și eciclă ii selective. Substanțele nocive pe ca e le conține pot
p ovoca polua ea mediului și ep ezintă o amenința e pent u sănătatea umană.
Dist ibuit de Lechpol Elect onic SRL, Republicii n . 5, Resita, CS, ROMANIA.
SPECIFICATII
CURĂȚARE ȘI DEPOZITARE
• ATENȚIE. Apa atul t ebuie pus pe supo t atunci când nu este utilizat.
• Puneți dispozitivul pe supo t după utiliza e și lăsați-l să se ăceacă înainte de a-l
depozita.
• Depozitați apa atul înt -un loc uscat. Nu îl lăsați la îndemâna copiilo .
Pute e: 300 W
Alimenta e: 220-240 V~; 50 Hz
Debit maxim de ae : 22l/min
Tempe atu ă ae cald: 200°C - 500°C
Reglaj tempe atu ă: digital
Afișaj LCD pent u tempe atu ă
G eutate: 399 g
Lungime cablu de alimenta e: 110 cm
Setul include: 3 duze (5, 8, 12 mm), supo t

www. ebelelect o.com
Table of contents
Languages: