Redbusbar SS10LNAN User manual

SmokeSight SS10LNAN V0.9.0
Page 1
SmokeSight Residential Smoke Alarm
By Redbusbar
Part Number: SS10LNAN
Description: 10 Year Lithium Battery Power Photoelectric Smoke Alarm with Option Card
PLEASE LEAVE THESE INSTRUCTIONS WITH THE OCCUPANT, TO BE RETAINED FOR THE LIFE OF THE ALARM.
1Read all Instructions before Installation and Operation
Regular testing of this smoke alarm is necessary to ensure the unit is functional and that the battery is in good
condition. It is recommended that the smoke alarm be replaced after 10 years of normal service. The only user-
serviceable parts are the Option Card batteries. Refer to ‘Replacing the Backup Batteries’.
EQUIPMENT INSTALLATION HAZARD
• This product must only be used for the purpose described in these instructions and must be installed in accordance
with the local regulations.
• Ensure that the product has been correctly installed and tested for safe operation.
• Smoke Test each interlinked alarm. Check to ensure every interlinked alarm, alarms correctly. If any unit fails to
alarm, refer to ‘Troubleshooting’
Failure to follow these instructions may result in equipment damage or injury.
Smoke Alarm –Top View
Smoke Alarm –Bottom View
1. Option Card
(White) LED
2. Alarm (Red)
LED
3. Smoke Alarm
Power Switch
4. Option Card
Battery Holder
5. Option Card
Enable
Switches
Mounting Base –Top View
Mounting Base –Bottom View
6. Locking Tab
7. Tamper Clip
1
2
7
6
7
7
7
6
4
3
5

SmokeSight SS10LNAN V0.9.0
Page 2
2Specifications
Smoke Alarm
Application
Residential Smoke Alarm for domestic
dwellings
Installation
Ceiling or wall mounted
Power Supply
10 Year Lithium Battery
Sensing Type
Photoelectric. The smoke alarm contains
NO radioactive material
Environment
Altitude: 0m to 2,000m
Temperature: 0°C to 40°C
Humidity: 5% to 95%
Visual Indication
Alarm: Red LED
Audible
Indication
Alarm: 85dBA at 3m, ISO 8201
Battery Low: Chirp
Compliance
AS 3786:2014, AS/NZS 60065,
AS/NZS 60950.1, IEC 62599.2
Option Card
Application
Radio Interlink, Auto
Test, Escape Lighting,
Clap Silence
Power Supply
2 x AA Batteries
Interlink
Radio: 24 alarms over
150 metres free air
maximum
Visual Indication
Status, Alert, Escape:
White LED
Audible Indication
Alert: 50dBA at 3m
Battery Low: Chirp
3Locations
This smoke alarm can be used in all residential homes and apartments and positioned in accordance with building
regulations and state legislation. Refer to figure below when deciding the number of and location of smoke alarms.
Avoid dead air space positions. Install smoke alarms along exit paths from bedrooms. Locate alarms in stairways as
stairways act as chimneys for smoke and heat. Locate a smoke alarm in any area where a smoker sleeps or where
electrical appliances are used in bedrooms. Smoke, heat and other combustion materials rise to the ceiling and
spread horizontally. In a residential dwelling, mount the smoke alarm in the centre of the ceiling. In mobile homes,
wall mount the smoke alarm on an inside partition to avoid the thermal barrier that may form under the ceiling.

SmokeSight SS10LNAN V0.9.0
Page 3
4Locations to Avoid
Within 1 metre of air conditioner ducts, ceiling fans
and other high air flow areas. Smoke may be blown
away or diffused in these areas.
In areas where the temperature may fall below 0°C
or rise above 45°C. Failure to alarm, improper alarms
or nuisance alarms may result.
In damp or very humid areas such as bathrooms or
laundries, where the normal humidity may rise
above 95% or fall below 5% relative humidity. False
alarms and unstable operation may result.
In areas where particles of combustion are normally
present, such as garages or kitchens, as this can
cause false alarms.
In dusty or dirty areas, as an accumulation of dust
and dirt in the sensing chamber may block the
openings and prevent an alarm, or may cause false
alarms.
Where bugs or insects are present as they may block
the openings and prevent an alarm, or may cause
false alarms.
Within 1 metre of electrical noise sources, e.g.
fluorescent lights, LED lights and fan motors.
Electrical noise may cause nuisance alarms.
5Installation and Setup
1. If tamper prevention is required (prevents alarm removal without the use of a tool), remove the Tamper Clip
from the mounting base by twisting it back and forth until it breaks loose.
2. Attach the mounting base flat against the surface using appropriate fasteners. Screw diameter 8gauge/4mm.
3. Set/confirm Radio Interlink and/or Auto Test Enable Switches. Refer to Enable Switches for details.
4. If the Radio Interlink feature is required, refer to Option Card - Radio Interlinked Smoke Alarms –Initial Setup.
5. Only if the Radio Interlinked feature was not required,
and therefore not setup, apply option card power by
installing 2xAA batteries into the into the top battery bay
of the smoke alarm
Option Card
Batteries
6. Engage and slide the smoke alarm along the mounting base until it is fully home and it ‘clicks’. The ‘smoke alarm
power switch’is turned on automatically when the smoke alarm is fully home and it ‘clicks’.
Slide
Ready to slide
Engages with a ‘click’
7. Press the Test+Hush button to check that alarm and all other interlinked alarms, sound.
The Red LED will flash every 5mins and 45secs and the White LED will flash every 5mins to indicate correct
operation.
Installation and Setup is not complete until alarm has been checked for correct operation.
8. If tamper prevention is required, slide the Tamper Clip between the ceiling and the mounting base, locking tab.
The Tamper Clip can be removed by gripping it with pliers and pulling the clip away from the smoke alarm.

SmokeSight SS10LNAN V0.9.0
Page 4
Loose Tamper Clip
Tamper Clip Installation
Tamper Clip Installed
6Overview
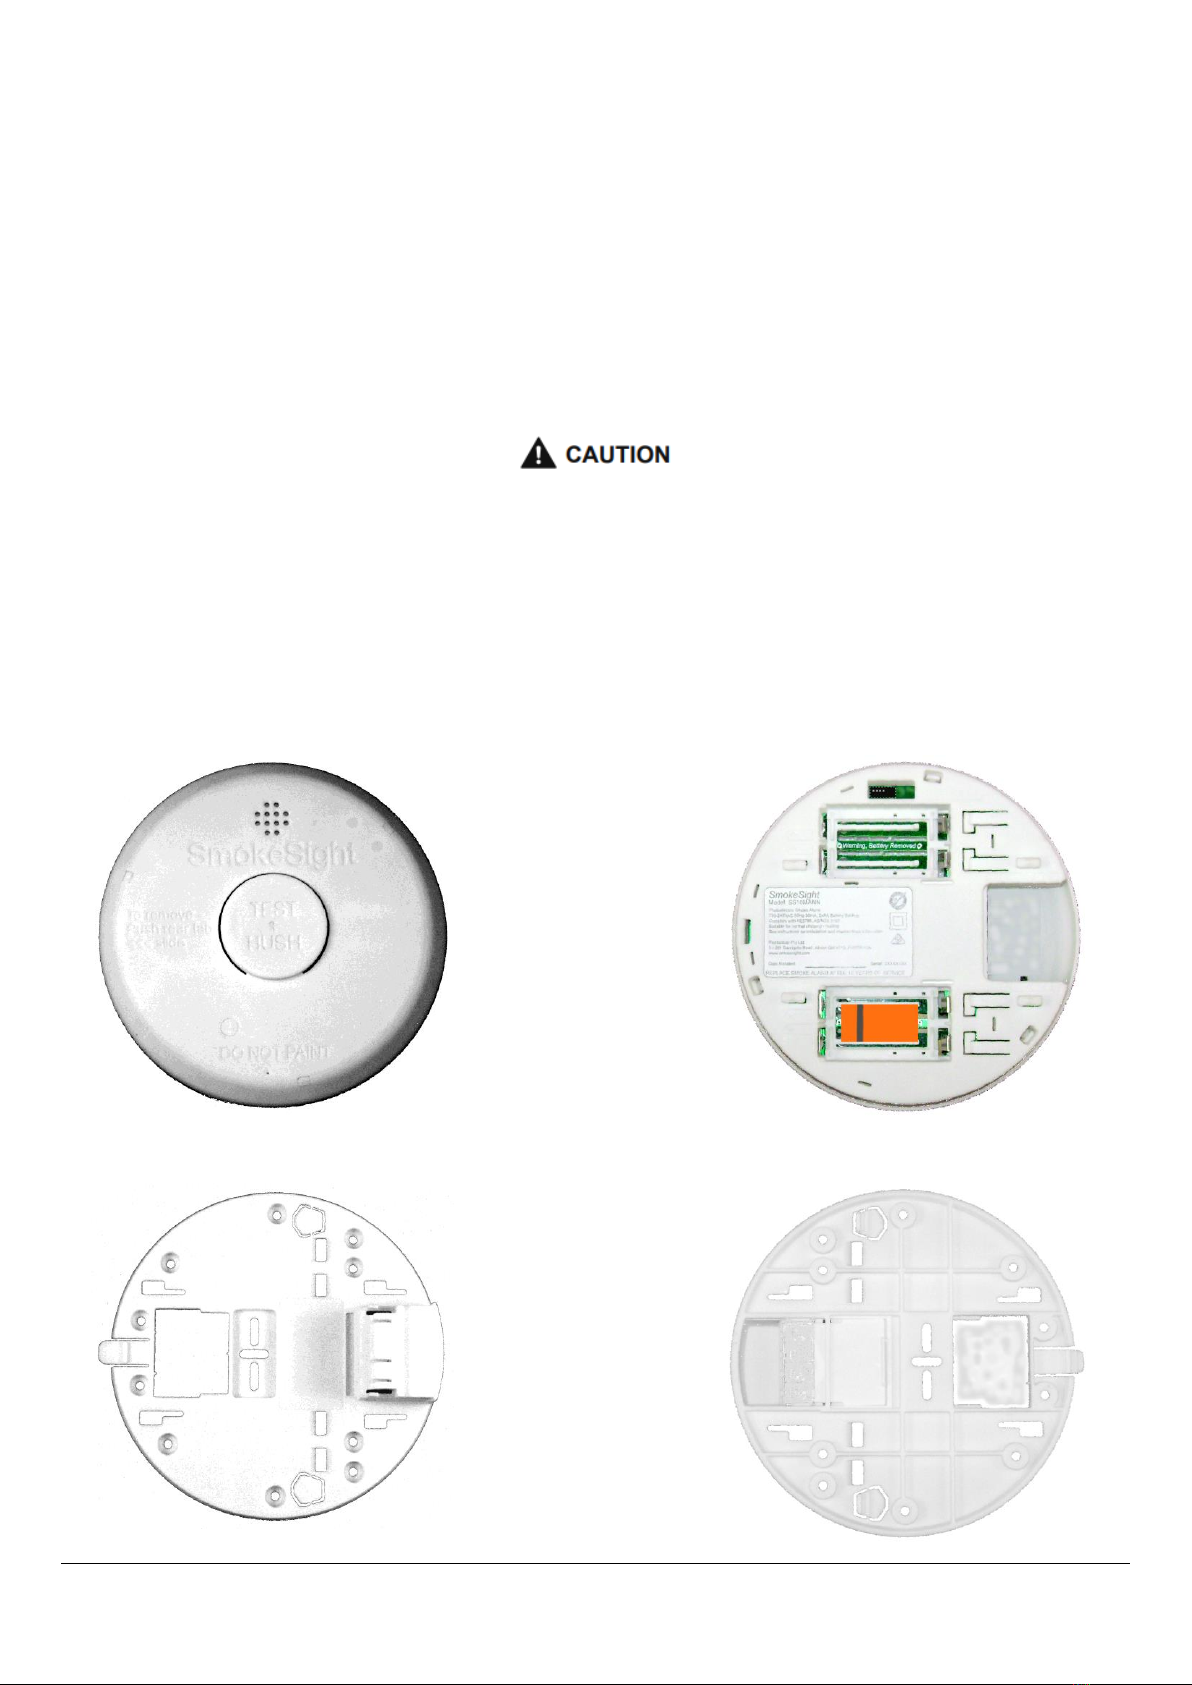
Your smoke alarm comprises two separate sections each powered independently. The smoke module provides
smoke sensing, alarming and wired interlinking. The option card provides radio interlinking and smart features.
Refer to the relevant sections below for more details. For initial setup of your smoke alarm, refer above to
Installation and Setup.
7Smoke Module
This section relates to smoke alarm operation only. For initial setup of your smoke alarm, refer above to Installation
and Setup. For option card operation, refer below to the option card section. Once power is supplied via the ‘smoke
alarm power switch’ (Refer section ’Smoke Alarm –Bottom View’ Page 1), the smoke alarm is operational. The
‘smoke alarm power switch’ is turned on automatically when the smoke alarm is slid onto the mounting base. If
smoke is detected the alarm will sound and the red LED will flash rapidly. This will continue until the air is cleared of
smoke. During normal operations the red LED flashes once every 5mins and 45secs to indicate that the smoke alarm
and battery backup is functional.
7.1 When the Alarm Sounds
1. Alert small children in the home.
2. Leave immediately by your plan of escape. Don’t waste time getting dressed or picking up valuables.
3. When leaving, don’t open any inside door without first feeling its surface. If hot, or if you see smoke seeping
through cracks, don’t open that door! Instead, use your alternate exit. If inside the door is cool, place your
shoulder against it, open it slightly and be ready to slam it shut if heat and smoke rush in.
4. Stay close to the floor if air is smoky. Breathe shallowly through a wet cloth if possible.
5. Once outside, go to your selected meeting place and make sure everyone is there.
6. Call the Fire Brigade from your neighbour’s home - not from yours!
7. Don’t return to your home until officials say that it is safe to do so.
For further information on fire safety contact your local Fire Brigade.
7.2 Testing
TEST THE SMOKE ALARM ONCE PER MONTH TO ENSURE CORRECT OPERATION. Test by pushing the Test+Hush
button on the smoke alarm until the alarm sounds. The alarm will sound if all electronic circuitry, siren and battery
are functional. Any Interlinked alarms will also sound. If no alarm sounds, remove the smoke alarm from its base and
confirm that the Smoke Alarm Power Switch is ON indicated by the symbol ‘I’. If the Smoke Alarm Power Switch is
ON and the alarm still doesn’t sound, replace the smoke alarm. If the smoke alarm is installed in a mobile home, test
weekly and after every journey. After the Test+Hush button has been pressed, wait 10mins before any additional

SmokeSight SS10LNAN V0.9.0
Page 5
testing is conducted to avoid any false alarm responses as the alarm is in reduced sensitivity mode during this
period. Refer to ‘Hush‘.
IMPORTANT: If premises are unoccupied for a period of time (more than a few days) then a battery test should be
undertaken upon return. If the low battery warning sounds, test and replace the battery if necessary.
Never use an open flame of any type to test your alarm. Check that all interlinked smoke alarms operate during
the test.
7.3 Hush
This smoke alarm has a built-in Hush feature incorporated into the Test button. If cooking or other non-hazardous
sources cause the alarm to sound, it can be temporarily silenced by pressing the Test+Hush button. The alarm then
enters a low sensitivity period for 9mins. If the smoke density increases during this period from a smoke or fire
event, the unit will go into alarm mode.
Before using the alarm HUSH feature, identify the source of smoke and be certain that a safe condition exists.
8Option Card
This section relates to option card operation only. For initial setup of your smoke alarm, refer above to Installation
and Setup. For smoke alarm operation, refer above to the smoke alarm module section. This smoke alarm
incorporates an option card that supports the following features:
Auto Test –Automatic alarm, scheduled self-testing
Clap Silence - Hush a false smoke alarm with a hand clap
Escape Lighting –Escape path visibility during an alarm
Radio Interlink –Allows one smoke alarm to activate all smoke alarms wirelessly
During normal operations the white LED flashes once every 5mins to indicate that the option card and battery
backup is functional. Refer to the option card manual for detailed option card operation and configuration details.
8.1 Enable Switches
Some functions require activation using enable
switches accessible through the base of the smoke
alarm. Changing of any switch will require removing
power to the option card for 1min before repowering.
Switch Assignment
Switch
Function
1
Radio
Interlink
2
Auto Test
3
Spare
4
Spare
8.2 Radio Interlinked Smoke Alarms
Interlinking smoke alarms ensures that if one alarm senses smoke, all of the alarms connected to the radio network
will operate (alarm). The smoke alarm, radio interlink is a separate network that the smoke alarms establish. Refer
to the option card manual for detailed option card operation and configuration details.
8.2.1 Initial Setup
For correct network setup please follow this procedure closely. A video of the procedure is available on the
website support pages.
1. Before powering any smoke alarm, place all smoke alarms and their 2xAA option card batteries on a table.
2. Confirm that the Radio Interlink switch is set to ON for each alarm. Refer to Enable Switches for details.
Enable Switches

SmokeSight SS10LNAN V0.9.0
Page 6
3. Apply option card power to the first smoke alarm by inserting its
batteries into the top battery bay of the smoke alarm. The alarm will
listen for networks for 30secs during which the white LED will flash
every 2secs. It will then allocate a unique Home ID to this network
and assign itself as the master node confirmed by 1 Beep/Flash for
3secs. Then it will 5flash + 5beep every 10secs.
4. Apply option card power to the second smoke alarm by inserting its batteries into the top battery bay of the
smoke alarm within 2mins. The alarm will listen for networks during which the white LED will flash every 2secs.
It will then 1 Beep/Flash for 1sec confirming that it has joined the network as a slave and then 5flash + 5beep
every 10secs.
5. Repeat step 4 above on the next alarm, and each subsequent alarm, taking care to only apply option card power
to each alarm after confirmation that the previously powered alarm has joined the network.
6. Slide the ‘smoke alarm power switch’ (Refer section ’Smoke Alarm –Bottom View’ Page 1) to the ‘I’ position
(toward the centre of the alarm) on each alarm.
7. To complete the network setup either 4Tap any node’s Test+Hush button or wait 2mins.
8. On any alarm press the Test+Hush button to check that this alarm and all other interlinked alarms sound. If not,
you will need to perform a ‘Return to Factory Defaults’ and repeat this ‘Initial Setup’. Refer to the option card
manual for detailed option card operation and configuration details.
9. Refer back to the ‘Installation and Setup’ section above to complete the setup
8.3 Auto Test
The Auto Test function provides scheduled, automatic testing of the smoke alarm. Testing consists of momentarily
simulating smoke internal to the smoke alarm which activates the smoke alarm’s siren. The option card listens for
the correct smoke alarm tone and reports an option card alarm if the test failed. The test establishes, on a regular
basis, that the smoke alarm’s smoke sensor, controller and siren are functional. Test duration is 5secs and can be
configured to be performed at a convenient time. The default time is 14days and 0hrs following insertion of the
option card batteries. Refer to the option card manual for detailed option card operation and configuration details.
8.4 Clap Silence
If the smoke alarm is in alarm state, two loud hand claps, approximately 0.5 sec apart, from ground level
immediately below the alarm is equivalent to pressing the Test+Hush button on that alarm. An alarm in alarm state
is evidenced by its red LED flashing rapidly. As clap volume and timing may vary, you may need to repeat clap silence
more than once. The alarm must incorporate an option card for clap silence to function.
8.5 Escape Lighting
If the smoke alarm is in alarm state or receives an interlink signal from a smoke alarm that is in alarm state, the
option card, white LED flashes in high intensity mode. This feature assists evacuation by illuminating the escape path
or could be used to better signal an alarm to a hearing impaired resident.

SmokeSight SS10LNAN V0.9.0
Page 7
8.6 Replacing the Option Card Batteries
The power to the smoke alarm option card is supplied by 2xAA 1.5VDC alkaline
batteries, located in the top battery bay of the smoke alarm. The batteries should
last a minimum of 5 years under normal operating conditions. If you experience
white LED flash/beep refer to Troubleshooting above. It is recommended to
replace the batteries on a memorable day eg 1st April, April Fool’s Day.
RECOMMENDED BATTERIES: Energizer E91, Duracell MN1500, Fujitsu LR6
TEST THE OPERATION OF THE SMOKE ALARM BY PRESSING THE TEST+HUSH
BUTTON AFTER BATTERY REPLACEMENT
9Troubleshooting
The SmokeSight smoke alarm constantly monitors its internal functions to maintain your safety. During normal
operations regular LED flashes indicate that the smoke alarm is functional. If it is sounding, either alarming or
chirping, note answers to the following questions to diagnose the problem, and your solution:
1. If it’s alarming, 3 loud tones repeating every 1.5secs, refer to smoke alarm troubleshooting below.
2. If it’s chirping, 1 or more beeps every 40secs and the chirps do not coincide with white LED flashes, refer to
smoke module troubleshooting below.
3. If it’s chirping, 4 or more beeps every 5mins and the chirps coincide with white LED flashes, refer to option
card troubleshooting below.

SmokeSight SS10LNAN V0.9.0
Page 8
9.1 Smoke module troubleshooting
CONDITION
CAUSE
REMEDY / ACTION
ALARMS & TEST+HUSH
Alarm sounds and the red
LED is blinking rapidly.
Smoke has activated the smoke
alarm
If the cause is unknown, vacate the
building immediately and call the Fire and
Emergency Services.
If the cause is known to be a false alarm,
see “False Alarm” section below.
Alarm sounds but the red
LED is OFF.
Smoke has activated an interlinked
alarm, located somewhere else in
the dwelling.
Smoke alarm is sounding, it
does not stop when
Test+Hush is pressed.
Smoke density is too high, even in
low sensitivity mode, for the Hush
feature to activate.
Smoke alarm is sounding, it
stops when Test+Hush is
pressed.
Low sensitivity mode has been
activated for 9mins
Make sure you are safe and have
eliminated the source of the smoke. See
“False Alarm” section below.
While the Test+Hush
button is pressed the alarm
sounds
The smoke alarm is indicating that
all electronic circuitry, siren and
battery are functional
Normal test condition. Test regularly to
ensure proper operation
While the Test+Hush
button is pressed the alarm
does not sound
The smoke alarm may not be
operating correctly
Check that the green LED is ON and the
red LED flashes once every 5mins. If
problem persists contact an electrician for
replacement.
CHIRP
1 chirp every 43secs (no
LED flash)
Low battery warning
Replace the 2xAA 1.5VDC batteries. Press
the Test+Hush button to silence the low
battery chirp for up to 8 hours.
3 chirps every 43secs (no
LED flash)
The smoke alarm’s smoke sensor is
not operating correctly
Clean smoke alarm according to
“Maintenance, Repairs and Service”
section. If problem persists contact an
electrician for replacement.
LED
Green LED ON.
240VAC mains supply ON
Normal operating condition
Green LED OFF.
240VAC mains supply OFF
Check that mains power is ON. Main
circuit breaker may have tripped. Wiring
could be incorrect.
Red LED flashes every
5mins and 45secs.
The smoke alarm is functioning
correctly
Normal operating condition.
Red LED flashes every 8 to
12secs.
The smoke alarm is in low
sensitivity mode. Test+Hush
button has been pressed
Wait 10mins to return to normal operating
mode.
OTHER
Smoke alarm will not slide
along the base until it
clicks.
Battery or batteries missing
Install missing battery or batteries
9.1.1 False Alarm
In the event of a false alarm (alarms are sounding without any smoke present):
1. Identify which smoke alarm/s are in alarm state –Look for the alarm/s sounding and with red LED fast flashing.
2. On each smoke alarm in alarm state press the Test+Hush button to silence the alarm
3. Disconnect all smoke alarms in the alarm state by removing them from their base.

SmokeSight SS10LNAN V0.9.0
Page 9
4. Clean smoke alarms in accordance with the “Maintenance, Repairs and Service” section.
5. Re-install and test all the smoke alarms.
9.2 Option card troubleshooting
If the option card is unresponsive to a tap of the Test+Hush button ie no white LED flash or beeps then
install/replace the option card batteries. An active alert is reported every 5mins. A 1 Tap of the Test+Hush button
will report the active alert and silence the chirps for 8 hours. After tapping once, 1 long LED flash/beep followed by
the active alert is reported. Further 1 taps during this silence period will report the active alert again and restart the
8 hour silence period. The 8 hour silence period continues even if the active alert clears.
ALERT
CAUSE
REMEDY / ACTION
4 chirps/white
LED every 5mins
Low battery warning.
Replace the 2xAA 1.5VDC batteries. Press the Test+Hush button to
silence the low battery chirp for up to 8 hours.
5 chirps/white
LED every 5mins
Radio Interlink Loss
(Slave Lost) –After <
30mins
Identify all the slave node(s).
Press Test+Hush on each slave to
confirm alarm interlink function.
Failure of alarm interlink function
on a slave identifies this slave is
lost. Relocate the failed slave to
within 5m from the master. Wait
5 mins for the network to heal and
the radio interlink alerts to stop. If
successful, consider an alternate
final location for slave alarm
If the adjacent remedy for slave or
master lost does not stop option
card, radio interlink alerts, rebuild
the network by performing a
‘Return to Factory Defaults’ on
each alarm. Then, rebuild the
radio interlink network using the
‘Initial Setup’ process. Alarms not
able to join the network should be
replaced.
Refer to the option card manual
for detailed option card operation
and configuration details
6 chirps/white
LED every 5mins
Radio Interlink Loss
(Master or Network
Lost) –After < 10mins
Identify the master node. Press
Test+Hush on the master to
confirm alarm interlink function.
Failure of alarm interlink function
on the master confirms the master
is lost. Relocate the failed master
to within 5m of a slave. Wait 5
mins for the network to heal and
the radio interlink alerts to stop. If
successful, consider an alternate
final location for master alarm
7 chirps/white
LED every 5mins
Auto Test Fail
With the Smoke Alarm Power Switch on/smoke alarm on its base press
the Test+Hush button and confirm smoke alarm sounding. If it fails to
sound, replace the smoke alarm. If it sounds but fails subsequent Auto
Tests, either disable Auto Test and perform manual tests for the
remaining life of the alarm, or replace the smoke alarm.

SmokeSight SS10LNAN V0.9.0
Page 10
10 Maintenance, Repairs and Service
It is recommended that the smoke alarm is inspected monthly to ensure it is free from dust, fibres and insects.
10.1Cleaning
1. Remove smoke alarm power
2. Clean the sensor chamber using a vacuum or can of compressed air. Do not use an air compressor as it will
damage the smoke alarm as the air is not dry or clean. Place the nozzle near the alarm lip, adjacent to the
wording “To remove – Push rear tab <<< slide” and slanted upwards toward the cover.
3. Turn the smoke alarm over (top cover facing down) and repeat the clean
4. Tap the smoke alarm lightly on a hard surface to dislodge attached foreign bodies
5. Repeat the clean
6. Turn the smoke alarm over (top cover facing up)
7. Repeat steps 4 and 5
8. Apply smoke alarm power and wait for 1 minute
a. If the alarm starts sounding the smoke alarm has not/cannot be cleaned properly
b. If the alarm does not sound reinstall the cleaned smoke alarm
ALWAYS TEST THE SMOKE ALARM AFTER CLEANING.
If the smoke alarm is defective in any way, do not tamper with the smoke alarm. The smoke alarm does not contain
any user-serviceable parts. As the smoke alarm does not contain any radioactive material, disposal with domestic
rubbish is permitted in Australia and New Zealand.
11 Warranty
Redbusbar Pty Ltd, warrants this product to be free from defects in materials and workmanship for a period of 5
(five) years from the date of installation. Refer to the Redbusbar terms of sale for full warranty conditions
http://www.redbusbar.com/Terms-and-Conditions.html
Redbusbar reserves the right to change specifications, modify designs and discontinue items without incurring
obligation and whilst every effort is made to ensure that descriptions, specifications and other information in this
document are correct, no warranty is given in respect thereof and the company shall not be liable for any error
therein. © Redbusbar 2018. Redbusbar acknowledges that the Activfire Certified logo is a trademark of CSIRO.

SmokeSight SS10LNAN V0.9.0
Page 11
This page intentionally left blank

SmokeSight SS10LNAN V0.9.0
Page 12
This page intentionally left blank
Other manuals for SS10LNAN
1
Table of contents
Other Redbusbar Smoke Alarm manuals