RedMax SRTZ235 User manual

SRTZ235, LRTZ235
EN Operator's manual 2-20
ES-MX Manual de usuario 21-41
FR-CA Manuel d’utilisation 42-62

Contents
Introduction..................................................................... 2
Safety..............................................................................4
Assembly........................................................................ 8
Operation........................................................................ 8
Maintenance................................................................. 12
Troubleshooting............................................................ 16
Transportation, storage and disposal........................... 17
Technical data.............................................................. 17
Warranty....................................................................... 19
Introduction
Product description
The product is a hedge trimmer with a combustion
engine.
Intended use
Use the product to cut branches and twigs. Do not use
the product for other tasks.
Product overview
4
5
1
2
14
7
20 21 22
23 24
89
11
3
18
13
19 6
10
15
16
17
12
1. Blade
2. Gearbox
3. Position adjustment handle
4. Grease nipple
5. Handle
6. Front handle
7. Shaft
8. Harness support hook (LRTZ235)
9. Stop switch
10. Throttle trigger
11. Throttle trigger lockout
12. Rear handle
13. Spark arrester
14. Starter rope handle
15. Fuel tank
16. Air purge
17. Choke lever
18. Transport guard
19. Shoulder strap (LRTZ235)
20. Operator's manual
21. Combination wrench
22. Combination spanner
23. Screwdriver
24. Hex key
21695 - 001 - 24.06.2021

Symbols on the product
WARNING! This product can be
dangerous and cause serious injury or
death to the operator or others. Be careful
and use the product correctly.
Read the operator's manual carefully and
make sure that you understand the
instructions before use.
Use a protective helmet, approved
hearing protection and approved eye
protection.
Choke, open position.
Choke, closed position.
Mixture of gasoline and two-stroke oil.
yyyywwxxxx The rating plate shows the
serial number. yyyy is the
production year, ww is the
production week.
Note: Other symbols/decals on the product refer to
certification requirements for some markets.
EPA III
KHQZS.0254HD
KHQZS.0254PA
25cc
300h
Jan. 2019
TWC
SP
Husqvarna Zenoah Co.,Ltd.
2019
The Emissions Compliance Period referred to on the
Emission Compliance label indicates the number of
operating hours for which the engine has been shown to
meet Federal emissions requirement. Maintenance,
replacement or repair of the emission control devices
and system may be performed by any nonroad engine
repair establishment or individual.
EMISSION CONTROL LABEL ABBREVIATIONS
General:
CAL California EXH/EVP Exhaust and Evapora-
tive
REGS Regulations
DISPL Displacement EVAP Evaporative SORE Small off road engines
ECS Emission control system HRS Hours US EPA United States Environ-
mental Protection Agen-
cy
Exhaust emission control system:
ECM Engine control
module (Auto-
tune)
OC Oxidizing Cata-
lyst
EM Engine modifica-
tion
TWC Three way cata-
lyst
Evaporative emission control systems:
C Coextruded (Mul-
tilayer)
P Treated HDPE or
PE
N Nylon S Sealed
California Proposition 65
WARNING!
The engine exhaust from this
product contains chemicals known
to the State of California to cause
cancer, birth defects or other
reproductive harm.
1695 - 001 - 24.06.2021 3

Canada EMC
This spark ignition system complies with the Canadian
standard ICES-002.
Product liability
As referred to in the product liability laws, we are not
liable for damages that our product causes if:
• the product is incorrectly repaired.
• the product is repaired with parts that are not from
the manufacturer or not approved by the
manufacturer.
• the product has an accessory that is not from the
manufacturer or not approved by the manufacturer.
• the product is not repaired at an approved service
center or by an approved authority.
Safety
Safety definitions
Warnings, cautions and notes are used to point out
specially important parts of the manual.
WARNING: Used if there is a risk of
injury or death for the operator or bystanders
if the instructions in the manual are not
obeyed.
CAUTION: Used if there is a risk of
damage to the product, other materials or
the adjacent area if the instructions in the
manual are not obeyed.
Note: Used to give more information that is necessary
in a given situation.
General safety instructions
WARNING: Read the warning
instructions that follow before you use the
product.
• Incorrect or careless use of the product can turn it
into a dangerous tool that can cause serious or even
fatal injury. It is extremely important that you read
and understand the contents of this operator’s
manual.
• This product produces an electromagnetic field
during operation. This field may under some
circumstances interfere with active or passive
medical implants. To reduce the risk of serious or
fatal injury, we recommend persons with medical
implants to consult their physician and the medical
implant manufacturer before operating this product.
• Overexposure to vibration can lead to circulatory
damage or nerve damage in people who have
impaired circulation. Contact your doctor if you
experience symptoms of overexposure to vibration.
Such symptoms include numbness, loss of feeling,
tingling, pricking, pain, loss of strength, changes in
skin color or condition. These symptoms normally
appear in the fingers, hands or wrists. The risk
increases at low temperatures.
• If you encounter a situation where you are uncertain
how to proceed you should ask an expert. Contact
your dealer or your service workshop. Avoid all
usage which you consider to be beyond your
capability.
• Keep in mind that the operator is responsible for
accidents or hazards occurring to other people or
their property.
• Never allow anyone else to use the product without
first ensuring that they have understood the contents
of the operator’s manual.
• Never allow children to use or be in the vicinity of the
product. As the product is equipped with a spring-
loaded stop switch and can be started by low speed
and force on the starter handle, even small children
under some circumstances can produce the force
necessary to start the product. This can mean a risk
of serious personal injury. Therefore remove the
spark plug cap when the product is not under close
supervision.
• Store the product out of reach of children.
• Never use the product if you are tired, if you have
drunk alcohol, or if you are taking medication that
could affect your vision, your judgement or your
coordination.
• Never use a product that is faulty. Carry out the
checks, maintenance and service instructions
described in this manual. Some maintenance and
service measures must be carried out by trained and
qualified specialists. Refer to instructions under the
heading Maintenance.
• Never use a product that has been modified in any
way from its original specification.
Safety instructions for operation
WARNING: Read the warning
instructions that follow before you use the
product.
• Never use the product in extreme weather conditions
such as severe cold, very hot and/or humid climates.
• Faulty blades can increase the risk of accidents.
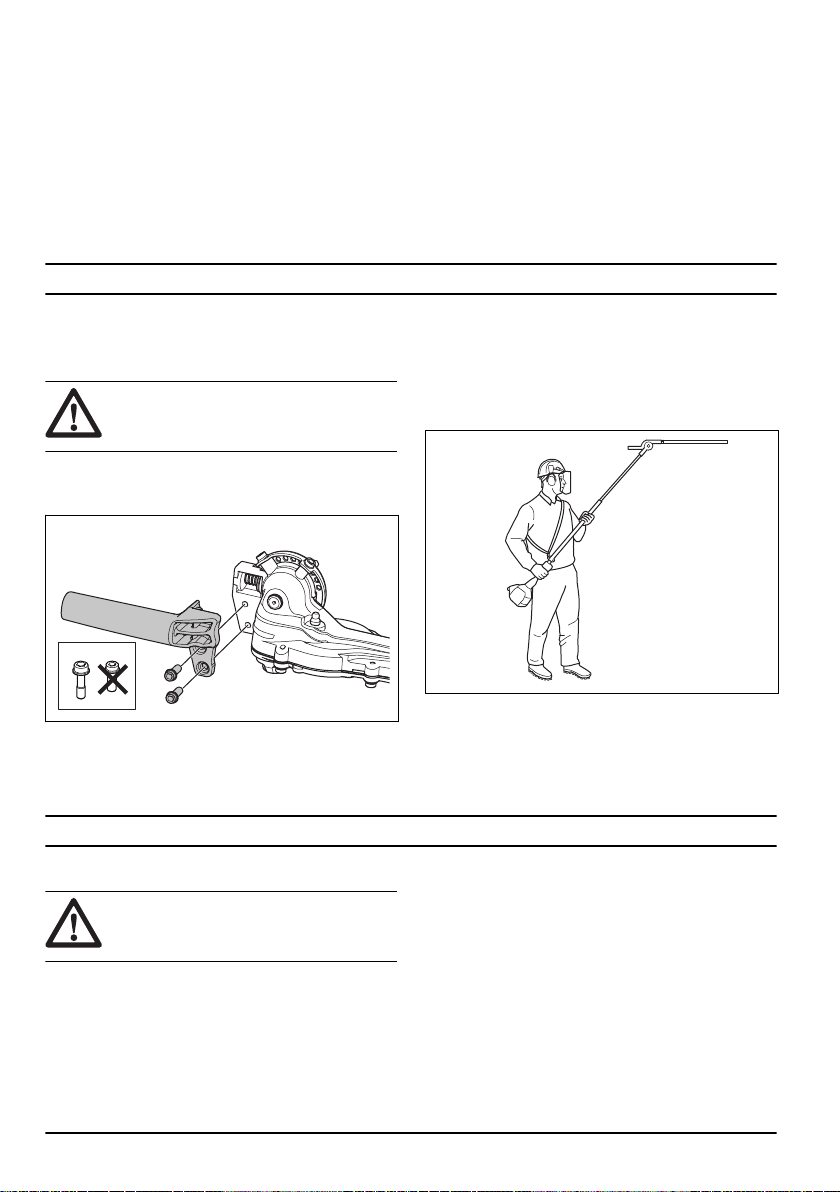
• Ensure that no people or animals comes closer than
15 m / 50 ft while you work.
• Observe your surroundings and make sure that there
is no risk of people or animals coming into contact
with the cutting equipment.
41695 - 001 - 24.06.2021

• Inspect the working area. Remove any objects that
could be thrown out.
• Always ensure you have a safe and stable working
position.
• Never leave the product unsupervised with the
engine running.
• Make sure that your hands and feet do not come
near the cutting unit when the engine is running.
• If anything jams in the blades while you are working,
switch off the engine and wait until it has stopped
completely before cleaning the blades. Disconnect
the spark plug cap from the spark plug.
• When the engine is switched off, keep your hands
and feet away from the cutting unit until it has
stopped completely.
• Watch out for stumps of branches that can be thrown
out during cutting.
• Listen out for warning signals or shouts when you
are wearing hearing protection. Always remove your
hearing protection as soon as the engine stops.
• Never work from a ladder, stool or any other raised
position that is not fully secured.
• Always use both hands to hold the product. Hold the
product in front of your body.
• If any foreign object is hit or if vibrations occur stop
the product immediately. Disconnect the spark plug
cap from the spark plug. Check that the product is
not damaged. Repair any damage.
• Ensure that the spark plug cap and ignition lead are
undamaged to avoid the risk of electric shock.
• Check that all nuts and screws are tight.
• Make sure the gearbox is lubricated correctly. Refer
to
To lubricate the bevel gear and gearbox on page
15
.
• The gearbox gets hot when the product has been in
use. To avoid burning yourself do not touch the
gearbox.
• All covers and guards must be fitted before starting.
• If the blades get stuck, they can be loosened by
sticking the combination wrench into the gearbox.
Stick the combination wrench into the gearing and
turn it back and forth. Refer to
To examine the
blades on page 15
.
• The transport guard should always be fitted to the
cutting unit when the product is not in use.
Personal protective equipment
WARNING: Read the warning
instructions that follow before you use the
product.
• Always use approved personal protective equipment
when you use the product. Personal protective
equipment cannot fully prevent injury but it
decreases the degree of injury if an accident does
occur. Let your dealer help you select the right
equipment.
• Use approved hearing protection that provides
adequate noise reduction. Long-term exposure to
noise can result in permanent hearing impairment.
• Use approved eye protection. If you use a visor, you
must also use approved protective goggles.
Approved protective goggles must comply with the
ANSI Z87.1 standard in the USAs or EN 166 in EU
countries.
• Always use protective gloves.
• Use sturdy non-slip boots or shoes.
• Use clothing made of a strong fabric. Always use
heavy, long pants and long sleeves. Do not use
loose clothing that can catch on twigs and branches.
Do not wear jewelry, short pants, sandals or go with
bare feet. Put your hair up safely above shoulder
level.
• Keep first aid equipment close at hand.
Safety devices on the product
WARNING: Read the warning
instructions that follow before you use the
product.
• Do not use a product with defective safety devices.
1695 - 001 - 24.06.2021 5

• Do a check of the safety devices regularly. If the
safety devices are defective, speak to your RedMax
service agent.
To do a check of the throttle trigger lockout
The throttle trigger lockout prevents accidental operation
of the throttle control.
1. Push the throttle trigger lockout (A) and make sure
that the throttle control is released (B).
A
B
2. Release the throttle trigger lockout and make sure
that the throttle control is locked at idle speed.
3. Push the throttle trigger lockout and make sure that it
goes back to its initial position when you release it.
4. Make sure that the throttle control and throttle trigger
lockout move freely and that the return springs
operate correctly.
5. Start the product and apply full throttle. Refer to
To
start the engine on page 10
.
6. Release the throttle control and make sure that the
cutting attachment stops. If the cutting attachment
rotates with the throttle in the idle position, do a
check of the carburetor adjustments. Refer to
To
adjust the idle speed on page 13
.
To do a check of the stop switch
1. Start the engine.
2. Move the stop switch to the stop position and make
sure that the engine stops. To see where the stop
switch is on your product, refer to
Product overview
on page 2
.
WARNING: The stop switch
automatically goes back to start position.
To prevent accidental start, remove the
spark plug cap from the spark plug when
you assemble or do maintenance on the
product.
To do a check of the vibration damping system
WARNING: Use of incorrectly wound
cord or an incorrect cutting attachment
increases the level of vibration.
The vibration damping system decreases vibration
between the engine unit and the shaft unit, which makes
the operation easier. Refer to
Product overview on page
2
to see where the vibration damping units are on your
product.
1. Stop the engine.
2. Do a visual check for deformation and damage, for
example cracks.
3. Make sure that the vibration damping units are
attached correctly.
To do a check of the muffler
The muffler keeps noise levels to a minimum and sends
exhaust fumes away from the operator.
• Do a visual check for damage and deformation.
61695 - 001 - 24.06.2021

• Make sure that the muffler is correctly attached to
the product.
• If the muffler on your product has a spark arrester
screen, do a visual check. Replace the spark
arrester screen if it is damaged.
a) Clean the spark arrester screen if it is blocked. A
blocked spark arrester screen causes the engine
to become too hot which causes damage to the
engine.
b) Make sure that the spark arrestor mesh is
attached correctly.
To do a check of the blades
1. Stop the engine and make sure that the blades stop.
2. Remove the spark plug cap from the spark plug.
3. Put on protective gloves.
4. Make sure that the blades are not damaged or bent.
Always replace a damaged or bent blade.
5. Make sure that the screws to the blades are tight.
To do a check of the bevel gear and gearbox
WARNING: To prevent burn injuries, let
the product become cool before you touch
the bevel gear and gearbox.
• Do a visual check for damage and deformation.
Fuel safety
WARNING: Read the warning
instructions that follow before you use the
product.
• Do not mix the fuel indoor or near a heat source.
• Do not start the product if there is fuel or engine oil
on the product. Remove the unwanted fuel/oil and let
the product dry. Remove unwanted fuel from the
product.
• If you spill fuel on your clothing, change clothing
immediately.
• Do not get fuel on your body, it can cause injury. If
you get fuel on your body, use a soap and water to
remove the fuel.
• Do not start the engine if you spill oil or fuel on the
product or on your body.
• Do not start the product if the engine has a leak.
Examine the engine for leaks regularly.
• Be careful with fuel. Fuel is flammable and the fumes
are explosive and can cause injuries or death.
• Do not breathe in the fuel fumes, it can cause injury.
Make sure that there is sufficient airflow.
• Do not smoke near the fuel or the engine.
• Do not put warm objects near the fuel or the engine.
• Do not add the fuel when the engine is on.
• Make sure that the engine is cool before you refuel.
• Before you refuel, open the fuel tank cap slowly and
release the pressure carefully.
• Make sure there are sufficient airflow when refueling
and mixing fuel (petrol and two-stroke oil) or draining
the fuel tank.
• Fuel and fuel vapor are highly flammable and can
cause serious injury when inhaled or allowed to
come into contact with the skin. For this reason,
observe caution when handling fuel and make sure
there is sufficient airflow.
• Tighten the fuel tank cap carefully or a fire can
occur.
• Move the product at a minimum of 3 m (10 ft) from
the position where you filled the tank before a start.
• Do not put too much fuel in the fuel tank.
• Make sure that a leak cannot occur when you move
the product or fuel container.
• Do not put the product or a fuel container where
there is an open flame, spark or pilot light. Make
sure that the storage area does not contain an open
flame.
• Only use approved containers when you move the
fuel or put the fuel into storage.
• Empty the fuel tank before long-term storage. Obey
the local law on where to dispose fuel.
• Clean the product before long-term storage.
• Remove the spark plug cap before you put the
product into storage to make sure that the engine
does not start accidentally.
Safety instructions for maintenance
WARNING: Read the warning
instructions that follow before you use the
product.
• Stop the engine and make sure that the cutting
equipment stops. Let the product become cool
before you do the maintenance.
• Disconnect the spark plug cap before you do the
maintenance.
1695 - 001 - 24.06.2021 7

• The exhaust fumes from the engine contain carbon
monoxide, an odourless, poisonous and very
dangerous gas that can cause death. Do not run the
product indoors or in closed spaces.
• The exhaust fumes from the engine are hot and can
contain sparks. Do not run the product indoors or
near flammable material.
• Accessories and changes to the product that are not
approved by the manufacturer, can cause serious
injury or death. Do not change the product. Always
use original accessories.
• If the maintenance is not done correctly and
regularly, there is an increased risk of injury and
damage to the product.
• Only do the maintenance as this operator's manual
recommends. Let an approved RedMax service
agent do all other servicing.
• Let an approved RedMax service agent do servicing
on the product regularly.
• Replace damaged, worn or broken parts.
Assembly
Introduction
This section describes how to assemble and adjust the
product.
WARNING: Before you assemble the
product, read the safety chapter and the
assembly instructions.
To install the handle
• Install the handle with the 2 screws.
To adjust the harness LRTZ235
Always use the harness when you operate the product.
The harness gives maximum control during operation of
the product. The harness decreases the risk of tiredness
in your body.
1. Put on the harness.
2. Attach the product to the harness support hook.
3. Adjust the length of the harness until the support
hook is level with your hip.
Operation
Introduction
WARNING: Before you operate the
product, you must read and understand the
safety chapter.
To do before you operate the product
• Examine the work area and remove loose objects.
• Do a check of the cutting unit. Refer to
To examine
the blades on page 15
.
• Make sure that the safety devices of the product
operate correctly. Do not use the product without all
safety devices installed correctly.
• Make sure that all screws and nuts are tight.
• Make sure that all covers are attached correctly and
not damaged before you start the product.
• Make sure that the cutting unit stops when the
engine is at idle speed.
Fuel
This product has a two-stroke engine.
81695 - 001 - 24.06.2021

CAUTION: Incorrect type of fuel can
result in engine damage. Use a mixture of
gasoline and two-stroke oil.
Premixed fuel
• Use RedMax premixed alkylate fuel for best
performance and extension of the engine life. This
fuel contains less harmful chemicals compared to
regular fuel, which decreases harmful exhaust
fumes. The quantity of remains after combustion is
lower with this fuel, which keeps the components of
the engine more clean.
To mix fuel
Gasoline
• Use good quality unleaded gasoline with a maximum
of 10% ethanol contents.
CAUTION: Do not use gasoline with
an octane grade less than 90 RON/87
AKI. Use of a lower octane grade can
cause engine knocking, which causes
engine damages.
Two-stroke oil
• For best results and performance use RedMax two-
stroke oil.
• If RedMax two-stroke oil is not available, use a two-
stroke oil of good quality for air-cooled engines.
Speak to your servicing dealer to select the correct
oil.
CAUTION: Do not use two-stroke
oil for water-cooled outboard engines,
also referred to as outboard oil. Do not
use oil for four-stroke engines.
To mix gasoline and two-stroke oil
Gasoline, liter Two-stroke oil,
liter
2% (50:1)
5 0.10
10 0.20
15 0.30
20 0.40
US gallon US fl. oz.
1 2 ½
2 1/2 6 ½
5 12 ⅞
CAUTION: Small errors can influence
the ratio of the mixture drastically when you
mix small quantities of fuel. Measure the
quantity of oil carefully and make sure that
you get the correct mixture.
1. Fill half the quantity of gasoline in a clean container
for fuel.
2. Add the full quantity of oil.
3. Shake the fuel mixture.
4. Add the remaining quantity of gasoline to the
container.
5. Carefully shake the fuel mixture.
CAUTION: Do not mix fuel for more
than 1 month at a time.
To fill the fuel tank
WARNING: Obey the procedure that
follows for your safety.
1. Stop the engine and let the engine become cool.
2. Clean the area around the fuel tank cap.
3. Shake the container and make sure that the fuel is
fully mixed.
4. Remove the fuel tank cap slowly to release the
pressure.
5. Fill the fuel tank.
1695 - 001 - 24.06.2021 9

CAUTION: Make sure that there is
not too much fuel in the fuel tank. The
fuel expands when it becomes hot.
6. Tighten the fuel tank cap carefully.
7. Clean fuel spillage on and around the product.
8. Move the product 3 m/10 ft or more away from the
refueling area and fuel source before you start the
engine.
Note: To see where the fuel tank is on your product,
refer to
Product overview on page 2
.
To start the engine
1. Push the air purge bulb again and again until fuel
starts to fill the bulb. It is not necessary to fill the air
purge bulb fully.
2. Move the choke lever to the choke position.
WARNING: The cutting unit starts
to move immediately when you start the
engine with the choke.
3. Hold the body of the product on the ground with your
left hand.
4. Hold the starter rope handle with your right hand and
the throttle trigger and throttle trigger lockout with
your left hand.
5. Slowly pull out the starter rope with your right hand
until you feel some resistance.
WARNING: Do not twist the starter
rope around your hand.
6. Pull the cord quickly and with force. Pull a maximum
of 5 times.
CAUTION: Do not pull the starter
rope to full extension and do not let go of
the starter rope handle when the starter
rope is fully extended. This can cause
damage to the product.
7. Reset the choke when the engine fires.
8. Pull the starter rope again and again until the engine
starts.
9. Operate the throttle gradually when the engine
starts.
10. Make sure that the engine runs smoothly and let the
engine become warm for 1-2 minutes before
operation.
To stop the product
• Push the stop switch to stop the engine.
10 1695 - 001 - 24.06.2021

WARNING: The stop switch
automatically goes back to start position. To
prevent accidental start, remove the spark
plug cap from the spark plug when you
assemble or do maintenance on the product.
To operate the product
• Start near the ground and move the product up
along the hedge when you cut the sides.
• Make sure that the engine does not touch the hedge.
• Hold the product near your body for a stable work
position.
• Make sure that the cutting unit does not touch the
ground.
• Be careful and work slowly until all the branches are
correctly cut.
To adjust the angle of the cutting unit
The cutting unit can be adjusted in 10 different positions.
WARNING: Do not operate the cutting
unit when you adjust the angle.
1. Let the engine run at idle speed and make sure the
cutting unit does not move.
2. Pull down the position adjustment handle.
3. Tilt the cutting unit to the correct position. Use 1 of
the procedures that follow.
a) Use the handle.
b) Push the end of the cutting unit against a stable
surface.
4. Release the position adjustment handle to lock the
cutting unit.
5. Push the cutting unit against the hedge to make sure
that it is locked.
To adjust the friction for angle adjustment
WARNING: Do not operate the cutting
unit when you adjust the friction.
1. Push the stop switch to stop the product.
2. Install the transport guard on the cutting unit
3. Pull down the position adjustment handle.
1695 - 001 - 24.06.2021 11

4. Tilt the cutting unit to the applicable position.
5. Adjust the screw to set the friction.
6. Set the cutting unit in different positions to try the
friction.
To set the product in transport position
WARNING: Do not start the product
when the product is in transport position.
1. Push the stop switch to stop the product.
2. Install the transport guard on the cutting unit.
3. Pull down the position adjustment handle.
4. Fold the cutting unit to make it parallel to the shaft.
Maintenance
Introduction
WARNING: Read and understand the
safety chapter before you do maintenance
on the product.
Maintenance schedule
Maintenance Daily Weekly Monthly
Clean the external surface. After each operation.
Clean the muffler, exhaust pipe and engine from leaves, dirt and unwanted lubri-
cant. After each operation.
Make sure that the cutting unit does not move at idle speed. X
Do a check of the stop switch. X
Examine the cutting unit for damages and cracks. Replace if it is damaged. X
Do a check of the throttle trigger lockout and the throttle trigger. X
Examine the engine, the fuel tank and the fuel lines for leaks. X
Tighten nuts and screws. X
12 1695 - 001 - 24.06.2021

Maintenance Daily Weekly Monthly
Examine the fuel filter for contamination and the fuel hose for cracks and other
defects. Replace if necessary. X
Examine the starter and the starter rope for damages. X
Clean the air filter. Replace if it is necessary. X
Examine the vibration damping units for damages and cracks. X
Examine the spark plug, refer to
Technical data on page 17
. X
Clean the cooling system. X
Clean the external surface of the carburetor and the area around it. X
Clean or replace the spark arrester mesh. X
Clean the inner surface of the fuel tank. X
Make sure that the gearbox is filled with grease. X
To adjust the idle speed
Note: Adjust the idle speed with the idle adjustment
screw. The idle adjustment screw is identified with a "T"
mark.
1. Make sure that the air filter is clean and that the air
filter cover is installed.
2. Start the product and let the engine become warm.
3. Do 1 of the steps that follow.
a) If the engine stops frequently at idle speed, turn
the idle adjustment screw clockwise.
b) If the cutting equipment rotates at idle speed,
turn the idle adjustment screw counterclockwise.
Note: Refer to
Product overview on page 2
for the
position of the idle adjustment screw.
The idle speed is correct when the engine operates
smoothly in all positions. The idle speed must be below
the speed when the cutting equipment starts to rotate.
WARNING: If the cutting equipment
does not stop when you adjust the idle
speed, speak to your nearest servicing
dealer. Do not use the product until it is
correctly adjusted or repaired.
Note: Refer to
Technical data on page 17
for the
recommended idle speed.
To examine and adjust the throttle
cable
1. Examine the play of the throttle cable. The play must
be 3-4 mm/0.12 in. on the carburetor side.
2. If the play is incorrect, adjust the throttle cable with
the cable adjuster.
To do maintenance on the muffler
The muffler decreases the noise level and points the
exhaust gases away from the operator.
WARNING: Mufflers that have catalytic
converters get very hot during operation and
will stay hot for some time after you stop the
product. This also applies at idle speed. If
you touch the product it can result in burns
to the skin. Think about of the risk of fire.
1. Stop the product and let it cool down.
2. Make sure that the muffler is correctly attached and
that it is not damaged.
1695 - 001 - 24.06.2021 13

3. Remove the screw that holds the spark arrestor
screen.
4. Clean the spark arrestor screen if it is blocked or
replace it if it is damaged.
CAUTION: The spark arrestor screen
must be replaced if it is damaged. Do not
use a product without, or with a broken,
spark arrestor screen if you must have a
spark arrestor screen in your area. Obey
local regulations and maintenance
instructions.
CAUTION: If the spark arrestor screen
is frequently blocked it can be a sign that the
performance of the catalytic converter is
decreased. Turn to your servicing dealer to
examine the muffler. A blocked spark
arrestor screen will cause overheating and
result in damage to the cylinder and piston.
To clean the cooling system
The product has a cooling system to keep the operation
temperature as low as possible.
CAUTION: A dirty or blocked cooling
system makes the product too hot which
causes damage to the piston and cylinder.
The cooling system has the components that follow:
• Air intake on the starter.
• Flywheel fins on the flywheel.
• Cooling fins on the cylinder.
• Cylinder cover (points cool air over the cylinder).
• Muffler cover.
• Muffler plate.
• Clean the components of the cooling system with a
brush weekly or more frequently in rougher
conditions.
To examine the spark plug
CAUTION: Always use the
recommended spark plug type. Incorrect
spark plug type can cause damage to the
product.
• Examine the spark plug if the engine is low on
power, is not easy to start or does not operate
correctly at idle speed.
• To decrease the risk of unwanted material on the
spark plug electrodes, obey these instructions:
a) Make sure that the idle speed is correctly
adjusted.
b) Make sure that the fuel mixture is correct.
c) Make sure that the air filter is clean.
• If the spark plug is dirty, clean it and make sure that
the electrode gap is correct, refer to
Technical data
on page 17
.
• Replace the spark plug if it is necessary.
Air filter
Remove dust and dirt from the air filter to keep it clean
and prevent these problems:
• Carburetor malfunctions.
• Problems when you start the product.
• Loss of engine power.
• Increased wear to engine parts.
• Too much fuel consumption.
To clean the air filter
CAUTION: An air filter that is damaged,
very dirty or soaked with fuel must always be
replaced.
If you use an air filter for a long time it cannot be fully
cleaned. Replace the air filter with a new one at regular
intervals.
14 1695 - 001 - 24.06.2021

1. Move the choke up to close the choke valve.
2. Remove the air filter cover and remove the air filter.
3. Clean the air filter with warm soap water.
4. Replace the air filter if it is too dirty to fully clean.
Always replace a damaged air filter.
5. Clean the inner surface of the filter cover with
compressed air or a brush.
6. Examine the rubber seal for wear and damage.
Replace the rubber seal if it is damaged.
7. Make sure that the filter is dry before you assemble
it.
To lubricate the bevel gear and
gearbox
WARNING: To prevent burn injuries, let
the product become cool before you touch
the bevel gear and gearbox.
Note: New products are first filled with grease after
approximately 20 hours of operation.
• Use special grease. Speak to your servicing dealer
for more information.
• Add the grease through the grease nipple.
CAUTION: Do not fill the gearbox fully.
To clean and lubricate the blades
1. Clean the blades from unwanted materials before
and after you use the product.
2. Lubricate the blades before long periods of storage.
Note: Speak to your servicing dealer for more
information about recommended cleaning agents and
lubricants.
To examine the blades
1. Remove the screw from the gearbox.
1695 - 001 - 24.06.2021 15

2. Put the combination wrench in the gearbox and turn
clockwise and counterclockwise. Make sure that the
blades move freely.
3. Examine the edges of the blades for damages and
deformation.
4. Use a file to remove burrs on the blades.
5. Install in the opposite sequence.
Troubleshooting
Troubleshooting
The engine does not start
Problem Possible cause Recommended step
Starter pawls The starter pawls cannot
move freely.
Adjust or replace the starter pawls.
Clean around the starter pawls.
Speak to an approved servicing dealer.
Fuel tank Incorrect fuel type. Drain it and use correct fuel.
Carburetor Incorrect idle speed. Adjust the idle speed.
No spark The spark plug is dirty or
wet.
Make sure that the spark plug is dry and clean.
Incorrect electrode gap.
Clean the spark plug. Make sure that the electrode gap
of the spark plug is correct. Make sure that the spark
plug is installed with a suppressor.
Refer to
Technical data on page 17
for correct elec-
trode gap.
Spark plug The spark plug is loose. Tighten the spark plug.
The engine starts but stops again
Problem Possible cause Recommended step
Fuel tank Incorrect fuel type. Drain it and use correct fuel.
Carburetor Incorrect idle speed. Adjust the idle speed. Refer to
To adjust the idle speed
on page 13
. Speak to your servicing dealer if it is neces-
sary.
16 1695 - 001 - 24.06.2021

The engine starts but stops again
Problem Possible cause Recommended step
Air filter Clogged air filter. Clean the air filter.
Blade
Problem Possible causes Recommended step
The blade moves slowly or
does not move.
The blade is blocked or it is
damaged.
Clean the blades from unwanted materials. Refer to
To
clean and lubricate the blades on page 15
. Remove
burrs from the blade, refer to
To examine the blades on
page 15
. Replace the blade if it is damaged.
The blade does not cut
easily.
The blade is not sharp or it
is damaged.
Sharpen the blade, refer to
To examine the blades on
page 15
. Replace the blade if it is damaged.
The blade becomes hot. There is friction between
the blades.
Remove burrs from the blade and lubricate the blade.
Refer to
To examine the blades on page 15
.
Transportation, storage and disposal
Transportation and storage
• Always allow the product to cool down before
storage.
• For storage and transportation of the product and
fuel, make sure that there are no leaks or fumes.
Sparks or open flames, for example from electrical
devices or boilers, can start a fire.
• Always use approved containers for storage and
transportation of fuel.
• Empty the fuel before transportation or before long-
term storage. Discard the fuel at an applicable
disposal location.
• Attach the transport guard during transportation and
storage.
• Remove the spark plug cap from the spark plug.
• Attach the product during transportation. Make sure
that it cannot move.
• Clean and do servicing on the product before long-
term storage.
Technical data
Technical data
SRTZ235 LRTZ235
Engine
Cylinder displacement, cu.i3/cm31.4/22.5 1.4/22.6
Idle speed, rpm 2800-3200 2800~3200
Recommended max speed, rpm 11000 11000
Maximum engine power acc. to ISO 8893, kW/hp @ rpm 0.75/1@8500 0.75/1@8501
Catalytic converter muffler Yes Yes
1695 - 001 - 24.06.2021 17

SRTZ235 LRTZ235
Ignition system
Spark plug NGK BPMR8Y NGK BPMR8Y
Electrode gap, inch/mm 0.026/0.65 0.026/0.65
Fuel and lubrication system
Fuel tank capacity, Us Pint/l 1.35/0.64 1.35/0.64
Weight
Weight, lbs/kg 12.5/5.7 13.5/6.1
Blades
Type Double sided Double sided
Cutting length, inch/mm 23.6/600 23.6/600
Cutting speed, cuts/min 4200 4200
18 1695 - 001 - 24.06.2021

Warranty
CALIFORNIA, U.S FEDERAL, AND
CANADA EXHAUST AND
EVAPORATIVE EMISSIONS
CONTROL WARRANTY STATEMENT
YOUR WARRANTY RIGHTS AND OBLIGATIONS
The California Air Resources Board (CARB), U.S.
Environmental Protection Agency (EPA), Environment
and Climate Change Canada and Husqvarna
Professional Products, Inc. are pleased to explain the
exhaust and evaporative emissions ("emissions") control
system warranty on your 2021-2022* small off-road
engine. In California, new equipment that use small off-
road engines must be designed, built, and equipped to
meet State's stringent anti-smog standards. Husqvarna
Professional Products, Inc. must warrant the emissions
control system on your small off-road engine for the
periods of time listed below provided there has been no
abuse, neglect or improper maintenance of your small
off-road engine or equipment leading to the failure of the
emissions control system. Your emissions control
system may include parts such as the carburetor or fuel
injection system, the ignition system, catalytic convertor,
fuel tanks, fuel lines (for liquid fuel and fuel vapors), fuel
caps, valves, canisters, filters, clamps and other
associated components. Also included may be hoses,
belts, connectors, and other emission-related
assemblies. Where a warrantable condition exists,
Husqvarna Professional Products, Inc. will repair your
small off-road engine at no cost to you including
diagnosis, parts and labor.
MANUFACTURER′S WARRANTY COVERAGE
The exhaust and evaporative emissions control system
on your small off-road engine is warranted for two years.
If any emissions-related part on your small off-road
engine is defective, the part will be repaired or replaced
by Husqvarna Professional Products, Inc..
OWNER′S WARRANTY RESPONSIBILITIES
• As the small off-road engine owner, you are
responsible for performance of the required
maintenance listed in your owner’s manual.
Husqvarna Professional Products, Inc. recommends
that you retain all receipts covering maintenance on
your small off-road engine, but Husqvarna
Professional Products, Inc. cannot deny warranty
coverage solely for the lack of receipts or for your
failure to ensure the performance of all scheduled
maintenance.
• As the small off-road engine owner, you should
however be aware that Husqvarna Professional
Products, Inc. may deny you warranty coverage if
your small off-road engine or a part has failed due to
abuse, neglect, or improper maintenance or
unapproved modifications.
• You are responsible for presenting your small off-
road engine to a Husqvarna Professional Products,
Inc. authorized servicing dealer as soon as the
problem exists. The warranty repairs shall be
completed in a reasonable amount of time, not to
exceed 30 days. If you have any questions regarding
your warranty rights and responsibilities, you should
contact Husqvarna Professional Products, Inc. in
USA at 1-800-487-5951, in CANADA at
1-800-805-5523 or send e-mail correspondence to
[email protected] or warranty@hpp-
emissions.com.
WARRANTY COMMENCEMENT DATE
The warranty period begins on the date the engine or
equipment is delivered to an ultimate purchaser.
LENGTH OF COVERAGE
Husqvarna Professional Products, Inc. warrants to the
ultimate purchaser and each subsequent owner that the
engine or equipment is designed, built, and equipped so
as to conform with all applicable regulations adopted by
CARB and EPA, and is free from defects in materials
and workmanship that causes the failure of a warranted
part for a period of two years.
WHAT IS COVERED
REPAIR OR REPLACEMENT OF PARTS: Repair or
replacement of any defective warranted part will be
performed at no charge to you at a brand authorized
servicing dealer. Except for repairs and replacement
under this Emission Control Warranty, you may choose
a repair shop or other person to maintain, replace or
repair emission control devices and systems. However,
Husqvarna Professional Products, Inc. recommends that
all maintenance, replacement and repairs of emission
control devices and systems be performed by a brand
authorized servicing dealer.
IMPORTANT:This product is compliant with U.S. EPA
Phase 3 regulations for exhaust and evaporative
emissions. To ensure EPA Phase 3, California Air
Resources Board and Environment and Climate Change
Canada regulation, we recommend using only genuine
product branded replacement parts. Use of non-
compliant replacement parts is a violation of federal and
state laws.
WARRANTY PERIOD: Any warranted part which is not
scheduled for replacement as required maintenance, or
which is scheduled only for regular inspection to the
effect of "repair or replace as necessary" is warranted
for 2 years (or time defined in the product warranty
statement, whichever is longer) from the date of
purchase by the initial consumer purchaser. Any
warranted part which is scheduled for replacement as
required maintenance is warranted for the period of the
time up to the first scheduled replacement for that part.
1695 - 001 - 24.06.2021 19

Any part repaired or replaced under the warranty must
be warranted for the remaining warranty period.
DIAGNOSIS: You will not be charged for diagnostic
labor that leads to the determination that a warranted
part is in fact defective, provided that such diagnostic
work is performed at a brand authorized servicing
dealer.
OTHER DAMAGES: Husqvarna Professional Products,
Inc. will repair other engine components caused by the
failure of a warranted part still under warranty.
EMISSION WARRANTY PARTS LIST
1. Carburetor and intake parts or fuel injection system.
2. Air filter and fuel filter covered up to maintenance
schedule.
3. Spark Plug, covered up to maintenance schedule.
4. Ignition Module.
5. Mufflers with catalyst and exhaust manifolds.
6. Fuel tank, fuel lines (for liquid fuel and fuel vapors),
fuel cap, carbon canister and tip-over/anti-slosh
valves as applicable.**
7. Electronic Controls, Vacuum, temperature, and time
sensitive valves and switches.
8. Hoses, connectors, and assemblies.
9. All other components the failure of which would
increase the engine's exhaust and evaporative
emissions of any regulated pollutant as set forth at
the following:
• For California see California Code of
Regulations, 13 CCR §2405(d) and 2760(d).
• For U.S. and Canada see US Federal Code of
Regulations, 40 C.F.R 1068 Appendix I (iii).
WHAT IS NOT COVERED
All failures caused by abuse, neglect, unapproved
modifications, misuse or improper maintenance are not
covered.
ADD -ON OR MODIFIED PARTS: Add-on or modified
parts that are not exempted by CARB or EPA may not
be used. The use of any non-exempted add-on or
modified parts will be grounds for disallowing a warranty
claim. Husqvarna Professional Products, Inc. will not be
liable to warrant failures of warranted parts caused by
the use of a non-exempted add-on or modified part.
HOW TO FILE A CLAIM
If you have any questions regarding your warranty rights
and responsibilities, you should contact your nearest
authorized servicing dealer or call Husqvarna
Professional Products, Inc. in USA at 1-800-487-5951,
in CANADA at 1-800-805-5523 or send e-mail
correspondence to [email protected] or
WHERE TO GET WARRANTY SERVICE
Warranty services or repairs are provided through all
Husqvarna Professional Products, Inc. authorized
servicing dealers. If the nearest authorized servicing
dealer is more than 100 miles from your location,
Husqvarna Professional Products, Inc. will arrange and
pay for the shipping costs to and from a brand
authorized servicing dealer or otherwise arrange for
warranty service in accordance with applicable
regulations.
MAINTENANCE, REPLACEMENT AND REPAIR OF
EMISSION-RELATED PARTS
Any replacement part may be used in the performance
of any warranty maintenance or repairs and must be
provided without charge to the owner. Such use will not
reduce the warranty obligations of the manufacturer.
MAINTENANCE STATEMENT
The owner is responsible for the performance of all
required maintenance, as defined in the owner’s
manual.
* Current and following model year will be updated
annually in the warranty statement provided to the
consumer. For example, in 2012 model year, 2012-2013
will be specified.
** Evaporative emission parts.
20 1695 - 001 - 24.06.2021
This manual suits for next models
1
Table of contents
Languages:
Other RedMax Lawn And Garden Equipment manuals

RedMax
RedMax EXTREME EXZ2500S-BC Owner's manual

RedMax
RedMax EXTREME EXZ2450S-PH Owner's manual

RedMax
RedMax SGC2300DL Owner's manual

RedMax
RedMax SGCZ2500S Owner's manual

RedMax
RedMax BCZ2500S/SU Owner's manual

RedMax
RedMax GK-280 Owner's manual

RedMax
RedMax LRT-A Owner's manual

RedMax
RedMax AG4300 Owner's manual

RedMax
RedMax EXTREME EXZ2460S-PH Owner's manual

RedMax
RedMax EXtreme EX-LRT Owner's manual