manuals.online logo
Brands
  1. Home
  2. •
  3. Brands
  4. •
  5. Redwood
  6. •
  7. Electric Heater
  8. •
  9. Redwood CA700AF User manual

Redwood CA700AF User manual

Installation & User Manual Instructions
Models:CA700AF,CA900AF,CA125 AF,CA150 AF,CA180 AF
(This picture is only for reference. Please carefully read these instructions before using the product.)
SAA
Items Per Carton:
Please check everything is complete in the package, as follows:
A body
B feet
C fixing flat
D small expansion screw
E hook
F big expansion screw
G screw for feet
H screw
A
B
C
D
E
G
F
G
G
C
H
Models:
Models:
Power(W)
Rated Voltage
Rated
Frequency
Fins
CA700 AF
700
220-240V~
50Hz
4
CA900 AF
900
220-240V~
50Hz
6
CA125 AF
1250
220-240V~
50Hz
8
CA150 AF
1500
220-240V~
50Hz
10
CA180AF
1800
220-240V~
50Hz
12
# New Zealand only has CA900AF and CA180AF available.
Important Safeguards:
In order to avoid any fire, electric shock or injury risk, please read and comply with the following
instructions: Our quality assurance doesn’t cover damage caused by non-compliance with this operation
manual.
1)The appliance must be connected to power with the voltage equivalent to the rated voltage on the
label of the electrical appliance.
2)Never use the heater near gas, explosives, or inflammable or explosive goods.
3)Warning: To avoid overheating, clothing, blankets etc are prohibited from covering the heater.
4)When operating the appliance the surface temperature will increase.
5)The appliance is not intended for use by persons (including children) with reduced physical sensory
or mental capabilities, or lack of experience and knowledge, unless they have been given
supervision or instruction concerning use of the appliance by a person responsible for their safety.
6)Do not place the appliance directly underneath a plug or socket.
7)Any faulty appliance should not be carried out by the user and needs to be returned to the sales
agent.
8)Before the maintenance or cleaning work is finished, the appliance must be disconnected from the
power.
9)Do not place the appliance close to bathrooms, shower rooms, or pools, etc. The appliance is only
for indoor use.
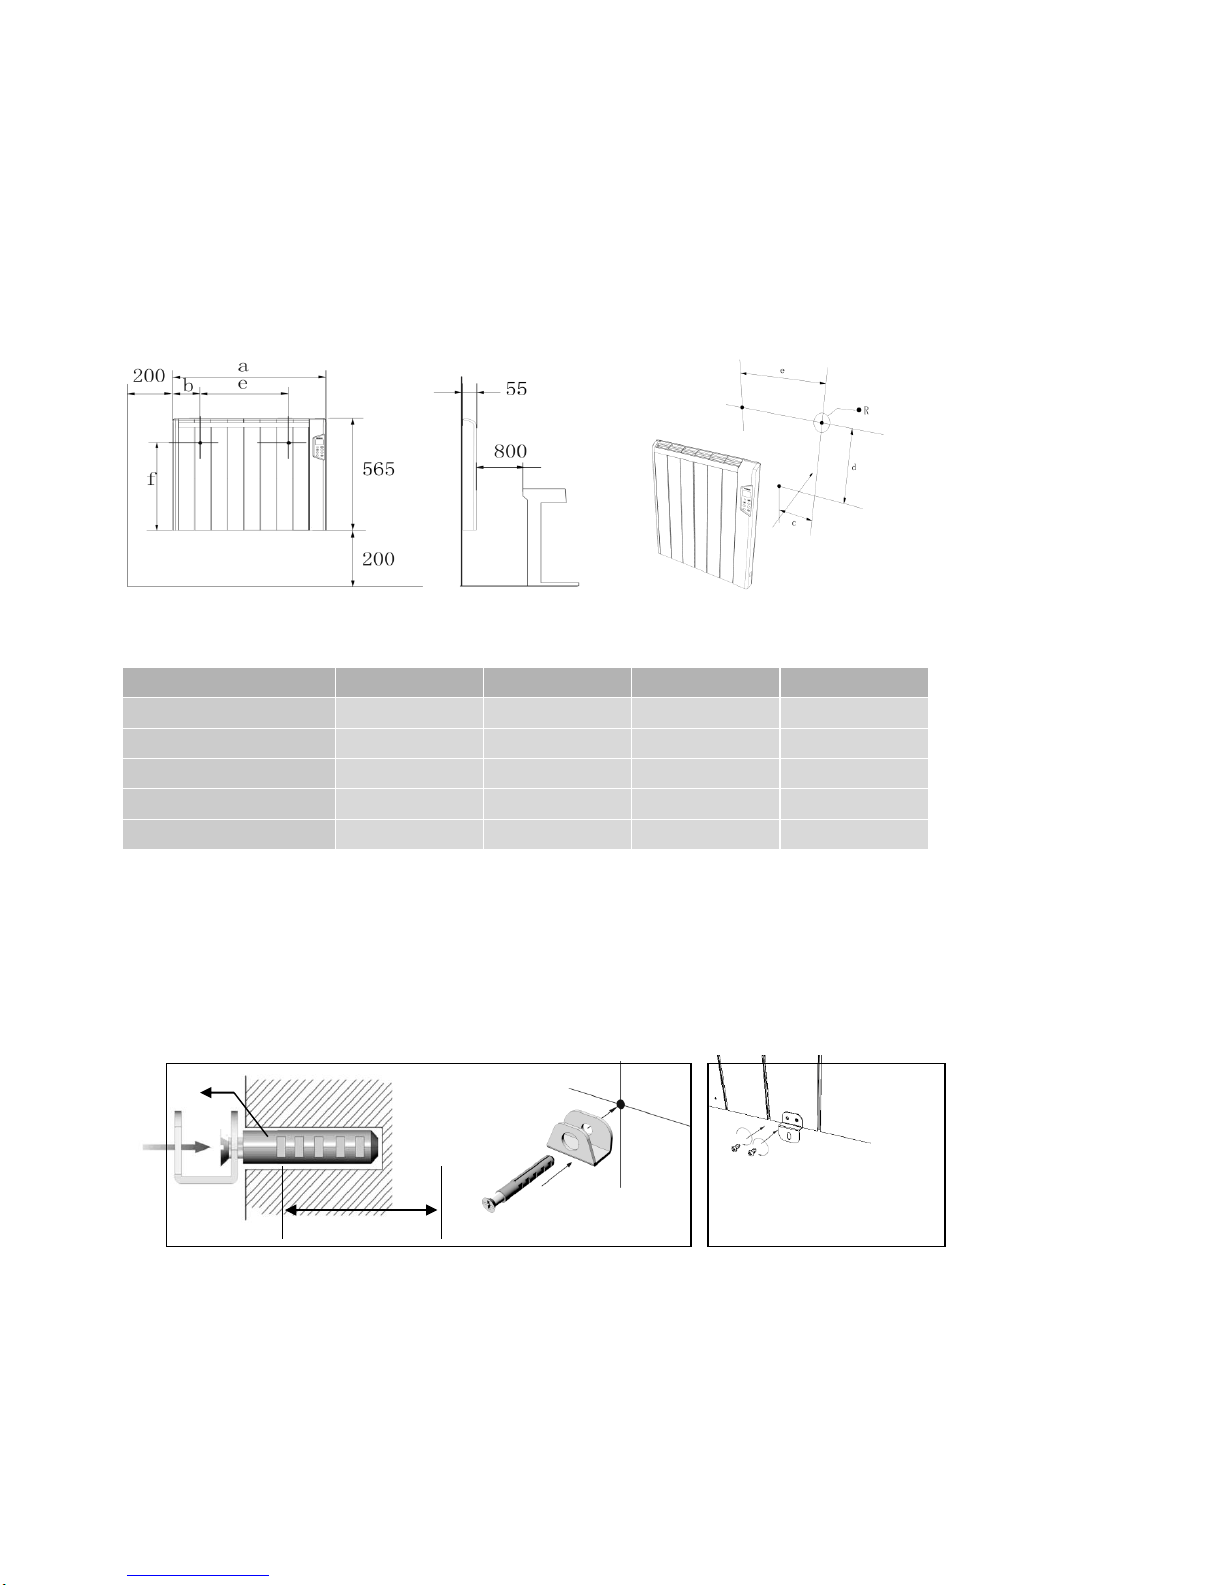
Installation Location
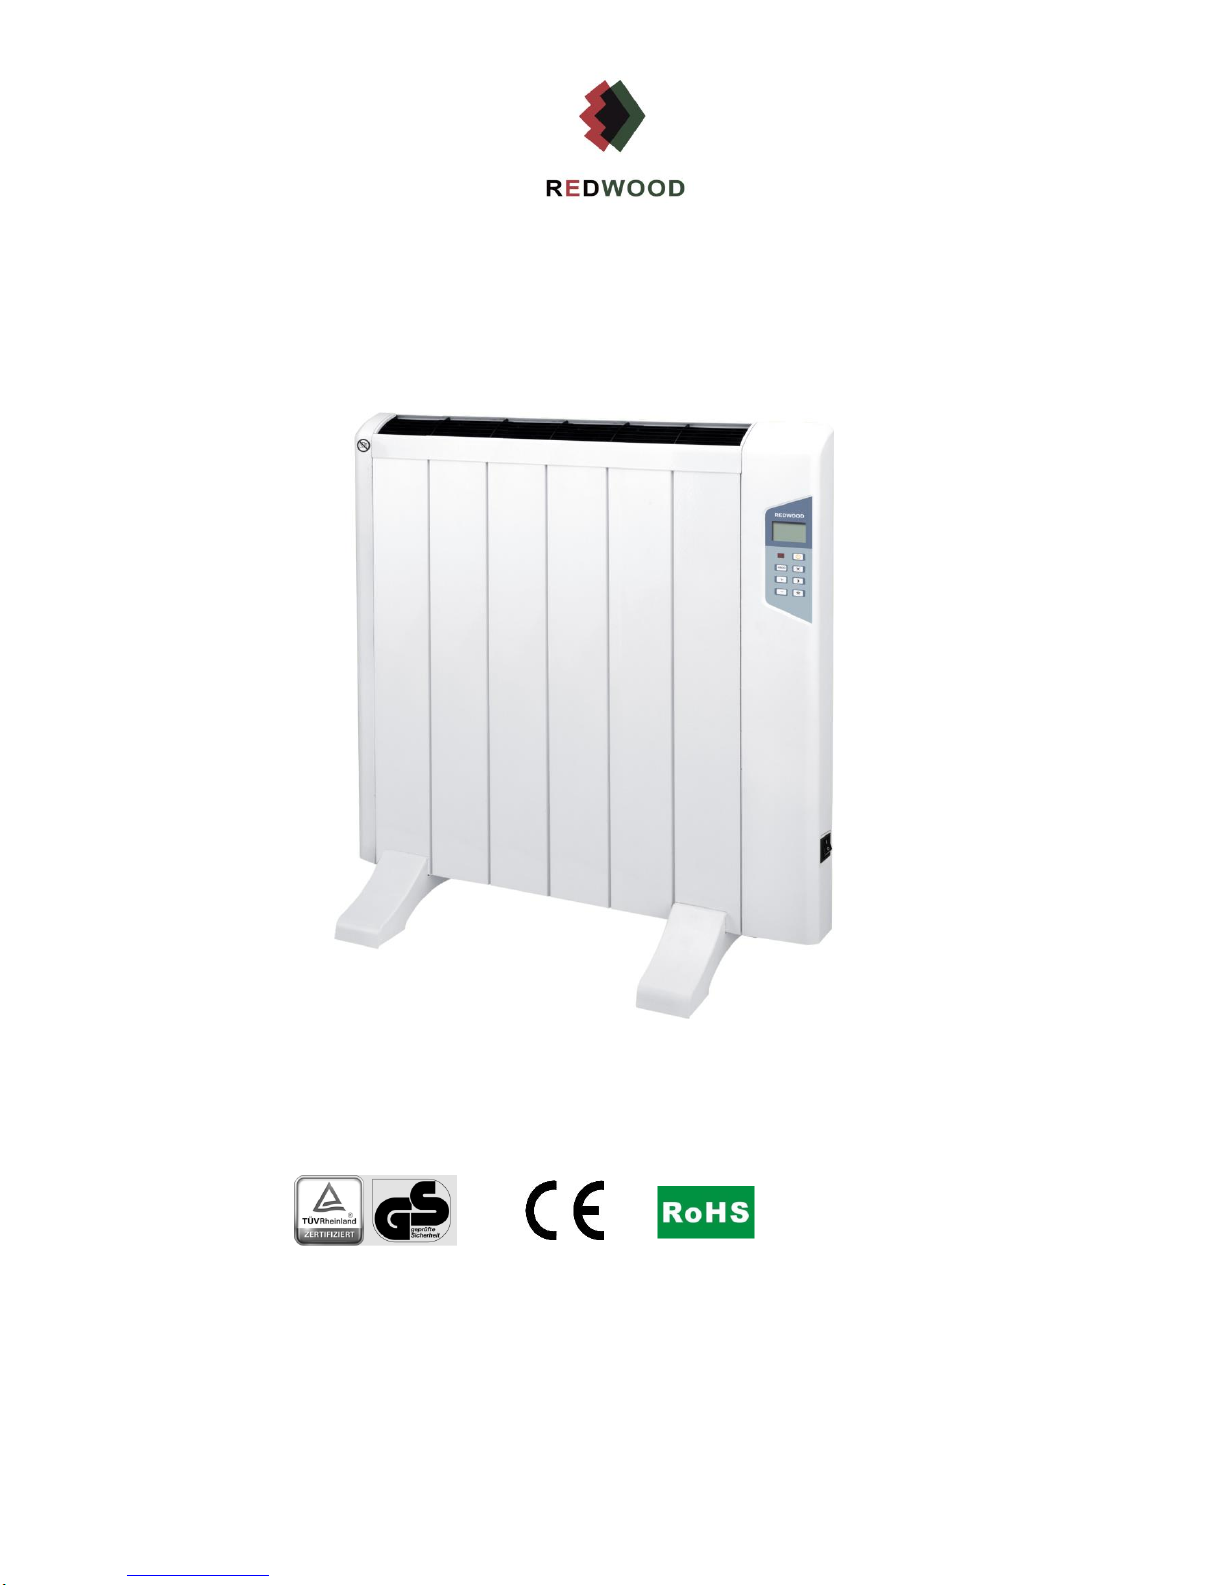
1)This appliance can be wall-mounted or free-standing.
2)Do not install this product near furniture, curtains or any other appliances.
3)Do not install this appliance in the corner of the wall.
4)For maximum performance endeavour to locate away from the doors and windows.
5)The appliance must not be located in wet rooms and cannot touch the appliance’s switch or
controller.
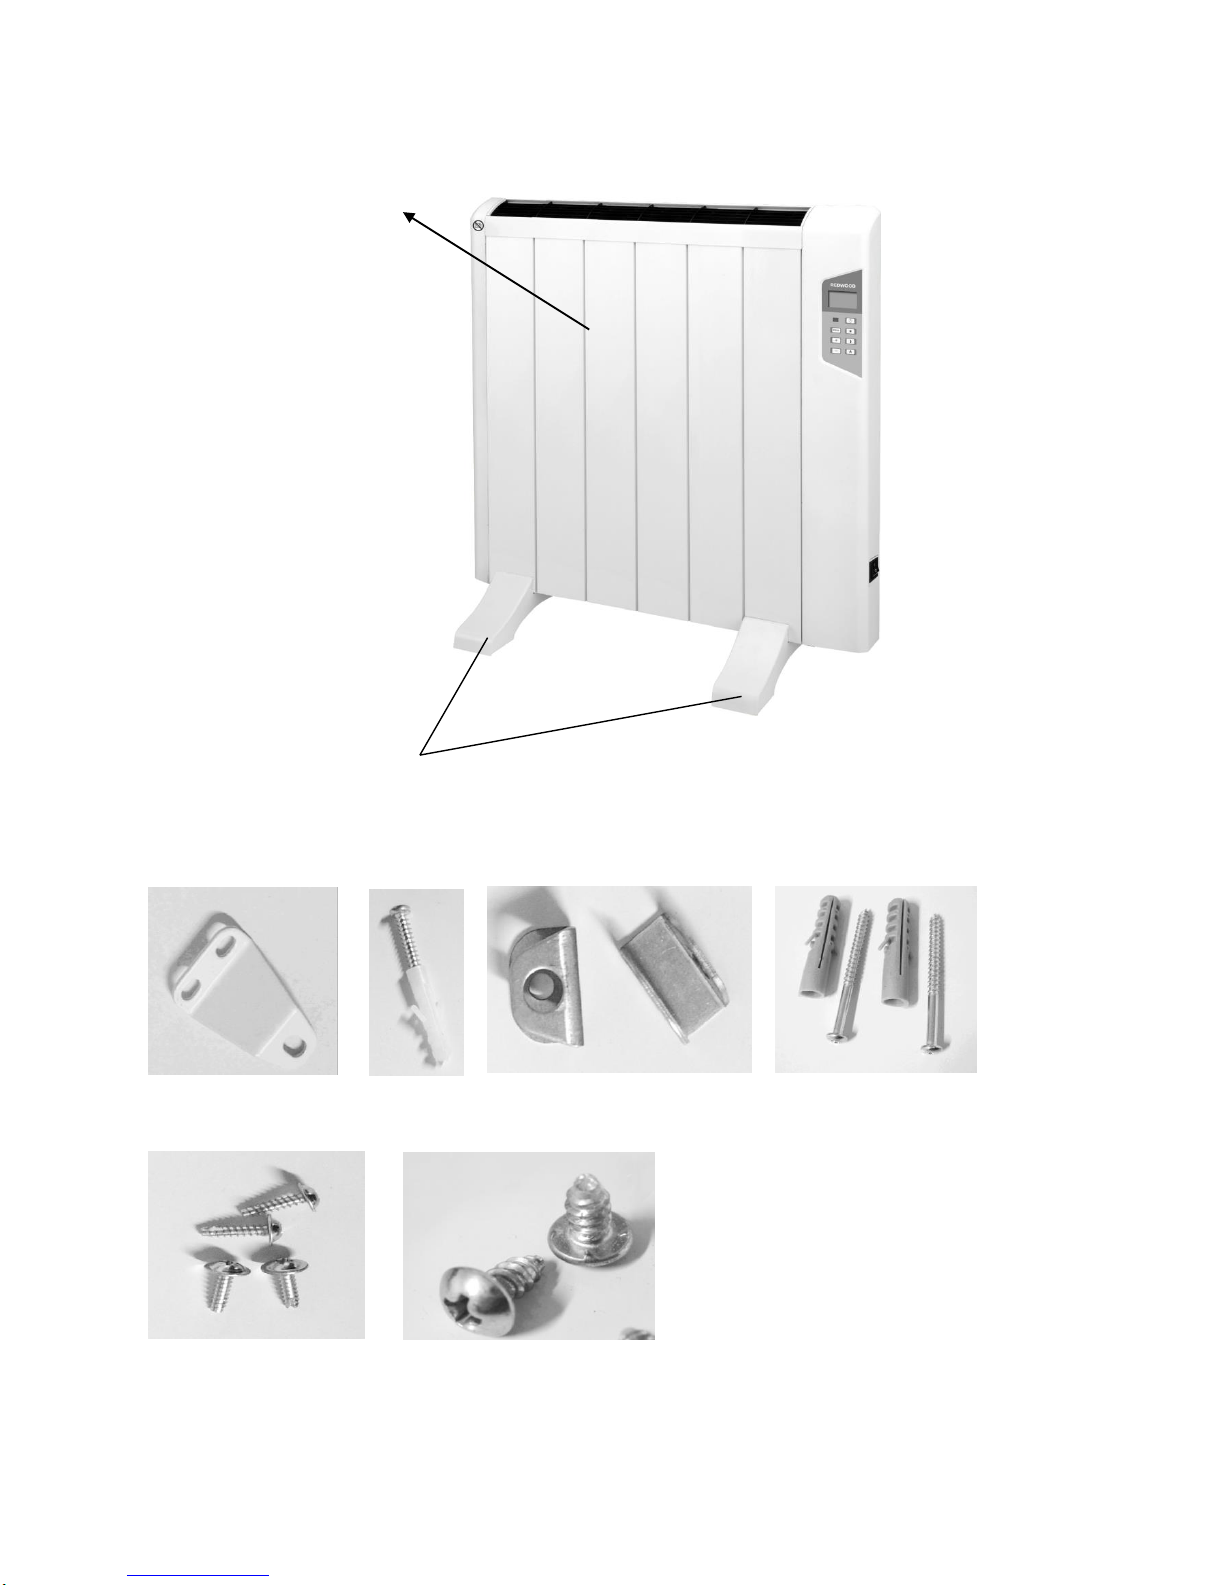
Free Standing Installation Instructions
Place the legs to the fins at the bottom of the heater and screw tight using screws provided.
Make sure the body and feet holes line up correctly as shown on the following pictures:
Wall Mounted Installation Instructions
1)Before fixing the heater to the wall make sure it will be kept at a minimum distance (shown in below pictures)
from the wall.(Unit:MM)
The distances marked above will vary depending on the model of heater. The dimensions are as follows:
Models
a (mm)
b (mm)
e (mm)
f (mm)
CA700AF
415
73
220
495
CA900 AF (900W)
565
73
372
495
CA125 AF
715
73
524
495
CA150 AF
870
73
676
495
CA180 AF (1800w)
1020
73
828
495
2) First, drill 2 holes on the wall (diameter: 10mm; depth: 60mm), the 2 holes’ distance should correspond to
the “e” position shown on the above.
Fix the hooks (E item as below picture) on the wall with the big expansion screws (F item as below picture).
Use screws (H item as below picture) to fix the fixing flat (C item as below picture) to the body of the
appliance. (Pls. see below pictures for installation)
3) Hang the appliance on the hooks (shown as below). Be sure the bracket is totally hung on the hook. Once
the appliance is hung on the hook, try to pull down the appliance, to ensure the appliance is hooked and
unmovable.
Mark a hole position on the wall for the lower flat fixing (C item as below picture), and drill the hole at diameter
4mm, depth 25mm. Fix the appliance to the wall. (Pls. see below pictures for installation)
60mm
Φ10mm
Electrical Connection
Before plugging into the socket make sure your power supply and voltage is the same labeled power and
voltage on the appliance.
This product is in compliance with the electromagnetic interference prevention standard 89/336/EEC.
Control Panel Instructions
As shown below:
1. On/Off “ ” button:
Note: No function will work if the heater is in Lock Mode (see paragraph 6)
2. Programme button (“ ”): This function programmes.
* Set day and time.
* Set on and off times by week, and or, day
Note: Hold down the (“ ”)button for 3 seconds to enter into the week programmed mode.
3. There are two working modes:
1) “ ” Comfort Mode
2) “ ” Anti Frost Mode. Note: Anti Frost Mode is normally used during the night when you wish the
heater to automatically turn on when the temperature drops below a set temperature.
4. To change from Auto Operation to Manual Operation press (“ ”).
5. Setting desired temperature.
* Press the “ ” button to enter Comfort Mode, then press the “+” or “-“ buttons to select your desired
temperature between 5 and 35℃.
* Press the “ ” button to enter Anti Frost mode, then press the “+” or “-“ buttons to select your desired
temperature between 5 and 18℃.
* When the heater is unlocked, Press the “ ” or “ ” button and you will see the pre-set temperature.
You can then increase or decrease the temperature at any given time as desired. Each press of the
button, the temperature will be increased or decreased by 0.5 degrees. Holding down the button for over
3 seconds speeds up the change. The heater will only stop heating up once the room temperature
exceeds this set temperature.
Note: By changing the temperature it will automatically change both Automatic and Manual modes.
6. Lock/ Unlock button
Press the “ ” button on the control panel 3 seconds and the heater will be unlocked. If no button is
pressed within 60 seconds, the heater becomes locked and is shown on the display. See Pic 3
below.
Instruction for LCD as below:
Pic 3
When setting the heater, the display’s background light is blue and after the setting has been finished
for 10 seconds, the blue light will turn off.
The LCD will indicate the room’s temperature (shown as below) when the heater is under normal
working and standby mode.
Pic 4
When the heater is heating, the icon “ ” ” will appear on the LCD.
Operation Instructions
Starting and Manual Mode:
1. Turning on:
Plug in, and turn the power switch on the side of the heater. The heater will now be in standby state and
the display will indicate the room’s current temperature.
(When you turn the heater on again after use it will default to the working mode at the powered off
moment.)
2. Press “ ” and the heater will start working if the room temperature is less than the set temperature,
otherwise the heater will be in standby mode.
3. Comfort Mode: Press the “ ” comfort button to enter comfort mode.
4. Press “ ” or “ ” to set the desired room temperature in this mode.
5. Anti-Frost Mode:Press “ ” the anti-frost button to enter anti-frost mode.
6. Press “ ” or “ ” to set the desired room temperature in this mode (normally sleeping hours. Typically
called ‘night setback’). So select a temperature that you do NOT wish the heater to drop below. E.g. 16
Deg C. The heater will then automatically turn on if the temperature drops below this set temperature.
Note: If you wish to use the Manual Operation Only and no programming function then stop here.
Set Present Time, and Day (these only need to be set if you are using auto mode)
Program operation setting: If you want the heater to run every day at set times, and temperature, you
need to set the program operation first.
Setting sequence:
1. Current clock setting: Press “ ”for 3 seconds and the clock setting interface will be displayed.
(below pic 5)
The first two numbers = hours and they will flash.
Press the “ ” or “ ” buttons to set the present hour, then press “ ” again the minutes will flash.
Press the button “ ” or “ ” to set the current minutes.
Note: The flashing will continue until you set the time, and if the heater is left, the heater will
automatically lock and continue to flash as a reminder, until you finish the setting.
2. After setting the time, press the “ ” button and enter into the current day selection.
Above Pic 7 shows default pre-programmed times.
Default pre-programmed temperatures for Anti Frost = 15 degrees and Comfort = 21 degrees.
1.Current time set
2. Day set (Mon.?)
3. Mode working time set
Pic 5
Pic 6
Pic 7
Programming Set Time and Temperatures:
Press the “ ” button, the program will default to a Monday start position, the screen will display
“”, “ ” = Monday, “2” = Tuesday etc.
By pressing “ ” or “to select current day.
1. After setting the day, as above… Press the “ ” button, to select the heating mode in each working
time (0~24hours).
2. By pressing “ ” or “ ” to set working time .In each hour followed by pressing “ ” or “ ” to confirm the
working mode you want on.
3. After setting Monday (the starting default day) the heater will automatically operate at the set times for 7
Days(all week). No other programming is required; the setting for the remaining 6 days will be same as
Monday.
For example as shown in Pic 7: Comfort Mode ON = 6:00 —9:00 and 18.00 –22.00. Anti-frost mode
22.00—06.00: and 9.00:—18.00. (These are default times.)
Note: you do not need to program the days –times or temperatures if you are happy with the default
pre-programming.
Separate Day Programming:
If you want to separate some days and programming to be different. E.g. Saturday and Sunday.
Press the “Day” button (as shown in pic 8) and then press “ ” to select the day you wish to
change the working time.
By pressing “ ”、“ ” to set working time . In each hour followed by pressing “ ” or “ ” to confirm
the working mode you want on.
As shown in pic 9. This means comfort mode is on Tuesday 10:00 to 12:00. Anti Frost Mode is on
12:00 to 10:00.
When you are finished programming, press “Day” again to confirm and quit.
Pic 8 Pic 9
Note: Under normal work conditions (weekly/comfort/anti-frost mode), and when the heater is unlocked,
the temperature can be manually adjusted by pressing the ““-”” or “+”.
Power off/ power switch off
The heater will stop working if the power switch is turned off or there’s a power cut. The time clock will stop at
the power off moment, and all setting will be stored in the memory. Once powered on, the time clock will go on
moving from its powered off moment and all programs will continue running.
High temperature protection
The heater transfers the heat through convection and radiation. If you cover this heater with textile products in
whole or in part it will affect the heater’s function and will result in the heater itself increasing in temperature.
Do not cover the heater with textiles as it may destroy or block the air circulation and cause low efficiency.
Daily Maintenance and cleaning
Before cleaning or maintaining the heater, remove the plug from the power socket and wait until main body of the
appliance is completely cool.
The heater does not require special technical maintenance.
A vacuum cleaner and soft brush can be used to clean the surface of the heater.
Stains can be cleaned with a wet rag.
.
Fault Detection and Solution
Ensure the power is connected.
Ensure the appliance is switched on and the LCD light is on.
Ensure the setting temperature is higher than the room’s temperature.
If problems still exist, contact technical support.
This appliance is marked according to the European directive 2002/96/EC on Waste Electrical and Electronic Equipment.
Main components of the heater can be recycled to save energy and resources. In order to remind users that
the appliance should be disposed separately, there’s a cross trash can mark on the product.
0800 432 846
Register for your “Full Warranty” On-Line
www.theheatingcompany.co.nz/Warranty

This manual suits for next models

4

Popular Electric Heater manuals by other brands

Radialight ICON Wi-Fi operating instructions

Radialight

Radialight ICON Wi-Fi operating instructions

Bionaire BCH9208 Instruction leaflet

Bionaire

Bionaire BCH9208 Instruction leaflet

Pfannenberg FLH operating instructions

Pfannenberg

Pfannenberg FLH operating instructions

Radialight BALI manual

Radialight

Radialight BALI manual

Trox TVZ manual

Trox

Trox TVZ manual

Orbegozo BB 4000 instruction manual

Orbegozo

Orbegozo BB 4000 instruction manual

Gude GH 3 P manual

Gude

Gude GH 3 P manual

DeLonghi TRD0715T Important instructions

DeLonghi

DeLonghi TRD0715T Important instructions

Dyna-Glo EG7500DH User's manual and operating instructions

Dyna-Glo

Dyna-Glo EG7500DH User's manual and operating instructions

Harvia Spirit Owner's/operator's manual

Harvia

Harvia Spirit Owner's/operator's manual

MONDEX Balance C Installation and operating instructions

MONDEX

MONDEX Balance C Installation and operating instructions

CONVECTAIR adagio 7640 Installation & operating instructions

CONVECTAIR

CONVECTAIR adagio 7640 Installation & operating instructions

Detroit Radiant Products CL3-30-65 installation manual

Detroit Radiant Products

Detroit Radiant Products CL3-30-65 installation manual

Comfort Glow EUH352 Homeowner's manual

Comfort Glow

Comfort Glow EUH352 Homeowner's manual

Qlima R 3224 X operating manual

Qlima

Qlima R 3224 X operating manual

Global Industrial 256551 user manual

Global Industrial

Global Industrial 256551 user manual

flowair LEO EL Technical documentation operation manual

flowair

flowair LEO EL Technical documentation operation manual

Bromic Heating platinum Smart-heat instruction manual

Bromic Heating

Bromic Heating platinum Smart-heat instruction manual

manuals.online logo
manuals.online logoBrands
  • About & Mission
  • Contact us
  • Privacy Policy
  • Terms and Conditions

Copyright 2025 Manuals.Online. All Rights Reserved.