Rega fono mm User manual

fono mm

fono mm
English
Français
Deutsch
Italiano
Español
Português
Nederlands
Dansk
Svenska
Polski
3/
7 /
11 /
15 /
19 /
23 /
27 /
31 /
35 /
39 /

introduction /
The Fono MM has been designed to be eective, easy to use, and above all, to
reproduce music. The Fono MM uses a fully discrete, cascaded, complementary
amplier input stage. This conguration has been proven to work well with moving
magnet cartridges. The RIAA equalization has been split into two stages to
minimise interaction. Polyester capacitors have been used in the signal path and
polypropylene capacitors are used in the RIAA equalization circuits.
The aesthetic design of the Fono MM was as important as the quality of its electrical
capabilities, so it benets from the same aluminium case as the Rega TTPSU and
Fono MC amplier, giving it a design which oers a familiar feel and moreover
brings it in line with its illustrious bigger brothers.
The Fono disk stage is designed to amplify the signal from a moving magnet
cartridge to a level which can feed into a 200mV line level input on a standard hi-
amplier.
powering up /
The Fono MM is turned on by pressing the on-o button located on the front, when
the unit is active the Rega logo will glow RED.
WARNING: We advise you to turn the Fono on rst followed by the amplier. This
is because the power surge in the Fono could cause an audible power on “thump”
which may distress the speakers.
3 /
English

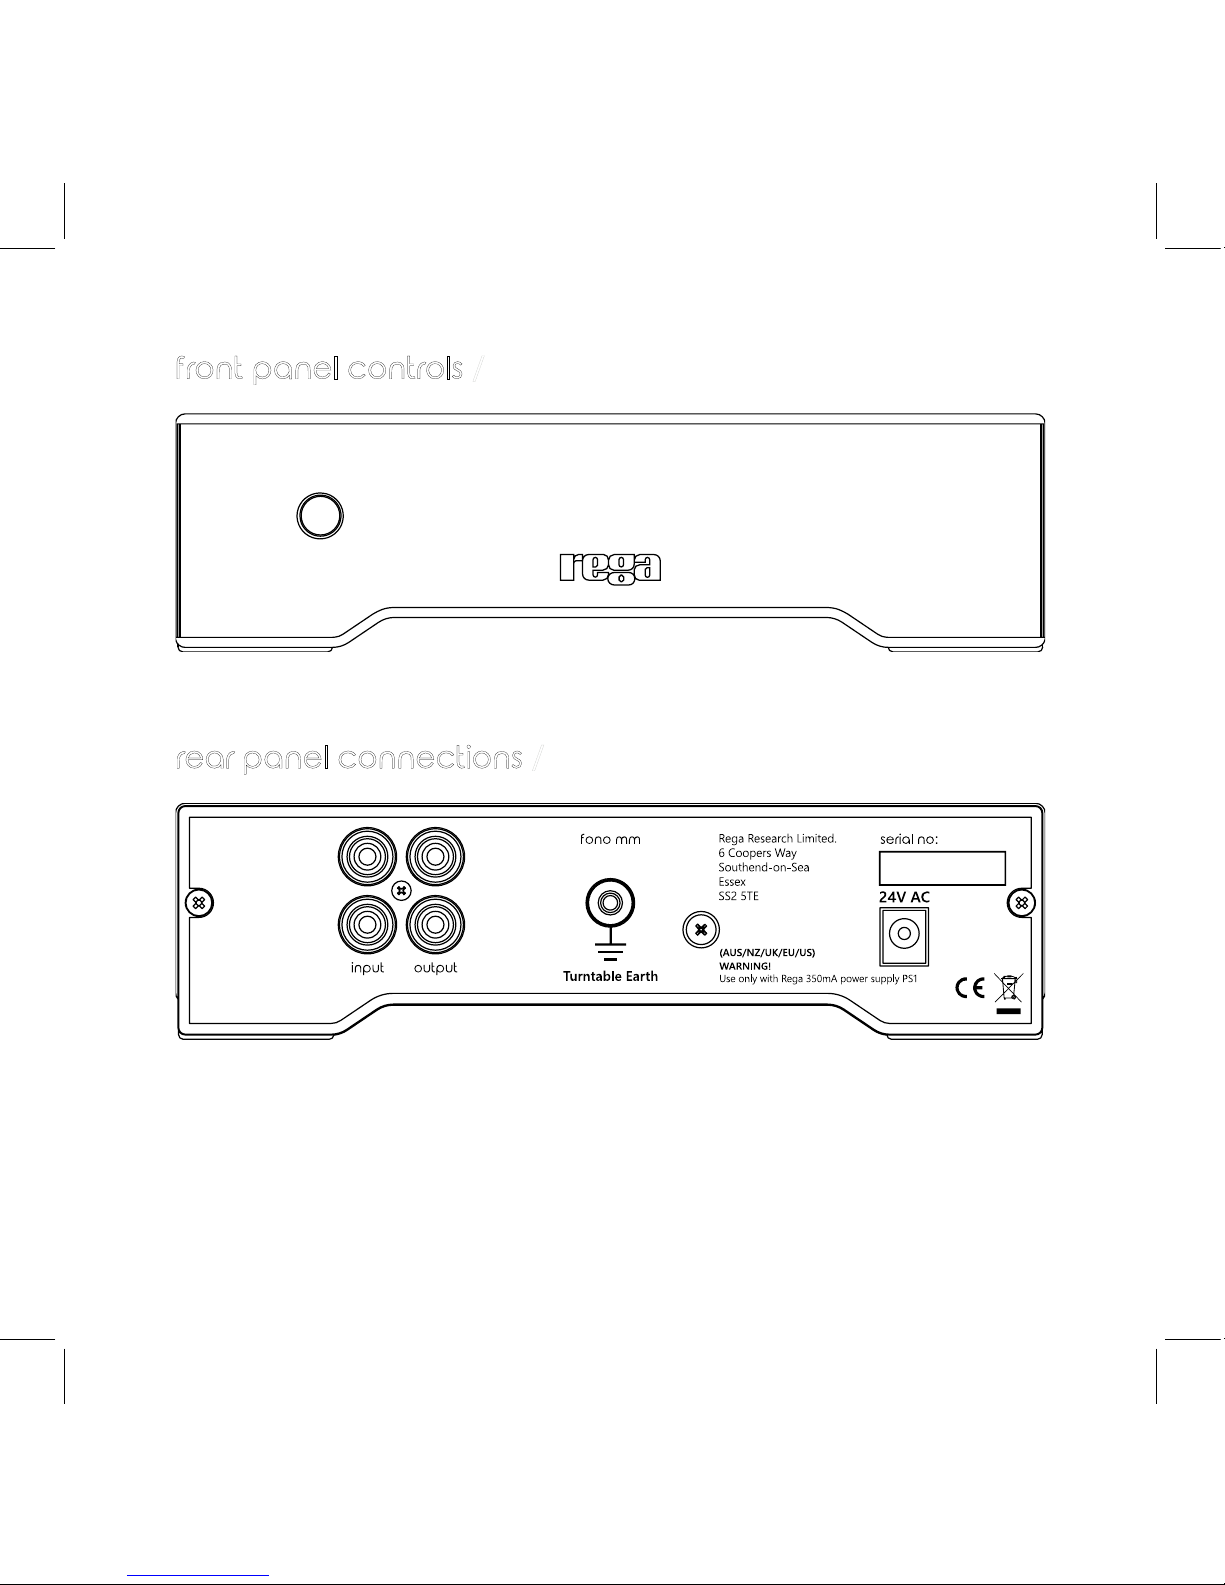
method of connection /
INPUT
Connect the tonearm leads and earth (if used) to the input socket and to the earth
terminal on the back of the Fono.
Turntable Earth
If the turntable or tonearm has a separate signal earth connection this should be
connected to the turntable earth terminal on the back of the unit.
OUTPUT
Connect the output socket of the Fono to the line input on the amplier.
Please note: If you have an integrated amplier with built in phono stage, DO NOT
connect the Fono to this input.
POWER SUPPLY
Connect the Rega PS1 to the AC socket on the Fono back panel.
4 /English

5 /
front panel controls /
Power
rear panel connections /
English

specications /
Input sensitivity = 1.7mV for 200mV
output
Input loading = 47KΩ in parallel with
100pF
Maximum input level = 60mV at 1KHz
Gain = 41.4dB at 1KHz
Output impedance = 200Ω
Recommended minimum output load
resistance = 5KΩ
Frequency response (50KΩ output load) =
15Hz (-3dB) to 100KHz (-0.2dB)
RIAA accuracy (50KΩ output load) =
better than +/-0.2dB 100Hz to 100KHz
Power requirements = 24V AC at 80mA
maximum. Only to be used with Rega PS1.
PS1 (UK)
Input...................................................230V ~ 50Hz 0.07A
Output......................................................24V ~ 350MA AC
PS1 (EU - Euro 2 pin)
Input...................................................230V ~ 50Hz 0.07A
Output......................................................24V ~ 350MA AC
PS1 (UL - American)
Input..........................................................115-120V ~ 60Hz
Output......................................................24V ~ 350MA AC
The Rega PS1 and Fono MM amplier is a class II apparatus.
Use only with the Rega PS1 power
supply. Never expose the unit to
rain or moisture. Do not open the
case covers. There are no user
serviceable parts inside.
6 /English

introduction /
Le Fono MM a été conçu pour être ecace, facile à utiliser, et surtout, pour reproduire
de la musique. Le Fono MM utilise un état d’entrée d’amplicateur complémentaire en
cascade entièrement discret. Cette conguration a été prouvée bien fonctionner avec
les phonocapteurs à aimant mobile. L’égalisation RIAA a été divisée en deux états
pour minimiser l’interaction. Des condensateurs en polypropylène ont été utilisés dans
le trajet du signal et dans les circuits d’égalisation RIAA.
Le côté esthétique du Fono MM était aussi important que la qualité de ses capacités
électriques, il bénécie donc du même boîtier en aluminium que le Rega TTPSU et de
l’amplicateur Fono MC, lui donnant un design à l’aspect familier et continuant dans la
lignée de ses illustres grands frères.
Le préamplicateur de disque Fono est conçu pour amplier le signal d’un
phonocapteur à aimant mobile à un niveau qui peut s’adapter à une entrée de niveau
ligne de 200 mV sur un amplicateur hi- standard.
mise en marche /
Le Fono MM s’allume en appuyant sur le bouton marche/arrêt (on/o) situé sur le
devant, lorsque l’unité est active le logo Rega sera illuminé en ROUGE.
AVERTISSEMENT: Nous vous recommandons d’allumer le Fono en premier suivi
de l’amplicateur. Ceci parce que la surtension dans le Fono pourrait causer une
alimentation audible de « bruit sourd » pouvant troubler les haut-parleurs.
7 /
Français

méthode de connexion /
ENTRÉE
Connecter les ls du bras et la terre (si utilisée) à la prise d’entrée et à la borne de
terre à l’arrière du Fono.
Terre Platine
Si la platine ou le bras a une prise de terre signal séparée, elle devrait être connectée
à la borne de terre de la platine à l’arrière de l’unité.
SORTIE
Connecter la prise de sortie du Fono sur l’entrée de ligne de l’amplicateur.
Veuillez noter: Si vous possédez un amplicateur intégré avec un phono intégré,
NE PAS connecter le Fono à cette entrée.
ALIMENTATION ÉLECTRIQUE
Connecter le Rega PS1 à la prise CA du panneau arrière du Fono.
8 /Français

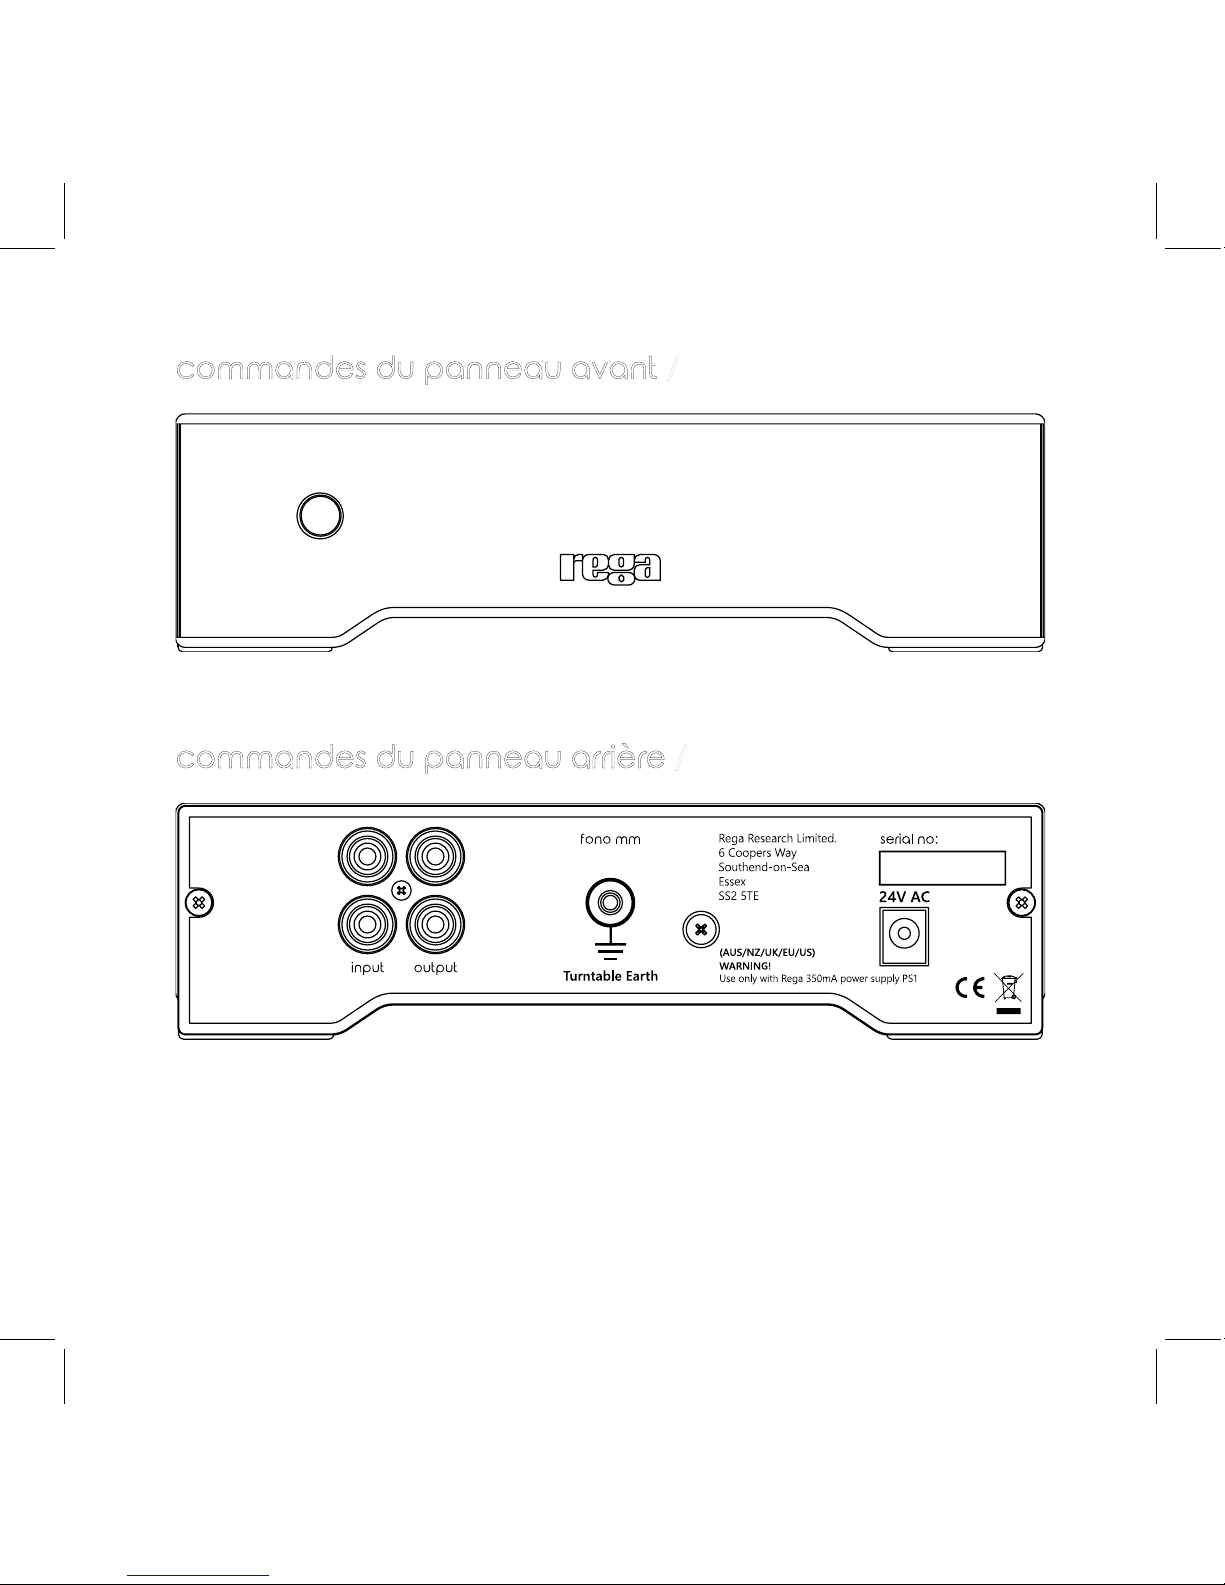
commandes du panneau avant /
Power
commandes du panneau arrière /
9 /
Français

caractéristiques /
Sensibilité d’entrée = 1,7 mV pour sortie de
200 mV
Charge entrée = 47 kΩ en parallèle avec
100 pF
Niveau maximum entrée = 60 mV à 1 kHz
Gain = 41,4 dB à 1 kHz
Impédance de sortie = 200Ω
Résistance de charge sortie minimum
recommandée = 5KΩ
Réponse de fréquence (charge sortie
50KΩ) = 15 Hz (- 3 dB) à 100 kHz (- 0,2 dB)
Précision RIAA (charge sortie 50KΩ) =
Meilleure que +/- 0,2 dB 100 Hz à 100 kHz
Puissance requise = 24 V CA à 80 mA
maximum. Utiliser uniquement avec le
Rega PS1.
PS1 (Royaume-Uni)
Entrée...................................................230 V ~ 50 Hz 0,07 A
Sortie......................................................24 V ~ 350 MA CA
PS1 (Europe - Euro 2 broches)
Entrée...................................................230V ~ 50Hz 0,07A
Sortie......................................................24V ~ 350MA CA
PS1 (UL - Américain)
Entrée..........................................................115-120V ~ 60Hz
Sortie......................................................24V ~ 350MA CA
Le Rega PS1 et l’amplicateur Fono MM constituent un
appareil de classe II.
Utiliser uniquement avec
l’alimentation électrique Rega PS1. Ne
jamais exposer l’unité à la pluie ou
l’humidité. Ne pas ouvrir le couvercle
des boîtiers. Aucune pièce interne
n’est réparable par l’utilisateur.
10 /Français

Einführung /
Der Fono MM wurde für mehr Ezienz, für einfache Handhabung und vor allem zur
Wiedergabe von Musik entwickelt. Im Fono MM kommt eine völlig diskrete kaskadierte
komplementäre Verstärkereingangsstufe zum Einsatz. Diese Konguration funktioniert
nachweislich gut mit Moving-Magnet-Tonabnehmersystemen. Die RIAA-Entzerrung
wurde zur Minimierung der Interaktion in zwei Stufen gesplittet. Im Signalpfad wurden
Polyesterkondensatoren und in der RIAA-Entzerrschaltung Propylenkondensatoren
verwendet.
Die Ästhetik des Fono MM sollte der Qualität seiner elektrischen Leistung in nichts
nachstehen, weshalb für das Gerät das gleiche Alu-Gehäuse verwendet wurde, mit
dem auch der Rega-TTPSU und der Fono-MC-Verstärker ausgestattet sind, und dessen
Design ein vertrautes Gefühl vermittelt und ihn darüber hinaus mit seinen klangvollen
größeren Brüdern vergleichbar macht.
Die Fono-Diskstufe ist so angelegt, dass sie das Signal eines Moving-Magnet-
Tonabnehmers bis zu einem Niveau verstärkt, dass es auf einem Standard-HiFi-Verstärker
in einen 200-mV-Line-Pegel-Eingang eingespeist werden kann.
Einschalten /
Eingeschaltet wird der Fono MM durch Betätigung der On-O-Taste auf der
Vorderseite. Ist das Gerät aktiviert, leuchtet das Rega-Logo ROT.
WARNHINWEIS: Wir empfehlen Ihnen, zunächst den Fono und dann den
Verstärker einzuschalten, da der Stromstoß im Fono einen hörbaren Einschalt-
„Schlag“ verursachen könnte, was die Lautsprecher belasten kann.
11 /
Deutsch

Verbindungsmethode /
EINGANG
Verbinden Sie die Tonarmkabelenden und die Erdung (falls verwendet) mit der
Eingangsbuchse und dem Massepol an der Rückseite des Fono.
Plattentellererdung
Wenn der Plattenteller oder der Tonarm über einen getrennten
Signalerdungsanschluss verfügen, sollte dieser mit dem Plattenteller-Massepol an der
Rückseite des Geräts verbunden werden.
AUSGANG
Verbinden Sie die Ausgangsbuchse des Fono mit dem Leitungseingang am Verstärker.
Bitte beachten Sie: Wenn Sie einen integrierten Verstärker mit einer eingebauten
Phonostufe haben, verbinden Sie den Fono NICHT mit diesem Eingang.
NETZANSCHLUSS
Verbinden Sie den Rega PS1 mit der Wechselstrombuchse auf der Rückseite des Fono.
12 /Deutsch

Frontbedienelemente /
Power
Anschlüsse an der Rückwand /
13 /
Deutsch

Spezikationen /
Eingangsempndlichkeit = 1,7 mV für
200-mV-Ausgang
Eingangslast = 47 KΩ parallel mit 100 pF
Max. Eingangspegel = 60 mV bei 1 KHz
Verstärkung = 41,4 dB bei 1 KHz
Ausgangsimpedanz = 200 Ω
Empfohlener
Mindestausgangslastwiderstand = 5 KΩ
Frequenzgang (50 KΩ Ausgangslast) = 15
Hz (-3 dB) bis 100 KHz (-0,2 dB)
RIAA-Genauigkeit (50 KΩ Ausgangslast) =
besser als +/-0,2 dB 100 Hz bis 100 KHz
Strombedarf = 24 V Wechselstrom bei 80
mA max. Nur zu verwenden mit Rega PS1.
PS1 (UK)
Eingang................................................230 V ~ 50 Hz 0,07 A
Ausgang.............................24 V ~ 350 MA Wechselspannung
PS1 (EU - Euro 2 Pin)
Eingang................................................230 V ~ 50 Hz 0,07 A
Ausgang.............................24 V ~ 350 MA Wechselspannung
PS1 (UL - Amerikanisch)
Eingang................................................115-120 V ~ 60 Hz
Ausgang.............................24 V ~ 350 MA Wechselspannung
Der Rega PS1 und Fono-MM-Verstärker ist ein Gerät der Klasse II.
Nur mit dem Rega-PS1-Netzteil zu
verwenden. Das Gerät unbedingt vor
Regen oder Feuchtigkeit schützen. Önen
Sie nicht die Gehäuseabdeckungen. Das
Gehäuseinnere enthält keine durch den
Benutzer zu wartenden Teile.
14 /Deutsch

presentazione /
Il Fono MM è stato progettato per essere funzionale, facile da usare e, soprattutto,
riprodurre musica. Il Fono MM utilizza uno stadio di ingresso per amplicatore
complementare in cascata assolutamente discreto. Questa congurazione ha
dimostrato di funzionare bene con le testine a magnete mobile. L’equalizzazione RIAA
è stata divisa in due fasi per minimizzare l’interazione. Sono stati utilizzati condensatori
in poliestere nel percorso di segnale e condensatori in polipropilene nei circuiti di
equalizzazione della RIAA.
Il design esteriore del Fono MM ha un valore pari a quello delle sue capacità elettriche.
Presenta lo stesso involucro in alluminio del Rega TTPSU e dell’amplicatore Fono MC,
con una progettazione che ore uno stile familiare e lo pone allo stesso livello dei suoi
illustri fratelli maggiori.
Il pre-amplicatore Fono è progettato per amplicare il segnale da una testina a
magnete mobile a un livello in grado di alimentare un ingresso di linea da 200 mV in
un amplicatore hi- standard.
alimentazione /
Il Fono MM si accende premendo il pulsante on-o collocato sulla parte frontale.
Quando l’unità è attiva il logo Rega diventa ROSSO.
ATTENZIONE: Consigliamo di accendere prima il Fono e successivamente
l’amplicatore. Questo perché lo sbalzo di corrente nel Fono potrebbe causare un
forte “colpo” con interferenze nelle casse.
15 /
Italiano

Italiano
sistema di connessione /
INGRESSO
Collegare il connettore del braccio e la messa a terra (se utilizzata) alla presa
d’ingresso e al morsetto di terra sul retro del Fono.
Conduttore di terra del giradischi
Se il giradischi o il braccio possiedono una connessione a terra separata, questa
deve essere collegata al morsetto di terra del giradischi sul retro dell’unità.
USCITA
Collegare la presa di uscita del Fono all’ingresso di linea dell’amplicatore.
NB: Se si è in possesso di un amplicatore integrato con stadio phono incorporato,
NON collegare il Fono a questo ingresso.
ALIMENTAZIONE ELETTRICA
Collegare il Rega PS1 alla presa CA sul pannello posteriore del Fono.
16 /Italiano

controlli pannello anteriore /
Power
collegamenti pannello posteriore /
17 /
Italiano

speciche /
Sensibilità d’ingresso = 1,7 mV per uscita
200 mV
Carico d’ingresso = 47 KΩ in parallelo con
100 pF
Livello d’ingresso max = 60 mV a 1 KHz
Guadagno = 41,4 dB a 1 KHz
Impedenza d’uscita = 200 Ω
Resistenza di carico d’uscita minima
consigliata = 5 KΩ
Risposta in frequenza (carico d’uscita 50
KΩ) = da 15 Hz (-3 dB) a 100 KHz (-0,2 dB)
Precisione RIAA (carico d’uscita 50 KΩ) =
Migliore di +/-0,2 dB, da 100 Hz a 100 KHz
Requisiti di alimentazione = 24 V CA a max
80 mA. Utilizzabile solo con Rega PS1.
PS1 (GB)
Ingresso...................................................230 V ~ 50 Hz 0,07 A
Uscita......................................................24 V ~ 350 MA CA
PS1 (UE - Euro a 2 poli)
Ingresso...................................................230 V ~ 50 Hz 0,07 A
Uscita......................................................24 V ~ 350 MA CA
PS1 (UL - America)
Ingresso..........................................................115-120 V ~ 60 Hz
Uscita......................................................24 V ~ 350 MA CA
Il Rega PS1 e l’amplicatore Fono MM sono
apparecchiature di II categoria.
Utilizzare solo con l’alimentatore
Rega PS1. Non esporre l’unità a
pioggia o umidità. Non aprire il
coperchio dell’involucro. All’interno
non sono presenti parti riparabili
dall’utente.
18 /Italiano

introducción /
El Fono MM ha sido diseñado para resultar ecaz, fácil de usar y, sobre todo, para
reproducir música. El Fono MM utiliza una plataforma de entrada para amplicador
complementaria en cascada totalmente independiente. Esta conguración ha
demostrado funcionar adecuadamente con cartuchos magnéticos móviles. La
ecualización RIAA se ha dividido en dos etapas para minimizar la interacción. Se han
utilizado condensadores de poliéster en la trayectoria de la señal y condensadores de
polipropileno en los circuitos de ecualización RIAA.
La apariencia estética del Fono MM se consideró tan importante como la calidad de
sus funciones eléctricas, de modo que se benecia de la misma carcasa de aluminio
que la fuente de alimentación Rega TTPSU y el amplicador Fono MC, aportándole
un diseño con una sensación familiar y que, además, está en la línea de sus ilustres
hermanos mayores.
Este previo de fono se ha diseñado para amplicar la señal de un cartucho magnético
móvil a un nivel que pueda alimentar un nivel en línea de 200 mV en un amplicador
hi- estándar.
encendido /
El Fono MM se enciende pulsando el botón de encendido/apagado situado en la
parte delantera. La unidad está activa cuando el logotipo de Rega se ilumina en color
ROJO.
ADVERTENCIA: Se recomienda encender primero el Fono y después el amplicador, ya que una
sobrecarga temporal del Fono podría generar una energía audible que generaría un “ruido sordo”
que podría interferir en los altavoces.
19 /
Español

método de conexión /
ENTRADA
Conectar las tomas del brazo y la puesta a tierra (si existe) en la toma de entrada y
en la terminal a tierra en la parte posterior del Fono.
Puesta a tierra del plato
Si el plato o el brazo cuentan con una conexión a tierra independiente, deberá
conectarse al terminal de puesta a tierra del plato en la parte posterior de la unidad.
SALIDA
Conectar la toma de salida del Fono a la entrada en línea del amplicador.
Tenga en cuenta: Si dispone de un amplicador integrado con un pre-amplicador,
NO conecte el Fono a esta entrada.
ALIMENTACIÓN
Conectar el Rega PS1 a la toma AC del panel posterior del Fono.
20 /Español
Table of contents
Languages:
Other Rega Amplifier manuals