Regulus RGMAT E W6 User manual

www.regulus.eu
RGMAT E W6
RGMAT E W6
EN
Installation and Operation Manual
RegulusRGMAT E W6 LOAD UNIT
for heating systems

1. Introduction
RegulusRGMAT E W6 Load Unit makes boiler installation quicker as it contains all components needed
for boiler circuit circulation and for boiler protection against low-temperature corrosion. It is designed to
be installed directly on a boiler return piping. The distance of pipe axis from a wall shall be at least 100
mm to enable insulation removal if needed. This Load Unit is intended for hydronic fireplaces and
solid-fuel boilers.
2. Description of the Load Unit
RGMAT E W6 keeps the temperature in a hydraulic boiler circuit above the flue gas condensation
temperatures, which prevents so called low-temperature corrosion of the boiler combustion chamber.
This limits condensation and boiler tarring significantly, the efficiency of fuel combustion increases and
service life of the boiler is extended.
Main Features
Function maintaining a minimum inlet temperature into a boiler (fireplace)
through a load valve
Application Load Unit for solid-fuel boilers and fireplaces; it prevents
low-temperature corrosion and boiler (fire) fouling
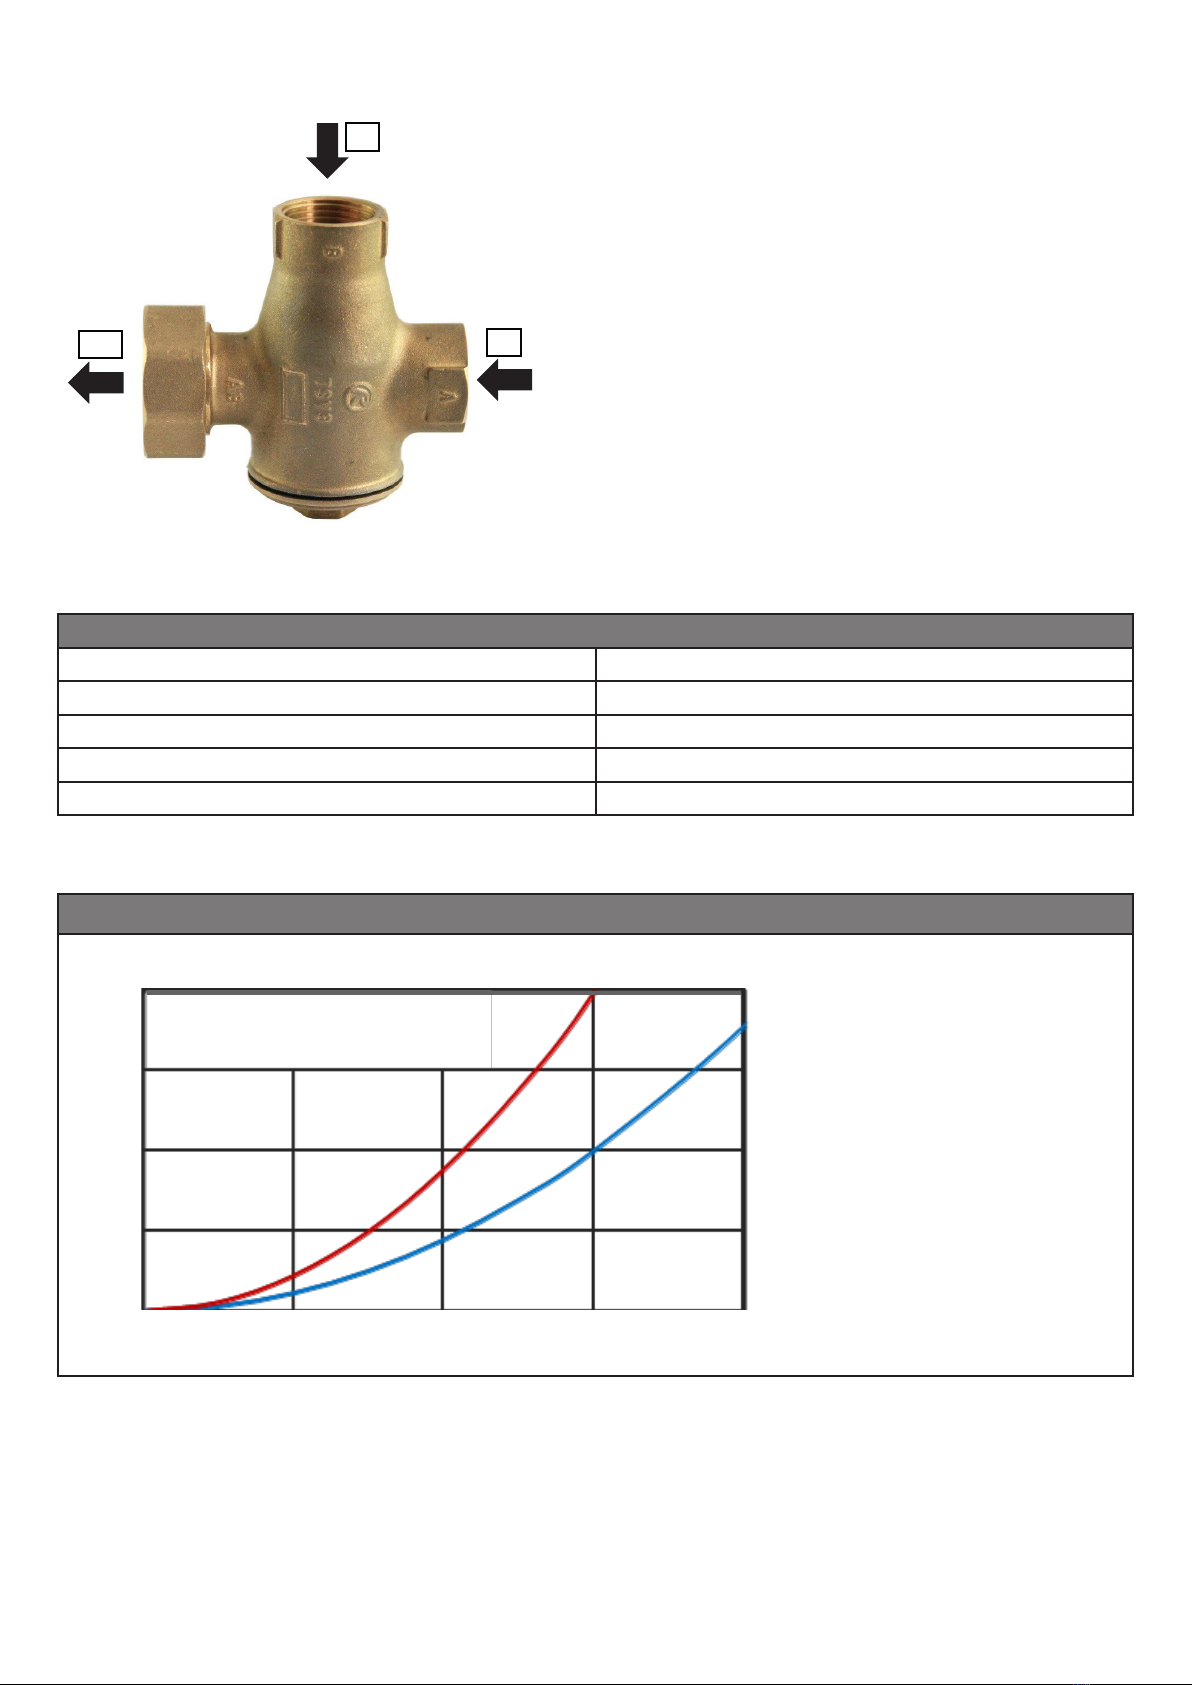
Description consists of Wilo PARA SC 25/6 pump, TSV3B valve (with
automatic by-pass balancing), thermometer and insulation
Working fluid water; water/glycol mixture (max. 1:1) or water-glycerine
mixture (max. 2:1)
Installation on return pipe, min. pipe centre distance from wall is 100 mm
Code Max. boiler output
18668 for opening temperature 45 °C 45 kW at ΔT 20 K
18680 for opening temperature 50 °C 42 kW at ΔT 20 K
18612 for opening temperature 55 °C 36 kW at ΔT 20 K
18681 for opening temperature 60 °C 32 kW at ΔT 20 K
18682 for opening temperature 65 °C 25 kW at ΔT 20 K
18683 for opening temperature 70 °C 22 kW at ΔT 20 K
Data for RGMAT E W6 Load Unit
Fluid working temperature 5 - 95 °C
Max. working pressure 6 bar
Min. working pressure 0.5 bar
Ambient temperature 5 - 40 °C
Max. rel. humidity 80% non condensing
Insulation material EPP RG 60 g/l
Overall dimensions 325 x 140 x 155 mm
Total weight 3.1 kg
Connections 3x G 1" F
Accessories
Bypass with non-return valve code 16126

3. RGMAT E W6 Connection Diagram
Install the Load Unit respecting the following instructions:
Connect the Load Unit outlet marked AB to the piping entering the boiler. Connect the return line from
the heating system to the Ainlet, and the outlet pipe from the boiler to the B inlet via a T-piece. Take
care to install shut-off valves and filter where necessary to avoid draining the whole system for valve
cleaning or replacing the thermostatic element.
When the connecting pipes are not arranged or sloped properly, the load valve may get blocked by air
inside. This may hinder or even disable its operation.
Always respect valid rules and boiler manufacturer’s data during installation.
HW STORAGE TANK
THERMAL STORE
RGMAT E W6
CSE MIX W
CSE OTS ZV W

4. Function Description of TSV3B Valve
The TSV3B load valve is fitted with an integrated
thermostatic insert that will close the Ainlet (from
a heating system), if the return water temperature to the
boiler (AB outlet) is lower than the opening one. As soon
as the opening temperature is reached, the thermostat
starts opening the Ainlet slowly and mixing the cold
return water with the hot water from the Binlet (boiler
flow) with the aim to reach the opening temperature (AB
outlet) in the return pipe.
At the same time, the valve closes the Binlet, limiting so
the hot water flow coming from the bypass till its complete
tight closure. Thanks to this, no balancing valve is
needed. The load valve is made of brass, element and
plug seals are in EPDM, cone seal is made of NBR.
Technical Data
Valve opening temperature depending on the thermostatic element
Control range tvalve,opening+ 5 °C
Valve Kvs (A→AB direction) 6.2 m³/hod
Valve Kvs (B→AB direction) 4.4 m³/h
Nominal inner diameter DN 32
Valve pressure drop graph
The pressure drop value
moves between the two
curves depending on the
mixing ratio during mixing.
B
AB A
▬▬ A AB, Kvs = 6,2 m3/h
▬▬ B AB, Kvs = 4,4 m3/h
Q [m3/h]
Δp [m H2O]
0,0 0,5 1,0 1,5 2,0
1,2
0,9
0,6
0,3
0,0

9
8
7
10
3
2
1
4
5
6
5. PARA 25/6 SC 130 mm Pump
5.1. General Information
The high efficiency circulation pumps of the PARA SC series are used exclusively for the circulation
of liquids in hot water heating systems. Operating the pump in other systems or in systems lacking
water, containing air or in unpressurized systems can lead to its rapid destruction.
5.2. Pump Description
1 - Pump housing
2 - Pump motor
3 - Condensate drain openings
4 - Pump housing bolts
5 - Control module
6 - Rating plate
7 - Pump adjustment button
8 - LED indication of operation/fault
9 - Display of the selected pump operating mode
10 - Display of the selected pump curve (I, II, III)
5.3. Permitted and Prohibited Pump Positions
The pump station may be installed either horizontally or vertically.
Permitted positions Prohibited positions

5.4. Pump Wiring
The pump shall be wired to electrical installation by a qualified person in compliance with
EN 50110-1!
Plug the power cable (2) into the connector on the pump so that the connector lock (1) is in the
correct position, see Fig.
1 Lock
2 Power cable connector
5.5. Pump Control
Constant speed operating mode and pump performance curve III are preset as factory settings for
the PARA SC pump. After switching on, the pump runs at the factory setting or at the last setting.
The settings can be changed using the operating button, see below.
Briefly press the operating button to:
select the pump operating mode: constant speed, Δp-v or Δp-c and the pump performance
curve (I, II, III)
2
1
OVLÁDACÍ TLAČÍTKO
OPERATING BUTTON
POWER SUPPLY (230V, 50 Hz)
brown - L
blue - N
yellow-green - PE

Press and hold the operating button for the specified time to activate::
- Pump venting function - hold the control button for 3 seconds.
- Manual restart - hold the operating button for 5 seconds.
- Locking / Unlocking the operating button - hold the button for 8 seconds.
- Factory setting - hold the control button for at least 4 seconds and switch off the pump by
disconnecting it from the mains.
SETTING THE PUMP PROFILE
Briefly press the operating button for 1 second to select operating mode
and pump performance curve. LEDs show pump settings (operating mode
/ performance curve).
LED indicators Operating mode Performance curve
constant speed
constant speed
Δp-v variable
Δp-v variable
Δp-v variable
Δp-c constant
Δp-c constant
Δp-c constant
constant speed

PUMP VENTING
If air is present in the pump:
o Activate the pump venting function by pressing and holding
the operating button for 3 sec. The upper and lower rows of
LEDs will flash in 1sec interval, see Fig.
o Pump venting takes 10 minutes, after that the pump returns
to current mode. In order to cancel pump venting, press and
hold the operating button for 3 sec.
MANUAL RESTART
If the pump has been inactive for a long time or is blocked, activate
the manual restart by holding the operating button for 5 seconds. The
LEDs flash sequentially clockwise. The manual restart takes max.
10 minutes before the pump returns to normal operation. To cancel
the manual restart, hold down the operating button for 5 seconds.
If the pump does not get unblocked, contact a qualified technician.
sec
3
min
10
sec
5
min
10

OPERATING BUTTON LOCKING / UNLOCKING
To lock the operating button, press it for 8 seconds.
The selected setting then starts flashing and cannot be changed.
To unlock, hold down the operating button again for 8 seconds
and the LEDs will stop flashing.
FACTORY SETTINGS
To return to the factory settings, press and hold the operating button for at least 4 sec. (all LEDs
flash for 1 second) and turn off the pump by unplugging. When switched on again, the pump will
run at the factory settings.
sec8

PUMP OPERATING MODES
Variable differential pressure Δp-v
It is not recommended to use variable differential pressure for solid fuel boiler pumps!
The Variable differential pressure operating mode is recommended in systems where it is
advisable to reduce the discharge pressure of the pump in parallel with the decreasing required
flow rate. A typical example is a heating circuit with radiators equipped with thermostatic valves,
where the selection of this operating mode can reduce the noise from thermostatic valves which is
caused by closing too many radiators in the system. This mode, on the other hand, is unsuitable
for circuits with heat sources where the reduction of the head and flow can make these sources
even inoperable.
By reducing the discharge as the flow decreases, the pump‘s power consumption and therefore the
operating costs are significantly reduced (see graph Q-P). In larger heating circuits and in circuits
where there are significant differences in heating demand in separate heating zones, this mode
may temporarily cause insufficient heating. In these systems, it may be preferable to switch the
pump to Δp-c mode.
Performance curves
II
III
I
II
III
I
,500 ,511,0 2,0 2,5
,200 0,4 0,6 0,8
02468
0
1
2
3
4
5
6
0
10
20
30
40
50
60
0 ,50 1,0 ,51 2,0 2,5
3,0
10
3,0
0
10
20
30
40
Wilo-Para 25/6 p/kPa
H/m
P1/W
Q/m³/h
Q/l/s
Q/Igpm
Q/m³/h
Δp-v
max.
Δp-v (variabilní)
II
III
I
II
III
I
,500 ,511,0 2,0 2,5
,200 0,4 0,6 0,8
02468
0
1
2
3
4
5
6
0
10
20
30
40
50
60
0 ,50 1,0 ,51 2,0 2,5
3,0
10
3,0
0
10
20
30
40
Wilo-Para 25/6 p/kPa
H/m
P1/W
Q/m³/h
Q/l/s
Q/Igpm
Q/m³/h
Δp-v
max.
Δp-v (variabilní)
H[m]
P1[W]
Q [m3/ h]
Q [m3/ h]
Δp-v (variable)

Constant differential pressure Δp-c
The Constant differential pressure (constant delivery head) operating mode is suitable for
hydraulic circuits of heat sources (boilers, heat pumps, solar thermal systems etc.), hot water
storage tanks, heaters, underfloor heating systems and large heating circuits where the previous
mode Δp-v could cause insufficient heating through discharge reduction.
By decreasing the required flow, the pump maintains a constant delivery head, thus the pump
power consumption decrease is more gentle than in the Δp-v mode.
Performance curves
0 ,50 ,511,0 2,0 2,5
,200 0,4 0,6 0,8
1020 468
0
1
2
3
4
5
6
0
10
20
30
40
50
60
,500 ,511,0 2,0 2,5
3,0
3,0
0
10
20
30
40
III
I
II
III
I
II
Wilo-Para 25/6 p/kPa
H/m
P1/W
Q/m³/h
Q/l/s
Q/Igpm
Q/m³/h
max.
Δp-c
max.
Δp-c (konstantní)
0 ,50 ,511,0 2,0 2,5
,200 0,4 0,6 0,8
1020 468
0
1
2
3
4
5
6
0
10
20
30
40
50
60
,500 ,511,0 2,0 2,5
3,0
3,0
0
10
20
30
40
III
I
II
III
I
II
Wilo-Para 25/6 p/kPa
H/m
P1/W
Q/m³/h
Q/l/s
Q/Igpm
Q/m³/h
max.
Δp-c
max.
Δp-c (konstantní)
H[m]
P1[W]
Q [m3/ h]
Q [m3/ h]
Δp-c (constant)

Constant speed
Constant speed operating mode means that the pump does not adjust its speed in any way
depending on the flow rate or discharge of the hydraulic circuit. The flow and discharge of the
pump are thus entirely dependent on the speed setting set (I, II, III) and the hydraulic circuit
settings. This mode is used when the more economical Δp-c mode is not suitable. This is the
same mode as in the older types of classic circulation pumps where the speed I, II, III was set by a
selector switch.
For example, this mode may be suitable for older circuit types where flow is regulated by throttling
and this method required to be maintained. Furthermore, it may be suitable for solid fuel boilers
that are equipped with older types of TSV valves with balancing using a manual throttle valve, or in
other similar specific cases of requiring a constant pump performance.
Performance curves
I
III
II
I
III
II
,500 ,511,0 2,0 2,5
,200 0,4 0,6 0,8
20 64 8
0
1
2
3
4
5
7
0
10
20
30
40
50
70
660
,500 1,0 ,51 2,0 2,5
0
10
20
30
40
10
3,0
3,0
Wilo-Para 25/6 p/kPa
H/m
P1/W
Q/m³/h
Q/l/s
Q/Igpm
Q/m³/h
Konstantní otáčky I, II, III
I
III
II
I
III
II
,500 ,511,0 2,0 2,5
,200 0,4 0,6 0,8
20 64 8
0
1
2
3
4
5
7
0
10
20
30
40
50
70
660
,500 1,0 ,51 2,0 2,5
0
10
20
30
40
10
3,0
3,0
Wilo-Para 25/6 p/kPa
H/m
P1/W
Q/m³/h
Q/l/s
Q/Igpm
Q/m³/h
Konstantní otáčky I, II, III
H[m]
P1[W]
Q [m3/ h]
Q [m3/ h]
Δp-v (variable)

5.6. Technical Data
Wilo PARA 25/6 SC
Electric Data
Power supply 230 V, 50 Hz
Power input (min./max.) 3 / 43 W
Current (min./max.) 0.04 / 0.44 A
Max. speed 4300 rpm
Speed control frequency converter
Energy Efficiency Index ≤ 0.21 by EN 16 297/3
IP rating IPX4D
Motor protection integrated

5.7. FAULTS, THEIR REASONS AND TROUBLESHOOTING
The LED light signals a defect. The pump will switch off (depending on the defect type)
and try to restart.
FAULTS REASONS TROUBLESHOOTING
Pump does not run despite
power supply switched on Pump not energized Check circuit breakers or fuses in the
system control
Pump is making noise Cavitation due to insufficient
inlet pressure
Increase pressure in heating system
within permissible range or check
that circuit breaker has not tripped
Check head setting, if necessary, set
lower head
Building not warming up Heat output of heating surfaces
too low
Set higher temperature at controller
and fully open radiator valves. If this
does not help, increase circulation
pump performance.
If the fault cannot be rectified, contact a specialized technician.
green is lit
red is lit
ashing red
ashing red and green
1 - pump is running in trouble-free operation
2 - electric motor winding defect
3 - pump overheated
2 - electric short circuit in pump
1 - power supply lower/higher than 230 V
1 - rotor is blocked
1 - unforced uid circulation through the pump
2 - pump speed lower than desired
3 - air in pump
LED indication state description and possible fault reasons

6. Installation Options
This Load Unit comes in the version for horizontal installation to the right of a boiler. However, it can be
installed also into vertical piping or horizontally to the left of a boiler. When being installed horizontally
to the left of a boiler, the Load Unit needs to be turned by 180° and the TSV3 valve turned as shown in
the pics below.
FLOW DIRECTION
FLOW DIRECTION
FLOW DIRECTION

©2020 We reserve the right to errors, changes and improvements without prior notice.
REGULUS spol. s r.o.
E-mail: [email protected]
Web: www.regulus.eu
v1.0-12/2020
This manual suits for next models
12
Table of contents
Other Regulus Power Supply manuals
Popular Power Supply manuals by other brands

Pulsar
Pulsar 54V/8x03A/4x7Ah manual

Manson Engineering Industrial
Manson Engineering Industrial NTP-5521 user manual

Altronix
Altronix ALTV248ULHi installation guide

Omron
Omron S8VK-G Series instruction manual

VOLTCRAFT
VOLTCRAFT DSP-3005 operating instructions

illuburg
illuburg ST-46M-DALI2 operating instructions