R&S RT-ZC31 User manual

R&S®RT-ZC31
Current Probe
User Manual
User Manual
Version 01
1801494902
(B1aa2)

This manual describes the following R&S products:
●R&S®RT-ZC31, Current Probe (1801.4932.02)
●R&S®RT-ZA13, Probe Power Supply (1409.7789.02)
© 2020 Rohde & Schwarz GmbH & Co. KG
Mühldorfstr. 15, 81671 München, Germany
Phone: +49 89 41 29 - 0
Fax: +49 89 41 29 12 164
Email: [email protected]
Internet: www.rohde-schwarz.com
Subject to change – Data without tolerance limits is not binding.
R&S® is a registered trademark of Rohde & Schwarz GmbH & Co. KG.
Trade names are trademarks of the owners.
1801.4949.02 | Version 01 | R&S®RT-ZC31
The following abbreviations are used in this manual: R&S®RT-ZC31 is abbreviated as R&S RT-ZC31.

Contents
R&S®RT-ZC31
3User Manual 1801.4949.02 ─ 01
Contents
1 Notes on Safety......................................................................5
2 Product Description............................................................ 10
2.1 Product Overview............................................................................... 10
2.2 Key Features....................................................................................... 10
2.3 Inspecting the Contents..................................................................... 10
2.4 Description of the Probe.................................................................... 11
2.4.1 Probe Overview.....................................................................................11
2.4.2 Termination Unit.................................................................................... 12
2.4.3 Junction Box (Keys, LEDs)................................................................... 14
2.4.4 Sensor...................................................................................................16
3 Measuring Procedure.......................................................... 18
3.1 Preparing the Measurement...............................................................18
3.2 Demagnetizing and Zero Adjustment............................................... 21
3.3 Connecting the Probe to the DUT..................................................... 23
3.4 Disconnecting the Probe from the DUT............................................29
3.5 How to Measure Current Accurately................................................. 30
3.6 Protection Mode..................................................................................31
3.7 Typical Characteristics.......................................................................32
3.7.1 Frequency Characteristics.................................................................... 33
3.7.2 Frequency Derating Curve....................................................................33
3.7.3 Input Impedance................................................................................... 34
3.7.4 Consumption Current............................................................................34
3.7.5 Influence of Common-Mode Voltage.....................................................35
4 Troubleshooting...................................................................36

Contents
R&S®RT-ZC31
4User Manual 1801.4949.02 ─ 01
4.1 Possible Device Errors.......................................................................36
4.2 LED Display Errors............................................................................. 37
5 Maintenance and Service....................................................41
5.1 Cleaning...............................................................................................41
5.2 Contacting Customer Support...........................................................41
5.3 Returning for Servicing...................................................................... 42
5.4 Calibration Interval............................................................................. 42
5.5 Discarding the Product...................................................................... 43
6 R&S RT-ZA13 Probe Power Supply....................................44

Notes on Safety
R&S®RT-ZC31
5User Manual 1801.4949.02 ─ 01
1 Notes on Safety
Thank you for purchasing the R&S RT-ZC31 current probe.
To obtain maximum performance from the device, please read this manual first,
and keep it handy for future reference.
Risk of physical injury
This device is designed to comply with IEC 61010 Safety Standards, and
has been thoroughly tested for safety before shipment. However, mishan-
dling during use could result in injury or death, and damage to the device.
Be certain that you understand the instructions and precautions in the man-
ual before use.
Follow these precautions to ensure safe operation and to obtain the full benefits
of the various functions.

Notes on Safety
R&S®RT-ZC31
6User Manual 1801.4949.02 ─ 01
Risk of fatal injury
●To avoid electric shock, do not remove the device's cover. The internal
components of the device carry high voltages and may become very hot
during operation.
●To avoid electric shock and short circuits, never attach the clamp to
bare, unisolated conductors.
Make sure to measure at a location on an insulated wire where the insu-
lation is sufficient for the circuit voltage.
●Be careful to avoid damaging the insulation surface while taking mea-
surements.
●Refer to the derating characteristics when measuring current that
includes a high-frequency component and never measure any current
that exceeds the rated current. Use with high frequencies or strong
magnetic fields may cause the device to become abnormally hot, result-
ing in fire, equipment damage, or burns.
●To prevent fire or damage of the measurement target and device as well
as burns, exercise caution concerning the following when measuring
high-frequency currents or currents that contain high-frequency compo-
nents:
– Eddy current loss may cause heating of the sensor head.
– Dielectric heating may cause heating of cord insulation and other
materials.
●Connect the probe only to the secondary side of a breaker, so the
breaker can prevent an accident if a short circuit occurs. Never connect
it to the primary side of a breaker, because unrestricted current flow
could cause a serious accident if a short circuit occurs.
●Be sure to observe all operating precautions for the oscilloscope and
other instruments to which this device is connected.

Notes on Safety
R&S®RT-ZC31
7User Manual 1801.4949.02 ─ 01
Risk of fatal injury
●This device is made for use with the R&S RT-ZA13 probe power supply.
●When using a measurement instrument that does not provide isolation
between its input terminals and chassis or other input terminals, please
pay attention to the following points. If a signal is applied to an input ter-
minal other than that to which this device is connected, do not connect
the ground-side terminal to any nonground potential. Otherwise, short-
circuit current flows through the R&S RT-ZA13 probe power supply, or
this device from the ground terminal, which could cause an electrical
accident or damage.
Shock hazard
To avoid shock and short circuits, turn off all power before connecting the
device.
Do not allow the device to get wet, and do not take measurements with wet
hands. This may cause an electric shock.
To avoid electric shock when measuring live lines, wear appropriate protec-
tive gear, such as insulated rubber gloves, boots, and a safety helmet.

Notes on Safety
R&S®RT-ZC31
8User Manual 1801.4949.02 ─ 01
Risk of instrument damage
●To avoid damage to the device, protect it from vibration or shock during
transport and handling, and be especially careful to avoid dropping.
●To avoid damage to the device, do not place the device on an unstable
table or an inclined place. Dropping or knocking down the device can
cause injury or damage to the device.
●Do not store or use the device where it could be exposed to direct sun-
light, high temperature, humidity, or condensation. Under such condi-
tions, the device may be damaged and insulation may deteriorate so
that it no longer meets its specifications.
●Do not store or use the device near induction heating systems (such as
high-frequency induction heating systems and IH cooking equipment)
●Do not store or use the device near HF power supply units.
●Before using the device the first time, verify that it operates normally to
ensure that no damage occurred during storage or shipping. If you find
any damage, contact your dealer or R&S representative.
●This device is not designed to be entirely water- or dust-proof. To avoid
damage, do not use it in a wet or dusty environment.
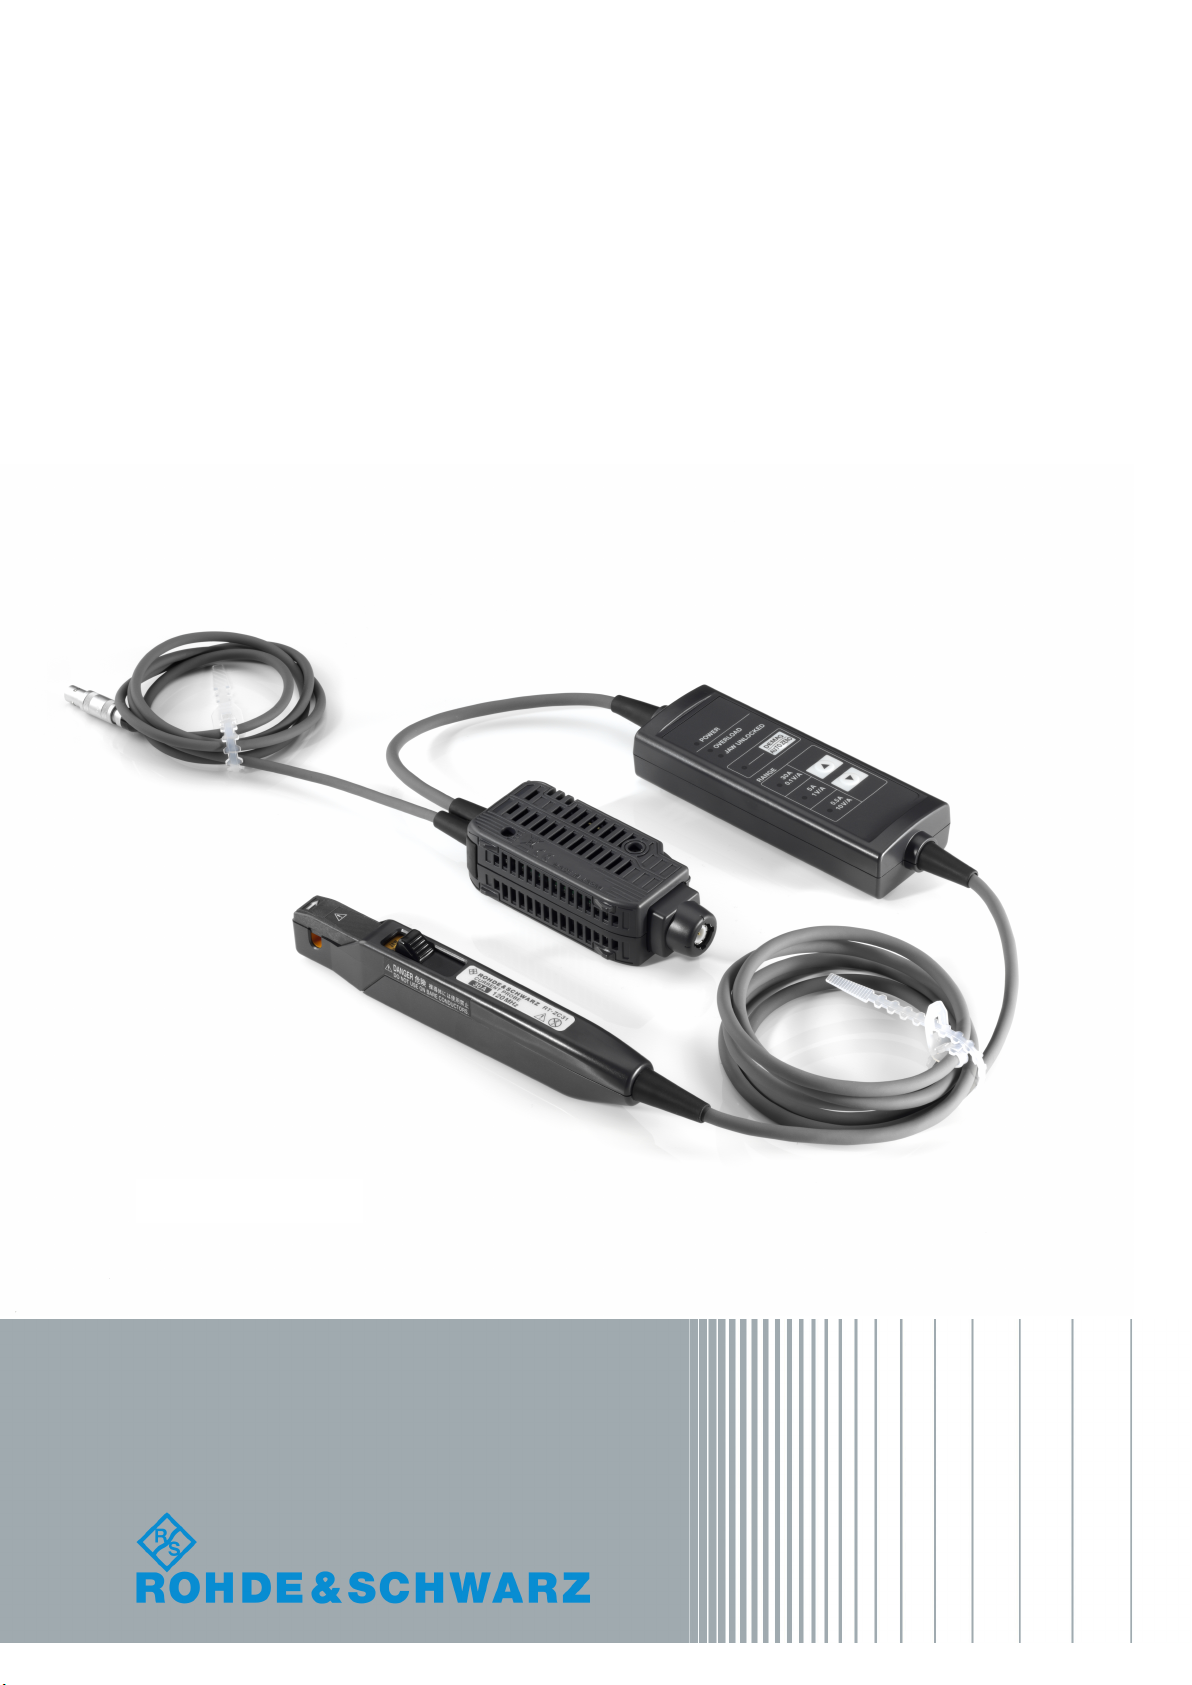
●The sensor head is a precision assembly including a molded compo-
nent, a ferrite core, and a Hall effect element. It may be damaged if sub-
jected to sudden changes in ambient temperature, or mechanical strain
or shock, and therefore great care should be exercised in handling it.
●Do not apply a static electricity or other source of high voltage to the
sensor. Doing so may damage the internal Hall elements and circuitry of
the sensor.
●The mating surfaces of the sensor head are precision, and should be
treated with care. If these surfaces are scratched, performance may be
impaired.
●Do not place foreign objects between the mating faces of the sensor
head, insert foreign objects into the gaps of the sensor head, or touch
the mating faces. Doing so may worsen the performances of the sensor
or interfere with clamping action.
●While the POWER LED is on, keep the core section of the sensor
closed, except when clamping it onto the conductor to be measured.
The mating surface of the core section can be scratched while it is open.

Notes on Safety
R&S®RT-ZC31
9User Manual 1801.4949.02 ─ 01
●Keep the sensor head closed when not in use, to avoid accumulating
dust or dirt on the mating core surfaces, which could interfere with
clamp performance.
●Avoid stepping on or pinching the cable, which could damage the cable
insulation.
●Keep the cable well away from heat sources, as bare conductors could
be exposed if the insulation melts.
●Do not obstruct the ventilation holes on the sides and bottom of the ter-
minator, as it could overheat and be damaged, or cause a fire.
Strong electromagnetic fields
Correct measurement may be impossible in the presence of strong mag-
netic fields, such as near transformers and high-current conductors, or in
the presence of strong electromagnetic fields such as near radio transmit-
ters.

Product Description
R&S®RT-ZC31
10User Manual 1801.4949.02 ─ 01
2 Product Description
2.1 Product Overview
The R&S RT-ZC31 is a clamp-on current probe that features high current-detec-
tion sensitivity and broad frequency band. The probe uses three current ranges to
detect current waveforms from a few hundred µA to 50 A.
By clamping on the conductor to be measured, the current waveform is captured
easily without interrupting the electric circuit.
2.2 Key Features
●The sensor head has a clamp design that makes it possible to easily observe
current waveforms while current continues to flow through the conductor being
measured.
●Three current measurement ranges: 0.1 V/A, 1 V/A, and 10 V/A.
●You can observe low-current waveforms at the high sensitivity of 10 V/A.
●LED warnings indicate overload and unlocked sensor head.
●Broadband frequency characteristics DC to 120 MHz.
●Demagnetization and automatic zero adjustment functions make it easy to get
ready for measurement.
2.3 Inspecting the Contents
●Inspect the package for damage.
Keep the package and the cushioning material until the contents have been
checked for completeness and the device has been tested.
If the packaging material shows any signs of stress, notify the carrier and your
Rohde & Schwarz service center. Keep the package and cushioning material
for inspection.
●Inspect the probe.
Inspecting the Contents

Product Description
R&S®RT-ZC31
11User Manual 1801.4949.02 ─ 01
If there is any damage or defect, or if the R&S RT-ZC31 current probe does
not operate properly, notify your Rohde & Schwarz service center.
●Inspect the accessories.
If the contents are incomplete or damaged, notify your Rohde & Schwarz ser-
vice center.
The following accessories are delivered with the probe:
●User manual
●Carrying case
●R&S RT-Zxx data sheet
●Calibration certificate
●Documentation of calibrated values
2.4 Description of the Probe
2.4.1 Probe Overview
Figure 2-1: Probe overview
1 = Sensor
2 = Junction box
3 = Termination unit
Description of the Probe

Product Description
R&S®RT-ZC31
12User Manual 1801.4949.02 ─ 01
2.4.2 Termination Unit
Figure 2-2: Termination unit overview
1 = Output terminal
2 = Unlock lever
3 = Ventilation holes
Description of the Probe

Product Description
R&S®RT-ZC31
13User Manual 1801.4949.02 ─ 01
4 = Serial number
5 = Power plug
6 = Shell
Unlock lever
The lock mechanism keeps the clamp closed.
Vents
The vents are on the sides and bottom. Do not clog them.
Power plug
Connect the plug to the R&S RT-ZA13 probe power supply receptacle to supply
power to the sensor.
Shell
Pull on the power plug while simultaneously pulling this shell to disconnect the
plug.
Description of the Probe

Product Description
R&S®RT-ZC31
14User Manual 1801.4949.02 ─ 01
2.4.3 Junction Box (Keys, LEDs)
1 = POWER LED
2 = OVERLOAD LED
3 = JAW UNLOCKED LED
4 = DEMAG/AUTO ZERO key
5 = DEMAG/AUTO ZERO LED
6 = RANGE LEDs
7 = ▲(Higher range) key
8 = ▼(Lower range) key
POWER LED
The POWER LED turns green (lighting up continuously) when the device is ener-
gized. It flashes rapidly if a checksum error has occurred.
Description of the Probe

Product Description
R&S®RT-ZC31
15User Manual 1801.4949.02 ─ 01
OVERLOAD LED (red light)
Shows the overload status of the system. The following states are defined:
Color State
Flashes three
times
Indicates that demagnetizing or automatic zero adjustment cannot be per-
formed.
Fast flashing red Indicates that an overload state is detected, the device has entered pro-
tection mode or a checksum error has occurred.
JAW UNLOCKED LED (red light)
The JAW UNLOCKED LED turns red (lighting up continuously) if the sensor head
is not locked.
Color State
Lights red The upper jaw is unlocked.
Flashes three
times
Indicates that demagnetizing or automatic zero adjustment cannot be per-
formed.
Fast flashing red Indicates that the device has entered protection mode or a checksum
error has occurred.
DEMAG / AUTO ZERO LED (orange light)
Color State
Flashes slowly Demagnetization or automatic zero adjustment has not yet been per-
formed
Lights orange Demagnetization and automatic zeroadjustment are in execution
No light Demagnetization and automatic zero adjustment has been completed
Lights red The upper jaw is unlocked.
Flashes three
times
Indicates that demagnetizing or automatic zero adjustment cannot be per-
formed.
Fast flashing Indicates that the device has entered protection mode or a checksum
error has occurred.
DEMAG/AUTO ZERO key
Performs demagnetization and zero adjustment.
Press this key long (approx. 1 sec.) for demagnetization and zero adjustment.
Press this key short (within 0.5 sec.) for a zero adjustment only.
Demagnetization and zero adjustment cannot be performed in the following cir-
cumstances:
Description of the Probe

Product Description
R&S®RT-ZC31
16User Manual 1801.4949.02 ─ 01
●The sensor head is unlocked (JAW UNLOCKED LED is lit up)
●During an overload condition (the OVERLOAD LED is flashing)
●When a measured current is detected
(Higher range) key / (Lower range) key
Switch over to a next higher / lower current range.
RANGE LEDs (green lights)
Color State
Lights green The current range is chosen.
Fast flashing Indicates that the device has entered protection mode or a checksum
error has occurred.
2.4.4 Sensor
Description of the Probe

Product Description
R&S®RT-ZC31
17User Manual 1801.4949.02 ─ 01
1 = JAW UNLOCKED indicator
2 = Current direction indicator
3 = Opening lever
4 = Sensor aperture
5 = Jaws
6 = Sensor head
JAW UNLOCKED indication
If the sensor head is unlocked, you can see this indication on the probe.
Current direction indication
Clamp the device to the conductor so that the direction in which the current being
measured is flowing matches the arrow.
Opening lever
Operating lever for opening the sensor head. Always use this lever to open the
sensor head.
Sensor aperture
A conductor to be measured has to pass through this aperture.
Sensor head
The sensor head clamps on the conductor being measured, and carries out the
actual current measurement.
Description of the Probe

Measuring Procedure
R&S®RT-ZC31
18User Manual 1801.4949.02 ─ 01
3 Measuring Procedure
3.1 Preparing the Measurement
Voltage check
When using a different power supply than the R&S RT-ZA13 probe power
supply, before turning on the power, make sure that the voltage of the used
power supply matches the supply voltage indicated in the data sheet "R&S
RT-Zxx high voltage and current probes".
●The output of this device is terminated internally. Use a high impedance
input of the measuring instrument. With an input impedance of 50 Ω,
accurate measurement is not possible.
●If using BNC-banana plug adapters or similar to connect to input termi-
nals other than BNC connectors, make sure the polarity is correct.
●Turn the collar until it clicks, and check that it is locked securely.
1. Have the R&S RT-ZA13 probe power supply, and an oscilloscope or waveform
measuring instrument ready.
2. Turn off the power switch. Connect the power cord.
3. Connect the power plug of the R&S RT-ZC31 to the power receptacle of the
R&S RT-ZA13 probe power supply.
Preparing the Measurement

Measuring Procedure
R&S®RT-ZC31
19User Manual 1801.4949.02 ─ 01
4. Check that the conductor being measured is not clamped when supplying
power to the R&S RT-ZC31. When power is turned on, a demagnetizing wave-
form is initially applied to the output. This is intentional in the design, and not a
fault.
5. Turn on the power switch R&S RT-ZA13 probe power supply. Ensure that the
front panel power indicator lights.
The POWER LED lights up in green and the DEMAG/AUTO ZERO LED is
slowly flashing in orange.
6. Connect the output connector of the R&S RT-ZC31 to one of the BNC input
connectors of the oscilloscope. Turn the collar until it clicks, and check that it
is locked securely.
Figure 3-1: Oscilloscope inputs
The current waveform of the measured conductor is output at a constant rate
(1 V/A).
7. Configure the probe connection at the oscilloscope. Make sure to set the fol-
lowing:
● Vertical unit = Ampere
● Coupling = DC
● Termination = 1 MΩ
● Manual Gain = 1 V/A
Alternatively, select "Predefined probe" = R&S RT-ZC31 if this selection is
available on the instrument.
The procedure depends on the used instrument and is described in the oscil-
loscope's user manual. Supported oscilloscopes are listed in the R&S RT-Zxx
data sheet.
8. When disconnecting the output connector, be sure to release the lock before
pulling off the connector. Forcibly pulling the connector without releasing the
lock, or pulling on the cable can damage the terminator.
Preparing the Measurement

Measuring Procedure
R&S®RT-ZC31
20User Manual 1801.4949.02 ─ 01
Risk of instrument damage
●Check that the conductor being measured is not clamped when supply-
ing power to the device. A demagnetizing waveform may be generated
when power is supplied, causing damage to components connected to
the circuit being measured.
●To avoid damaging the terminator, keep it oriented in a straight line rela-
tive to the waveform measurement instrument when connecting and dis-
connecting it.
●To avoid damaging the output connector, pull the unlock lever toward
you and then pull the connector out and away from the waveform mea-
surement instrument.
●To avoid damaging the output connector of the terminator, or the BNC
input terminal’s locking mechanism on the waveform measuring instru-
ment, do not rotate when both terminals are connected. Ensure that
connections are not subject to stress.
Preparing the Measurement
This manual suits for next models
1
Table of contents
Other R&S Accessories manuals
Popular Accessories manuals by other brands

KROHNE
KROHNE 1000 Series Supplementary instructions

Honeywell
Honeywell RPW317 Instruction leaflet

Siemens
Siemens RUGGEDCOM WIN7225 installation guide

Secutron
Secutron MRI-2351RAP Installation and maintenance instructions

Philips
Philips SB6G19 Specifications

BATROL RESEARCH
BATROL RESEARCH Mag-Probe operating instructions