manuals.online logo
Brands
  1. Home
  2. •
  3. Brands
  4. •
  5. REL Acoustics
  6. •
  7. Subwoofer
  8. •
  9. REL Acoustics 212/SE User manual

REL Acoustics 212/SE User manual

Operang Instrucons for the
212/SE
Sub-Bass
System
REL Acouscs Limited
North Road, Bridgend industrial Estate . Bridgend, CF31 3TP . United Kingdom
Telephone: +44 (0)1 656 768 777 . Fax: +44 (0) 1 656 766 093
Web: www.rel.net
REL_212/SE_Manual_01-15.indd 2-3 1/16/15 3:08 PM
2
Cauon Marking Explanaon
The lightning ash with arrowhead symbol within an equilateral triangle is intended to alert the
user to the presence of un-insulated dangerous voltage within the product’s enclosure that may
be of sucient magnitude to constute a risk of electric shock to persons.
The exclamaon point within an equilateral triangle is intended to alert the user to the presence
of important operang and maintenance (servicing) instrucons in the literature accompanying
the appliance.
REL_212/SE_Manual_01-15.indd 4-5 1/16/15 3:08 PM
43
1 Read all of these instrucons.
2 Save these instrucons for future use.
3 Heed all warnings.
4 Follow all instrucons.
5 Do not use this apparatus near water.
6 Clean only with automove polish and micro ber cloth.
7 Install in accordance with the manufacturer’s instrucons.
8 Do not install near any heat sources such as radiators, heat registers, stoves or other apparatus (including
ampliers) that produce heat.
9 Do not defeat the safety purpose of the grounding-type plug. A grounding type plug has two blades and
a third grounding prong. The third prong is provided for your safety. If the provided plug does not t into
your outlet, consult and electrician for replacement of the obsolete outlet.
10 Protect the power cord from being walked on or pinched parcularly at plugs, convenience receptacles,
and the point where they exit from the apparatus.
11 Only use aachments/accessories specied by the manufacturer.
12 Use only with a cart, stand, tripod, bracket, or table specied by the manufacturer, or sold with the
apparatus. When a cart is used, use cauon when moving the cart/apparatus combinaon to avoid
injury from p-over.
13 Unplug this apparatus during lightning storms or when unused for long periods of me.
14 Refer all servicing to qualied service personnel. Servicing is required when the apparatus has been
damaged in any way, such as power-supply cord or plug is damaged, liquid has been spilled or objects
have fallen into the apparatus, the apparatus has been exposed to rail or moisture, does not operate
normally, or has been dropped.
Warning
To reduce the risk of re or electric shock, do not expose this apparatus to rain or moisture.
The apparatus shall not be exposed to dripping or splashing and no objects lled with liquids, such as vases,
shall be placed on apparatus.
The mains plus is used as disconnect device. The mains plug of the apparatus should not be obstructed OR
should be easily accessed during intended use. To be completely disconnected from the power input, the
mains plug of the apparatus shall me disconnected from the mains.
An appliance with a protecve earth terminal should be connected to a mains outlet with a protecve
earth connecon.
Design Safety
This apparatus is supplied with a detachable mains cord. For 240V operaon a 3.15/S/2, 5A/S/3, 5A/S/5
fuse is ed in the socket, for 120V operaon a 6.3A/S/2, 9A/S/3, 9A/S/5 fuse is ed. Should the fuse
need to be replaced use a similar rated fuse approved to ASTA or BSI 362 standards. Do not use without
the fuse cover in place. Replacement fuse covers are available from your distributor.
Important Safety Instrucons
REL_212/SE_Manual_01-15.indd 6-7 1/16/15 3:08 PM
5 6
Aenon Explicaon Marquage
L’éclair avec le symbole de pointe de èche dans un triangle équilatéral est desné à alerter
l’ ulisateur de la présence de non isolée tension dangereuse à l’intérieur de l’enceinte du
produit qui peut être d’une ampleur susante pour constuer un risque d’électrocuon pour
les personnes.
Le point d’exclamaon dans un triangle équilatéral est desné à alerter l’ulisateur de la
présence d’instrucons dans la documentaon accompagnant l’appareil exploitaon et de
maintenance (entreen).
1 Lisez aenvement ces instrucons.
2 Conservez ces instrucons.
3 Respectez tous les averssements.
4 Suivez toutes les instrucons.
5 Ne pas uliser cet appareil près de l’eau.
6 Neoyez seulement avec du vernis automobile et ssu microbre.
7 Installer conformément aux instrucons du fabricant.
8 Ne pas installer près de sources de chaleur telles que des radiateurs, registres de chaleur, poêles ou
autres appareils (y compris les amplicateurs) qui produisent de la chaleur.
9 Ne pas contourner le disposif de sécurité de la prise de terre. Une che de terre a deux lames et une
troisième broche de mise à la terre. La troisième broche est fournie pour votre sécurité. Si la che fournie
ne rentre pas dans votre prise, consultez un électricien pour le remplacement de la prise obsolète.
10 Protégez le cordon d’alimentaon ne soit piéné ou pincé, en parculier au niveau des ches, des prises
de courant, et le point de sore de l’appareil.
11 Ulisez uniquement des xaons/accessoires spéciés par le fabricant.
12 Ulisez seulement avec un chariot, stand, trépied, support ou table spécié par le fabricant, ou vendu
avec l’appareil. Lorsque vous ulisez un chariot, soyez prudent lorsque vous déplacez l’ensemble
chariot/appareil pour éviter les blessures en cas de chute.
13 Débranchez cet appareil pendant un orage ou lorsqu’il est inulisé storsm pour de longues périodes
de temps.
14 Conez toute réparaon à un personnel qualié. Une réparaon est nécessaire lorsque l’appareil a été
endommagé de quelque façon que ce cordon d’alimentaon ou la che est endommagé, du liquide a
été renversé ou des objets sont tombés dans l’appareil, l’appareil a été exposé à rail ou à l’humidité, ne
fonconne pas normalement, ou a été échappé.
Informaons Importantes Relaves a la Securite
REL_212/SE_Manual_01-15.indd 8-9 1/16/15 3:08 PM
7 8
Averssement
Cet arcle est lourd. Pour éviter tout risque de blessure, prendre soin lors de la manipulaon.
L’ appareil ne doit pas être exposé à des éclaboussures et aucun objet rempli de liquide, comme des vases,
ne doit être placé sur l’appareil.
Les conduites Plus est ulisé comme disposif de déconnexion. La che de l’appareil ne doit pas être
obstruée OU doit être facilement accessible pendant l’ulisaon. Pour être complètement déconnecté de
l’alimentaon électrique, le cordon d’alimentaon de l’appareil doit me débranché.
Un appareil avec une borne de terre doit être branché sur une prise de courant en étant relié à la terre.
Sécurité Design
Cet appareil est livré avec un cordon amovible cordon. Pour le fonconnement d’un fusible de 220V
3.15/S/2, 5A/S/3, 5A/S/5 est montée dans la douille, pour le fonconnement de 120V un fusible de
6.3A/S/2, 9A/S/3, 9A/S/5 est monté. Si le fusible doit être remplacé ulisaon un fusible similaire
approuvé pour ASTA ou BSI normes 362. Ne pas uliser sans le couvercle de fusible en place. Les
couvercles de rechange sont disponibles auprès de votre distributeur
FCC STATEMENT
This device complies with Part 15 of the FCC Rules. Operaon is subject to the following two condions:
(1) This device may not cause harmful interference, and
(2) This device must accept any interference received, including interference that may cause
undesired operaon.
NOTE: This equipment has been tested and found to comply with the limits for a Class B digital Device, pursuant to Part 15 of the
FCC Rules. These limits are designed to provide reasonable protecon against harmful interference in a residenal installaon.
This equipment generates, uses and can radiate radio frequency energy and, if not installed and used in accordance with the
instrucons, may cause harmful interference to radio communicaons. However, there is no guarantee that the interference will
not occur in a parcular installaon. If this equipment does cause harmful interference to radio or television recepon, which can
be determined by turning the equipment o and on, the user is encouraged to try and correct the interference by one or more of
the following measures:
Reorient or relocate the receiving antenna.
Increase the separaon between the equipment and receiver.
Connect the equipment into an outlet on a circuit dierent from that to which the receiver is connected.
Consult the dealer or an experienced radio/TV technician for help.
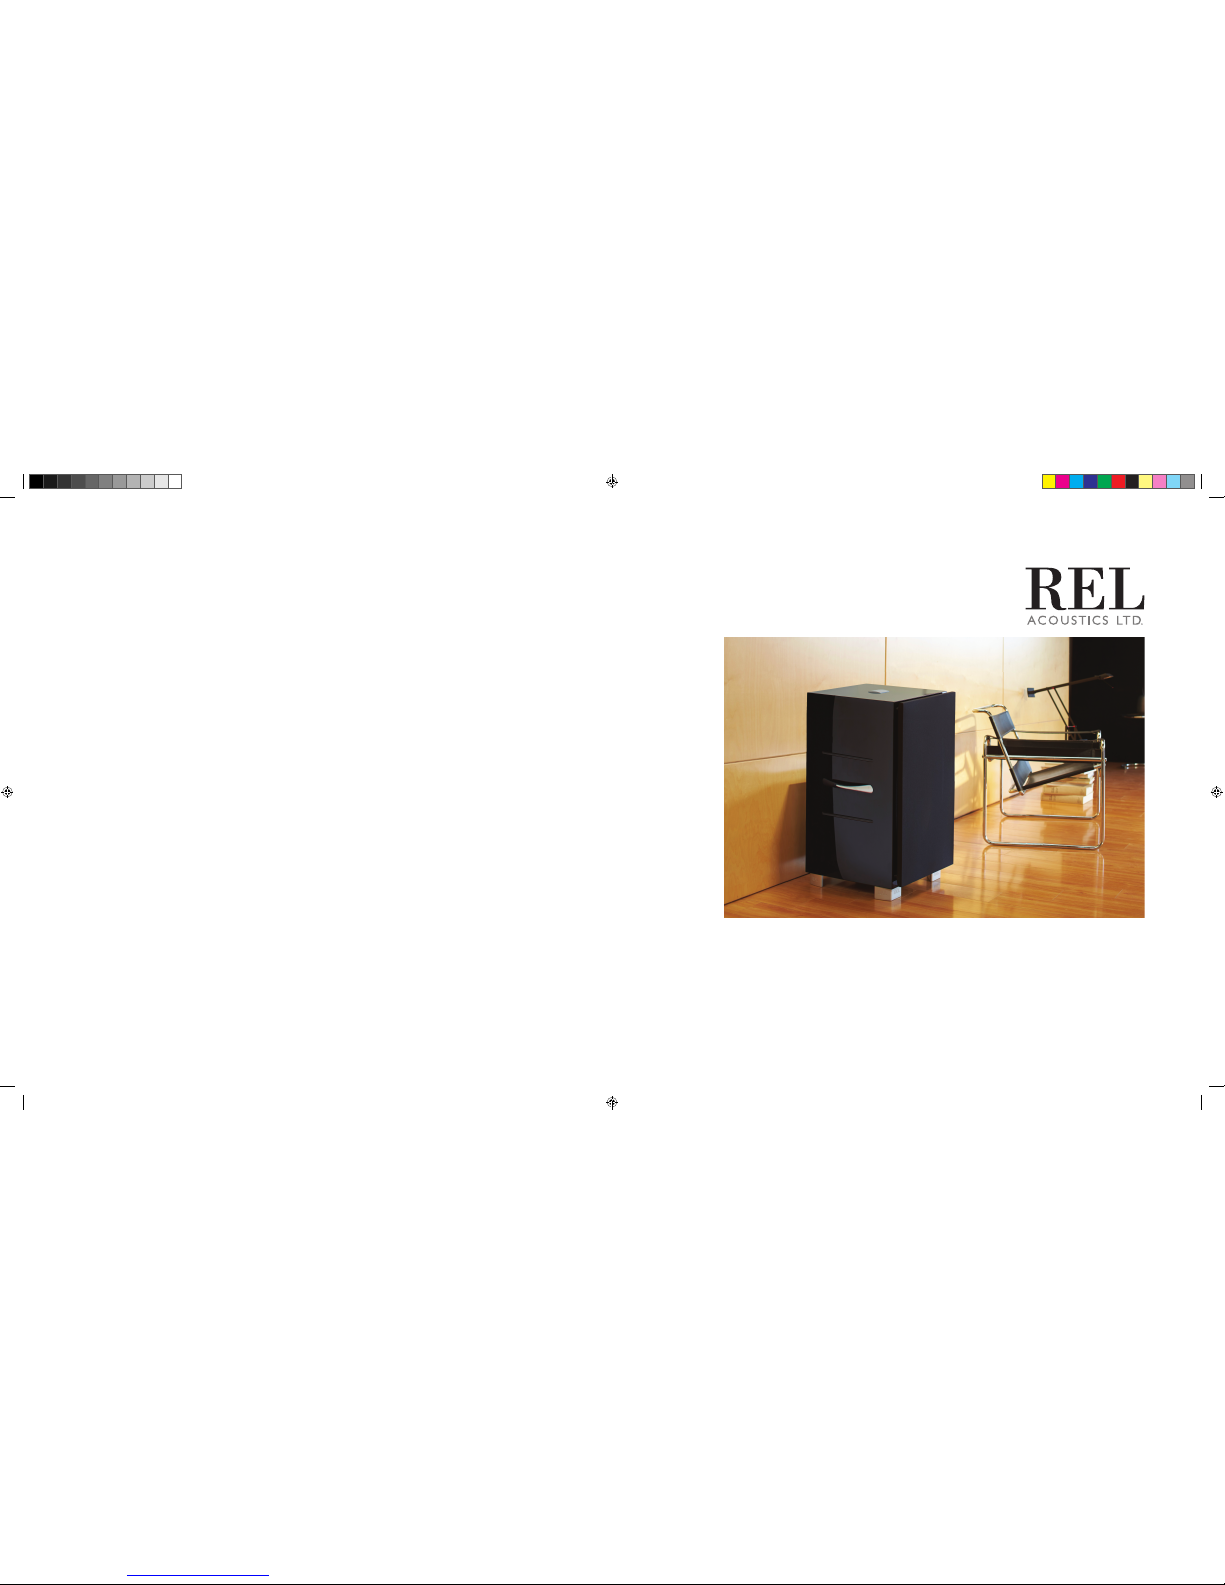
Congratulaons on your purchase of the 212/SE, a truly formidable instrument for the reproducon of
exceponal low bass in very large-scale music and theater systems. 212/SE is the next signicant step in
REL’s relentless progression towards becoming the best sounding, best-built specialty subwoofer
manufacturer extant.
REL have always prided ourselves on providing seamless mang of our subwoofer designs with any brand
and model of quality loudspeaker the customer chooses. This tradion connues on in 212/SE, ulizing all
the design experse REL are acknowledged for in our renowned lter technologies, as well as the truly
brilliant Limitless™ electronic limiters we employ that permit extraordinary output levels to be delivered
with lile fear of overloading the drivers.
Where 212/SE builds a new step in REL’s path is in the sheer volume and output a REL is capable of. Whilst
retaining all the subtlety and delicacy of classic REL designs, 212/SE will play shaeringly loud.
This capability confers signicant merit when paired with larger state of the art speakers in stereo pairs
of 212/SE’s (recommended as a wonderful improvement over the excellent single 212/SE set-up) and
especially so in large home theaters. Here, the 212/SE delivers copious quanes of explosively fast, hard
bass. Special eects delivered via LFE such as explosions by the latest movie soundtracks are delivered with
visceral slam. Meanwhile, the classic REL approach of using both High Level + .1/LFE permits richly natural
bass to wash through less ambious tracks allowing for greater enjoyment of the movie experience, no
maer the scale of the movie.
212/SE rearms REL’s relentless pursuit of delivering the best and most varied oerings among subwoofer
manufacturers.
Welcome to the REL Family
REL_212/SE_Manual_01-15.indd 10-11 1/16/15 3:08 PM
9 10
Beyond 2-Channel Lies Theatre Reference:
212/SE is equipped to allow you to take full advantage of Dolby Digital AC3, DTS, MPEG 2 and any other
digital sound format that includes a dedicated Low Frequency Eects (LFE) channel.
The dedicated LFE input meets the tough specicaon laid down for digital 3/2.1 channels, usually known
as 5.1. The output is nominally at from 35 Hz – 90 Hz. It has a dedicated input level control which enables
users to set the LFE level independently of the processor. This is important because not all processors oer
control over this signicant parameter. The LFE channel is frequently output at 10 dB higher levels than the
other channels.
The 212/SE models also have High Level (speaker level) inputs with dedicated input level control. Uniquely,
both the High Level and LFE input can be used simultaneously. This means you may achieve the best possible
2-channel performance with your CDs or other music signals and instantly transform to a powerhouse with
LFE when watching movies. This feature requires no switching, but instead is a seamless benet to doing
things the REL way.
This feature provides real benet if you wish to play music in stereo mode in the purist audiophile way and
also in REL Theatre Reference mode with no switching necessary. By connecng BOTH High Level and .1
concurrently and seng your processor to “Large” or “Full Range”, the best possible performance will be
obtained. Consult the owner’s manual of your loudspeakers or consult with your dealer before seng to
Large as a few speakers cannot handle the bass that is then directed through to the main speakers.
Wireless Freedom with Zero Compression: Longbow™
Once our team achieved the high standards for performance our customers expect of all REL subwoofers,
we turned our aenon to connecvity methods. In addion to our comprehensive array of hard-wired
inputs, 212/SE benets from the nest sounding, most natural wireless system available at this me.
In order to achieve high quality wireless, the REL team found a new chipset remarkable for its speed and
lack of delay. Building on this foundaon our engineering team took to the task of creang Longbow™,
REL’s latest delivery method. Longbow™’s wireless system uses a proprietary security codec that ensures
exceponal protecon of the signal, while using zero digital compression—the bane of convenonal
wireless systems. This results in a dynamic, ultra wide-bandwidth sound with almost zero delay. Praccally
speaking, 212/SE equipped with Longbow™ can be connected to very high end hard-wired systems with
none of the delay issues that plague garden variety wireless systems. Addionally, the REL team was able
to maintain both HIGH LEVEL and .1/LFE simultaneous connecvity of REL Reference Theatre .Theatre
Reference produces a FAR richer, fuller and beer integrated theater sound than convenonal .1-only
based systems. And now, customers can have all this wirelessly if they so choose. Yet another breakthrough
for REL!
All 212/SE models include REL Longbow™ receiver technology built into the amplier. Wireless transmission
requires the purchase of a separate Longbow™ transmier. For details on how to acvate this wireless
connecvity, please see the REL Longbow™ transmier manual.
212/SE, A More Complete Approach:
Many or most loudspeakers emphasize the mid-bass. This is the range from 50 to 90 Hz. We at REL believe
this is an incomplete approach and that loudspeakers need to be augmented in the lowest frequencies in
order to reestablish the natural balance of sound we experience eortlessly in real life.
All of our designs are true Sub-Bass Systems, meaning they are designed to reproduce very low frequencies
(useful output in the 20 Hz – 50 Hz region) that are felt as well as heard. This is because we believe that
music is full-range, as are sound eects on movies, and we intend for our products to reproduce all of these
sounds, not just a narrow band.
REL_212/SE_Manual_01-15.indd 12-13 1/16/15 3:08 PM
11 12
1 Volume Control for HI/LOW Level input: Use to adjust output when using either HI Level or LOW Level
input. Do not use both simultaneously.
2 Volume Control for .1/LFE Input: Use to adjust output level when using .1/LFE input from a 5.1 amplier
or processor.
3 Crossover: Used to select crossover frequency. Variable between 30 Hz and 120 Hz.
4 Low-Level Le channel Phono Input: Used to connect low-level to the output of a preamplier,
integrated amplier or receiver. (For home cinema, use .1/LFE input).
5 Low-Level Right channel Phono Input: Used to connect low-level to the output of a preamplier,
integrated amplier or receiver. (For home cinema, use .1/LFE input).
6 .1/LFE Phono Input: Used to connect to the .1/LFE output from a 5.1 amplier of processor.
7 Phase: Used to set phase 0-180 degrees.
8 High-Level Neutrik® Speakon® Socket: Use to connect high-level to the main front amplier
speaker terminals.
9 Wireless enable switch: Used to turn on wireless receiver when connected to REL Longbow™
wireless transmier.
10 Standby/ Always On Switch: Used to enable standby mode.
11 Power Pilot Light: Power On/O indicator.
12 Power ON/OFF Switch: Use to turn unit on or o.
13 IEC Mains Socket: Fused mains (AC) input socket that accepts a detachable power cord.
14 Antenna connector: Used with REL Longbow™ wireless transmier.
15 Pair Pilot Light: Indicates if unit has been paired with REL Longbow™ transmier.
16 Pair Switch: Used to iniate Pair sequence with REL Longbow™ Transmier.
REL 212/SE Rear Panel Connecon Legend
8 9
10 11
12
13
1 2 3
4 5 6
7
14
15
16
REL_212/SE_Manual_01-15.indd 14-15 1/16/15 3:08 PM
13 14
Always switch o your system before disconnecng any wires.
To increase the versality of connecng up, the 212/SE models have four separate inputs. A Neutrik®
Speakon® socket and three phono sockets. This is to facilitate use with both two-channel stereo systems
and AV surround sound systems.
The high-level, unbalanced, dual-channel (stereo) input is via a Neutrik® Speakon® connector which is
connected to the power amplier’s le and right channel speaker terminals. This has the advantage of
ensuring that the REL receives exactly the same signal as the main speakers. This means that the character
of the bass from the main system is carried forward into the sub-bass. This is a very important point and
together with the REL’s Acve Bass Controller (ABC) ensures far superior system integraon of the sub-bass
with the main system.
The low-level input is via three separate phono jacks that connect to either the .1/LFE output of a home
cinema amplier/processor or to the le and right output of a stereo preamplier.
HI LEVEL and .1/LFE inputs can be used simultaneously. The benets are two-fold when used with a home
cinema system. The low level input reproduces the .1/LFE channel and the high level connecon underpins
the main front speakers. The main front speakers should be set to the ‘large’ opon on the processor. See
“Home Cinema Applicaons” for more informaon.
Connecng to the Power Amplier Using the Speakon® High Level Input
To engage the Neutrik® Speakon® plug, insert fully into socket and rotate clockwise unl locked.
To remove the Neutrik® Speakon® plug, grip body of plug, place thumb on chrome lever, move lever
backwards, rotate plug anclockwise quarter turn and withdraw.
The high-level input is designed to accept the stereo (two-channel) signals from the speaker terminals of
your receiver, integrated amplier or basic amplier. This has the advantage of ensuring that your subwoofer
receives exactly the same signal as the main speakers, which means that the character of the bass from the
main system is carried forward into the Sub-Bass System.
This is a very important point and together with REL’s Natural RollO™ circuitry, ensures far superior
system integraon of the Sub-Bass System with the main system.
High-Level Input: Connecons should be made to the same binding post on main amplier as the main
speakers. Connect as shown above. Red to amplier main right speaker red terminal, yellow to amplier
main le speaker red terminal and black to amplier main speaker black terminal, right or le but not both.
Plug the Neutrik® Speakon® plug into the HI LEVEL Speakon® socket.
.1 Input: This requires a phono-to-phono cable and is a dedicated true .1 channel. This circuit therefore
eliminates the normal Natural RollO™ Crossover and passes the .1 low-level signal through with only the
required 120Hz fourth-order lter.
Low-Level Input: These le and right phono inputs allow for convenonal connecon from a preamplier
and should be used in the rare event that a high-level connecon proves incompable. Connect as shown
below. Plug one end of the phono-phono cables into the LOW LEVEL INPUT le and right jacks of the REL
and the other end into the le or right channel output of your preamplier.
PHASE SWITCH – Used to set phase
Posion 0 / High-Level, Low-Level or LFE: 0 degrees phase
Posion 180 / High-Level, Low-Level or LFE: 180 degrees phase
PHASE SELECTION AFFECTS BOTH HIGH- AND LOW-LEVEL INPUTS
Crossover is always engaged for Hi level input. The .1/LFE signal does not pass through the crossover circuit.
Connecng Up
REL_212/SE_Manual_01-15.indd 16-17 1/16/15 3:08 PM
• The standard high-level hook up procedure is: aach the red wire to the amplier’s right posive speaker
output terminal; aach the yellow wire to the amplier’s le posive speaker output terminal; aach the
black wire to whichever of the amplier’s ground output terminals is convenient; plug the Speakon®
connector into the Sub-Bass System’s high-level input.
• For dierenal (i.e. fully balanced) ampliers using one REL, simply use the standard connecng scheme
with the excepon of NOT connecng the black wire to a negave speaker terminal. Instead, it should
rst be allowed to “oat” or hang down without connecon to ANY terminal. Should hum occur using this
method, please try connecng to an unused RCA connector on the rear of a preamp or amplier. Please
contact your dealer should there be any quesons concerning this or any other hookup procedure.
NOTE: The 212/SE models are equipped with internal circuitry to allow seamless connecon to Class-D (digital)
ampliers. If connecng to a Class-D amplier, follow the above connecon procedure for dierenal ampliers.
15 16
REL products are not tradional subwoofers, but true Sub-Bass Systems. A REL is designed to augment the
performance of “full range” speaker systems in order to provide, in certain cases, linear response below
15 Hz. Therefore, for the moment, please set aside everything you’ve been taught about subwoofers and
how they are integrated into a stereo or home cinema system. REL Sub-Bass Systems set-up and posioning
diers from convenonal subwoofers. A REL will take advantage of physics and room acouscs to provide
deep pressurizaon as no tradional subwoofer can. It is important that you bring to the set-up process a
willingness to do things a lile dierently in order to obtain these superior results. The end result of your
labours will be an uerly seamless integraon of true deep bass to a sound system, regardless of the main
speakers’ low bass capability.
Basic set-up should take no more than ten to een minutes to accomplish once connected.
Two Things Before You Begin
1 It is helpful to know that you will almost always connect the REL to the input on the rear panel labeled
“HIGH LEVEL INPUT.” This connecon is made using the supplied 32’ 10” (10 meters) cable, the bare
leads of which connect to the speaker output terminals of the power amplier. The easy and foolproof
connecon at the REL is done with a Neutrik® Speakon® connector. The purpose of connecng to the
speaker output terminals is one of the unique secrets of REL’s success. By connecng to the High Level
input on the REL from the amplier, you build forward the sonic signature of your main system, including
the tonal balance and ming cues of the enre electronics chain. In this way, the REL is fed the exact
signal that is fed to the main speakers.
2 When possible, the REL should be placed in one of the corners behind the speakers. Remember, we are dealing
with true LOW bass pressurizaon with RELs. Low bass pressurizaon below 40 Hz is best derived from
corner placement, where the most linear and ecient low bass can be produced because the subwoofer is
able to take advantage of the tangenal (corner-to-corner) axis which is typically the longest axis in a room.
Connecng and Seng Up
High-level connecon, using the enclosed cable with the Neutrik® Speakon® connector, is always the rst
choice. This connecon can be made without aecng the performance of the amplier because the REL’s
amplier input impedance is 150,000 ohms, in eect producing NO addional load on the rest of your system.
REL Set-Up Made Simple
Standard High-level
Dierenal (i.e. Fully Balanced)
REL_212/SE_Manual_01-15.indd 18-19 1/16/15 3:08 PM
17 18
• If connecng RELs to Mono Bloc amplifers we strongly advocate using (2) RELs, one for each amplier.
Connect the black wire of each REL to the negave speaker terminal of the corresponding amplier
channel; twist together the red and yellow wires of each REL separately and connect each pair to the
posive speaker terminal of the corresponding amplier channel. In some instances, this will result in
exceponally high gain (output) from the RELs. If it seems simply too high in gain, please remove either
the red or yellow wire from the twisted pair. This will reduce output by half and restore a natural dynamic.
If the amplier is of balanced dierenal design, please follow the instrucons in the secon above
labeled Dierenal Connecon.
• If connecng a single REL as a dedicated center channel sub, please consider connecng to the rear of the
speaker, rather than roung the REL High Level cable all the way back to the amplier. Connect the black
wire of the REL to the negave center channel speaker terminal; twist together the red and yellow wires
and connect this pair to the posive center channel speaker terminal.
• If connecng a REL as a dedicated rear channel sub, connect the black wire of the REL to either the le
rear or right rear negave speaker terminal; connect the yellow wire to the le rear posive speaker
terminal; connect the red wire to the right rear posive speaker terminal. If the amplier is of balanced
dierenal design, please follow the instrucons in the secon above labeled Dierenal Connecon.
Low-level connecon (via phono connectors) is always an opon if high-level connecon is not possible.
When connecng to the low-level inputs in a system in which high-level connecon is not possible, such as
if using internally-amplied speakers, connect le and right phono cables between the LOW LEVEL INPUT
jacks of the REL and the le and right channel outputs of your preamplier.
Mono Bloc
Mono Bloc Dierenal
Dedicated Center Channel
Dedicated Rear Channel
REL_212/SE_Manual_01-15.indd 20-21 1/16/15 3:08 PM
18 19
When connecng to a home cinema system where there is a .1/LFE channel output, connect a single phono
cable between the sub output of the processor/receiver and the .1/LFE input jack on the REL.
1 Posioning: The opmal posion for a REL is in one of the corners behind the main speakers. This posion
provides 9 dB of mechanical amplicaon and allows for the most linear true low bass wave launch,
owing to the ability to tune the REL to the longest distance in the room in order to produce the longest,
therefore lowest, bass waves.
2 The Process: To begin the set-up process, choose a piece of music that has a repeve bass line that is
very low in frequency. We suggest track 4 from the soundtrack to Sneakers (Columbia CK 53146). This has
a repeve bass drum throughout that gives you plenty of me to move the woofer around, but more
importantly, the venue was quite large for this recording, and therefore it has a very deep and large-scale
bass signature. This type of track is perfect for the set-up process and should be played at the highest
reasonable level expected for system playback.
Working with a partner, one in the listening posion and one at the REL manipulang the controls, is the
most eecve and ecient way to set up the REL. If working alone, the inial steps in the set-up can be
very eecvely carried out from the locaon of the REL. Trying to ignore all other music in the track, listen
for the bass drum and its eect on the listening room.
3 Phase Orientaon: Once in the corner we need to adjust for phase. This may be the single most
crical step, and because it really is quite simple, it is oen over-thought. Keep in mind; the right phase
is whichever posion is the loudest or fullest. While playing music with true low bass, adjust the crossover
to a point where the REL and the speaker are sure to share frequencies (about halfway up, or at 12
o’clock on the crossover control, or slightly higher for smaller speakers). At this point turn the HI/LOW
LEVEL control up so that both the REL and speaker are roughly equal in volume and then switch, using
the phase switch, from “0” to “180” phase posions. Again, whichever posion is loudest or fullest is the
correct posion. That is, when the posion is working in harmony with your main speakers, reinforcing
bass, not cancelling it.
4 Placement: The next step is to determine precisely how far from the corner the sub should be placed
to achieve the most ecient output, as well as the lowest frequency extension. With the REL fully into
the corner, and poinng straight out along the diagonal coming out of the corner, connuing to play the
music, slowly pull the REL from the corner on the diagonal, equidistant from both side and rear wall. At a
certain point (somemes a maer of only a few inches, in rare cases a foot or more) the REL will audibly
go lower, play louder, and, if it truly locks on to the room and is fully pressurizing it, the air around the
REL will seem to be energized, stop right there! This is the correct posion from the corner for the REL.
5 Orientaon: Once the posion from the corner has been established, the orientaon of the woofer must
be determined by rotang the REL from an imagined centre point at the rear of the REL. As the REL is
moved from one side to the other listen for the greatest level of output and bass linearity. In eect, the
REL should be le in the posion where it is playing the loudest and lowest.
6 Crossover and Level Sengs: To determine the crossover point, take the volume of the REL (using the
HI/LO Level control) all the way down, and put the crossover to 30 Hz. At this point, bring the REL’s volume
back up slowly to the point where you have achieved a subtle balance, i.e. the point at which you can hear
the REL even with the main speakers playing. Now, bring the crossover point up unl it is obviously too
high; at this point bring it down to the appropriate lower seng. For all intents and purposes, this is the
correct crossover point. Once this stage has been reached, subtle changes to volume and crossover can be
accomplished to provide the last bit of complete and seamless integraon. With that, set-up is complete.
Hint: There may be a tendency to set the crossover point too high and the volume of the Sub-Bass System
too low when rst learning how to integrate a REL with the system, the fear being one of overwhelming the
main speakers with bass. But in doing so, the resulng set-up will be lacking in bass depth and dynamics. The
proper crossover point and volume seng will increase overall dynamics, allow for extended bass frequencies,
and improve soundstage properes. Note, volume must be adjusted in conjuncon with crossover changes.
In general, when selecng a lower crossover point, more volume may need to be applied.
REL_212/SE_Manual_01-15.indd 22-23 1/16/15 3:08 PM
20 21
Theatre Applicaons
For Dolby Digital AC3 or other 5.1 theatre systems, once the standard set-up for two-channel outlined
above is complete, the LFE output from the processor or receiver should be connected to the .1/LFE INPUT
and appropriate volume adjustments made using the .1/LFE level control. For this conguraon, you must
set the processor to the “large” or “full range” seng for the le and right speakers in order for the REL to
receive the bass signal via the high-level cable. In this conguraon, the REL provides support for both the
le and right speakers for two-channel listening, and support for the LFE when movies are playing. Most
processors will allow you to defeat the subwoofer output when listening in the two-channel mode. The
eect of this set-up is one of greatly increased dynamics in the mid-bass range, no bass bloat, and a greater
degree of space and ming from the special audio eects. For an even greater sense of space and impact,
a second REL connected in parallel to the centre channel will prove to be a dramac improvement as well.
And if that is not enough fun, a rear REL, both to support the rear channel speakers as well as to evenly
distribute LFE through the room, truly completes the full-range sonic picture for state-of-the-art
lm reproducon.
Running In
Care taken during run in will be rewarded by many years of pleasurable use. Both the electronics and the
drive unit will benet from an inial period of carefully controlled use. Possible damage may be sustained
by running in the unit at too high a volume seng over an extended period. On the other hand, by taking a
lile care over this inial period, about 24 hours of actual use, a longer life with a higher potenal eventual
performance is assured.
Care and Polishing
The cabinets are best maintained by using an automobile polish made by reputable manufacturers. Our
favorites are those made by Meguiars and Mother’s. If objects are to be placed upon the top, it is advisable
to use a small mat to protect the surface and to avoid the risk of rales.
Technical
The 212/SE models use an unusual method of bass loading. They are designed to operate below normal
system resonance. This has been achieved without the normal form of bass boost or electronic equalizaon.
Instead of a constantly increasing bass equalizaon response, we simply ensure there is sucient amplier
gain to drive the speaker unit to its maximum excursion level at whatever the designated lowest operang
frequency is, and then cut the bass at a controlled rate of 12 dB per octave above this frequency. Although
this may at rst seem idencal to boosng the bass, it is actually quite dierent and ensures that the ming of
transients is far improved compared to the usual bass equalizaon used. Bass will sound cleaner and faster.
The amplier is fully DC coupled to avoid phase shis and compromises in its low end performance. It
is inherently stable and will retain its characteriscs over very long periods of me – important in a unit
designed for an exceponally long working life. These ampliers are designed to withstand reasonable
abuse and overloads. If in doubt, please contact your dealer.
We believe that the importance of the electronics, cabinet and drivers being designed to work in harmony is
paramount. This approach allows the 212/SE Sub-Bass Systems to achieve the highest possible level of delity.
Overload Protecon
All REL Sub-Bass Systems are designed as true sub bass speakers. They are designed to reproduce those
exceponally deep notes that are felt as well as heard. This it will aempt to do at whatever volume level
you set. If set too high no damage should result because the built-in electronics will limit the cone movement.
This electronic control is called Set-Safe™. It constantly and instantaneously monitors the output from the
power amplier and is totally transparent in operaon unl required. This means it has absolutely no eect
on the sound quality of your REL unl an overload is detected.
Ordinarily an overload would cause the power amplier to go into clipping with resultant loss of control
over the drive unit. This can cause drive unit damage, and always sounds nasty. Set-Safe™ detects the point
of incipient clipping and gently so-clips the waveform of the signal to ensure actual clipping does not occur.
This is a necessarily simplied descripon of what actually happens, but in eect, Set-Safe™ controls the
amplier and ensures there is minimum risk of amplier and driver damage caused by over-driving.
REL_212/SE_Manual_01-15.indd 24-25 1/16/15 3:08 PM
22 23
A thermal overload device is ed to all 212/SE Sub-Bass Systems. If the unit is deliberately overdriven this
device will sense the temperature rise and cut the output; recovery me is approximately ve minutes.
If this happens, it is a warning that the unit is being overdriven and the volume level control should be
reduced to a safe level.
Although everything possible has been done to minimize risk of thermal overload failure, there can be
no defense against those individuals who deliberately abuse the device. Such damage is NOT covered by
warranty. Please remember your REL is there to supplement your main system, not overwhelm it!
Power Saving Eciency:
All REL sub bass system designs ulize a true On-O switch that aords the owner the ability to turn
o their unit completely, without having to unplug the A/C mains cord. When a REL sub bass system is
switched o using the On-O switch on the rear panel it draws ZERO power.
In addion to the ecient power-at-idle exhibited by all REL models, the 212/SE also features an automac
standby mode that is enabled when the power mode switch on the rear of the unit is set to the “STANDBY”
posion. In this mode, the input signal is constantly monitored for audio acvity. If not audio informaon is
detected over a period of 30 minutes, the unit will enter a low power standby mode in which less power is
consumed. When input signal acvity is detected, the unit resumes normal operaon. By using the standby
mode, you can ensure that there is no unnecessary power draw when the unit is not in use.
Note: Due to variaons in program material, it is impossible to produce a perfectly reliable standby circuit.
Bass rich music or eects will consistently trigger our standby circuit whilst content that is low in volume
and possesses lile or no bass cannot be relied upon to trip the standby funcon.
Alternavely, the user has the opon to leave the unit in the normal operaon mode at all mes by
selecng the “ALWAYS ON” posion of the power mode switch. Leaving a REL on, produces the best sonic
performance and the most reliable operaon. In this mode, the unit will not enter standby regardless of
whether or not there is acvity at the input. Using this seng ensures that the 212/SE is ready to react
instantaneously to bass transients, whether in music of movies.
The REL 212/SE is shipped in the “ALWAYS ON” mode with the wireless receiver disabled.
During inial setup, use the REL this way. If you are using a REL Longbow™ transmier for inial setup,
the wireless switch must be enabled, please follow instrucons for pairing included in the REL Longbow™
transmier manual.
REL_212/SE_Manual_01-15.indd 26-27 1/16/15 3:08 PM
Type: Two front-ring acve woofers, rear and down-ring passive radiator
Acve Drive Units: 12 in., 300mm long-throw, die cast aluminium chassis
Passive Radiator Rear: 12 in., 300mm, die cast aluminum chassis
Passive Radiator Down: 12 in., 300mm
LF Response in Room: 21Hz at -6 dB
Input Connectors: Hi Level Neutrik Speakon, Le and Right Lo Level phono, LFE phono,
SMA connector for wireless antenna
Gain Control Range: 80 dB
Power Output: 1000 was (RMS)
Phase Switch: Yes, 0 or 180 degrees
Amplier Type: Next Gen II Class D
Wireless capability: Yes – REL Longbow™ transmier [required]. Sold separately.
Protecon System
Fully Electronic with SET-SAFE: Yes
D.C. Fault: Yes
Output Short: Yes
Mains Input Voltage: 220-240 volts, 110-120 volts for certain markets
Fuses: 7 Amp semi delay 220 volts operaon
15 Amp semi delay 120 volts operaon
Dimensions (WHD): Including feet and rear panel controls
17.2 x 32 x 20 in., (436 x 815.5 x 507 mm)
Add 1.75in (44.5mm) in depth when using Hi Level connector
Net Weight: 122 lbs. (55.3 kg)
Shipping Weight: TBD
Finish: Gloss Piano Black
Supplied Accessories
Mains Lead: Yes
Neutrik Speakon Interconnect: Yes (10 Meters Nominal)
Users Manual: Yes
In the interest of product development, REL Acouscs Limited reserve the right to vary these specicaons without noce
24 25
Aer inial setup, if you wish to employ the standby mode, simply move the power mode switch into the
up posion to “STANDBY”. 212/SE Specicaons
Model Power Draw at Standby Power Draw at Standby w/ wireless Power Draw at Idle
212/SE > 0.5 Was > 1 Wa 40 Was
REL_212/SE_Manual_01-15.indd 28-29 1/16/15 3:08 PM

Other REL Acoustics Subwoofer manuals

REL Acoustics No. 25 User manual

REL Acoustics

REL Acoustics No. 25 User manual

REL Acoustics G1 User manual

REL Acoustics

REL Acoustics G1 User manual

REL Acoustics Gibraltar Series User manual

REL Acoustics

REL Acoustics Gibraltar Series User manual

REL Acoustics T-9 User manual

REL Acoustics

REL Acoustics T-9 User manual

REL Acoustics Habitat1 User manual

REL Acoustics

REL Acoustics Habitat1 User manual

REL Acoustics T1 User manual

REL Acoustics

REL Acoustics T1 User manual

REL Acoustics Q Series User manual

REL Acoustics

REL Acoustics Q Series User manual

REL Acoustics R-205 User manual

REL Acoustics

REL Acoustics R-205 User manual

REL Acoustics Serie R User manual

REL Acoustics

REL Acoustics Serie R User manual

REL Acoustics S/2 User manual

REL Acoustics

REL Acoustics S/2 User manual

REL Acoustics G1 Mk II User manual

REL Acoustics

REL Acoustics G1 Mk II User manual

REL Acoustics T/i Series User manual

REL Acoustics

REL Acoustics T/i Series User manual

Popular Subwoofer manuals by other brands

JBL P1040 owner's manual

JBL

JBL P1040 owner's manual

Dynacord PowerSub 312 owner's manual

Dynacord

Dynacord PowerSub 312 owner's manual

MartinLogan Grotto I Brochure & specs

MartinLogan

MartinLogan Grotto I Brochure & specs

Rockford Fosgate POWER T3 quick start guide

Rockford Fosgate

Rockford Fosgate POWER T3 quick start guide

Pioneer Elite S-LX70-W operating instructions

Pioneer

Pioneer Elite S-LX70-W operating instructions

Velodyne DLS-5000R datasheet

Velodyne

Velodyne DLS-5000R datasheet

Boss Audio Systems Phantom P128DC user manual

Boss Audio Systems

Boss Audio Systems Phantom P128DC user manual

Velodyne EQ-Max Series user manual

Velodyne

Velodyne EQ-Max Series user manual

Harman JBL Pasion 12SP manual

Harman

Harman JBL Pasion 12SP manual

NVX BE-TSLAS-VCW104 installation guide

NVX

NVX BE-TSLAS-VCW104 installation guide

Harman JBL SW10 Service manual

Harman

Harman JBL SW10 Service manual

Emotiva Airmotiv Series user manual

Emotiva

Emotiva Airmotiv Series user manual

Beta Three Veyron Series user manual

Beta Three

Beta Three Veyron Series user manual

Niles SW10 Specification sheet

Niles

Niles SW10 Specification sheet

Infinity ENTRA SUB TWO Service manual

Infinity

Infinity ENTRA SUB TWO Service manual

Boston Acoustics PowerVent PV1000 Brochure & specs

Boston Acoustics

Boston Acoustics PowerVent PV1000 Brochure & specs

Boss Audio Systems CH12 Specifications

Boss Audio Systems

Boss Audio Systems CH12 Specifications

NHT B-10d Setup guide

NHT

NHT B-10d Setup guide

manuals.online logo
manuals.online logoBrands
  • About & Mission
  • Contact us
  • Privacy Policy
  • Terms and Conditions

Copyright 2025 Manuals.Online. All Rights Reserved.